Prepare for your embedded Linux career with our comprehensive guide on Yocto Interview Questions. This article covers common and advanced questions, practical tips, and step-by-step explanations to help you confidently crack Yocto-related interviews. Ideal for beginners and experienced developers aiming to strengthen their Yocto knowledge and ace technical rounds.
When Ravi, a young embedded developer, first joined an automotive company, he was super excited about working with Yocto. On his very first task, he was asked to customize the Linux kernel and add a new package to the image. But he froze—he only knew the basics of Yocto and BitBake. His senior smiled and said:
“Don’t worry, once you understand the intermediate concepts, Yocto will feel less scary and more powerful.”
That’s exactly what this article is about. If you’ve already covered the Yocto basics, these intermediate interview questions will help you prepare for real-world scenarios like Ravi’s.
Intermediate Yocto Interview Questions
1.Explain the Yocto build process step by step.
Meet Priya, an embedded engineer who needs a custom Linux image for a BeagleBone. She’s never built a full Yocto image before, so she treats the work like a recipe: gather ingredients, prepare the kitchen, follow the steps, and taste-test the result. Below is the recipe Priya followed — written so you can copy, paste, and run it yourself.
Short roadmap (what you’ll do)
- Prepare your build host and install prerequisites.
- Fetch Yocto (poky) and any BSP/meta layers.
- Create a build directory and source the environment.
- Configure
local.confandbblayers.conf. - Add custom layers or recipes (optional).
- Run
bitbake <image>to build. - Inspect outputs, SDKs, and caches.
- Debug and iterate.
The step-by-step story (with commands & why)
1) Prepare the build host
Priya installs the packages the Yocto docs list (Python, git, required dev libs). Having the recommended host packages avoids weird failures later. The Yocto Quick Start lists the build-host prerequisites and the basic flow to get started. (Yocto Project Documentation)
Why: Yocto builds are heavy and sensitive to host tools. Install the distro packages the docs recommend before you start.
2) Get the source: clone poky and layers
Priya clones poky (the Yocto reference distribution) and any layers she needs (for example meta-openembedded, vendor BSP layers, or meta-myproject).
git clone git://git.yoctoproject.org/poky
cd poky
git clone git://git.openembedded.org/meta-openembedded ../meta-openembedded
# add other BSP/meta layers as needed
This is the usual starting point for a Yocto build. The Quick Build shows the typical checkout-and-build flow. (Yocto Project Documentation)
3) Create a build directory and source the environment
Priya runs the helper script to create and enter a build environment:
source oe-init-build-env build
# or: . ./oe-init-build-env
That script creates build/conf/ and sets up environment variables so bitbake works from the build directory. (Yocto Project Documentation)
4) Configure the build (local.conf & bblayers.conf)
Inside build/conf/ there are two files you edit:
local.conf— setMACHINE,BB_NUMBER_THREADS,PARALLEL_MAKE, and paths forDL_DIRandSSTATE_DIR.bblayers.conf— list the layers (paths) the build should use.
Priya sets MACHINE to her board (e.g., beaglebone), points DL_DIR and SSTATE_DIR to a big fast disk, and tweaks thread counts so the build uses her CPU effectively. The Yocto build docs explain how these files control the build and where to set caches and machine targets. (Yocto Project Documentation)
Tip: Use a shared sstate-cache if you build multiple images or share between developers — it saves a lot of rebuild time.
5) Add or create a layer (optional; for your recipes)
If Priya needs to add a custom driver or recipe, she either adds an existing layer with:
bitbake-layers add-layer ../meta-my-layer
or creates one (yocto-layer helper or templates) and puts .bb recipes there. Layers let you keep custom code separate from upstream meta layers. The Yocto docs and common tasks sections show how layers and recipes organize metadata. (Yocto Project Documentation, The Yocto Project)
6) Build the image with BitBake
Now the main command:
bitbake core-image-minimal # or your custom-image
What happens under the hood? BitBake parses recipes, resolves dependencies, and runs recipe tasks in order (for each recipe: do_fetch → do_unpack → do_patch → do_configure → do_compile → do_install → do_package → do_populate_sysroot / image assembly). These tasks and their ordering are defined in the build system and are executed automatically. (Yocto Project Documentation)
Practical notes:
- Build time depends on what needs to be compiled and whether artifacts exist in
sstate/DL_DIR. - Use
bitbake -k <image>to keep building other packages when failures occur, orbitbake -c cleansstate <recipe>to force rebuilding a recipe from scratch.
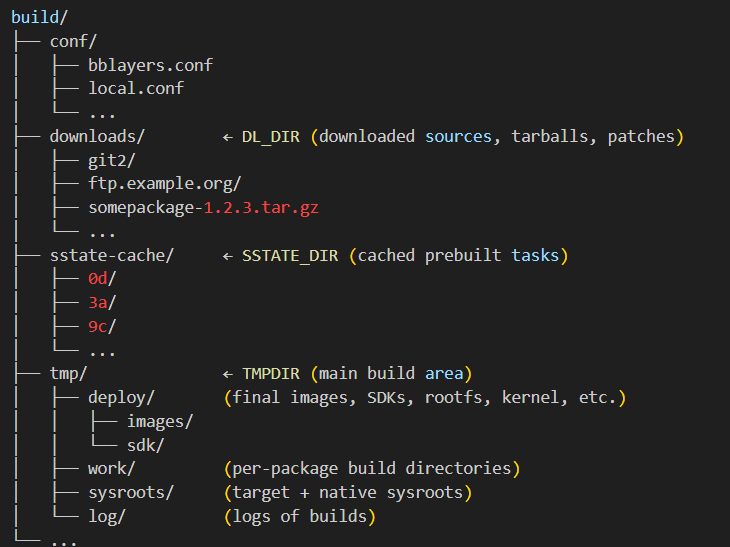
7) Where the results live (artifacts)
When the build succeeds, Priya finds images and packages under:
build/tmp/deploy/images/<MACHINE>/
There will be kernel zImage/uImage, rootfs tarballs, wic images, and package feeds. If she built an SDK, it appears from bitbake -c populate_sdk <image> (or bitbake <image>-sdk). The Yocto Quick Build and build docs describe where these outputs are placed. (Yocto Project Documentation)
8) Caching & downloads — why they matter
Two folders are critical:
DL_DIR— stores downloaded source tarballs.SSTATE_DIR— shared state cache with prebuilt intermediate results.
Priya points these to persistent storage so subsequent builds (or other developers) reuse downloads and compiled pieces — massively speeding up rebuilds. The docs emphasize using DL_DIR and SSTATE_DIR to optimize builds. (Yocto Project Documentation)
9) Useful BitBake commands for iteration & debugging
bitbake -c listtasks <recipe>— show available tasks.bitbake -c fetch <recipe>— fetch sources only.bitbake -c cleansstate <recipe>— erase sstate for a recipe.bitbake -e <recipe>— show environment variables.bitbake <recipe> -c devshell— drop into a build shell for debugging (if supported).- Inspect logs:
build/tmp/work/<arch>/<recipe>/<version>/temp/log.*fordo_compile,do_configure, etc.
See the tasks and common tasks docs for more debugging workflows. (Yocto Project Documentation)
Quick troubleshooting checklist (like Priya’s pocket notes)
- If a dependency fails to fetch: check
DL_DIRand proxy settings. - If compile fails: inspect the recipe’s
log.do_compileand trybitbake -c cleansstate <recipe>and rebuild. - If build is slow: increase
BB_NUMBER_THREADSandPARALLEL_MAKEinlocal.confand ensuresstateis on fast storage. - If image missing a package: add it to
IMAGE_INSTALLinlocal.confor the image recipe.
Final — a one-paragraph recap
Priya’s Yocto build was a sequence of preparation (host packages), pulling the right metadata (poky and layers), configuring local.conf/bblayers.conf, and running bitbake which orchestrates many recipe tasks (fetch → configure → compile → package → assemble image). Artifacts end up in tmp/deploy/images/<MACHINE>, while DL_DIR and SSTATE_DIR speed up future builds. The Yocto docs (Quick Start, build/dev manual, and BitBake tasks reference) are excellent companions while you learn and iterate. (Yocto Project Documentation, The Yocto Project)
2.What is a .bbclass file and why is it used?
Imagine you are working in a kitchen that serves hundreds of recipes every day. Instead of writing the same steps like “wash vegetables, cut onions, add oil to the pan” in every recipe card, you create a shared guidebook. Every new recipe just says “follow the guidebook for chopping and frying” — simple, clean, and reusable.
That’s exactly what a .bbclass file does in Yocto.
A .bbclass file is a BitBake class file used in Yocto.
It contains common functions, tasks, and variables that can be inherited by multiple recipes (.bb files).
Instead of duplicating code across recipes, developers put shared logic in a .bbclass file and then use:
inherit <classname>inside their .bb recipe.
Why is it used? (Benefits)
- Code Reuse → Write once, use everywhere.
Example: packaging steps, fetching from Git, or autotools build flow. - Consistency → Ensures all recipes follow the same structure for similar tasks.
- Simplifies Maintenance → Fix a bug or update logic in one
.bbclassfile, and all recipes that inherit it get the fix automatically. - Customization → Developers can create their own custom classes (like
mycompany-update.bbclass) to enforce company-specific build rules.
Examples in Yocto
autotools.bbclass→ Provides standard tasks for configure/compile/install when building with GNU Autotools.cmake.bbclass→ Defines how to build packages using CMake.kernel.bbclass→ Provides helper tasks for building Linux kernels.
In short:
A .bbclass file in Yocto is like a shared recipe guide. It holds reusable build instructions that multiple recipes can inherit, making builds more efficient, cleaner, and easier to maintain.
Rreal-life mini example to show how .bbclass makes your Yocto recipes clean and reusable.
Step 1: Create a custom .bbclass file
Let’s say you often write recipes that install a simple script into /usr/bin. Instead of repeating the do_install task everywhere, you can create a .bbclass file:
my-common.bbclass
# my-common.bbclass
# A reusable class to install scripts into /usr/bin

do_install() {
    install -d ${D}${bindir}
    install -m 0755 ${WORKDIR}/${PN}.sh ${D}${bindir}/${PN}
}
What this does:
- Creates
/usr/binin the rootfs (${bindir}). - Installs a script named after the recipe (
${PN}.sh) into/usr/bin.
Step 2: Create two recipes that use this class
Now we’ll write two recipes that inherit this class.
hello-script.bb
SUMMARY = "A simple hello world script"
LICENSE = "MIT"
SRC_URI = "file://hello-script.sh"

S = "${WORKDIR}"

inherit my-common
goodbye-script.bb
SUMMARY = "A simple goodbye script"
LICENSE = "MIT"
SRC_URI = "file://goodbye-script.sh"

S = "${WORKDIR}"

inherit my-common
Step 3: Add the scripts
Inside each recipe’s files/ directory, add the scripts:
hello-script.sh
#!/bin/sh
echo "Hello, Yocto World!"
goodbye-script.sh
#!/bin/sh
echo "Goodbye, Yocto World!"
Step 4: Build and check
When you run:
bitbake hello-script
bitbake goodbye-script
👉 Both will install their scripts into /usr/bin/hello-script and /usr/bin/goodbye-script, but thanks to my-common.bbclass, you didn’t duplicate the do_install logic in each recipe.
Key Takeaway:
The .bbclass file acts like a reusable library of tasks. Instead of repeating installation steps across multiple recipes, you write them once and just inherit it.
Typical Layer Structure
When you create a new layer (say meta-mycustom), the structure looks like this:
meta-mycustom/
├── conf/
│   └── layer.conf
├── classes/
│   └── my-common.bbclass   <-- put your .bbclass file here
├── recipes-example/
│   ├── hello-script/
│   │   ├── hello-script.bb
│   │   └── files/
│   │       └── hello-script.sh
│   └── goodbye-script/
│       ├── goodbye-script.bb
│       └── files/
│           └── goodbye-script.sh
Step 1: Add the .bbclass file
Inside your layer, create the classes/ directory (if it doesn’t exist).
Then place your file here:
meta-mycustom/classes/my-common.bbclass
# my-common.bbclass
do_install() {
    install -d ${D}${bindir}
    install -m 0755 ${WORKDIR}/${PN}.sh ${D}${bindir}/${PN}
}
Step 2: Update layer.conf
Make sure your layer’s layer.conf knows where to find classes.
Inside meta-mycustom/conf/layer.conf, add:
BBPATH .= ":${LAYERDIR}"
BBFILES += "${LAYERDIR}/recipes-*/*/*.bb \
            ${LAYERDIR}/recipes-*/*/*.bbappend"

BBCLASS += "${LAYERDIR}/classes"
This tells Yocto where to look for recipes (.bb) and classes (.bbclass).
Step 3: Inherit the class in your recipes
Inside each recipe (hello-script.bb or goodbye-script.bb), add:
inherit my-common
That’s it — now both recipes reuse the logic from your .bbclass.
Step 4: Build and verify
From your build directory:
bitbake hello-script
bitbake goodbye-script
After build, check inside the rootfs (tmp/work/.../image/usr/bin/) and you should see:
/usr/bin/hello-script
/usr/bin/goodbye-script
In short:
.bbclassfiles live inclasses/inside your layer.- Point to them via
layer.conf. - Inherit them in recipes to avoid duplicating code.
3.Difference Between .bb and .bbappend Files in Yocto
Imagine you’re a chef in a big kitchen.
- A recipe card (
.bbfile) tells you exactly how to cook a dish — what ingredients to fetch, how to prepare them, and how to plate it. - But sometimes, you don’t want to rewrite the whole recipe. Instead, you just want to say: “Add extra spices” or “Serve with salad”. That’s where a
.bbappendfile comes in — it lets you extend or modify the original recipe without copying the entire thing.
What is a .bb file?
- A BitBake recipe file (
.bb) describes how to build a package. - It contains instructions like:
- where to fetch source code (
SRC_URI) - how to configure and compile (
do_compile,do_install) - what license applies
- dependencies and tasks
- where to fetch source code (
Example: hello.bb
SUMMARY = "Hello World App"
LICENSE = "MIT"
SRC_URI = "file://hello.c"

do_compile() {
    ${CC} ${CFLAGS} ${LDFLAGS} hello.c -o hello
}

do_install() {
    install -d ${D}${bindir}
    install -m 0755 hello ${D}${bindir}/hello
}
This file defines the entire recipe for building the “hello” program.
What is a .bbappend file?
- A BitBake append file (
.bbappend) is used to extend or modify an existing recipe (.bb). - Its filename must match the recipe name and version it extends.
- Example:
hello_1.0.bbappendmodifieshello_1.0.bb.
- Example:
- You can:
- Add extra source files
- Change dependencies
- Add new tasks or override existing ones
Example: hello_1.0.bbappend
# Add an extra patch to hello recipe
SRC_URI += "file://hello-fix.patch"

do_install_append() {
    echo "Hello Yocto!" > ${D}${bindir}/extra.txt
}
This doesn’t replace the original recipe — it piggybacks on it and adds modifications.
Key Differences
| Feature | .bb File | .bbappend File |
|---|---|---|
| Purpose | Defines a recipe from scratch | Extends or modifies an existing recipe |
| Content | Full build instructions (fetch, compile, install) | Only contains changes or additions |
| Naming | <recipe>_<version>.bb | <recipe>_<version>.bbappend |
| Use Case | When creating a new package/recipe | When tweaking an existing recipe (add patches, change variables, etc.) |
In short:
.bb→ full recipe (like the original cookbook entry)..bbappend→ patch/extension to an existing recipe (like adding your own notes on the cookbook page).
4.How do you use the bitbake-layers command?
Ans: Imagine you’ve just started working on a Yocto project. You open the project folder and see so many files and directories that it feels like walking into a big library with no map. Every book (or in Yocto’s case, every recipe) is kept in a section called a layer. But the question is: how do you quickly find out which sections exist, what books are inside, or where a new book should go?
That’s where the bitbake-layers command becomes your guide. Think of it as the librarian of Yocto layers.
What can this “librarian” do for you?
- Show all the sections (layers) you already have
bitbake-layers show-layers=> Just like asking the librarian, “Which sections are in this library?” - List all the books (recipes) inside
bitbake-layers show-recipes=> You’ll see all the recipes Yocto knows about. - Find out who provides a specific book
bitbake-layers show-recipes <recipe-name>=> If the same book exists in two sections, this command tells you which one is being used. - Add a new section to your library
bitbake-layers add-layer ../meta-myproject=> Imagine bringing a brand-new section of books and placing it in the library. - Remove a section you no longer need
bitbake-layers remove-layer ../meta-myproject=> Just like taking out an old, unused section. - Check which books have special notes (appends)
bitbake-layers show-appends=> Shows you all.bbappendfiles—like sticky notes attached to certain books with extra instructions.
Why is this helpful for beginners?
When you’re new to Yocto, it’s easy to get lost. The bitbake-layers command gives you clarity and control:
- You know which layers are active.
- You can quickly spot which recipe is being used.
- Adding or removing layers becomes simple.
In short:
The bitbake-layers command is like a friendly librarian for your Yocto project—it shows you the layers, recipes, and lets you manage them without confusion.
5.What is the purpose of DL_DIR, SSTATE_DIR, and TMPDIR in Yocto?
Ans: Imagine you are building a huge Lego city with thousands of pieces. To make it faster and smoother, you don’t want to run to the shop every time you need a piece, right? You’ll keep some parts in storage, reuse old ones, and have a special workbench where you assemble everything.
In Yocto, these three directories act just like that:
1. DL_DIR → The Lego Shop Bag
Whenever you need new Lego parts, you first download them. In Yocto, source codes, patches, and tarballs are downloaded and saved inside DL_DIR.
Purpose:
- Stores all downloaded source files.
- Prevents downloading the same thing again in future builds.
- Saves internet bandwidth and time.
Think of it as the bag you bring home from the Lego shop—you keep it safe so you don’t need to buy the same piece twice.
2. SSTATE_DIR → The Reusable Parts Box
As you build, sometimes you already assembled something earlier, like a Lego house wall. Instead of rebuilding it from scratch, you pull it out of your reusable box.
Purpose:
- Stores precompiled and cached build outputs.
- Allows Yocto to reuse previous builds.
- Makes repeated builds much faster.
It’s like your personal storage of pre-built Lego walls, windows, and doors—ready to plug in without wasting time.
3. TMPDIR → The Workbench
This is where the real action happens. You open the bag, take out pieces, use some from your reusable box, and build on your workbench.Purpose:
- Stores all temporary build files.
- Contains the working space for compiling, assembling, and linking.
- Usually the largest directory in size.
It’s like the big table where you build your Lego city before showing it to the world.
Why are these three important together?
DL_DIRensures you don’t keep downloading sources.SSTATE_DIRensures you don’t rebuild the same thing again.TMPDIRis where Yocto actually builds your final image.
By using these three smartly, Yocto saves time, resources, and makes the build process efficient.
In short:
DL_DIR= Download bag (sources).SSTATE_DIR= Reusable parts box (cached builds).TMPDIR= Workbench (active build area).
Where do DL_DIR, SSTATE_DIR, and TMPDIR exist?
When you set up a Yocto build environment (by sourcing oe-init-build-env), a new folder called build/ (or whatever you named it) gets created. Inside this, there is a configuration folder called conf/local.conf.
This is the place where DL_DIR, SSTATE_DIR, and TMPDIR are defined.
Default locations:
DL_DIR- Default:
build/downloads/ - You can change it in
local.conf:DL_DIR ?= "${TOPDIR}/downloads" - This folder will contain all the tarballs, source code archives, and patches.
- Default:
SSTATE_DIR- Default:
build/sstate-cache/ - You can change it in
local.conf:SSTATE_DIR ?= "${TOPDIR}/sstate-cache" - This is where Yocto saves prebuilt shared state objects (cache).
- Default:
TMPDIR- Default:
build/tmp/ - You can change it in
local.conf:TMPDIR ?= "${TOPDIR}/tmp" - This folder is the biggest one—it contains all intermediate build files, sysroots, and the final images.
- Default:
So, do they always exist?
- Yes, by default they get created automatically when you run your first
bitbakebuild. - Their locations are controlled from
local.conf(insidebuild/conf/). - You can move them outside the build folder if you want to share downloads or sstate across multiple projects.
In short:
- These three directories exist inside your Yocto build directory by default.
- You’ll see them as:
build/downloads→ (DL_DIR)build/sstate-cache→ (SSTATE_DIR)build/tmp→ (TMPDIR)
6.How do you add a new package to a Yocto image?
Ans: Imagine you are preparing a lunchbox for a school trip. By default, the lunchbox already has some food items—like rice, vegetables, and water. But suddenly your friend says: “Hey, can you also add some chocolates?”
In Yocto, your image is just like that lunchbox. It already contains some software packages, but you can add extra packages (like chocolates) to it before it is built.
Step-by-Step (with Story)
- Find the package you want
- First, make sure the package exists in one of your Yocto layers.Example: Let’s say you want to add
nano(a text editor).
bitbake-layers show-recipes | grep nano - First, make sure the package exists in one of your Yocto layers.Example: Let’s say you want to add
- Edit the Image Recipe 🥡
- Open your custom image recipe or
local.conf.Add the package underIMAGE_INSTALL_append.
local.conf):IMAGE_INSTALL_append = " nano"Just like putting chocolates inside the lunchbox. - Open your custom image recipe or
- Rebuild the Image
- Now build the image again using:
bitbake core-image-minimal(or whichever image recipe you are using). This is like closing the lunchbox and preparing it for the trip.
- Flash and Check
- Once the image is built, flash it to your board and boot.Run:
nano --versionIf you see the version, it means your “chocolate” (package) is inside the lunchbox.
Why is this important?
Adding packages to a Yocto image is how you customize your embedded Linux system. Instead of shipping a plain box, you create a tailored image that has exactly the tools and applications you need.
In short:
To add a new package to a Yocto image, you:
- Check if the package recipe exists.
- Add it to your image (
IMAGE_INSTALL_append). - Rebuild the image.
- Boot and verify.
It’s just like packing extra food in your lunchbox before a trip—simple, flexible, and under your control.
Adding Packages in Yocto: local.conf vs. Custom Image Recipe
Continuing with our lunchbox story
Imagine you are preparing lunch for a short picnic today. You quickly add a chocolate bar 🍫 inside your own lunchbox. But when you open a canteen business (serving hundreds of students every day), you wouldn’t go and edit each lunchbox one by one—you’d create a standard menu 🍱 that always includes chocolates.
That’s exactly the difference between using local.conf and a custom image recipe in Yocto.
Method 1: Add Packages in local.conf
This is the quick and easy way, like packing your own lunchbox just for today.
- Open
build/conf/local.conf. - Add your package:
IMAGE_INSTALL_append = " nano htop" - Build the image.
Best for testing and experimenting with packages.
Not good for long-term projects, because your changes stay only in your local setup.
Method 2: Create a Custom Image Recipe
This is the professional way, like writing a canteen’s fixed lunch menu 🍱. Every lunchbox that comes out will automatically follow this recipe.
Steps:
- Create a new recipe inside your own layer, e.g.:
meta-myimage/recipes-core/images/my-image.bb - Inside the
.bbfile, define your image:SUMMARY = "My Custom Image" LICENSE = "MIT" IMAGE_INSTALL += " \ nano \ htop \ vim \ " inherit core-image - Build with:
bitbake my-image
Best for real projects and teams where you want reproducibility and a clean history of changes.
Comparison Table
| Method | When to Use | Example Use Case |
|---|---|---|
local.conf | Quick testing, one-time changes | Adding nano just to try |
| Custom Image Recipe | Permanent project setup | Your product image always needs nano + htop + vim |
7.What Steps Are Involved in Customizing the Linux Kernel in Yocto?
Ans : Let’s imagine a real-life story:
You bought a smart coffee machine that runs on an embedded Linux system. The company shipped it with basic features—make coffee, adjust temperature, etc. But as an engineer, you want to customize it. Maybe you want to add support for a new touchscreen display, or optimize the system to boot faster in the morning when you’re half-asleep.
This is exactly like customizing the Linux kernel in Yocto. The kernel is the heart of your embedded device, and Yocto lets you tune it for your hardware.
Here are the steps you’d follow in Yocto:
1. Identify Your Kernel Recipe
In Yocto, everything is managed with recipes. The Linux kernel recipe is usually found inside:
meta/recipes-kernel/linux/For example: linux-yocto.bb or a vendor-specific kernel recipe.
In our coffee machine story: This is like finding the original recipe for your coffee—what beans, water temperature, and milk ratio are used.
2. Create Your Own Layer for Customization
Never edit Yocto’s default files directly. Instead, create a new layer (example: meta-coffee-kernel). This keeps your changes clean and separate.
Just like in real life: Instead of spoiling the company’s recipe book, you make your own recipe notes in a new diary.
3. Use a .bbappend File
To modify the kernel, create a .bbappend file that matches the original kernel recipe’s name.
Example:
linux-yocto_%.bbappendHere you can add patches, extra configurations, or point to a different kernel source.
Think of it like adding your own twist to the coffee recipe—extra chocolate powder or almond milk—without rewriting the whole recipe.
4. Add Kernel Configuration Changes
Yocto allows kernel configs using fragments. You can create a file like myconfig.cfg:
CONFIG_SPI=y
CONFIG_I2C=y
CONFIG_USB_SERIAL=m
Then reference it in your .bbappend.
In the coffee machine: This is like saying, “Always enable the steam nozzle, but make milk frother optional.”
5. Apply Kernel Patches (if needed)
If you want deeper customization (e.g., new driver, bug fix), you add a patch file (.patch) and tell Yocto to apply it.
Like fixing your coffee machine’s button that sometimes doesn’t work—you solder a fix and update the design.
6. Rebuild the Kernel
Run:
bitbake linux-yoctoYocto will fetch, patch, configure, and build the kernel.
This is like brewing the coffee with your new recipe. You test if it tastes better.
7. Deploy and Test
Flash the newly built kernel to your board or device. Boot it and check logs:
dmesgMake sure your new features are working.
Like sipping the coffee ☕—if it’s too strong, adjust again. If perfect, enjoy .
[
Step 1 ] ➝ Find Kernel Recipe
   📂 Location: meta/recipes-kernel/linux/
   Example: linux-yocto.bb

        |
        v

[ Step 2 ] ➝ Create Custom Layer
   📂 Example: meta-coffee-kernel
   (Keep changes clean, separate from Yocto core)

        |
        v

[ Step 3 ] ➝ Add .bbappend File
   📝 File: linux-yocto_%.bbappend
   (Extend original recipe without modifying it)

        |
        v

[ Step 4 ] ➝ Add Kernel Configurations
   🛠️ Example: myconfig.cfg
   CONFIG_SPI=y
   CONFIG_I2C=y
   CONFIG_USB_SERIAL=m

        |
        v

[ Step 5 ] ➝ Apply Kernel Patches (if needed)
   🧩 Add .patch files for drivers, bug fixes, or features

        |
        v

[ Step 6 ] ➝ Rebuild Kernel
   💻 Command: bitbake linux-yocto

        |
        v

[ Step 7 ] ➝ Deploy & Test
   📱 Flash new kernel → Boot device
   🔍 Check logs with: dmesg
8.How Do You Enable or Disable systemd in a Yocto Build?
Ans : Imagine you’re setting up a smart home system .
- If you want everything automated (lights turn on, coffee machine starts, doors lock), you choose a modern manager to handle all tasks → this is like systemd.
- If you want an old-school approach where you manually start things one by one, you stick with SysVinit.
In Yocto, you can decide which init system (startup manager) your embedded device should use.
Steps to Enable or Disable systemd in Yocto
1. Add systemd to DISTRO_FEATURES
Edit your distro configuration file (e.g., local.conf or your custom distro .conf file):
To enable systemd:
DISTRO_FEATURES:append = " systemd"
VIRTUAL-RUNTIME_init_manager = "systemd"
VIRTUAL-RUNTIME_initscripts = ""
To disable systemd (and use SysVinit instead):
DISTRO_FEATURES:remove = " systemd"
VIRTUAL-RUNTIME_init_manager = "sysvinit"
VIRTUAL-RUNTIME_initscripts = "initscripts"
2. Set the Default systemd Package in Image
When using systemd, make sure your image has the right packages:
IMAGE_INSTALL:append = " systemd systemd-analyze"
For disabling, remove systemd-related packages if they were added.
3. Rebuild Your Image
Run:
bitbake <image-name>
Example:
bitbake core-image-minimal
4. Test on Target Device
- Boot your board/device.
- Run:
ps -p 1 -o comm=
If it shows systemd, then systemd is enabled.
If it shows init, then SysVinit is running.
Real-Life Analogy
Think of systemd vs SysVinit as coffee brewing styles:
systemd= Fully automated smart coffee machine ☕ (everything starts quickly and efficiently).SysVinit= Old manual filter coffee maker 🫖 (still works, but step by step).
In Yocto, you decide which one your “kitchen” (embedded device) should use.
9.What is the purpose of MACHINE, DISTRO, and TCLIBC variables?
1. MACHINE
- What it means:
It tells Yocto for which hardware (board/SoC/CPU architecture) you are building the image. - Why it matters:
Each board has different bootloaders, kernel configs, and device trees. TheMACHINEvariable ensures Yocto picks the right BSP (Board Support Package). - Example:
MACHINE = "beaglebone-yocto" MACHINE = "qemuarm64"👉 If you setMACHINE="beaglebone-yocto", the image will include BeagleBone-specific kernel, bootloader, and drivers.
2. DISTRO
- What it means:
It defines the distribution policy — i.e., the set of rules about how the image is built, what features are included, and how packages are managed. - Why it matters:
Different distros can enable/disable systemd, package managers, debug tools, or optimizations. - Example:
DISTRO = "poky" DISTRO = "nodistro"👉 If you useDISTRO="poky", you get the standard Poky distribution (Yocto’s reference distro). If you usenodistro, you get a very minimal build without distro-specific policies.
3. TCLIBC
- What it means:
It specifies which C library implementation will be used as the standard C library for the build. - Why it matters:
The C library affects performance, footprint, and compatibility. - Options:
glibc→ Default, full-featured, widely usedmusl→ Lightweight, fast, good for embeddeduclibc→ Older, small footprint, but less common now
- Example:
TCLIBC = "glibc" TCLIBC = "musl"👉 For a resource-constrained IoT device, you might choosemusl. For a general Linux system,glibcis standard.
In short:
MACHINE→ Which hardware/board am I targeting?DISTRO→ What distribution rules/policies should I follow?TCLIBC→ Which C library will power my programs?
Real-life analogy:
Imagine you are cooking 👩🍳:
MACHINE= Which kitchen are you cooking in? (big restaurant kitchen vs. small home kitchen)DISTRO= Which recipe book are you following? (Indian, Italian, or minimal diet plan)TCLIBC= Which cooking oil are you using? (butter = full flavor, olive oil = light, coconut oil = minimal)
Let’s go step by step so you see where and how Yocto actually sets these variables.
Where MACHINE, DISTRO, and TCLIBC are set
MACHINE
- Where it is set:
- Usually in your
conf/local.conffile (in thebuild/conf/directory). - Machine-specific details (bootloader, kernel, device tree) live inside
meta-<board>/conf/machine/<machine>.conf.
- Usually in your
- Example (
local.conf):MACHINE ?= "beaglebone-yocto" - Machine config file (
beaglebone-yocto.conf):require conf/machine/include/tune-arm926ejs.inc UBOOT_MACHINE = "am335x_boneblack_config" KERNEL_DEVICETREE = "am335x-boneblack.dtb"-> This tells Yocto to use BeagleBone’s bootloader and kernel device tree.
DISTRO
- Where it is set:
- In
conf/local.conf(to pick which distribution you want). - The actual distro configuration file is inside
meta-poky/conf/distro/poky.conf(if you’re using Poky).
- In
- Example (
local.conf):DISTRO ?= "poky" - Distro config file (
poky.conf):DISTRO_NAME = "Poky (Yocto Project Reference Distro)" DISTRO_VERSION = "4.0" INIT_MANAGER = "systemd" PACKAGE_CLASSES ?= "package_rpm"-> Here Yocto decides: use systemd as init, RPM as package format, etc.
TCLIBC
In short:
MACHINE→ Set inlocal.conf, details inmachine/*.conf.DISTRO→ Set inlocal.conf, rules defined indistro/*.conf.TCLIBC→ Set inlocal.conf, C library recipes chosen accordingly.
Real-life story:
Imagine you’re running a food delivery kitchen:
MACHINE= Which branch kitchen you are cooking from (Delhi branch vs. Bangalore branch).DISTRO= Which menu card you follow (North Indian thali, Italian pasta, or a custom diet menu).TCLIBC= Which cooking base you use (butter, olive oil, or ghee).
All three work together so the customer (your embedded device) gets the right dish (final Linux image).
10.How to Minimize the Size of a Yocto Root Filesystem
Ans: When we build an operating system image with Yocto, the root filesystem (rootfs) contains all the programs, libraries, and files that your device will use.
But in embedded devices (like routers, IoT boards, or automotive systems), storage is very limited. So, we must make the rootfs as small as possible.
Simple Ways to Minimize Yocto Rootfs
Use a Smaller Base Distribution
- Instead of using the full
poky(which is like a big buffet meal), you can usepoky-tiny, which only gives you the essentials.
This way, your system only gets what it really needs to run, nothing extra.
Remove Extra Tools and Debug Packages
- By default, Yocto may add tools for debugging, profiling, or package management.
- If your device doesn’t need them, remove them.
It’s like packing your travel bag — if you’re going on a weekend trip, you don’t need to carry an iron, a heavy coat, or five pairs of shoes. Just take what’s necessary.
Use BusyBox Instead of Full Utilities
- BusyBox is like a Swiss Army knife: it combines many small tools (like
ls,cp,rm) into one lightweight binary. - This drastically cuts down size.
Imagine instead of carrying 10 different kitchen tools (spoon, knife, peeler, corkscrew, opener…), you just carry a single Swiss knife that does all the jobs.
Choose a Lightweight C Library (musl)
- Most Linux systems use
glibc, but it’s heavy. - For small embedded devices,
muslis a better option.
It’s like choosing a lightweight sports bike instead of a heavy truck when you only need to move around the city.
Strip Debug Information
- Programs often include debugging details, which are helpful for developers but unnecessary on the final device.
- Removing this information saves space.
It’s like buying new clothes — you don’t keep the price tags and extra packaging, you throw them away before wearing them.
Disable Package Manager (if you don’t need updates)
- Package managers like RPM or opkg allow you to install new software later, but they also take up space.
- If your device has a fixed purpose (like showing weather data on a screen), you don’t need a package manager.
It’s like a set-top box — you don’t install apps on it every day, so why keep that extra overhead?
Compress the Filesystem
- Use compressed filesystems like
squashfsto shrink the final image size.
This is like vacuum-packing clothes before a trip — same items, but taking up half the space.
Real-Life Application
Imagine you’re designing a smart home temperature monitor with an ESP32 or BeagleBone:
- You only need:
- A Linux kernel
- Drivers for Wi-Fi and sensors
- A small web server
- A few basic commands
You don’t need:
- Big GUI libraries
- Multimedia tools
- Heavy debugging utilities
By following the above tricks:
- Your rootfs might shrink from 200 MB → 20 MB.
- That means it fits easily into the device’s flash memory, and your product becomes faster and cheaper to produce.
In short:
- Pick the smallest base (like
poky-tiny). - Use BusyBox + musl.
- Remove extras and strip binaries.
- Compress the filesystem.
Your embedded device then becomes like a minimal backpack for a short trip — small, light, and only carrying what you need.
Minimal local.conf Example for Small Root Filesystem
# ================================
# Yocto Minimal RootFS Configuration
# ================================

# 1. Select target machine (board/SoC)
MACHINE ?= "beaglebone-yocto"

# 2. Use a small distribution
DISTRO ?= "poky-tiny"

# 3. Use lightweight C library
TCLIBC ?= "musl"

# 4. Keep only minimal image features
IMAGE_FEATURES = "splash"
EXTRA_IMAGE_FEATURES = ""

# 5. Remove unnecessary tools (debug, profiling, package management)
IMAGE_FEATURES_remove = "tools-debug tools-profile package-management"

# 6. Prefer BusyBox over full GNU utilities
PREFERRED_PROVIDER_virtual/ps = "busybox"
PREFERRED_PROVIDER_virtual/init = "busybox"

# 7. Strip debug symbols to reduce binary size
INHERIT += "rm_work"
IMAGE_GEN_DEBUGFS = "0"

# 8. Choose smaller package format (ipk is usually lighter than rpm/deb)
PACKAGE_CLASSES ?= "package_ipk"

# 9. Add compressed root filesystem type
IMAGE_FSTYPES += "squashfs"

# 10. Set default image to a minimal base image
CORE_IMAGE_EXTRA_INSTALL = ""
What This Does in Real Life
Imagine you are making a smart home gateway (like a Wi-Fi hub for IoT devices).
- ✅
poky-tiny+musl= minimal Linux base → fits into 16 MB flash. - ✅
busybox= one tool instead of many → reduces space. - ✅
rm_work= removes developer leftovers → smaller binaries. - ✅
squashfs= compresses everything → like vacuum-packing your OS. - ✅ No package manager → your device is locked, stable, and light.
So, instead of a 200 MB rootfs, you might end up with 20–30 MB, which makes a huge difference for cost and performance in embedded systems.
Normal Yocto vs. Minimal Yocto RootFS
| Feature / Setting | Normal Yocto (poky + glibc) | Minimal Yocto (poky-tiny + musl + tweaks) |
|---|---|---|
| RootFS Size | ~150–250 MB | ~20–40 MB |
C Library (TCLIBC) | glibc (full-featured, heavy) | musl (lightweight, small footprint) |
| Utilities | GNU Coreutils (separate tools) | busybox (single binary, multiple tools) |
Distro Policy (DISTRO) | poky (default, rich features) | poky-tiny (minimal policy) |
| Debug Tools | Included (gdb, profiling) | Removed (IMAGE_FEATURES_remove) |
| Package Management | Enabled (rpm, opkg, deb) | Disabled → fixed image, smaller footprint |
| Filesystem Compression | Usually ext4 | squashfs / compressed ext4 |
| Image Features | ssh-server, debug-tweaks, dev-pkgs | Only splash (or nothing extra) |
| Boot Time | Longer (more services) | Faster (minimal services) |
| Use Case | Development boards, rich OS | IoT devices, gateways, automotive ECUs |
Real-Life Analogy
- Normal Yocto rootfs = A full suitcase for a month-long vacation. It has everything — clothes, extra shoes, books, and gadgets.
- Minimal Yocto rootfs = A backpack for a weekend trip. Only the essentials — a pair of clothes, toothbrush, and a wallet.
The backpack is lighter, faster to carry, and easier to fit in tight spaces, just like a minimal rootfs fits into tiny embedded storage.
You can also Visit other tutorials of Embedded Prep
- Multithreading in C++
- Multithreading Interview Questions
- Multithreading in Operating System
- Multithreading in Java
- POSIX Threads pthread Beginner’s Guide in C/C++
- Speed Up Code using Multithreading
- Limitations of Multithreading
- Common Issues in Multithreading
- Multithreading Program with One Thread for Addition and One for Multiplication
- Advantage of Multithreading
- Disadvantages of Multithreading
- Applications of Multithreading: How Multithreading Makes Modern Software Faster and Smarter”
- Master CAN Bus Interview Questions 2025
- What Does CAN Stand For in CAN Bus?
- CAN Bus Message Filtering Explained
- CAN Bus Communication Between Nodes With Different Bit Rates
- How Does CAN Bus Handle Message Collisions
- Message Priority Using Identifiers in CAN Protocol

Mr. Raj Kumar is a highly experienced Technical Content Engineer with 7 years of dedicated expertise in the intricate field of embedded systems. At Embedded Prep, Raj is at the forefront of creating and curating high-quality technical content designed to educate and empower aspiring and seasoned professionals in the embedded domain.
Throughout his career, Raj has honed a unique skill set that bridges the gap between deep technical understanding and effective communication. His work encompasses a wide range of educational materials, including in-depth tutorials, practical guides, course modules, and insightful articles focused on embedded hardware and software solutions. He possesses a strong grasp of embedded architectures, microcontrollers, real-time operating systems (RTOS), firmware development, and various communication protocols relevant to the embedded industry.
Raj is adept at collaborating closely with subject matter experts, engineers, and instructional designers to ensure the accuracy, completeness, and pedagogical effectiveness of the content. His meticulous attention to detail and commitment to clarity are instrumental in transforming complex embedded concepts into easily digestible and engaging learning experiences. At Embedded Prep, he plays a crucial role in building a robust knowledge base that helps learners master the complexities of embedded technologies.