Master the Build Process in C from source code to executable. Learn preprocessing, compilation, assembly, and linking for 2025 interviews.
Master the Build Process in C from source code to executable in this complete 2025 guide. Learn each stage of the Build Process including preprocessing, compilation, assembly, and linking with clear explanations and real interview-oriented insights. Understand how source files are transformed into object files and finally into an executable, along with the role of compilers, assemblers, linkers, and build tools like GCC and Make. This guide is perfect for beginners, embedded engineers, and interview preparation, helping you troubleshoot build errors, optimize builds, and gain a strong foundation in C programming internals. Boost your understanding of the Build Process and confidently answer C interview questions in 2025.
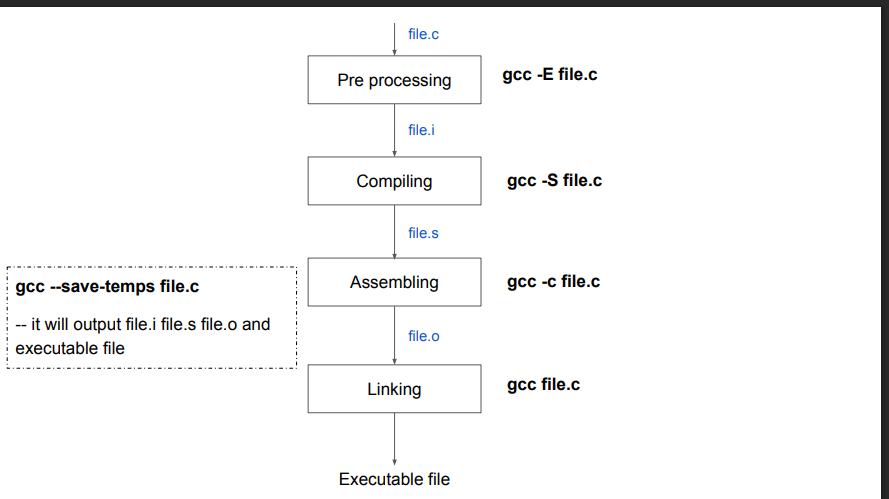
Build Process in C from ource Code to Executable : Understanding the build process in C is crucial for developers, especially those working with embedded systems, operating systems, or performance-critical applications. The process of transforming human-readable C source code into an executable involves multiple stages. Let’s dive deep into these stages and understand their significance.
Stages of the Build Process
The C build process consists of the following major stages:
- Preprocessing
- Compilation
- Assembly
- Linking
Each of these stages plays a vital role in generating the final executable file.
1. Preprocessing (Expanding Macros and Includes)
The first stage of the build process is preprocessing, where the C preprocessor (cpp) expands macros, processes #include files, and handles conditional compilation directives like #ifdef.
Key Tasks in Preprocessing:
- Expands macros (
#define) - Replaces header file includes (
#include) - Handles conditional compilation (
#ifdef, #ifndef, #endif)
Example:
Consider the following program.c:
#include <stdio.h>
#define PI 3.14
int main() {
    printf(\"Value of PI: %f\\n\", PI);
    return 0;
}
After preprocessing, the code will look like this:
// Expanded version after preprocessing
#include <stdio.h>
int main() {
    printf(\"Value of PI: %f\\n\", 3.14);
    return 0;
}
To see the preprocessed output, use:
gcc -E program.c -o program.i
2. Compilation (Converting C Code to Assembly)
In this stage, the compiler (gcc, clang) translates the preprocessed source code into assembly language, which is a low-level representation of the code.
Example:
gcc -S program.i -o program.s
This generates an assembly file (program.s) containing processor-specific instructions.
Example assembly output (simplified):
.section .text
.globl main
main:
    pushq   %rbp
    movq    %rsp, %rbp
    movl    $0, %eax
    popq    %rbp
    ret
3. Assembly (Converting Assembly to Machine Code)
The assembler (as) takes the assembly code and converts it into machine code, producing an object file (.o file).
Command to generate object file:
gcc -c program.s -o program.o
The .o file contains binary instructions but is not yet a complete executable because it still needs linking.
4. Linking (Combining Object Files to Create an Executable)
The linker (ld) combines multiple object files and links necessary system libraries to produce the final executable.
- Resolves function calls (e.g., linking
printf()tolibc). - Merges object files (
.o) into a single executable. - Allocates memory for variables and functions.
Command to link:
gcc program.o -o program
After linking, the final executable (program) is created and ready to run:
./program
Complete Build Process in One Command
Instead of running all steps separately, we can compile and link in one step using:
gcc program.c -o program
This internally performs preprocessing → compilation → assembly → linking automatically.
Understanding Static and Dynamic Linking
Static Linking:
- Includes all required libraries in the executable.
- Larger file size but runs independently.
- Example:
gcc -static program.c -o program
Dynamic Linking:
- Links external libraries at runtime (e.g.,
glibc). - Smaller executable but requires shared libraries (
.sofiles). - Example:
gcc program.c -o program -lm # Links math library dynamically
Build Automation with Makefiles
For large projects with multiple files, Makefiles automate the build process efficiently.
Example Makefile:
program: main.o helper.o
    gcc main.o helper.o -o program
main.o: main.c
    gcc -c main.c
helper.o: helper.c
    gcc -c helper.c
clean:
    rm -f *.o program
To build the program, simply run:
make
To clean object files:
make clean 💛 Support Embedded Prep
If you find our tutorials helpful and want to support our mission of sharing high-quality embedded system knowledge, you can contribute by buying us a coffee. Every small contribution helps us keep creating valuable content for learners like you. ☕
Thank you for your support — it truly keeps Embedded Prep growing. 💻✨
Interview Questions of build process
Build Process Basics
- What are the steps involved in the build process of a C/C++ program?
- What is the difference between compilation and linking?
- What happens during preprocessing? Can you give examples of preprocessing directives?
- What is an object file?
- Why do we need a linker in the build process?
Makefile and Build Automation
- What is a Makefile and why is it used?
- Explain the structure of a Makefile. What are targets, prerequisites, and commands?
- How does
makeknow when to rebuild a file? - What is the difference between
makeandcmake? - What is a phony target in Makefile and why do we use
.PHONY?
Toolchain and Cross-Compilation
- What is a cross-compiler and when do you use it?
- What’s the difference between
gccandg++? - What are the different stages involved when using a cross-toolchain for embedded development?
- How do you build an image for an embedded board using a build system like Yocto or Buildroot?
Build Configuration and Optimization
- What are common compiler optimization flags you use?
- What’s the purpose of flags like
-Wall,-O2,-g,-std=c99, etc.? - What’s the difference between static and dynamic linking?
- How do you debug a build error due to a missing symbol or header file?
Advanced / Real-World Scenarios
- Have you written a custom Makefile or modified a Yocto recipe? Explain.
- How do you include third-party libraries in your build process?
- Have you used build systems like Yocto, CMake, or Bazel? Compare them.
- What’s the role of the linker script in embedded systems?
Conclusion
Understanding the build process helps in optimizing code, debugging errors, and improving performance. Whether you\’re debugging linking errors, reducing compilation time, or managing dependencies in large projects, mastering these stages is essential for any C developer.
Thank you for exploring Build Process in C ! Stay ahead in embedded systems with expert insights, hands-on projects, and in-depth guides. Follow Embedded Prep for the latest trends, best practices, and step-by-step tutorials to enhance your expertise. Keep learning, keep innovating!
You can also Visit other tutorials of Embedded Prep
- Top 30+ I2C Interview Questions
- Bit Manipulation Interview Questions
- Structure and Union in c
- Little Endian vs. Big Endian: A Complete Guide
Mr. Raj Kumar is a highly experienced Technical Content Engineer with 7 years of dedicated expertise in the intricate field of embedded systems. At Embedded Prep, Raj is at the forefront of creating and curating high-quality technical content designed to educate and empower aspiring and seasoned professionals in the embedded domain.
Throughout his career, Raj has honed a unique skill set that bridges the gap between deep technical understanding and effective communication. His work encompasses a wide range of educational materials, including in-depth tutorials, practical guides, course modules, and insightful articles focused on embedded hardware and software solutions. He possesses a strong grasp of embedded architectures, microcontrollers, real-time operating systems (RTOS), firmware development, and various communication protocols relevant to the embedded industry.
Raj is adept at collaborating closely with subject matter experts, engineers, and instructional designers to ensure the accuracy, completeness, and pedagogical effectiveness of the content. His meticulous attention to detail and commitment to clarity are instrumental in transforming complex embedded concepts into easily digestible and engaging learning experiences. At Embedded Prep, he plays a crucial role in building a robust knowledge base that helps learners master the complexities of embedded technologies.