Category: Embedded

  • Compare firmware version strings in C | Master Embedded Coding (2026)

    Compare firmware version strings in C : In embedded systems development, firmware updates are crucial for fixing bugs, improving performance, or adding new features. A common challenge developers face is comparing two firmware version strings in C to decide whether an upgrade or downgrade is required.

    For example, you might want to check if version “1.2.10” is newer than “1.2.9”. At first glance, this looks like a simple string comparison—but in practice, you need to handle version numbers numerically, not lexicographically.

    Compare firmware version strings in C this article, we will:

    • Understand the basics of firmware version strings
    • Learn why direct string comparison fails
    • Write a C program to compare version strings properly
    • Explore practical use cases in embedded software development

    What is a Firmware Version String?

    A firmware version string is a sequence that represents the version of your software. Common formats include:

    • "1.0.0" → (major.minor.patch)
    • "2.5" → (major.minor)
    • "3.10.7-beta" → (with suffix)

    Each number (major, minor, patch) carries meaning:

    • Major version: Big changes, possibly breaking compatibility.
    • Minor version: New features, still backward compatible.
    • Patch version: Small fixes or improvements.

    Why Simple String Comparison Fails

    Let’s say we compare “1.10” and “1.2” as strings.

    strcmp("1.10", "1.2");  

    Here, "1.10" would be considered smaller than "1.2" because strcmp compares character by character ('1' == '1', then '0' < '2').

    But in reality:

    • 1.10 (ten) is greater than 1.2 (two).

    So, we need numeric comparison.

    Pseudocode: Compare Two Firmware Version Strings
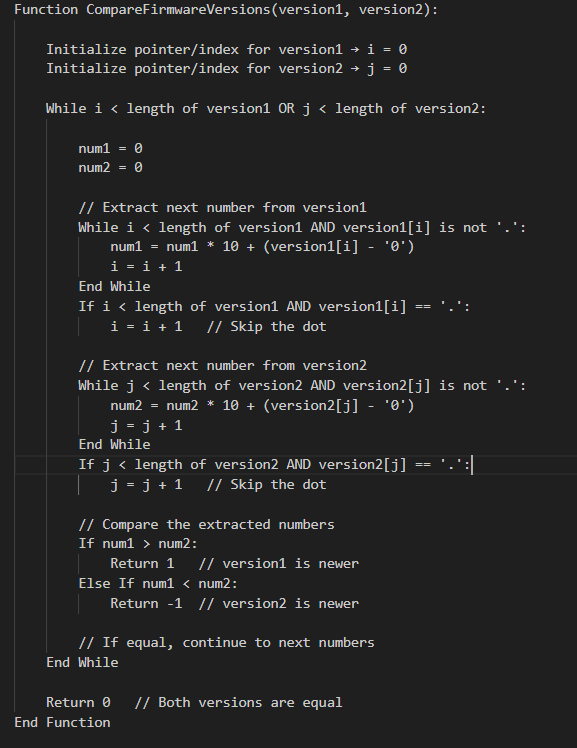
    Pseudocode: Compare Two Firmware Version Strings

    How the Pseudocode Works

    1. Iterate through both version strings simultaneously.
    2. Extract numbers between dots (.) and convert them to integers.
    3. Compare numbers one by one:
      • If a number in version1 is greater → version1 is newer.
      • If a number in version2 is greater → version2 is newer.
      • If equal → continue.
    4. Handle versions of different lengths by treating missing numbers as 0.
    5. Return 0 if all numbers are equal.

    This pseudocode is optimized for embedded systems logic and avoids string splitting with extra memory allocation.

    C Program to Compare Firmware Version Strings

    Here’s a beginner-friendly C program that compares two version strings correctly:

    #include <stdio.h>
    #include <string.h>
    #include <stdlib.h>
    
    // Function to compare two firmware version strings
    int compareVersions(const char *v1, const char *v2) {
        // Create copies since strtok modifies strings
        char *ver1 = strdup(v1);
        char *ver2 = strdup(v2);
    
        char *token1 = strtok(ver1, ".");
        char *token2 = strtok(ver2, ".");
    
        while (token1 != NULL || token2 != NULL) {
            int num1 = (token1 != NULL) ? atoi(token1) : 0;
            int num2 = (token2 != NULL) ? atoi(token2) : 0;
    
            if (num1 > num2) {
                free(ver1); free(ver2);
                return 1;  // v1 is greater
            } else if (num1 < num2) {
                free(ver1); free(ver2);
                return -1; // v2 is greater
            }
    
            token1 = (token1 != NULL) ? strtok(NULL, ".") : NULL;
            token2 = (token2 != NULL) ? strtok(NULL, ".") : NULL;
        }
    
        free(ver1);
        free(ver2);
        return 0; // Both versions are equal
    }
    
    int main() {
        const char *v1 = "1.2.10";
        const char *v2 = "1.2.9";
    
        int result = compareVersions(v1, v2);
    
        if (result == 0) {
            printf("Both versions are equal.\n");
        } else if (result > 0) {
            printf("Version %s is newer than %s.\n", v1, v2);
        } else {
            printf("Version %s is newer than %s.\n", v2, v1);
        }
    
        return 0;
    }
    

    Explanation of the Code: Compare version numbers in embedded systems

    1. Splitting the version string:
      • We use strtok with "." as a delimiter to separate numbers like "1", "2", "10".
    2. Converting to integers:
      • Each token is converted using atoi().
      • "10" becomes 10 (so "1.10" > "1.2").
    3. Comparison logic:
      • If one number is greater, we immediately return the result.
      • If equal, we move to the next part.
      • If lengths differ (e.g., "1.2" vs "1.2.0.0"), missing parts are treated as 0.

    Example Output of C code for firmware version management

    For input:

    v1 = "1.2.10"
    v2 = "1.2.9"
    

    Output:

    Version 1.2.10 is newer than 1.2.9.
    

    Optimized Firmware Version Comparison in C (No strtok / No strdup)

    When writing firmware for resource-constrained embedded devices, we must minimize memory usage and avoid dynamic allocations like malloc, strdup, or even temporary token buffers.

    Instead of splitting the version string, we can parse it character by character, extracting numbers on the fly.

    Optimized C Code of Numeric comparison of version strings in C

    #include <stdio.h>
    #include <ctype.h>
    
    // Function to extract the next integer from version string
    int getNextNumber(const char **str) {
        int num = 0;
    
        // Parse until '.' or end of string
        while (**str && **str != '.') {
            if (isdigit(**str)) {
                num = num * 10 + (**str - '0');
            }
            (*str)++;
        }
    
        // Skip the '.' character
        if (**str == '.') {
            (*str)++;
        }
    
        return num;
    }
    
    // Compare two firmware version strings
    int compareVersions(const char *v1, const char *v2) {
        while (*v1 || *v2) {
            int num1 = getNextNumber(&v1);
            int num2 = getNextNumber(&v2);
    
            if (num1 > num2) return 1;   // v1 is greater
            if (num1 < num2) return -1;  // v2 is greater
        }
        return 0; // Versions are equal
    }
    
    int main() {
        const char *v1 = "2.10.3";
        const char *v2 = "2.9.15";
    
        int result = compareVersions(v1, v2);
    
        if (result == 0) {
            printf("Both versions are equal.\n");
        } else if (result > 0) {
            printf("Version %s is newer than %s.\n", v1, v2);
        } else {
            printf("Version %s is newer than %s.\n", v2, v1);
        }
    
        return 0;
    }
    

    How Compare software version strings in C Works

    1. getNextNumber function
      • Reads characters until a . or \0 (end of string).
      • Converts digits into an integer ("15" → 15).
      • Skips the dot (.) and prepares for the next segment.
    2. compareVersions function
      • Loops until both strings are fully read.
      • Extracts one integer from each version string.
      • Compares them immediately.
      • If equal, continues to the next part.
      • If different, returns the comparison result.
    3. No extra memory
      • Works directly on the input strings.
      • No heap allocation, no strdup, no strtok.

    C program to compare version numbers Example Run

    Input:

    v1 = "2.10.3"
    v2 = "2.9.15"

    Output:

    Version 2.10.3 is newer than 2.9.15.
    

    Advantages for Embedded Systems Compare version numbers in embedded systems

    • No dynamic memory allocation (safe for microcontrollers).
    • Faster execution since it parses directly.
    • Smaller memory footprint.
    • Works even if versions have different lengths ("1.2" vs "1.2.0.0").

    Real-World Use Cases of Compare version numbers in embedded systems

    • Over-the-Air (OTA) Updates: Check if the device needs a firmware upgrade.
    • Bootloaders: Ensure only newer firmware is flashed.
    • Diagnostics Tools: Display correct version hierarchy.
    • Version Management: Maintain compatibility in embedded systems.

    Final Thoughts of C code for firmware version management

    Comparing firmware version strings in C is more than a simple string check—it requires numeric comparison to handle multi-digit versions correctly. By splitting the string, converting to integers, and comparing each part step by step, you can build a robust firmware version checker for your embedded systems projects.

    Frequently Asked Questions (FAQ) | Firmware version comparison in C language

    1. Why can’t I compare firmware version strings using strcmp in C?

    Ans: strcmp performs a lexicographic (alphabetical) comparison, not numeric. For example, "1.10" would appear smaller than "1.2" because "1" and "10" are compared as text, not numbers. That’s why a numeric comparison is required.

    2. What is the correct way to compare firmware versions in C?

    Ans: The correct approach is to split the version string by dots (.), convert each part into an integer, and compare them one by one. This ensures "1.10" is correctly recognized as greater than "1.2".

    3. Which method is better: using strtok or parsing manually?

    Ans:
    strtok method
    : Easier for beginners, but uses extra memory and may not be ideal for embedded systems.
    Manual parsing: Reads characters directly, avoids dynamic memory, and is more efficient for resource-constrained devices.

    4. How do I handle firmware versions with different lengths, like "1.2" vs "1.2.0.0"?

    Ans: In proper version comparison, missing parts are treated as zero. So, "1.2" is considered equal to "1.2.0.0".

    5. Can this logic be used in embedded bootloaders?

    Ans: Yes. Bootloaders often need to check if the new firmware is newer than the current one before flashing. The optimized version comparison code (without malloc or strtok) is ideal for this purpose.

    6. How do I compare versions with suffixes like "1.2.3-beta"?

    Ans: The simple numeric comparison handles only numbers. If you need to compare suffixes like "alpha", "beta", or "rc", you’ll need to extend the logic with string handling rules for these labels.

    7. What are the real-world applications of firmware version comparison?

    Ans:
    Over-the-Air (OTA) updates
    Bootloader validation before flashing
    Diagnostics tools to report correct firmware version
    Embedded systems compatibility checks

    8. Does the optimized code work on all C compilers?

    Ans: Yes , The provided code uses standard C functions (isdigit, printf, basic loops), so it works across most C compilers and embedded toolchains.
    Compare firmware version strings in C
    Compare firmware version strings in C Master Embedded Coding (2025)
  • What Are the Typical Synchronization Mechanisms Used in an RTOS? | RTOS Interview Question (2026)

    Typical synchronization mechanisms used in an RTOS (Real-Time Operating System) are techniques that manage the coordination and safe sharing of resources among multiple tasks running concurrently. These mechanisms—such as semaphores, mutexes, event flags, message queues, mailboxes, and barriers—help prevent race conditions, ensure mutual exclusion, and maintain deterministic behavior in time-critical applications. By enabling controlled access to shared memory, devices, and data structures, they keep real-time systems stable, predictable, and efficient. Whether it’s signaling between tasks, protecting resources, or coordinating task execution, these synchronization tools are essential for reliable RTOS performance.

    Typical Synchronization Mechanisms Used in an RTOS

    In a Real-Time Operating System (RTOS), multiple tasks often run concurrently and may need to share resources such as memory, hardware devices, or data structures. Without proper control, two tasks could try to access the same resource at the same time, leading to race conditions or data corruption.

    This is where synchronization mechanisms come into play. They ensure safe, predictable, and coordinated access to shared resources, maintaining system stability in real-time environments.

    Why Synchronization is Important in RTOS

    In real-time systems, timing and reliability are critical. Synchronization helps to:

    • Prevent race conditions and data corruption
    • Ensure mutual exclusion (only one task can access a resource at a time)
    • Maintain task coordination and predictable behavior
    • Improve system stability and deterministic performance

    Typical Synchronization Mechanisms Used in RTOS

    1. Semaphores

    A semaphore is a signaling mechanism that controls access to resources.

    • Binary Semaphore: Works like an on/off flag. Useful for task signaling and simple mutual exclusion.
    • Counting Semaphore: Allows a fixed number of tasks to access a resource simultaneously.

    Example: In an RTOS-based printer control system, a counting semaphore can allow up to 3 print jobs to be queued at the same time.

    2. Mutex (Mutual Exclusion)

    A mutex ensures that only one task can access a shared resource at any given moment.

    • Often supports priority inheritance, which helps prevent priority inversion problems in real-time systems.

    Example: Protecting a shared log file from being written by multiple tasks at the same time.

    3. Event Flags

    Event flags (or event groups) allow tasks to wait for specific conditions to occur.

    • Multiple bits in a flag group can represent different events.
    • Tasks can wait for any or all events to be set before proceeding.

    Example: A task waits for both “data received” and “data processed” flags before sending the next packet.

    4. Message Queues

    Message queues allow safe communication between tasks by sending and receiving messages in FIFO (First In, First Out) order.

    • Helps decouple tasks — the sender and receiver do not need to run at the same time.
    • Supports data passing with built-in synchronization.

    Example: A sensor task sends temperature readings to a processing task via a message queue.

    5. Mailboxes

    A mailbox is like a message queue but usually designed for fixed-size messages and single message storage.

    • Suitable when tasks need to exchange small messages quickly.

    Example: A control task sends a command to a motor driver task using a mailbox.

    6. Barriers

    A barrier is a synchronization point where multiple tasks must wait until all have reached the barrier before continuing.

    • Useful for coordinating stages in multi-task processing.

    Example: In a multi-core RTOS system, all tasks wait at a barrier until data loading is complete.

    Choosing the Right Mechanism

    The right synchronization mechanism depends on:

    • Type of resource (shared memory, hardware device, data buffer)
    • Number of tasks accessing the resource
    • Real-time constraints and timing requirements
    • Data size and communication frequency

    Quick Guide:

    • Use mutex for exclusive access to a resource.
    • Use semaphore for signaling between tasks or controlling resource count.
    • Use event flags for multi-condition synchronization.
    • Use message queues/mailboxes for safe inter-task communication.
    • Use barriers for group synchronization.

    Final Thoughts

    In an RTOS, synchronization mechanisms are essential for building stable, predictable, and safe embedded applications. Whether you are working with FreeRTOS, QNX, VxWorks, or any other RTOS, mastering semaphores, mutexes, event flags, and message queues will significantly improve your ability to design efficient real-time systems.

    FAQ – Typical Synchronization Mechanisms in an RTOS

    1. What is synchronization in an RTOS?

    Synchronization in an RTOS ensures that multiple tasks can safely share resources without conflicts or data corruption. It helps coordinate task execution and maintain predictable system behavior.

    2. Why is synchronization important in real-time systems?

    In real-time systems, timing is critical. Synchronization prevents race conditions, ensures mutual exclusion, and keeps system performance consistent and deterministic.

    3. What are the most common synchronization mechanisms in RTOS?

    The most common synchronization mechanisms include:

    • Semaphores (binary and counting)
    • Mutexes
    • Event flags
    • Message queues
    • Mailboxes
    • Barriers

    4. What is the difference between a semaphore and a mutex in RTOS?

    A semaphore is a signaling mechanism that can be used by multiple tasks, while a mutex provides exclusive access to a resource and usually supports priority inheritance to avoid priority inversion.

    5. When should I use event flags in RTOS?

    Event flags are best when a task must wait for one or more conditions to occur before continuing execution—such as waiting for multiple sensors to signal readiness.

    6. What is a message queue used for in RTOS?

    A message queue allows tasks to send and receive data safely, even if they run at different times. It supports FIFO ordering and prevents data loss during task communication.

    7. Do all RTOS platforms support the same synchronization mechanisms?

    No. While most RTOS platforms support semaphores, mutexes, and message queues, advanced features like barriers or event flags may vary depending on the RTOS (e.g., FreeRTOS, QNX, VxWorks).

  • Architecture of CAN Bus System | Master CAN Interview Questions (2026)

    Architecture of CAN Bus System: The Controller Area Network (CAN) bus system is a popular communication protocol widely used in automotive and industrial applications. It allows multiple electronic control units (ECUs) to communicate with each other efficiently over just two wires. In this article, we will explain the basic architecture of a CAN bus system in simple terms, making it easy for beginners to understand.

    Learn the basic architecture of a CAN bus system in this beginner-friendly guide. Understand key components like ECUs, CAN-High and CAN-Low wiring, message framing, and arbitration. Perfect for anyone starting with automotive or embedded communication protocols.

    What is a CAN Bus System?

    A CAN bus system is a robust vehicle bus standard designed to allow microcontrollers and devices to communicate without a host computer. It is especially useful in environments with high electrical noise, like cars, where reliable communication between multiple ECUs is essential.

    Key Components of CAN Bus Architecture

    1. Nodes (Electronic Control Units – ECUs)

    Each device or node in a CAN bus system contains:

    • A Microcontroller (MCU) that processes data.
    • A CAN controller that manages message framing, error detection, and protocol handling.
    • A CAN transceiver that converts data to and from the physical bus lines.

    Nodes can both send and receive messages on the bus, making CAN a multi-master system.

    2. Bus Lines: CAN-High and CAN-Low

    Communication takes place over two wires called CAN-High (CAN-H) and CAN-Low (CAN-L). These wires carry differential signals, meaning one wire carries the inverse of the other. This helps the system resist electrical noise and improves data integrity.

    3. Termination Resistors

    At both ends of the CAN bus, 120-ohm resistors are connected to prevent signal reflections and ensure reliable communication.

    Layers in the Architecture of the CAN Bus

    CAN bus architecture follows international standards defined by ISO 11898. It primarily works on two layers of the OSI model:

    • Physical Layer (ISO 11898-2): Defines wiring, signal voltage levels, and data rates. The twisted pair of CAN-H and CAN-L cables operate at speeds up to 1 Mbps (Classical CAN) or higher in CAN FD.
    • Data Link Layer (ISO 11898-1): Handles message framing, arbitration (which node gets to transmit when multiple nodes start transmitting simultaneously), error detection, and message acknowledgment.

    How CAN Bus Communication Works

    • Message Framing:
      Messages, or frames, consist of an identifier, data length, data payload (up to 8 bytes in Classical CAN), CRC for error checking, and control bits.
    • Arbitration:
      When multiple nodes send messages simultaneously, the one with the highest priority (lowest identifier number) wins the bus without data loss. This process is called arbitration.
    • Error Handling:
      CAN automatically detects errors and retransmits faulty messages, ensuring reliable communication.

    CAN Bus Physical Design and Topology

    The standard CAN bus uses a linear topology, where all nodes are connected along a single pair of wires with termination resistors at each end. This layout reduces reflections and interference.

    CAN Protocol Block Diagram — Overview

    The CAN bus follows a multi-master bus architecture, which means that any node (or ECU) connected to the bus can send or receive messages at any time. It also has built-in error handling to keep communication reliable.

    The main part of the CAN system is called the CAN core. This core acts like a memory-mapped device to the host processor and is responsible for sending and receiving CAN messages (called frames). It can be integrated easily with the host using standard interfaces like APB (Advanced Peripheral Bus) or AHB-Lite (Advanced High-performance Bus Lite), depending on performance and power needs.

    Key Parts Inside the CAN Core

    • Acceptance Filters: These help the system decide which messages should be accepted or ignored, making sure the ECU only processes relevant data.
    • Interrupts: Programmable signals to alert the processor about new messages or errors.
    • Buffers: Memory areas for storing messages before sending or after receiving.
      • There are two types of transmit buffers:
        • Primary Transmission Buffer (PTB): Holds high-priority messages.
        • Secondary Transmission Buffer (STB): Stores lower-priority messages.
      • Buffers work in a First-In-First-Out (FIFO) manner in priority mode.

    CAN Bus Layered Architecture

    The CAN communication protocol is defined by the ISO 11898 standard and has two main layers:

    1. Data Link Layer:
      This layer manages how data is sent between nodes, error checking, and message prioritization. It has two sublayers:
      • MAC (Medium Access Control): Controls which node can use the bus at a given time and handles framing and error detection.
      • LLC (Logical Link Control): Handles flow control, error recovery, and acceptance filtering.
    2. Physical Layer:
      This layer defines how the data is physically transmitted over the wires — including voltage levels, timing, and connectors. It consists of:
      • PCS (Physical Coding Sublayer): Encodes and decodes the bits on the bus.
      • PMA (Physical Medium Attachment): Handles framing and synchronization of bits.
      • PMD (Physical Medium Dependent): Deals with actual transmission and reception of bits on the wire.
      • MDI (Medium Dependent Interface): The physical connection to the network medium (cables).

    How CAN Bus Works — Data Transmission and Arbitration

    • CAN Frames:
      Data is sent in packets called frames. Each frame includes a unique identifier (priority), control bits, data payload, and error-checking codes.
    • Multi-Master and Arbitration:
      Multiple nodes can try to send data at the same time. To avoid collisions, CAN uses arbitration — a method that prioritizes messages with lower identifier numbers. The node with the highest priority continues to send, while others wait.
    • Bit Monitoring:
      While sending data, each node listens to the bus to make sure the bit they sent matches what is on the bus. If not, it means another node has a higher priority message, so the lower priority node stops transmitting.

    Example of Arbitration in the Architecture of the CAN Bus

    Imagine two ECUs want to send messages simultaneously:

    • ECU 1 has an identifier 0x234
    • ECU 2 has an identifier 0x352

    CAN uses wired-AND logic, meaning a dominant bit (0) overrides a recessive bit (1). When both ECUs transmit the third bit, ECU 1 sends 0 and ECU 2 sends 1. The bus reads 0 (dominant). ECU 2 detects the difference and stops transmitting, letting ECU 1 continue because it has higher priority.

    Standard CAN Frame Format

    Here’s what a typical CAN message frame looks like (in the standard 11-bit format):

    FieldDescription
    SOF (Start of Frame)Indicates the beginning of a message (1 bit)
    IdentifierDefines message priority (11 bits)
    RTR (Remote Transmission Request)Distinguishes between data and remote frames (1 bit)
    Control FieldContains user-specified flags
    IDE (Identifier Extension)Indicates if frame is standard (11-bit) or extended (29-bit)
    DLC (Data Length Code)Specifies number of data bytes (4 bits)
    Data FieldContains up to 8 bytes of actual data
    CRC (Cyclic Redundancy Check)Error-checking code (15 bits)
    ACK (Acknowledgement)Confirms correct reception (2 bits)
    EoF (End of Frame)Marks the end of the message (7 bits)

    Summary Architecture of the CAN Bus

    CAN Bus ElementDescription
    Nodes (ECUs)Devices with MCU, CAN controller, and transceiver
    CAN-High and CAN-LowTwisted pair differential signaling wires
    Termination Resistors120 Ω resistors at bus ends to prevent reflections
    Physical Layer (ISO 11898-2)Defines wiring and signaling specifications
    Data Link Layer (ISO 11898-1)Manages message framing, arbitration, and error handling
    ArbitrationPriority-based bus access control

    Conclusion

    The CAN bus system is a simple yet powerful communication protocol enabling multiple devices to communicate over a shared two-wire bus efficiently. Its architecture combines robust physical wiring, standardized messaging, and smart arbitration techniques to ensure data integrity in noisy environments like vehicles. Understanding its basic components and working principle is essential for anyone diving into embedded systems or automotive electronics.

    1. What is the CAN bus system?

    The CAN (Controller Area Network) bus system is a robust communication protocol used primarily in automotive and industrial applications to allow microcontrollers and devices to communicate with each other without a host computer. It enables multiple nodes to share data efficiently over a single two-wire bus.

    2. How is the architecture of a CAN bus system structured?

    The CAN bus architecture consists of several nodes connected through a twisted pair cable. Each node contains a CAN controller and a transceiver. The controller manages data framing, error checking, and message filtering, while the transceiver converts the controller’s digital signals to differential signals for the bus.

    3. What are the main components of a CAN node?

    A typical CAN node has three main parts: the microcontroller (which runs the application), the CAN controller (which handles CAN protocol functions), and the CAN transceiver (which interfaces with the physical bus).

    4. What type of bus topology does CAN use?

    CAN uses a multi-master, broadcast communication bus topology. This means any node can start transmitting data when the bus is free, and messages are broadcast to all nodes simultaneously.

    5. How does CAN handle message priority?

    CAN uses message identifiers to determine priority. Lower numerical values of identifiers have higher priority on the bus, allowing critical messages to get transmitted first during bus arbitration.

    6. What is bus arbitration in CAN?

    Bus arbitration is the process by which multiple nodes attempt to transmit data simultaneously. CAN uses a nondestructive arbitration method based on message priority, ensuring the highest priority message gains bus access without data loss.

    7. How does CAN ensure data integrity and error handling?

    CAN includes several error detection mechanisms such as CRC (Cyclic Redundancy Check), bit stuffing, acknowledgment checks, and error flags. When an error is detected, nodes retransmit messages to maintain data reliability.

    8. Why is CAN preferred in automotive systems?

    CAN is highly reliable, efficient, and cost-effective. It supports real-time communication with robust error handling and allows many electronic control units (ECUs) to communicate over a simple two-wire bus, making it ideal for automotive applications.

    9. Can CAN bus systems support long distances and high speeds?

    CAN supports data rates up to 1 Mbps and bus lengths typically up to 40 meters at the highest speed. For longer distances, the speed is reduced to maintain signal integrity.

    10. What is the difference between CAN 2.0A and CAN 2.0B?

    CAN 2.0A supports standard frames with 11-bit identifiers, whereas CAN 2.0B supports extended frames with 29-bit identifiers, allowing for more message identifiers and better flexibility.
  • What is Bit Stuffing in CAN Bus Communication? | Master CAN Interview Questions (2026)

    Bit Stuffing in CAN (Controller Area Network) is a technique used to ensure reliable data transmission by inserting extra bits into the data stream. This prevents long sequences of identical bits, helping maintain synchronization between sender and receiver. In this article, we explain what bit stuffing is, why it’s essential in CAN communication, and how it works with real-world examples, making it easy for beginners and professionals to understand.

    Introduction – Bit Stuffing in CAN Bus

    If you’ve ever worked with CAN (Controller Area Network) bus communication, you may have come across the term bit stuffing. At first, it might sound like some tricky technical jargon, but in reality, it’s a clever way to keep communication smooth, synchronized, and error-free.

    In this article, we’ll break down what bit stuffing is, why it’s essential in CAN communication, and how it works — in plain, beginner-friendly language.

    1. What Is Bit Stuffing?

    Bit stuffing is a technique used in CAN communication where a complementary bit is inserted into the data stream after five consecutive identical bits.

    • If there are five 1s in a row → insert a 0.
    • If there are five 0s in a row → insert a 1.

    This happens automatically:

    • Transmitter: Adds the stuffed bit.
    • Receiver: Detects and removes it before processing the data.

    📌 Think of it like this:
    If a teacher is reading a long sentence without pauses, students might lose track. A small pause (bit stuffing) ensures everyone stays in sync.

    2. Why Is Bit Stuffing Used in CAN Bus?

    a) Clock Synchronization

    CAN is asynchronous, meaning it doesn’t send a separate clock signal.

    • Receivers synchronize their internal clocks by detecting changes (edges) in the signal.
    • If there are too many identical bits in a row, there are no edges, and synchronization is lost.
    • Bit stuffing ensures enough transitions for accurate timing.

    b) Preventing False Frame Detection

    Some bit patterns (like a long string of 0s or 1s) are used for special markers in CAN, such as Start of Frame (SOF) or End of Frame (EOF).

    • Without bit stuffing, these patterns might accidentally appear inside data.
    • Bit stuffing prevents that by breaking long identical sequences.

    c) Error Detection

    If the receiver finds more than 5 identical bits in a row without a stuffed bit, it knows an error occurred and raises a bit stuffing error.
    This is a built-in safety check.

    3. How Bit Stuffing in CAN Bus Works: Step-by-Step Example

    Original Data (before stuffing):

    1111101111100
    

    After Bit Stuffing:

    111110**0**111110**0**0
    

    Here’s what happened:

    1. Found five 1s → inserted 0.
    2. Found another five 1s → inserted another 0.

    The receiver will remove these inserted bits before processing.

    4. Bit Stuffing in Error Frames

    In CAN, bit stuffing is not applied to certain special fields like:

    • Stuff count fields
    • CRC delimiter
    • ACK delimiter
    • End of Frame (EOF)

    This prevents unnecessary changes to fixed-format parts of a message.

    Also, if bit stuffing is wrong (extra or missing stuffed bit), it triggers a stuff error, and the CAN error handling mechanism retransmits the frame.

    5. Key Takeaways for Beginners: Understanding Bit Stuffing in CAN Bus

    ✅ Bit stuffing inserts an opposite bit after five identical bits.
    ✅ It keeps CAN communication synchronized and error-free.
    ✅ Receivers automatically remove stuffed bits before processing.
    ✅ If stuffing is missing or wrong, CAN flags an error.

    Advantages of Bit Stuffing in CAN Bus

    1. Maintains Synchronization – Prevents loss of sync between transmitter and receiver by avoiding long sequences of identical bits.
    2. Error Detection Support – Helps identify frame errors if the stuffing rule is violated.
    3. Protocol Simplicity – Automatically handled by CAN controllers, requiring no manual intervention from developers.
    4. Works for Variable Data Patterns – Effective regardless of the actual message content.

    Disadvantages of Bit Stuffing in CAN Bus

    1. Increases Data Overhead – Extra stuffed bits make the transmitted frame longer.
    2. Slight Latency Impact – Additional bits increase transmission time, especially in large frames.
    3. Higher Bandwidth Usage – More bits mean slightly higher bus load, reducing available bandwidth for other messages.
    4. Complexity in Manual Analysis – Raw bitstreams are harder to read without decoding tools due to inserted bits.

    Real-Time Use Cases of Bit Stuffing

    • Automotive ECUs – Engine control units, ABS systems, and airbags rely on CAN bit stuffing for accurate high-speed data transfer.
    • Industrial Automation – PLCs and robotic arms use CAN for sensor and actuator communication with bit stuffing ensuring reliability.
    • Medical Equipment – Infusion pumps and diagnostic machines use CAN for safe and synchronized data exchange.
    • Aerospace Systems – Flight control and monitoring systems depend on CAN with bit stuffing to maintain data integrity in noisy environments.

    FAQs of Bit Stuffing in CAN

    Q1: Is bit stuffing the same for all protocols?

    Ans: No. While many protocols use bit stuffing, the rules (like the number of identical bits allowed) may differ.

    Q2: Does bit stuffing change the original message?

    Ans: No. Stuffed bits are removed before the data is processed, so the original message stays the same.

    Q3: Who handles bit stuffing in CAN — hardware or software?

    Ans: The CAN controller hardware automatically handles stuffing and destuffing.

    Conclusion

    Bit stuffing is a small yet powerful feature of CAN bus communication. It keeps devices in sync, prevents accidental message boundaries, and helps detect errors — all without affecting your actual data.

    So the next time you see a CAN message, remember: somewhere inside, bit stuffing is working quietly to keep the conversation going smoothly.

  • Minimum Bit Flips to Convert Number | Master Beginner’s Guide with LeetCode Solution 2026

    Minimum Bit Flips to Convert Number : When working with binary numbers in programming, you might encounter a problem where you need to find the minimum number of bit flips required to convert one number into another. This is a common interview and LeetCode problem that tests your understanding of bit manipulation.

    In this guide, we’ll explain the concept step-by-step, walk through examples, and provide a LeetCode-style C++ solution.

    What Does “Bit Flip” Mean?

    A bit flip means changing a 0 to 1 or a 1 to 0 in a number’s binary representation.

    Example:

    • Original bit: 0 → Flipped bit: 1
    • Original bit: 1 → Flipped bit: 0

    If you have two integers, finding the minimum bit flips means determining the positions where the bits differ.

    Minimum Bit Flips to Convert Number  leetcode solution
    Minimum Bit Flips to Convert Number leetcode solution

    Understanding the Problem

    Problem Statement:
    Given two integers start and goal, return the minimum number of bit flips required to convert start to goal.

    Example

    Input: start = 10, goal = 7
    Binary of 10 → 1010
    Binary of 7  → 0111
    

    Comparing bit by bit:

    1 0 1 0  
    0 1 1 1  
    ↑ ↑   ↑  
    Different bits at positions 1, 2, and 4 → 3 flips needed
    

    Approach

    1. Use XOR to identify different bits:
      • XOR (^) returns 1 for differing bits, 0 for same bits.
    2. Count set bits in the XOR result:
      • The number of 1s = the number of bit flips needed.

    Step-by-Step Example

    For start = 29 and goal = 15:

    1. XOR Operation: 29 (11101) 15 (01111) XOR → 10010
    2. Count set bits in 10010:
      There are 2 set bits → 2 flips needed.

    1. C++ Solution

    #include <iostream>
    using namespace std;
    
    int minBitFlips(int start, int goal) {
        int xorValue = start ^ goal; // Step 1: XOR to find differing bits
        int count = 0;
        while (xorValue > 0) {
            count += xorValue & 1;  // Step 2: Count set bits
            xorValue >>= 1;
        }
        return count;
    }
    
    int main() {
        int start = 10, goal = 7;
        cout << "Minimum Bit Flips: " << minBitFlips(start, goal) << endl;
        return 0;
    }
    

    ✅ Shortcut in C++ (GCC/Clang):

    return __builtin_popcount(start ^ goal);
    

    2. C Solution for Minimum Bit Flips to Convert Number

    #include <stdio.h>
    
    int minBitFlips(int start, int goal) {
        int xorValue = start ^ goal; // XOR to find differing bits
        int count = 0;
        while (xorValue > 0) {
            count += xorValue & 1;  // Count set bits
            xorValue >>= 1;
        }
        return count;
    }
    
    int main() {
        int start = 10, goal = 7;
        printf("Minimum Bit Flips: %d\n", minBitFlips(start, goal));
        return 0;
    }
    

    3. Java Solution for Minimum Bit Flips to Convert Number

    public class Main {
        public static int minBitFlips(int start, int goal) {
            int xorValue = start ^ goal; // XOR to find differing bits
            int count = 0;
            while (xorValue > 0) {
                count += xorValue & 1; // Count set bits
                xorValue >>= 1;
            }
            return count;
        }
    
        public static void main(String[] args) {
            int start = 10, goal = 7;
            System.out.println("Minimum Bit Flips: " + minBitFlips(start, goal));
        }
    }
    

    ✅ Shortcut in Java (Java 8+):

    return Integer.bitCount(start ^ goal);
    

    4. Python Solution for Minimum Bit Flips to Convert Number

    def min_bit_flips(start, goal):
        xor_value = start ^ goal  # XOR to find differing bits
        count = 0
        while xor_value > 0:
            count += xor_value & 1  # Count set bits
            xor_value >>= 1
        return count
    
    # Example
    start = 10
    goal = 7
    print("Minimum Bit Flips:", min_bit_flips(start, goal))
    

    ✅ Shortcut in Python:

    return bin(start ^ goal).count('1')
    

    Time Complexity for All Solutions

    • O(k), where k = number of bits in the integer.

    Real-World Applications

    • Error Detection & Correction in data transmission.
    • Cryptography and data encoding.
    • Digital Circuit Design optimization.

    Key Takeaways

    • Use XOR to detect differences in bits.
    • Count the number of 1s in the XOR result to get the flips.
    • This is a popular LeetCode problem for practicing bit manipulation.

    FAQ for Minimum Bit Flips to Convert Number

    Q1: Is this problem available on LeetCode?

    Yes, it’s a well-known LeetCode problem often asked in coding interviews.

    Q2: What’s the fastest approach?

    The XOR + count set bits method is the fastest and most memory-efficient.

    Q3: Can I solve this in one line in C++?

    Yes, using __builtin_popcount(start ^ goal) in GCC/Clang.
  • Master DHT11 to Firebase ESP8266 and ESP32 | Beginner’s Guide to Send Data & Display on Website (2026)

    Learn how to connect Wi-Fi, read Master DHT11 to Firebase ESP8266 and ESP32 Beginner’s Guide to Send Data & Display on Website (2025), and display temperature & humidity data live on your custom HTML/CSS/JS website. Learn how to read temperature & humidity from a DHT11 using ESP8266/ESP32, send it to Firebase Realtime Database over Wi-Fi, and display live readings on a custom HTML/CSS/JS website. Full code, wiring diagram, and SEO tips included.

    Master DHT11 to Firebase ESP8266 and ESP32

    Quick overview (What you’ll build for DHT11 to Firebase ESP8266 and ESP32 )

    1. ESP8266/ESP32 reads temperature & humidity from a DHT11 sensor.
    2. Device connects to your Wi-Fi and posts JSON data to Firebase Realtime Database.
    3. A simple web app (HTML/CSS/JS) reads the Firebase data and displays it live.
      This is a common workflow for hobby IoT dashboards. (Random Nerd Tutorials)

    Prerequisites of DHT11 to Firebase ESP8266 and ESP32

    • Hardware: ESP8266 NodeMCU (or ESP32), DHT11 sensor, jumper wires, breadboard, micro USB cable.
    • Software: Arduino IDE (or PlatformIO), DHT library (by Adafruit or other), WiFi and HTTP client libraries (built into ESP cores), Firebase Realtime Database (a Firebase project).
    • Basic familiarity with Arduino IDE and creating a Firebase project in the Firebase console. Helpful tutorials use these exact stacks. (Random Nerd Tutorials, Instructables)

    Hardware wiring (simple)

    • DHT11 VCC → 3.3V (or 5V depending on module; NodeMCU uses 3.3V recommended)
    • DHT11 GND → GND
    • DHT11 DATA → D2 (GPIO4) on NodeMCU (or any digital pin on ESP32)
    • If module has a pull-up resistor, fine; if not, add a 4.7k–10k pull-up between DATA and VCC.
      This wiring pattern is standard for NodeMCU+DHT setups. (Instructables, iotbyhvm.ooo)

    Step 1 : Create Firebase project & Realtime Database

    1. Go to [Firebase console] and create a new project.
    2. In “Build → Realtime Database” create a database and start in test mode for development (this allows reads/writes from the device). Important: test mode is insecure — switch to proper rules and auth before production.
    3. Note your database URL, it looks like https://your-project-id-default-rtdb.firebaseio.com/. You’ll use this as the base URL to POST JSON.
      (Using Realtime Database + direct REST writes or Firebase libraries is the common approach for IoT devices). (Random Nerd Tutorials)

    Security note: For production, secure your database with rules or use authenticated tokens. Tutorials often use test mode for beginners to simplify setup. (Random Nerd Tutorials)

    Step 2 : ESP code (NodeMCU / ESP8266 example using Arduino IDE)

    This example uses the DHT library + ESP8266HTTPClient to POST via Firebase REST API. Replace placeholders (SSID, PASSWORD, FIREBASE_URL) with your info.

    /* DHT11 -> Firebase (ESP8266) example
       Requires libraries:
       - DHT sensor library (by Adafruit) or similar
       - ESP8266WiFi (built-in)
       - ESP8266HTTPClient (built-in)
    */
    
    #include <ESP8266WiFi.h>
    #include <ESP8266HTTPClient.h>
    #include <ArduinoJson.h>    // optional but convenient
    #include <DHT.h>
    
    #define DHTPIN D2           // data pin (change if needed)
    #define DHTTYPE DHT11       // DHT 11
    DHT dht(DHTPIN, DHTTYPE);
    
    const char* ssid = "YOUR_WIFI_SSID";
    const char* password = "YOUR_WIFI_PASS";
    const char* firebaseUrl = "https://your-project-id-default-rtdb.firebaseio.com/"; // trailing slash
    
    unsigned long lastSend = 0;
    const unsigned long sendInterval = 15000; // 15s
    
    void setup() {
      Serial.begin(115200);
      delay(100);
      dht.begin();
      WiFi.begin(ssid, password);
      Serial.print("Connecting WiFi");
      while (WiFi.status() != WL_CONNECTED) {
        delay(500);
        Serial.print(".");
      }
      Serial.println("\nWiFi connected, IP: ");
      Serial.println(WiFi.localIP());
    }
    
    void loop() {
      if (millis() - lastSend < sendInterval) return;
      lastSend = millis();
    
      float h = dht.readHumidity();
      float t = dht.readTemperature();
    
      if (isnan(h) || isnan(t)) {
        Serial.println("Failed reading DHT sensor!");
        return;
      }
    
      // Build JSON
      String payload = "{";
      payload += "\"temperature\":" + String(t, 2) + ",";
      payload += "\"humidity\":" + String(h, 2) + ",";
      payload += "\"ts\":" + String(millis());
      payload += "}";
    
      // Firebase REST: POST to /readings.json to push a new node
      String url = String(firebaseUrl) + "readings.json"; // test mode (no auth)
      Serial.println("POST to: " + url);
      Serial.println(payload);
    
      if (WiFi.status() == WL_CONNECTED) {
        HTTPClient http;
        http.begin(url);
        http.addHeader("Content-Type", "application/json");
        int httpCode = http.POST(payload);
        if (httpCode > 0) {
          String resp = http.getString();
          Serial.printf("HTTP %d: %s\n", httpCode, resp.c_str());
        } else {
          Serial.printf("Failed, error: %s\n", http.errorToString(httpCode).c_str());
        }
        http.end();
      } else {
        Serial.println("WiFi not connected");
      }
    }
    

    Notes:

    • This uses the Realtime Database REST API (push to readings.json) — many community tutorials use the same method for simplicity. (How2Electronics, Instructables)
    • For ESP32, replace include/wifi classes accordingly and D2 pin selection may differ. See RandomNerdTutorials for ESP32 variants. (Random Nerd Tutorials)

    Step 3 : Verify data in Firebase console

    Open your Firebase Realtime Database in the console; you should see a /readings node with auto-generated keys and JSON objects containing temperature, humidity, and ts. This confirms successful writes. Many tutorials use this verify step. (Random Nerd Tutorials)

    Step 4 : Simple web app to display readings (HTML/CSS/JS)

    You can either:

    • Use Firebase Web SDK (recommended) to read Realtime Database easily and show live updates; or
    • Use REST calls from JS to pull latest data periodically.

    Below is a minimal Firebase Web SDK example (place in index.html). Replace the firebaseConfig object with your project config (found in Firebase console → Project settings → SDK setup):

    <!doctype html>
    <html>
    <head>
      <meta charset="utf-8">
      <meta name="description" content="Live DHT11 dashboard using Firebase Realtime Database">
      <meta name="viewport" content="width=device-width,initial-scale=1">
      <title>DHT11 Firebase Dashboard</title>
      <style>
        body{font-family:Arial,Helvetica,sans-serif;display:flex;flex-direction:column;align-items:center;padding:2rem;}
        .card{border-radius:8px;padding:1rem;box-shadow:0 6px 18px rgba(0,0,0,0.08);width:320px;text-align:center;}
        .big{font-size:2.4rem;font-weight:600;}
        .small{color:#666}
      </style>
    </head>
    <body>
      <div class="card">
        <div class="big" id="temp">-- °C</div>
        <div class="small">Temperature</div>
      </div>
      <div style="height:12px"></div>
      <div class="card">
        <div class="big" id="hum">-- %</div>
        <div class="small">Humidity</div>
      </div>
    
      <!-- Firebase SDK -->
      <script src="https://www.gstatic.com/firebasejs/9.22.0/firebase-app-compat.js"></script>
      <script src="https://www.gstatic.com/firebasejs/9.22.0/firebase-database-compat.js"></script>
      <script>
        // Replace with your Firebase config
        const firebaseConfig = {
          apiKey: "YOUR_API_KEY",
          authDomain: "YOUR_PROJECT.firebaseapp.com",
          databaseURL: "https://your-project-id-default-rtdb.firebaseio.com",
          projectId: "YOUR_PROJECT",
          storageBucket: "YOUR_PROJECT.appspot.com",
          messagingSenderId: "SENDER_ID",
          appId: "APP_ID"
        };
        firebase.initializeApp(firebaseConfig);
        const db = firebase.database();
    
        // Listen for last reading (assumes readings/child push used in the device)
        const readingsRef = db.ref('readings'); 
        // We'll query the last item:
        readingsRef.limitToLast(1).on('child_added', snapshot => {
          const data = snapshot.val();
          if (data) {
            document.getElementById('temp').textContent = (data.temperature || '--') + " °C";
            document.getElementById('hum').textContent = (data.humidity || '--') + " %";
          }
        });
      </script>
    </body>
    </html>
    

    Why this works: The Firebase Web SDK keeps a realtime socket to the DB and updates the DOM when new readings arrive. This is the same approach used in many Firebase IoT dashboards. (Random Nerd Tutorials)

    Common errors & troubleshooting ESP8266 and ESP32

    • Wi-Fi won’t connect: check SSID/password, check 3.3V vs 5V for modules.
    • DHT readings nan: ensure correct wiring and a short delay after dht.begin(). DHT11 is slow (max ~1Hz).
    • Firebase write errors (403): database rules might block unauthenticated writes — either open test mode (dev only) or implement auth. Tutorials warn about test mode. (Instructables, Arduino Forum)

    FAQ of DHT11 to Firebase

    Q: Do I need a Firebase paid plan?

    A: No — Firebase Realtime Database has a free tier sufficient for small hobby projects. For production and heavy write/read operations, consider billing & quotas. (Random Nerd Tutorials)


    Q: Can I use DHT22 instead of DHT11?

    A: Yes — DHT22 gives better accuracy and range; switch DHTTYPE and wiring as needed. Many guides use either sensor. (Random Nerd Tutorials)

    Q: Is it safe to keep DB in test mode?

    A: No — test mode is insecure. Use Firebase rules and authentication for production. (Random Nerd Tutorials)

    Sources & references (most useful tutorials / examples I consulted)

  • Master CAN Bus Interview Questions 2026

    CAN Bus Interview Questions : If you are preparing for an embedded systems or automotive interview, chances are you’ll face questions on CAN bus, a widely-used communication protocol in vehicles. This article simplifies CAN bus interview questions for beginners and helps you understand the key concepts, architecture, message handling, and real-world applications in a friendly tone.

    Whether you’re a student, fresher, or experienced developer brushing up for an interview, this guide is a great place to start.

    CAN Bus Interview Questions

    CAN Bus Interview Questions
    CAN Bus Interview Questions

    Basic Concepts

    1. What does CAN stand for in CAN bus?
    2. What is CAN bus and why is it used in automotive systems?
    3. Describe the basic architecture of a CAN bus system.
    4. What are the primary components of a CAN bus network?
    5. Explain the difference between a CAN node and a CAN message.

    Message Format and Communication

    1. Can you explain the message format used in CAN bus?
    2. What is the purpose of the CAN identifier field in a CAN message?
    3. Describe the difference between standard and extended CAN identifiers.
    4. How does CAN bus support prioritization of messages?
    5. Describe the process of arbitration in CAN bus communication.

    Data Transmission & Reliability

    1. How does CAN bus ensure message integrity and reliability?
    2. How does CAN bus handle message collisions?
    3. How does CAN bus handle error detection and error handling?
    4. What is bit stuffing, and why is it used in CAN bus communication?
    5. What is the maximum data transfer rate supported by CAN bus?

    Filtering, Speed, and Configuration

    1. Can you explain the concept of message filtering in CAN bus?
    2. How does CAN bus handle communication between nodes with different bit rates?
    3. How does CAN bus support both high-speed and low-speed communication within a vehicle?
    4. What factors should be considered when designing a CAN bus network?

    Hardware & Physical Layer

    1. Explain the significance of termination resistors in a CAN bus network.

    Applications & Real-World Use Cases

    1. What are the advantages of using CAN bus over other communication protocols in automotive applications?
    2. What are the advantages of using CAN bus in automotive applications?
    3. Describe a scenario where you would choose CAN bus over other communication protocols for a specific application.
    4. How does CAN bus contribute to the overall reliability and safety of automotive systems?
    5. Describe a scenario where you encountered a communication issue on a CAN bus and how you resolved it.

    Suggested Additional Questions (Optional for Advanced Interviews)

    1. What is the function of ACK slot in CAN message frame?
    2. What happens if both nodes on a CAN bus transmit messages simultaneously with the same priority?
    3. What tools can be used to debug or monitor CAN bus activity?
    4. Can you explain the role of CAN transceivers?
    5. What’s the difference between CAN, LIN, and FlexRay protocols?

    Frequently Asked Questions | CAN Bus Interview Questions

    1.What is the CAN bus used for?

    Answer: CAN (Controller Area Network) is used for communication between multiple electronic control units (ECUs) in vehicles and other embedded systems without needing a central host. It ensures fast, reliable, and real-time data exchange.

    2.Is knowledge of CAN protocol important for embedded system engineers?

    Answer: Yes. CAN is widely used in automotive and industrial systems, so understanding it is essential for embedded developers working with microcontrollers, ECUs, or automation.

    3.What are the most common topics asked in CAN bus interviews?

    Answer: Key topics include:

    • CAN architecture
    • Message format and identifiers
    • Arbitration and prioritization
    • Bit timing and error handling
    • Termination resistors and filtering

    4.What’s the difference between standard and extended CAN identifiers?

    Answer: Standard identifiers are 11-bit long, while extended identifiers are 29-bit long, offering more unique message IDs and supporting complex systems.

    5.How can I prepare for CAN bus interviews?

    Answer:

    • Understand how CAN works at both physical and protocol layers
    • Study message structure, arbitration, and filtering
    • Practice interpreting CAN frames using tools like CANalyzer, PCAN View, or BusMaster
    • Review real-world issues and troubleshooting scenarios

    6.Is CAN bus only used in automotive systems?

    Answer: No. While it started in automotive, it’s also used in industrial automation, robotics, aerospace, and medical devices due to its robustness and fault tolerance.

    7.What tools are used for working with CAN bus?

    Answer: Common tools include:

    • CANalyzer
    • CANoe
    • PCAN View
    • BusMaster (open-source)
    • Logic analyzers with CAN decoders

    8.How can I explain a real-world CAN issue in an interview?

    Answer: Be honest. For example, explain a scenario where a node failed due to missing termination or noise interference, how you diagnosed it using a CAN tool, and how you fixed it.

  • Abstract Class and Interface in Cpp | Master Beginner-Friendly Guide 2026

    When you’re learning object-oriented programming in C++, two important concepts you’ll come across are Abstract Class and Interface in Cpp. These might sound a bit technical at first, but don’t worry — we’ll break everything down in a simple way.

    Are you new to object-oriented programming and trying to understand the difference between an Abstract Class and Interface in Cpp? This beginner-friendly guide on Abstract Class and Interface in C++ is exactly what you need! In this detailed article, we explain what abstract classes are, how pure virtual functions work, and how C++ uses abstract classes to simulate interface behavior.

    You’ll learn:

    • The definition and purpose of abstract classes in C++
    • How to declare and use pure virtual functions
    • The concept of interfaces in C++ and how to implement them
    • Key differences between abstract classes and interfaces
    • Real-world examples and code snippets for hands-on learning

    Whether you’re a student, a programming beginner, or someone preparing for C++ interviews, this comprehensive explanation of Abstract Class and Interface in C++ will strengthen your understanding and help you write clean, modular, and reusable code.

    Abstract Class and Interface in Cpp

    What is an Abstract Class?

    An abstract class is a class that cannot be directly used to create objects. It’s like a blueprint that other classes must follow.

    It is mainly used when:

    • You want to define a common structure or behavior for all derived classes.
    • You want to force derived classes to implement some specific functions.

    How to define an abstract class?

    In C++, a class becomes abstract if it has at least one pure virtual function.

    class Animal {
    public:
        virtual void makeSound() = 0; // Pure virtual function
    };
    

    What is a Pure Virtual Function?

    A pure virtual function is a function that has no body in the base class and must be overridden in derived classes.

    Syntax:

    virtual returnType functionName() = 0;
    

    Example of Abstract Class:

    #include <iostream>
    using namespace std;
    
    class Animal {
    public:
        virtual void makeSound() = 0;  // pure virtual function
    };
    
    class Dog : public Animal {
    public:
        void makeSound() {
            cout << "Woof!" << endl;
        }
    };
    
    int main() {
        Dog d;
        d.makeSound();  // Output: Woof!
    }
    

    🔸 You can’t create an object of Animal because it’s an abstract class.
    🔸 You must override makeSound() in the derived class.

    What is an Interface?

    In C++, interface is not a keyword like in Java or C#. But we can achieve interface-like behavior using abstract classes.

    An interface:

    • Only contains pure virtual functions.
    • Doesn’t have any data members or function definitions.

    Example of Interface in C++:

    class Printable {
    public:
        virtual void print() = 0;  // pure virtual function
    };
    

    Any class that implements Printable must define the print() function.

    Full Example of Interface:

    #include <iostream>
    using namespace std;
    
    class Printable {
    public:
        virtual void print() = 0;
    };
    
    class Document : public Printable {
    public:
        void print() {
            cout << "Printing Document..." << endl;
        }
    };
    
    int main() {
        Document doc;
        doc.print();  // Output: Printing Document...
    }
    

    Key Differences: Abstract Class and Interface in cpp

    FeatureAbstract ClassInterface-like (in C++)
    Can have data members?YesNo
    Can have function body?Yes (non-pure virtual functions)No (only pure virtual functions)
    Can have constructors?YesNo (interfaces don’t need them)
    Used forShared code + enforcing rulesOnly enforcing rules (contract)

    When to Use What?

    • Use abstract class when you want to share code and behavior among related classes.
    • Use an interface-style class when you want to define a contract (a set of rules that must be followed) without any implementation.

    Summary of Abstract Class and Interface in cpp

    • Abstract class = class with at least one pure virtual function.
    • You can’t create objects of abstract classes.
    • Interfaces in C++ are implemented using abstract classes with only pure virtual functions.
    • Abstract classes can have both complete and incomplete functions; interfaces only have incomplete ones.

    Frequently Asked Questions (FAQ) – Abstract Class and Interface in cpp

    Q1: What is an abstract class in C++?
    A: An abstract class in C++ is a class that contains at least one pure virtual function. It cannot be used to create objects directly and is meant to be inherited by other classes that implement its pure virtual functions.

    Q2: What is a pure virtual function?
    A: A pure virtual function is a function declared in a base class with no definition. It uses the = 0 syntax and must be overridden by derived classes. Example:

    virtual void speak() = 0;
    

    Q3: Can we create an object of an abstract class in C++?
    A: No, you cannot create an object of an abstract class. You must inherit it in a derived class and implement all pure virtual functions before creating an object.

    Q4: What is an interface in C++?
    A: C++ does not have a built-in interface keyword like Java, but you can create interface-like behavior using an abstract class that contains only pure virtual functions and no data members.

    Q5: What is the difference between an abstract class and an interface in C++?
    A:

    • An abstract class can have both pure and non-pure (regular) member functions and can include data members.
    • An interface (in C++ terms) contains only pure virtual functions and no data or implementation.

    Q6: Can an abstract class have constructors in C++?
    A: Yes, abstract classes can have constructors. However, since you can’t create an object of an abstract class, the constructor is only called when a derived class is instantiated.

    Q7: Can a class implement multiple interfaces in C++?
    A: Yes, C++ supports multiple inheritance, so a class can inherit from multiple abstract classes (interfaces), allowing it to implement multiple sets of behaviors.

    Q8: When should I use an abstract class vs. an interface in C++?
    A:

    • Use an abstract class when you want to provide default/shared implementation along with rules.
    • Use an interface-style abstract class when you only want to enforce certain function definitions (pure contract).

    Q9: Can an abstract class have a destructor in C++?
    A: Yes, and it’s good practice to declare the destructor as virtual in an abstract class to ensure proper cleanup when deleting derived objects.

    Q10: Is it possible to inherit an abstract class without implementing all pure virtual functions?
    A: Yes, but then the derived class also becomes abstract. To make it concrete (instantiable), all pure virtual functions must be implemented.

  • Socket Programming Multithreading in 2026 : Master Real-Time Networking

    Socket Programming Multithreading : socket programming and multithreading in C++, Python, and Java. Learn how to build real-time apps using socket.io, TCP/UDP, and multithreaded client-server models with examples.

    Explore the power of real-time communication with this complete guide to Socket Programming and Multithreading in 2025. Whether you’re a beginner developer or an advanced programmer, mastering sockets is essential for building high-performance, networked applications.

    Socket programming allows systems to communicate with each other over a network using IP addresses and ports. It’s the foundation of real-time communication and is widely used in building chat applications, gaming platforms, IoT solutions, and enterprise-level software. In today’s digital world, the demand for efficient, low-latency systems makes socket programming more relevant than ever.

    What You’ll Learn in Socket Programming Multithreading Guide

    • How socket programming works in C++, Java, and Python
    • Real-world use cases of TCP and UDP sockets
    • Writing a multithreaded server to handle multiple clients simultaneously
    • Building real-time web apps using socket.io
    • Understanding the difference between socket, socket.io, and WebSocket
    • Writing scalable, thread-safe socket code for production
    • Performance tips for multi threading in socket applications

    Why Learn Socket Programming in 2025?

    With more applications depending on real-time communication—like video conferencing, online collaboration tools, and IoT devices—learning how to build systems with multithreaded sockets gives you a serious edge. Whether you’re working with socket Python, socket Java, or C++, this skill unlocks the potential to build lightning-fast and responsive applications.

    In addition to programming languages, this guide dives into socket.io, a high-level JavaScript library used for real-time web applications. You’ll understand the role of socket-io in powering chat apps, notifications, multiplayer games, and collaborative dashboards.

    Who Is This Guide For?

    • 🔰 Beginners looking for a clear path into networking concepts
    • 👩‍💻 Developers aiming to scale apps using multi-threaded socket handling
    • 🧠 Students and Engineers preparing for system-level interviews
    • 📡 IoT and Embedded Developers needing efficient data transmission
    • 🌍 Web Developers implementing socket.io for real-time communication

    What is Socket Programming?

    Socket programming is a method used to enable communication between computers across a network using IP and port numbers. It allows real-time data exchange, which is critical in today’s interconnected world.

    Whether you’re building:

    • A chat app 🗨️
    • A multiplayer game 🎮
    • An IoT platform 🌐
    • A web-based dashboard 🖥️

    You need to understand sockets and how they send and receive data.

    Components of Socket Programming

    1. What is a Socket?

    A socket is like a virtual plug that helps your computer connect to another device over the internet or local network. Think of it as the combination of an IP address (like your device’s address) and a port number (like a specific room inside your house). Together, they form a complete communication endpoint.

    Example:
    192.168.1.1:8080
    Here:

    • 192.168.1.1 is the IP address
    • 8080 is the port number

    This combination is used to identify where data should go and where it comes from during communication.

    2. Client-Server Model in Socket Programming

    In socket programming, communication usually follows a structure called the client-server model.

    How It Works:

    • Client: Starts the conversation. It sends a request.
    • Server: Waits for incoming connections. It receives the request and sends a response back.

    This model is used everywhere—from your browser connecting to websites, to chat apps like WhatsApp connecting users.

    Example Use Cases:

    • Sending a message from one device to another
    • Uploading/downloading a file
    • Streaming audio/video content

    Client-Server Communication Flow

    Although the full state diagram can get technical, here’s a simple version of how it typically works:

    Server Flow:

    1. Create a socket
    2. Bind it to an IP address and port
    3. Listen for incoming connections
    4. Accept connection and communicate
    5. Close the socket when done

    Client Flow:

    1. Create a socket
    2. Connect to the server’s IP and port
    3. Send or receive data
    4. Close the connection

    These steps are mostly the same in languages like C, Python, Java, and C++.

    Types of Sockets You Should Know

    1.TCP (Transmission Control Protocol)

    • Reliable, connection-based
    • Used for applications where data accuracy is crucial
    • E.g., file transfer, login authentication

    2.UDP (User Datagram Protocol)

    • Fast, connectionless
    • Ideal for real-time apps (e.g., gaming, VoIP)
    • No error-checking overhead

    What is Multithreading in Networking?

    Multithreading enables multiple threads to run concurrently, making socket programs more efficient.

    Example use cases:

    • Handling multiple clients on a server
    • Non-blocking real-time processing
    • Load balancing tasks across threads

    Socket Programming Examples

    Python Socket Example (Client-Server)

    Server (Python)

    import socket
    
    server_socket = socket.socket()
    server_socket.bind(('localhost', 8080))
    server_socket.listen(1)
    conn, addr = server_socket.accept()
    print(f"Connected with {addr}")
    data = conn.recv(1024).decode()
    print("Received:", data)
    conn.close()
    

    Client (Python)

    import socket
    
    client_socket = socket.socket()
    client_socket.connect(('localhost', 8080))
    client_socket.send(b"Hello Server")
    client_socket.close()
    

    Java Multithreaded Server (TCP)

    Server.java

    import java.io.*;
    import java.net.*;
    
    public class Server {
        public static void main(String[] args) throws IOException {
            ServerSocket server = new ServerSocket(5000);
            while (true) {
                Socket client = server.accept();
                new ClientHandler(client).start();
            }
        }
    }
    
    class ClientHandler extends Thread {
        private Socket socket;
        public ClientHandler(Socket socket) {
            this.socket = socket;
        }
        public void run() {
            try {
                BufferedReader in = new BufferedReader(new InputStreamReader(socket.getInputStream()));
                String msg = in.readLine();
                System.out.println("Received: " + msg);
                socket.close();
            } catch (IOException e) {
                e.printStackTrace();
            }
        }
    }
    

    How to Create a Server Using Socket Programming

    If you’re learning socket programming, understanding how to build the server-side process is a critical step. This process helps your server wait for and respond to client requests, whether you’re using TCP socket, UDP socket, or working with socket in Python or Java.

    Let’s break down the steps involved in creating a server-side socket in an easy way.

    Step 1: Create the Socket

    The first step in setting up a socket server is to create a socket.

    Think of a socket as a doorway that your server opens to listen for incoming connections. In code, we use a function to create this socket.

    💡 You’ll choose:

    • Type of communication:
      • SOCK_STREAM for TCP (reliable)
      • SOCK_DGRAM for UDP (faster, less reliable)
    • Domain: Usually AF_INET (for IPv4) or AF_INET6 (for IPv6)

    Step 2: Set Socket Options (Optional but Useful)

    Before the socket starts listening, you can use a helper function to adjust settings—like reusing the same port quickly after restarting the server.

    This helps avoid the common error:
    ❗ "Address already in use"

    This step is optional but improves performance and flexibility.

    Step 3: Bind the Socket to an IP and Port

    The next step is to tell the socket where to listen for connections.

    You bind it to:

    • A specific IP address (e.g., localhost or 0.0.0.0)
    • A port number (like 8080 or 5000)

    This is how the operating system knows which app is waiting for incoming messages on that address.

    Step 4: Start Listening for Connections

    Now the server is ready to accept clients—but it needs to listen.

    This step:

    • Puts the server into passive mode
    • Prepares a queue to handle multiple connection requests

    You can set a “backlog” value, which defines how many pending clients can wait in line while the server handles requests.

    Step 5: Accept a Client Connection

    When a client tries to connect, the server uses the accept function.

    This:

    • Pulls the first client from the queue
    • Creates a new socket dedicated to this client
    • Returns a new file descriptor to continue communication

    At this point, the server and client are connected and can exchange data.

    Step 6: Send and Receive Data

    Once connected, the server can:

    • Use send() to send data to the client
    • Use recv() to receive data from the client

    This is where real-time communication happens. You can exchange messages, files, or any kind of data.

    For example:

    send(new_socket, message, strlen(message), 0);
    recv(new_socket, buffer, sizeof(buffer), 0);
    

    Step 7: Close the Socket

    When you’re done communicating, always close the socket.

    This:

    • Frees up system resources
    • Ends the session with the client

    It’s good practice to close both the client and server sockets after the communication ends.

    Creating a Client-Side Process Socket Programming

    If you’re getting started with client-side socket programming in C, this guide will walk you through the key steps. A socket allows your program to communicate with other systems over a network — just like how a browser connects to a website.

    Let’s break down the essential steps for building a TCP client in C:

    1. Create a Socket

    The first step in socket programming is to create a socket on the client side. This socket acts as a communication endpoint.

    int sockfd = socket(AF_INET, SOCK_STREAM, 0);
    
    • AF_INET: Specifies IPv4.
    • SOCK_STREAM: Specifies TCP (connection-based).
    • 0: Use default protocol (TCP in this case).

    This is similar to how a server socket is created — the only difference is the client will initiate the connection.

    2. Connect to the Server

    Use the connect() function to establish a connection to the server.

    connect(sockfd, (struct sockaddr *)&server_addr, sizeof(server_addr));
    
    • sockfd: The socket created using socket().
    • server_addr: Contains the server’s IP address and port.
    • sizeof(server_addr): Size of the address structure.

    This is where your client socket in C attempts to connect to the server’s IP address and port number.

    3.Send and Receive Data

    After the connection is established, the client can now send messages and receive responses from the server.

    send(sockfd, message, strlen(message), 0);
    recv(sockfd, buffer, sizeof(buffer), 0);
    
    • send(): Used to send data to the server.
    • recv(): Used to receive data from the server.

    This exchange happens using TCP/IP communication, making it reliable.

    4.Close the Socket

    Once the data exchange is complete, it’s important to close the socket and release system resources:

    close(sockfd);

    This ends the session gracefully, just like the server side would.

    Chat Application Using Socket Programming in C++ (TCP Based)

    Socket programming in C++ allows you to build real-time communication between devices. In this tutorial, you’ll create a basic terminal-based chat app using TCP socket programming in C++, where one system will act as the server and the other as the client.

    • chat application using socket programming in C++
    • TCP socket in C++
    • client server communication in C++
    • real-time chat app using C++ sockets

    Requirements for Chat Application Using Socket Programming

    • A Linux system or terminal (tested with GCC)
    • Basic knowledge of C++ and networking

    Overview of Client-Server Model in Chatting App

    • The server waits for connections and handles messages.
    • The client connects to the server and exchanges messages.
    • Both use TCP sockets for reliable delivery.

    Server Code: chat_server.cpp

    // chat_server.cpp
    #include <iostream>
    #include <string>
    #include <unistd.h>
    #include <sys/socket.h>
    #include <netinet/in.h>
    #include <cstring>
    
    #define PORT 8080
    #define BUFFER_SIZE 1024
    
    int main() {
        int server_fd, new_socket;
        struct sockaddr_in address;
        int addrlen = sizeof(address);
        char buffer[BUFFER_SIZE] = {0};
        std::string message;
    
        // Create TCP socket
        server_fd = socket(AF_INET, SOCK_STREAM, 0);
        if (server_fd == 0) {
            std::cerr << "Socket creation failed\n";
            return -1;
        }
    
        address.sin_family = AF_INET;
        address.sin_addr.s_addr = INADDR_ANY; // Accept connections from any IP
        address.sin_port = htons(PORT);
    
        // Bind socket to IP/Port
        if (bind(server_fd, (struct sockaddr *)&address, sizeof(address)) < 0) {
            std::cerr << "Bind failed\n";
            return -1;
        }
    
        // Listen for connections
        listen(server_fd, 3);
        std::cout << "Server listening on port " << PORT << "\n";
    
        // Accept a connection
        new_socket = accept(server_fd, (struct sockaddr *)&address, (socklen_t*)&addrlen);
        if (new_socket < 0) {
            std::cerr << "Accept failed\n";
            return -1;
        }
    
        while (true) {
            memset(buffer, 0, BUFFER_SIZE);
            read(new_socket, buffer, BUFFER_SIZE);
            std::cout << "Client: " << buffer << "\n";
    
            std::cout << "Server: ";
            std::getline(std::cin, message);
            send(new_socket, message.c_str(), message.length(), 0);
    
            if (message == "exit") {
                break;
            }
        }
    
        close(new_socket);
        close(server_fd);
        return 0;
    }
    

    Client Code: chat_client.cpp

    // chat_client.cpp
    #include <iostream>
    #include <string>
    #include <unistd.h>
    #include <sys/socket.h>
    #include <arpa/inet.h>
    #include <cstring>
    
    #define PORT 8080
    #define BUFFER_SIZE 1024
    
    int main() {
        int sock = 0;
        struct sockaddr_in serv_addr;
        char buffer[BUFFER_SIZE] = {0};
        std::string message;
    
        // Create TCP socket
        sock = socket(AF_INET, SOCK_STREAM, 0);
        if (sock < 0) {
            std::cerr << "Socket creation error\n";
            return -1;
        }
    
        serv_addr.sin_family = AF_INET;
        serv_addr.sin_port = htons(PORT);
    
        // Convert IPv4 address from text to binary
        if (inet_pton(AF_INET, "127.0.0.1", &serv_addr.sin_addr) <= 0) {
            std::cerr << "Invalid address/ Address not supported\n";
            return -1;
        }
    
        // Connect to server
        if (connect(sock, (struct sockaddr *)&serv_addr, sizeof(serv_addr)) < 0) {
            std::cerr << "Connection Failed\n";
            return -1;
        }
    
        while (true) {
            std::cout << "Client: ";
            std::getline(std::cin, message);
            send(sock, message.c_str(), message.length(), 0);
    
            if (message == "exit") {
                break;
            }
    
            memset(buffer, 0, BUFFER_SIZE);
            read(sock, buffer, BUFFER_SIZE);
            std::cout << "Server: " << buffer << "\n";
        }
    
        close(sock);
        return 0;
    }
    

    How to Compile and Run

    g++ chat_server.cpp -o server
    g++ chat_client.cpp -o client
    

    Run in two terminals:

    # Terminal 1
    ./server
    
    # Terminal 2
    ./client
    

    Using socket.io for Real-Time Web Apps

    socket.io is a JavaScript library used for building real-time web apps over WebSockets or fallbacks like polling.

    Key Features:

    • Real-time bidirectional communication
    • Works with Node.js backend
    • Great for chats, notifications, dashboards

    Benefits of Socket Programming with Multithreading

    FeatureDescription
    Real-Time CommunicationInstant data transfer
    MultithreadingHandles thousands of users
    TCP/UDP SupportBased on use-case needs
    Cross-PlatformWorks on Linux, Windows, Mac
    VersatileUsed in mobile, embedded, and web

    Advantages of Socket Programming

    Socket programming is the foundation of real-time communication in today’s connected world. Here are some of the key benefits:

    1. Fast Real-Time Communication

    • Sockets enable instant data exchange between systems.
    • Useful in real-time apps like messaging, video calls, and multiplayer games.

    2. Low-Level Network Control

    • With TCP sockets and UDP sockets, developers have fine-grained control over how data is sent and received.
    • You can manage timeouts, packet size, error handling, etc.

    3. Cross-Platform Compatibility

    • Works across Windows, Linux, and macOS using languages like C, C++, Java, and Python socket libraries.

    4. Multithreaded Server Support

    • Socket programming allows building scalable multithreaded socket servers that handle multiple clients at once.

    5. Versatility Across Protocols

    • Supports both TCP (reliable) and UDP (fast) protocols.
    • Great for apps where speed or reliability is crucial.

    Disadvantages of Socket Programming

    Despite its power, socket programming does have some limitations, especially for beginners.

    1. Complex Implementation

    • Requires understanding of IP addresses, ports, and protocols.
    • Setting up proper communication using socket in C or C++ can be challenging.

    2. Error Handling Overhead

    • Developers must manually handle dropped connections, failed transmissions, and buffer overflows.

    3. Security Risks

    • Without encryption (like SSL/TLS), TCP and UDP sockets are vulnerable to attacks such as packet sniffing or spoofing.

    4. Resource Management

    • Poor handling of socket connections can lead to memory leaks or exhausted ports, especially in a multithreaded server.

    5. Limited Abstraction

    • Unlike REST APIs or HTTP libraries, socket programming is lower-level and lacks built-in features for session handling or authentication.

    Applications of Socket Programming

    Socket programming powers many of the technologies we use every day. Here are some real-world examples:

    1. Chat and Messaging Apps

    • Apps like WhatsApp, Slack, and Discord use real-time socket communication to send and receive messages instantly.

    2. Online Multiplayer Games

    • Games use UDP sockets for fast transmission of player movements, scores, and game state updates.

    3. Web Servers and HTTP Clients

    • Socket in C++ or Java is often used to build low-level web servers and custom HTTP clients.

    4. Remote Login Tools

    • Protocols like SSH and Telnet rely on socket connections to allow secure access to remote systems.

    5. IoT and Embedded Systems

    • Devices communicate via TCP/UDP socket programming to send sensor data, control signals, and receive commands.

    6. File Sharing and FTP

    • Applications like FileZilla or custom-built FTP clients use socket programming for transferring files over a network.

    7. Custom APIs and Services

    • Developers build custom APIs, client-server apps, and multithreaded services using socket programming in Python, Java, and C++.

    Best Practices for Socket Development

    1. Always close sockets after use.
    2. Use multi threading or asynchronous I/O for scalability.
    3. Handle timeouts and retries in unreliable networks.
    4. For real-time apps, use WebSockets or socket.io.
    5. Monitor connections with tools like Wireshark or netstat.

    Frequently Asked Questions (FAQs)

    Q1. Is socket programming still relevant in 2025?

    Yes! With the rise of IoT, microservices, and real-time web, socket programming is more important than ever.

    Q2. What languages are best for socket programming?

    C++, Python, Java, and JavaScript (with socket.io) are most commonly used.

    Q3. Can I use multithreading with sockets?

    Absolutely. Multithreaded servers handle multiple clients concurrently, improving performance.

    Q4. What’s the difference between TCP and UDP sockets?

    TCP is connection-based and reliable, while UDP is connectionless and faster, ideal for time-sensitive data.

    Q5. Is socket.io the same as traditional socket programming?

    No. socket.io is a higher-level abstraction for real-time web apps, often built over traditional sockets.

    Conclusion

    Socket programming is the backbone of real-time communication in modern apps. Combined with multithreading, it enables scalable, responsive, and robust systems across platforms. Whether you’re developing in Python, Java, or C++, mastering sockets is essential in 2025.

    Socket Programming Multithreading
    Socket Programming Multithreading in 2025: Master Real-Time Networking
  • Master namespace in C++ | A Complete Beginner’s Guide (2026)

    Mastering Namespace in C++: A Complete Beginner’s Guide (2025)” is a comprehensive, beginner-friendly tutorial designed to help you understand the concept of namespaces in C++. This guide covers everything from the basics of the global namespace to user-defined namespaces, nested namespaces, using directives, and best practices to avoid naming conflicts in large-scale projects. Whether you’re just starting with C++ or looking to strengthen your foundation, this updated 2025 guide will simplify complex concepts with clear examples, practical tips, and real-world use cases.

    Introduction to Namespace in C++

    As C++ projects grow in size, the chances of naming conflicts between functions, variables, and classes increase. This is where namespace in C++ comes to the rescue.

    A namespace is a container that allows you to group identifiers (like variables, functions, classes) under a unique name, thus avoiding name clashes.

    Why Use a Namespace in C++?

    Without namespaces, your global identifiers could conflict with others — especially in large codebases or when integrating third-party libraries.

    Key Benefits:

    • Avoids naming collisions
    • Organizes code logically
    • Makes code readable and maintainable

    Syntax of Namespace in C++

    namespace namespace_name {
        // declarations
        int value = 42;
    
        void display() {
            std::cout << "Inside custom namespace!" << std::endl;
        }
    }
    

    You can access the members of the namespace using the scope resolution operator :::

    namespace_name::display();  // Output: Inside custom namespace!
    

    Namespace Definition in C++

    When working with larger C++ projects, organizing code and avoiding name conflicts becomes crucial. This is where the concept of a namespace in C++ comes in.

    How to Define a Namespace in C++

    The basic syntax to define a namespace in C++ is:

    namespace namespace_name {
    // type1 member1;
    // type2 member2;
    // ...
    }

    🔎 Note: Unlike class or struct definitions, a namespace does not require a semicolon (;) after its closing brace.

    Example: Defining a Simple Namespace

    Let’s create a namespace called first_space that contains a simple function:

    #include <iostream>

    // Define a namespace named 'first_space'
    namespace first_space {
    void func() {
    std::cout << "Inside first_space" << std::endl;
    }
    }

    In the above code:

    • A namespace first_space is declared.
    • Inside it, a function func() is defined.

    Accessing Namespace Members in C++

    To access any function, variable, or class defined inside a namespace, you use the scope resolution operator (::).

    Syntax:

    namespace_name::member_name;

    Example: Accessing a Function Inside a Namespace

    #include <iostream>

    // Define a namespace named 'first_space'
    namespace first_space {
    void func() {
    std::cout << "Inside first_space" << std::endl;
    }
    }

    int main() {
    // Access the function using scope resolution operator
    first_space::func();
    return 0;
    }

    Output:

    Inside first_space

    Using the namespace Directive in C++

    In C++, instead of constantly prefixing your functions or variables with the namespace name, you can simplify your code using the using directive. This tells the compiler that the names used afterward refer to a specific namespace — reducing redundancy.

    Example: Using the using namespace Directive

    #include <iostream>

    // Define a namespace called 'first_space'
    namespace first_space {
    void func() {
    std::cout << "Inside first_space" << std::endl;
    }
    }

    // Use the namespace
    using namespace first_space;

    int main() {
    func(); // No need for first_space::func()
    return 0;
    }

    Output:

    scssCopyEditInside first_space
    

    Scope Rule for using Directive

    Names introduced by a using directive follow normal scope rules. They remain accessible from the point of the directive until the end of the scope where it’s declared. If a name from an outer scope conflicts, the inner declaration takes precedence.

    Using a Specific Member from a Namespace (Using Declaration)

    If you want to access only one specific function or variable from a namespace instead of everything, you can use the using declaration.

    Syntax of using Declaration

    using namespace_name::member_name;

    Example: Accessing a Specific Function

    #include <iostream>

    namespace first_space {
    void func() {
    std::cout << "Inside first_space" << std::endl;
    }
    }

    // Use only 'func' from first_space
    using first_space::func;

    int main() {
    func(); // Direct access without prefix
    return 0;
    }

    Output:

    Inside first_space

    This approach is safer in large projects where importing an entire namespace might lead to naming conflicts.

    Nested Namespaces in C++

    Namespaces can also be defined inside other namespaces. These are called nested namespaces, and they help organize code into logical modules or hierarchies.

    Example: Defining and Accessing Nested Namespaces

    #include <iostream>
    using namespace std;

    // Outer namespace
    namespace outer {
    void fun() {
    cout << "Inside outer namespace" << endl;
    }

    // Inner namespace
    namespace inner {
    void func() {
    cout << "Inside inner namespace";
    }
    }
    }

    int main() {
    // Accessing function from nested namespace
    outer::inner::func();
    return 0;
    }

    Output:

    Inside inner namespace

    In C++17 and above, you can simplify nested namespace declaration as:

    cnamespace outer::inner {
    void func() { /*...*/ }
    }

    Built-in Namespaces in C++: Understanding std

    The std namespace (short for standard) is the most commonly used built-in namespace in C++. It contains standard library functions, classes, and objects like cout, cin, endl, vector, and more.

    Example: Using the std Namespace

    #include <iostream>
    using namespace std;

    int main() {
    int a = 3, b = 7;

    // 'cout' and 'endl' are part of std
    cout << "Sum: " << a + b << endl;
    return 0;
    }

    Output:

    Sum: 10

    ⚠️ Best Practice: Avoid using using namespace std; in headers or large files. Instead, prefer std::cout and std::endl to maintain clarity and avoid clashes.

    Advanced Tip: Argument-Dependent Lookup (ADL)

    Argument-Dependent Lookup, or ADL, is a C++ feature where the compiler automatically searches the appropriate namespace for a function or operator based on the argument types passed to it.

    This means that if a function is defined in a namespace, and you’re calling it using an object from that namespace, the compiler may implicitly find and call the right function — even without a using directive.

    Example: Basic Usage of Namespace in C++

    #include <iostream>
    
    namespace MathUtils {
        int add(int a, int b) {
            return a + b;
        }
    
        int subtract(int a, int b) {
            return a - b;
        }
    }
    
    int main() {
        std::cout << "Addition: " << MathUtils::add(5, 3) << std::endl;
        std::cout << "Subtraction: " << MathUtils::subtract(5, 3) << std::endl;
        return 0;
    }
    

    Output:

    Addition: 8
    Subtraction: 2
    

    Types of Namespace in C++

    1. Named Namespace

    A user-defined named namespace (as shown above).

    2. Unnamed (Anonymous) Namespace

    Used when you want to restrict access to identifiers within a single file.

    namespace {
        int internalValue = 100;
    
        void show() {
            std::cout << "Anonymous Namespace" << std::endl;
        }
    }
    

    3. Nested Namespace

    Namespaces inside other namespaces:

    namespace Company {
        namespace Product {
            void version() {
                std::cout << "Version 1.0" << std::endl;
            }
        }
    }
    Company::Product::version();
    

    4. Inline Namespace (C++11)

    Used to allow versioning of APIs while maintaining backward compatibility.

    namespace API {
        inline namespace v1 {
            void greet() {
                std::cout << "Hello from v1!" << std::endl;
            }
        }
    
        namespace v2 {
            void greet() {
                std::cout << "Hello from v2!" << std::endl;
            }
        }
    }
    API::greet();     // Calls v1 by default
    API::v2::greet(); // Calls v2 explicitly
    

    using Keyword with Namespace

    1. Using Entire Namespace

    using namespace MathUtils;
    
    int main() {
        std::cout << add(3, 2); // No need to prefix with MathUtils::
        return 0;
    }
    

    ⚠️ Use with caution in large projects, as it can cause name conflicts.

    2. Using Specific Member

    using MathUtils::add;
    
    int main() {
        std::cout << add(4, 5);  // Only `add` is imported
    }
    

    Global, Extended, Alias, Inline & Anonymous Namespaces in C++


    Learn everything about namespace in C++, including global namespace, namespace extension, namespace aliasing, inline namespace, and anonymous namespace with examples and outputs. Write cleaner and conflict-free C++ code using these powerful namespace features

    What is the Global Namespace in C++?

    In C++, the global namespace refers to the default namespace where all identifiers (functions, variables, and classes) are placed when they are not explicitly wrapped in any custom namespace.

    Every entity you define outside of any named namespace belongs to the global scope automatically.

    Accessing Global Namespace

    To access variables or functions from the global namespace when there’s a naming conflict, use the scope resolution operator (::).

    Example: Access Global Variable

    #include <bits/stdc++.h>
    using namespace std;
    
    int n = 3;  // Global variable
    
    int main() {
        int n = 7;  // Local variable
    
        cout << ::n << endl;  // Access global 'n'
        cout << n;            // Access local 'n'
        return 0;
    }
    

    Output:

    3
    7
    

    Extending an Existing Namespace in C++

    One of the advantages of namespace in C++ is that you can extend it — even if it was defined in a different file or library. This is known as namespace extension.

    This feature allows you to add more members (functions, variables, or classes) to a previously defined namespace.

    Example: Extend a Namespace

    #include <bits/stdc++.h>
    using namespace std;
    
    namespace nmsp {
        void func() {
            cout << "You can extend me" << endl;
        }
    }
    
    // Add more functionality
    namespace nmsp {
        void func2() {
            cout << "Adding new feature";
        }
    }
    
    int main() {
        nmsp::func();
        nmsp::func2();
        return 0;
    }
    

    Output:

    You can extend me
    Adding new feature
    

    Creating an Alias for a Namespace in C++

    To make long or complex namespace names easier to work with, C++ allows namespace aliasing. It helps simplify code readability and usability.

    Syntax for Namespace Alias

    namespace original_namespace {
        // members
    }
    
    // Create alias
    namespace alias_name = original_namespace;
    

    Now you can use alias_name::member instead of original_namespace::member.

    Inline Namespace in C++ (C++11 and Later)

    Introduced in C++11, an inline namespace allows its members to be accessed as if they were part of the outer namespace, providing backward compatibility in API versioning.

    Example: Using Inline Namespace

    #include <iostream>
    using namespace std;
    
    // Define inline namespace
    inline namespace inline_space {
        void display() {
            cout << "Inside inline namespace";
        }
    }
    
    int main() {
        display();  // No need for inline_space::display()
        return 0;
    }
    

    Output:

    Inside inline namespace
    

    Why Use Inline Namespace?
    They allow older code to work with new versions without changing function calls.

    Anonymous Namespace in C++

    An anonymous namespace is a namespace with no name. It restricts the visibility of its members to the file in which it’s declared — making them internal to that translation unit.

    This is useful when you want to limit the scope of a function or variable only to the current file.

    Example: Anonymous Namespace in Action

    #include <iostream>
    using namespace std;
    
    // Anonymous namespace
    namespace {
        int value = 10;
    }
    
    int main() {
        cout << value;  // Direct access
        return 0;
    }
    

    Output:

    10
    

    Tip: Use anonymous namespaces instead of static keyword for internal linkage in modern C++.

    Key Takeaways About Namespace in C++

    • The namespace keyword is used to define a named scope.
    • Scope resolution operator :: is used to access members inside a namespace.
    • No semicolon is required after the closing brace of a namespace.
    • Namespaces help avoid name clashes in larger programs or when using multiple libraries.

    Best Practices for Using Namespace in C++

    • ✅ Prefer named namespaces over global scope.
    • ✅ Use using directive only inside functions, not in headers.
    • ✅ Use inline namespaces for API versioning.
    • ✅ Avoid polluting global namespace in libraries.

    Difference Between Namespace and Class in C++

    AspectNamespaceClass
    DefinitionA logical container to group identifiers like functions, variables, classesA blueprint to define objects with data members and functions
    Primary UseAvoiding name conflicts and organizing codeModeling real-world entities and implementing object-oriented design
    Instantiation❌ Cannot be instantiated✅ Can be instantiated to create objects
    ContainsFunctions, variables, classes, other namespacesData members (variables) and member functions
    Access SyntaxNamespaceName::identifierobject.memberFunction() or ClassName::staticMember
    Memory AllocationNo memory is allocated for namespace itselfMemory is allocated when an object is created
    Access SpecifiersNo public, private, or protected — all are accessibleSupports public, private, and protected
    Inheritance❌ Not possible✅ Fully supports inheritance and polymorphism
    Scope ControlControls naming scope but not encapsulationProvides encapsulation, abstraction, and access control
    Supports Constructors❌ Constructors/Destructors not allowed✅ Can have constructors and destructors
    Common Use CaseAvoiding conflicts between libraries or modulesCreating reusable, modular, and organized object-oriented components
    Master namespace in C++
    Master namespace in C++ | A Complete Beginner’s Guide (2025)

    Frequently Asked Questions (FAQs)

    Q1. What is a namespace in C++?
    A namespace in C++ is a container that lets you group identifiers like classes, functions, and variables under a unique name to avoid naming conflicts.

    Q2. Why should I use a namespace?
    To avoid collisions between identifiers from different libraries or modules and improve code organization.

    Q3. Can I define multiple namespaces in a file?
    Yes, C++ allows multiple named or unnamed namespaces in the same file.

    Q4. What happens if two namespaces have a function with the same name?
    They won’t conflict as long as you access them using the namespace prefix (e.g., A::func() vs B::func()).

    Q5. Is using namespace std; a good practice?
    It’s okay in small examples but not recommended in production code as it can lead to conflicts, especially in large projects.

    Q6. What is an inline namespace?
    An inline namespace allows you to define a default version of a namespace, making it easier to maintain backward compatibility.

    Q7. Can I nest namespaces?
    Yes, C++ allows nested namespaces. From C++17 onwards, you can use compact syntax like:
    namespace A::B::C { }

    Q8. Are namespaces only for functions?
    No. You can group variables, classes, structs, enums, and even other namespaces.

    Q9. How to restrict access to a namespace within a single file?
    Use an anonymous namespace, which makes members internal to that translation unit.

    Q10. Can I alias a namespace?
    Yes, using a namespace alias like:

    namespace utils = MathUtils;
    utils::add(3, 4);
    

    Q11. What is the global namespace in C++?
    It’s the default namespace where all global declarations live if they are not enclosed in any user-defined namespace.

    Q12. How do you access the global namespace in C++?
    By using the scope resolution operator ::, like ::variable_name.

    Q13. Can I add new members to an existing namespace?
    Yes, C++ allows extending a namespace across multiple files or blocks.

    Q14. What is the purpose of an inline namespace?
    It enables backward compatibility by making the members accessible as part of the enclosing namespace.

    Q15. What is a namespace alias in C++?
    A shortcut name for an existing namespace to reduce code verbosity.

    Q16. Are anonymous namespaces better than static variables?
    Yes, they provide the same internal linkage and are preferred in modern C++.

    Q17. What is the purpose of using namespace in C++?
    It allows you to access all the members of a namespace without prefixing them with the namespace name every time.

    Q18. Should I always use using namespace std;?
    No, avoid using it in header files or large codebases. It can lead to naming conflicts.

    Q19. What is the difference between using namespace and using declaration?

    • using namespace: imports everything from the namespace.
    • using declaration: imports only a specific member.

    Q20. How do nested namespaces help in C++?
    They help organize complex systems by grouping related code hierarchically.

    Q21. What are built-in namespaces in C++?
    The most common is std, which includes standard input/output, containers, algorithms, and other utilities.