Git Basics : In this blog post, we will dive deep into the core concepts of Git, one of the most widely used version control systems in modern software development. Whether you’re a beginner or looking to brush up on Git, this guide will help you understand how to efficiently manage and track your codebase.
We’ll start by covering the Git Basics such as cloning repositories, committing changes, pushing and pulling updates, and how these foundational commands are used in everyday development. After that, we’ll explore the power of Branching and Merging, which enables parallel development on separate features or fixes without disrupting the main codebase.
Next, we will dive into Git Workflow and examine popular strategies like Feature Branch Workflow and Git Flow, and explore the commands necessary to follow these workflows effectively. We’ll also tackle Conflict Resolution — a common challenge when collaborating with others — and provide best practices for resolving merge conflicts.
Furthermore, we will compare Git Rebase vs Merge, and understand their differences, use cases, and impact on project history. Finally, we will wrap up with Git Tags and Releases, showing how to mark specific points in your project’s history, such as version releases, and how to manage them with tags.
By the end of this post, you’ll have a solid understanding of Git’s key features and commands, enabling you to collaborate smoothly in any software development project.
1. Git Basics Overview:
Git is a distributed version control system that helps developers manage and track changes to their codebase over time. It allows multiple users to collaborate on the same project without overwriting each other’s changes. Below are the basic Git commands that are commonly used in any development project.
- Clone:
git cloneis used to create a local copy of a remote repository. This command pulls down all the files, commit history, and branches from the remote repository to your local machine.git clone <repository_url>Example:git clone https://github.com/user/project.git - Commit:
A commit represents a snapshot of your changes. After modifying files in your working directory, you need to add them to staging and commit them to the local repository.- Stage files:
git add <file>adds specific files to the staging area. To add all changed files, usegit add ..git add . - Commit changes: Once your files are staged, you use the
git commitcommand to save your changes to the local repository.git commit -m "Commit message describing changes"
- Stage files:
- Push:
Thegit pushcommand is used to upload local repository content to a remote repository. It is typically used after committing changes locally to push them to a shared remote repository.git push origin <branch_name>Example:git push origin main - Pull:
git pullis used to fetch and integrate changes from the remote repository into your local branch. This command combinesgit fetchandgit merge, ensuring you have the latest changes from the remote branch.git pull origin <branch_name>Example:git pull origin main
Branching & Merging
2. Branching:
Branching allows you to create separate environments to work on different features or fixes without affecting the main codebase. Each branch can be developed independently and then merged back into the main branch.
- Create a branch:
You can create a new branch with thegit branchcommand.git branch <branch_name>Example:git branch feature/new-feature - Switch to a branch:
To start working on a branch, usegit checkoutto switch to it.git checkout <branch_name>Example:git checkout feature/new-featureAlternatively, you can combine both creating and switching with:git checkout -b <branch_name>Example:git checkout -b feature/new-feature
3. Merging:
Merging is the process of bringing together changes from different branches. Typically, changes from a feature branch are merged back into the main branch.
- Merge a branch:
First, ensure you’re on the branch that you want to merge into (typicallymainormaster), then use thegit mergecommand.git merge <branch_name>Example:git merge feature/new-feature
Git Workflow (Feature Branch, Git Flow) and All Commands
4. Git Workflow:
Git workflow refers to how developers manage their branches and commits within a repository. Two popular workflows are the Feature Branch workflow and Git Flow workflow.
- Feature Branch Workflow:
In this workflow, each new feature or bug fix is developed in a separate branch. When the feature is complete, it’s merged into the main branch. Steps:- Create a feature branch:
git checkout -b feature/awesome-feature - Commit changes:
git add . git commit -m "Add awesome feature" - Push feature branch:
git push origin feature/awesome-feature - Open a pull request (PR) and merge into the main branch.
- Create a feature branch:
- Git Flow:
Git Flow is a more structured branching model, often used in larger projects. It divides work into different branches for features, releases, and hotfixes.- Main branches:
main(ormaster): Production-ready code.develop: Ongoing development code, where new features are integrated.
- Supporting branches:
- Feature branches: Used for new features.
- Release branches: Prepare for production releases.
- Hotfix branches: Used to fix urgent issues in production.
Installgit-flow:brew install git-flowInitialize git flow in a repository:git flow initStart a feature:git flow feature start <feature_name>Finish a feature:git flow feature finish <feature_name>Start a release:git flow release start <release_version>Finish a release:git flow release finish <release_version>Start a hotfix:git flow hotfix start <hotfix_version>Finish a hotfix:git flow hotfix finish <hotfix_version> - Main branches:
💛 Support Embedded Prep
If you find our tutorials helpful and want to support our mission of sharing high-quality embedded system knowledge, you can contribute by buying us a coffee. Every small contribution helps us keep creating valuable content for learners like you. ☕
Thank you for your support — it truly keeps Embedded Prep growing. 💻✨
Conflict Resolution
5. Conflict Resolution:
When merging branches, you might encounter conflicts if two branches modify the same part of a file. Git cannot automatically decide which change should be kept, so it marks the conflict in the file.
- Resolve Conflicts:
When a conflict occurs, Git will mark the file with conflict markers. Open the conflicted file, look for the markers (e.g.,<<<<<<<,=======,>>>>>>>), and manually resolve the conflict by selecting or merging the appropriate changes. - After resolving conflicts:
Once you’ve resolved the conflict, stage the file and commit the merge.git add <conflicted_file> git commit
Git Rebase vs Merge
6. Git Rebase vs Merge:
- Merge:
When you usegit merge, you combine the histories of two branches into a single branch. A merge commit is created to maintain the history of both branches.- Pros: Maintains a full history of commits, which can be useful for tracking changes.
- Cons: The history can become messy with multiple merge commits.
git merge <branch_name> - Rebase:
git rebasemoves or “replays” your commits from one branch onto another. It results in a cleaner history without merge commits.- Pros: Creates a linear history.
- Cons: Can rewrite history, which might be problematic for shared branches.
git rebase <branch_name>
Git Tags and Releases
7. Git Tags and Releases:
Git tags are used to mark specific points in history, often used for releases. A tag points to a particular commit, allowing you to easily identify and reference a release.
- Create a tag:
Tags are typically created at significant points in a project’s development, like when releasing a version.git tag -a <tag_name> -m "Tag message"Example:git tag -a v1.0 -m "First official release" - Push tags:
By default, tags are not pushed to remote repositories. You need to explicitly push tags.git push origin <tag_name>Example:git push origin v1.0 - List tags:
To view all the tags in a repository:git tag - Checkout a tag:
To checkout a specific tag (e.g., a previous release):git checkout <tag_name>Example:git checkout v1.0
Releases:
Releases in GitHub or GitLab use tags to provide a versioned snapshot of the code. When creating a release, you can associate it with a tag to specify the version being released.
Step 1: Set up a Remote Repository
To start, we’ll assume there’s a Git repository already hosted on a platform like GitHub or GitLab (you can create one there if needed).
For this example, the URL for the remote repository is:
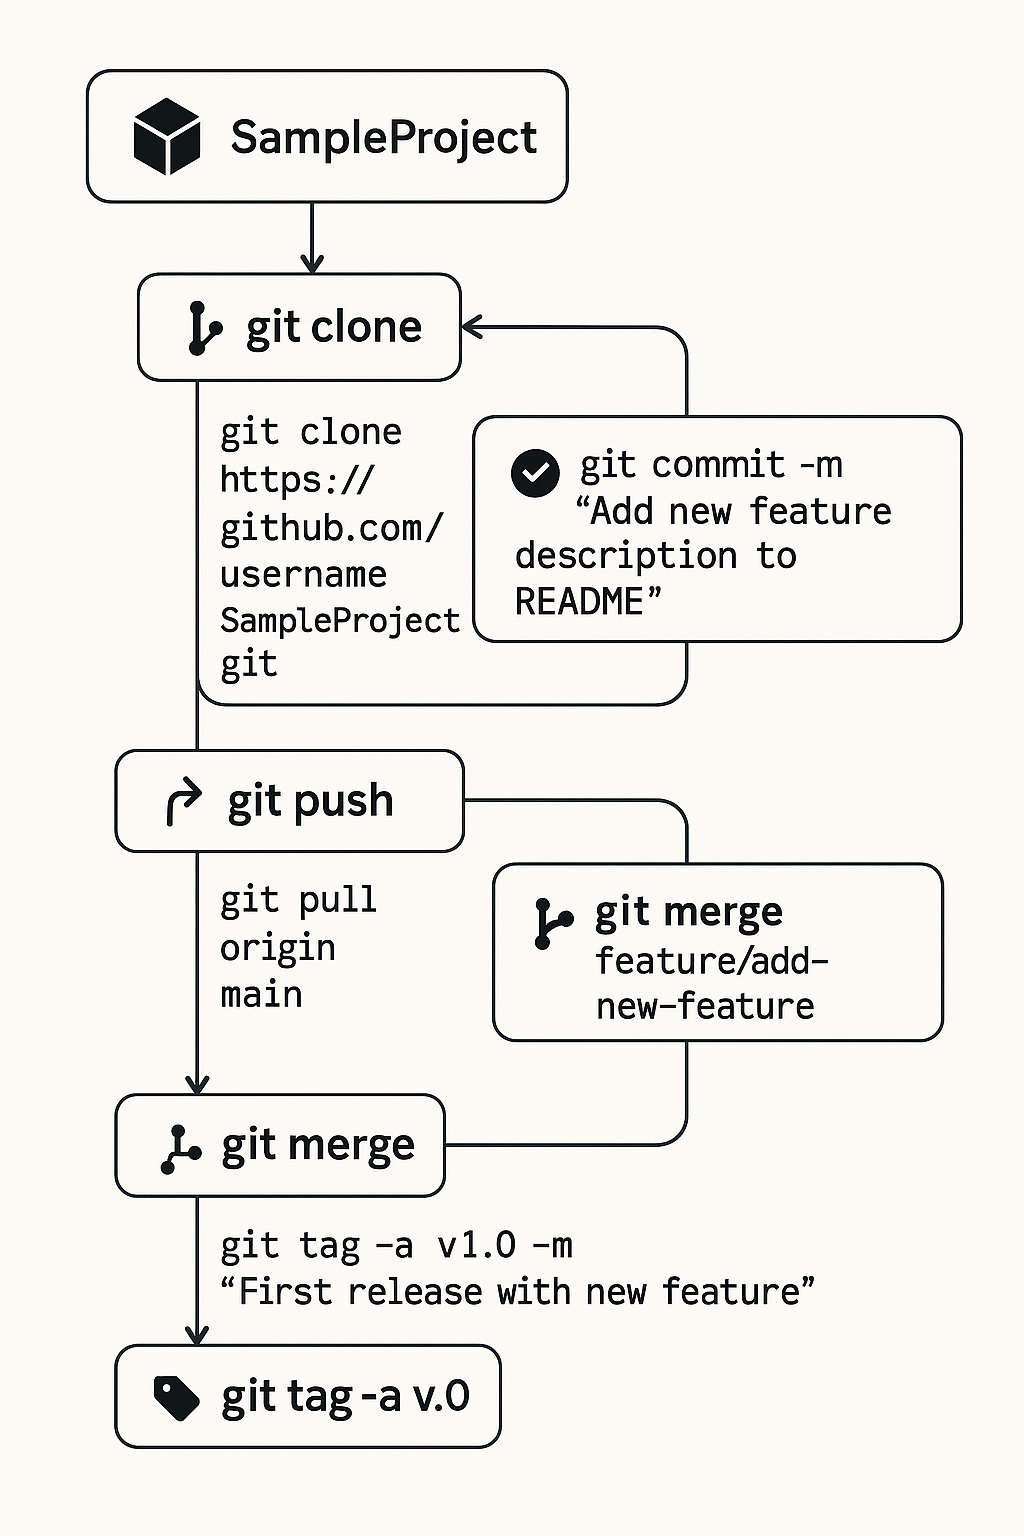
https://github.com/username/SampleProject.gitStep 2: Clone the Repository
First, we’ll clone the remote repository to create a local copy.
git clone https://github.com/username/SampleProject.git
After this, a new folder SampleProject will be created, and it will contain the files from the remote repository.
Step 3: Create a New Branch for Feature Development
Now that we have the repository, let’s create a new branch to work on a new feature. We’ll call this branch feature/add-new-feature.
cd SampleProject
git checkout -b feature/add-new-feature
The -b flag creates and checks out the new branch.
Step 4: Modify Files and Commit Changes
Let’s assume we add a new file or modify an existing one. For this example, we’ll modify a file called README.md.
- Open
README.mdand add a line like:This is a new feature added to the project. - After saving the file, we need to stage the changes and commit them.
git add README.md  # Stage the file
git commit -m "Add new feature description to README"
This command stages the changes and commits them with a descriptive message.
Step 5: Push the Branch to Remote Repository
Now that the feature is ready, let’s push the feature/add-new-feature branch to the remote repository.
git push origin feature/add-new-feature
This uploads your local branch to the remote repository, making it available for collaboration or review (such as in a pull request).
Step 6: Create a Pull Request (Optional)
If you’re working with a team, you would now go to the remote Git hosting platform (e.g., GitHub) and create a Pull Request (PR) to merge feature/add-new-feature into the main branch.
Step 7: Pull Latest Changes from the Remote Repository
While working on your feature, others may have pushed changes to the remote repository. To keep your local repository up to date, you can pull the latest changes from the main branch.
git checkout main        # Switch to the main branch
git pull origin main      # Pull latest changes from remote main branch
Step 8: Merge the Feature Branch into Main
Once the feature is approved (e.g., through a PR review), you can merge it back into the main branch. If you have already completed the PR, you’d merge the branches from the Git hosting platform interface. However, let’s do it manually on the command line:
git checkout main                  # Switch to the main branch
git merge feature/add-new-feature   # Merge feature branch into main
At this point, your main branch includes the changes from feature/add-new-feature.
Step 9: Resolve Merge Conflicts (If Any)
If changes in the main branch and feature/add-new-feature branch conflict (e.g., both modified the same line in README.md), Git will mark the file as conflicted, and you’ll need to resolve the conflict.
You’ll see conflict markers in the file, like:
<<<<<<< HEAD
This is the content from the main branch.
=======
This is the content from the feature branch.
>>>>>>> feature/add-new-feature
You manually edit the file to keep the desired changes and remove the markers.
After resolving conflicts, stage the changes:
git add README.md
git commit -m "Resolve merge conflict"
Step 10: Push the Merged Changes to the Remote Repository
After successfully merging the feature branch into the main branch and resolving any conflicts, push the changes back to the remote repository.
git push origin main
Step 11: Delete the Feature Branch (Optional)
Once the feature is successfully merged, you can delete the local and remote feature branch to keep the repository clean.
- Delete the local branch:
git branch -d feature/add-new-feature
- Delete the remote branch:
git push origin --delete feature/add-new-feature
Step 12: Create a Tag for the Release
Once your changes are merged into main and you’re ready to release a version, create a tag.
git tag -a v1.0 -m "First release with new feature"
git push origin v1.0
This command tags the current commit as v1.0 and pushes the tag to the remote repository.
Summary of Git Commands Used:
- Clone:
git clone <repo_url> - Create Branch:
git checkout -b <branch_name> - Commit Changes:
git commit -m "<message>" - Push Changes:
git push origin <branch_name> - Pull Changes:
git pull origin <branch_name> - Merge Branch:
git merge <branch_name> - Delete Branch:
git branch -d <branch_name>(local),git push origin --delete <branch_name>(remote) - Create Tag:
git tag -a <tag_name> -m "<message>"
Git interview questions
Basic Git Interview Questions
- What is Git and why is it used?
- What is the difference between Git and GitHub?
- What is a version control system?
- What are the advantages of using Git?
- How do you initialize a Git repository?
- What does
git clonedo? - What’s the difference between
git pullandgit fetch? - How do you check the status of your repository?
- How do you stage and commit changes?
- What does the
.gitignorefile do?
Intermediate Git Interview Questions
- What is the difference between
git mergeandgit rebase? - How do you resolve merge conflicts?
- What is a detached HEAD in Git?
- What are branches in Git and how do you create a new one?
- What is the purpose of
git stash? - What is
git cherry-pick? - How do you undo a commit?
- Explain
git revert,git reset, andgit checkoutwith use cases. - How do you delete a branch in Git (local and remote)?
- What is the use of
git tag?
Advanced Git Interview Questions
- What is the difference between
git reset --soft,--mixed, and--hard? - How do you handle rebase conflicts?
- What are Git hooks?
- What is the reflog in Git?
- How can you squash commits?
- How do you recover a deleted branch?
- Explain the Git workflow you use (e.g., Git Flow, GitHub Flow).
- What is a fast-forward merge?
- How do you compare branches?
- How can you see who changed a line of code (
git blame)?
Git in a Team/Real-World Use
- How do you handle code reviews using Git?
- How do you handle large binary files in Git?
- What strategies do you follow to avoid conflicts in team collaboration?
- How do you deploy code using Git?
- What are some best practices when using Git in a team environment?
You can also Visit other tutorials of Embedded Prep
- What is eMMC (Embedded MultiMediaCard) memory ?
- Top 30+ I2C Interview Questions
- Bit Manipulation Interview Questions
- Structure and Union in c
- Little Endian vs. Big Endian: A Complete Guide
- Merge sort algorithm
Special thanks to @mr-raj for contributing to this article on EmbeddedPr
Mr. Raj Kumar is a highly experienced Technical Content Engineer with 7 years of dedicated expertise in the intricate field of embedded systems. At Embedded Prep, Raj is at the forefront of creating and curating high-quality technical content designed to educate and empower aspiring and seasoned professionals in the embedded domain.
Throughout his career, Raj has honed a unique skill set that bridges the gap between deep technical understanding and effective communication. His work encompasses a wide range of educational materials, including in-depth tutorials, practical guides, course modules, and insightful articles focused on embedded hardware and software solutions. He possesses a strong grasp of embedded architectures, microcontrollers, real-time operating systems (RTOS), firmware development, and various communication protocols relevant to the embedded industry.
Raj is adept at collaborating closely with subject matter experts, engineers, and instructional designers to ensure the accuracy, completeness, and pedagogical effectiveness of the content. His meticulous attention to detail and commitment to clarity are instrumental in transforming complex embedded concepts into easily digestible and engaging learning experiences. At Embedded Prep, he plays a crucial role in building a robust knowledge base that helps learners master the complexities of embedded technologies.