Blog

  • Best RTOS for microcontrollers | Embedded Systems Interview Guide (2026)

    Best RTOS for microcontrollers : When working with embedded systems, choosing the right Real-Time Operating System (RTOS) is essential. An RTOS provides predictable task scheduling, resource management, and timing accuracy—critical for applications like automotive systems, IoT devices, robotics, and medical equipment.

    In this article, we’ll explore 6 popular RTOS software for embedded systems, highlighting their key features and use cases in a simple, beginner-friendly way.

    6 Best RTOS for microcontrollers

    1. FreeRTOS

    FreeRTOS is one of the most widely used open-source RTOS. It is lightweight, portable, and designed for microcontrollers and small embedded devices.

    Key Features:

    • Open-source and free to use
    • Supports over 40+ architectures
    • Small memory footprint
    • Large community support

    Best For: IoT devices, low-power microcontrollers, and academic projects.

    2. VxWorks

    VxWorks is a commercial RTOS developed by Wind River. It is known for high performance and reliability in mission-critical applications.

    Key Features:

    • Real-time scheduling and deterministic behavior
    • Strong security features
    • POSIX-compliant APIs
    • Extensive debugging and development tools

    Best For: Aerospace, defense, automotive, and industrial automation.

    3. QNX Neutrino RTOS

    QNX is a microkernel-based RTOS trusted for its stability and fault tolerance. It is commonly used in safety-critical applications.

    Key Features:

    • Microkernel architecture for high reliability
    • Scalability from small devices to large systems
    • Strong focus on safety standards (ISO 26262, IEC 61508)
    • Excellent inter-process communication

    Best For: Automotive infotainment, medical devices, and industrial systems.

    4. ThreadX (Azure RTOS)

    ThreadX, now part of Microsoft Azure RTOS, is optimized for simplicity and performance.

    Key Features:

    • Fast real-time performance with low latency
    • Integrated with Azure IoT services
    • Small footprint (as low as 2 KB RAM)
    • Pre-certified for safety standards

    Best For: IoT products, wearables, and consumer electronics.

    5. Micrium µC/OS-II & µC/OS-III

    Micrium’s RTOS family is well-documented and widely used in commercial and educational fields.

    Key Features:

    • Preemptive multitasking
    • Safety-certified kernels
    • Rich documentation and examples
    • Compatible with various microcontrollers

    Best For: Medical devices, industrial controls, and educational use.

    6. Zephyr RTOS

    Zephyr is an open-source RTOS backed by the Linux Foundation. It is gaining popularity due to its scalability and community support.

    Key Features:

    • Open-source and royalty-free
    • Supports multiple architectures (ARM, RISC-V, x86)
    • Strong IoT integration
    • Active developer community

    Best For: IoT, smart home devices, and wearable technology.

    Conclusion of Best RTOS for microcontrollers

    Choosing the right RTOS software for embedded systems depends on your project needs. For beginners, FreeRTOS and Zephyr are great starting points due to their open-source nature and community support. For advanced, safety-critical applications, VxWorks and QNX are widely trusted in industries.

    Frequently Asked Questions (FAQ) | Best RTOS for microcontrollers

    1. What is the best RTOS for microcontrollers in 2025?

    In 2025, the best RTOS for microcontrollers is still FreeRTOS due to its lightweight design, wide hardware support, and active community. However, Zephyr RTOS is quickly becoming a strong alternative for IoT-based microcontroller projects.

    2. Why should I use an RTOS instead of bare-metal programming?

    An RTOS provides task scheduling, multitasking, and resource management, making it easier to handle complex embedded applications. In bare-metal programming, the developer manages everything manually, which is harder to scale.

    3. Which RTOS is most used in the industry?

    • FreeRTOS is the most widely adopted in microcontrollers.
    • QNX and VxWorks dominate safety-critical industries like automotive, aerospace, and medical.
    • Zephyr is rapidly growing in IoT ecosystems.

    4. What is the lightest RTOS for microcontrollers?

    FreeRTOS and ThreadX (Azure RTOS) are considered the lightest RTOS options. They require very little RAM and ROM, making them ideal for small 8-bit and 32-bit microcontrollers.

    5. Can I run Linux instead of RTOS on microcontrollers?

    No. Linux requires more memory and processing power than most microcontrollers can provide. For resource-constrained devices, an RTOS is the best choice.

    6. Which RTOS is free to use?

    • FreeRTOS (MIT license)
    • Zephyr RTOS (Apache 2.0 license)
      Both are completely open-source and free to use in commercial or personal projects.

    7. What is the difference between an RTOS and a general OS?

    • RTOS: Provides deterministic timing and real-time scheduling for critical applications.
    • General OS (like Linux/Windows): Focuses on throughput, user interaction, and multitasking without strict timing guarantees.

    8. Is FreeRTOS the best RTOS for microcontrollers used in IoT?

    Yes. FreeRTOS is the most popular choice for IoT devices because it is lightweight, works with cloud platforms like AWS, and supports a huge range of microcontrollers

    Best RTOS for microcontrollers Embedded Systems
    Best RTOS for microcontrollers Embedded Systems Interview Guide (2025)
  • Embedded Firmware Software Engineer – Enfabrica | Hyderabad | Embedded Job 2026

    Company: Enfabrica
    Experience Required: 3 – 6 years
    Location: Hyderabad
    Employment Type: Full Time, Permanent
    Industry: FinTech / Payments
    Openings: 1
    Posted: 3+ weeks ago

    Job Overview Enfabrica | Embedded Job 2025

    Enfabrica is seeking a highly skilled Embedded Firmware Software Engineer with expertise in low-level firmware development, Linux systems, and board support packages (BSPs). This role is ideal for professionals who enjoy working at the intersection of hardware and software, ensuring seamless integration and performance of in-house developed PCBs.

    You will play a key role in developing and optimizing firmware using Rust, C, and C++, while collaborating closely with hardware engineers to deliver robust solutions for networking and high-performance computing applications.

    🛠 Key Responsibilities

    • Design, implement, and maintain low-level firmware for custom PCBs using Rust.
    • Develop and optimize drivers for CPLDs, Ethernet OSFPs, PCIe CEM via I2C and SPI interfaces.
    • Collaborate with hardware teams to understand board specifications and requirements.
    • Work with Linux systems and kernel drivers for firmware integration and board-level support.
    • Debug and troubleshoot hardware/software issues using industry-standard tools.
    • Write and maintain comprehensive technical documentation for firmware and BSPs.
    • Participate in code reviews and contribute to best practices in embedded development.

    🎓 Qualifications

    • Bachelor’s degree in Computer Science, Electrical Engineering, or related field (or equivalent experience).
    • Proven experience in low-level system programming or embedded development (C, C++, or Rust).
    • Strong knowledge of Linux internals and their interaction with firmware.
    • Hands-on experience developing drivers for CPLDs, PCIe, Ethernet OSFPs, and related hardware.
    • Proficiency in debugging techniques for both hardware and software issues.
    • Excellent problem-solving, documentation, and communication skills.

    🌟 Preferred Qualifications

    • Prior experience with the Rust programming language (desired but not mandatory).
    • Familiarity with embedded systems and microcontroller architectures.
    • Experience with embedded RTOS (Hubris knowledge is a plus).
    • Proficiency with version control systems (Git); familiarity with Bazel build tooling is a plus.

    📌 Role Details

    • Role Category: Software Development
    • Department: Engineering – Software & QA
    • Role: Embedded Firmware Software Engineer
    • Type: Full Time, Permanent

    🔑 Key Skills

    • Embedded Firmware
    • System Programming (C, C++, Rust)
    • Linux Kernel & Device Drivers
    • RTOS
    • Networking & Ethernet
    • PCIe / CPLD / I2C / SPI
    • Debugging & Troubleshooting
    • Automotive & Embedded Software

    📍 How to Apply

    Interested candidates can apply directly through the Enfabrica careers portal.

    Why Join Enfabrica?

    At Enfabrica, you’ll be working on cutting-edge embedded systems and networking solutions that power next-generation FinTech and payment platforms. This is an excellent opportunity for engineers who want to push the boundaries of low-level programming and firmware design while working in a collaborative, innovation-driven environment.

  • Compare firmware version strings in C | Master Embedded Coding (2026)

    Compare firmware version strings in C : In embedded systems development, firmware updates are crucial for fixing bugs, improving performance, or adding new features. A common challenge developers face is comparing two firmware version strings in C to decide whether an upgrade or downgrade is required.

    For example, you might want to check if version “1.2.10” is newer than “1.2.9”. At first glance, this looks like a simple string comparison—but in practice, you need to handle version numbers numerically, not lexicographically.

    Compare firmware version strings in C this article, we will:

    • Understand the basics of firmware version strings
    • Learn why direct string comparison fails
    • Write a C program to compare version strings properly
    • Explore practical use cases in embedded software development

    What is a Firmware Version String?

    A firmware version string is a sequence that represents the version of your software. Common formats include:

    • "1.0.0" → (major.minor.patch)
    • "2.5" → (major.minor)
    • "3.10.7-beta" → (with suffix)

    Each number (major, minor, patch) carries meaning:

    • Major version: Big changes, possibly breaking compatibility.
    • Minor version: New features, still backward compatible.
    • Patch version: Small fixes or improvements.

    Why Simple String Comparison Fails

    Let’s say we compare “1.10” and “1.2” as strings.

    strcmp("1.10", "1.2");  

    Here, "1.10" would be considered smaller than "1.2" because strcmp compares character by character ('1' == '1', then '0' < '2').

    But in reality:

    • 1.10 (ten) is greater than 1.2 (two).

    So, we need numeric comparison.

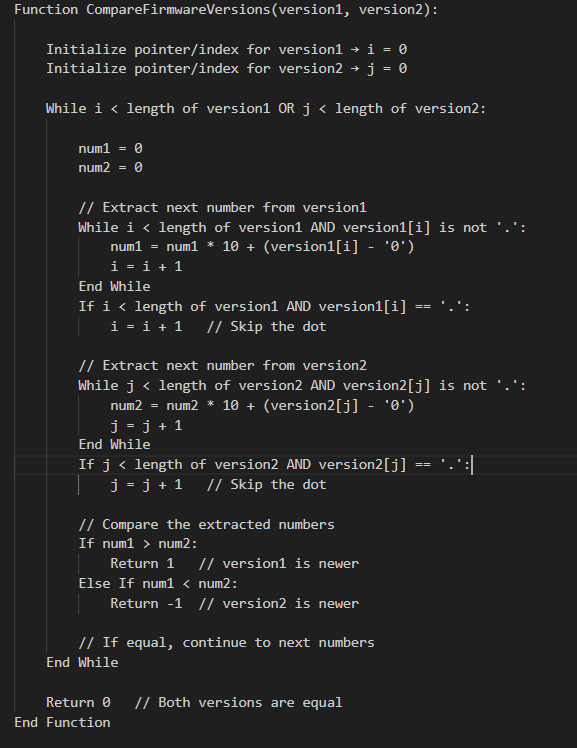
    Pseudocode: Compare Two Firmware Version Strings

    Pseudocode: Compare Two Firmware Version Strings

    How the Pseudocode Works

    1. Iterate through both version strings simultaneously.
    2. Extract numbers between dots (.) and convert them to integers.
    3. Compare numbers one by one:
      • If a number in version1 is greater → version1 is newer.
      • If a number in version2 is greater → version2 is newer.
      • If equal → continue.
    4. Handle versions of different lengths by treating missing numbers as 0.
    5. Return 0 if all numbers are equal.

    This pseudocode is optimized for embedded systems logic and avoids string splitting with extra memory allocation.

    C Program to Compare Firmware Version Strings

    Here’s a beginner-friendly C program that compares two version strings correctly:

    #include <stdio.h>
    #include <string.h>
    #include <stdlib.h>
    
    // Function to compare two firmware version strings
    int compareVersions(const char *v1, const char *v2) {
        // Create copies since strtok modifies strings
        char *ver1 = strdup(v1);
        char *ver2 = strdup(v2);
    
        char *token1 = strtok(ver1, ".");
        char *token2 = strtok(ver2, ".");
    
        while (token1 != NULL || token2 != NULL) {
            int num1 = (token1 != NULL) ? atoi(token1) : 0;
            int num2 = (token2 != NULL) ? atoi(token2) : 0;
    
            if (num1 > num2) {
                free(ver1); free(ver2);
                return 1;  // v1 is greater
            } else if (num1 < num2) {
                free(ver1); free(ver2);
                return -1; // v2 is greater
            }
    
            token1 = (token1 != NULL) ? strtok(NULL, ".") : NULL;
            token2 = (token2 != NULL) ? strtok(NULL, ".") : NULL;
        }
    
        free(ver1);
        free(ver2);
        return 0; // Both versions are equal
    }
    
    int main() {
        const char *v1 = "1.2.10";
        const char *v2 = "1.2.9";
    
        int result = compareVersions(v1, v2);
    
        if (result == 0) {
            printf("Both versions are equal.\n");
        } else if (result > 0) {
            printf("Version %s is newer than %s.\n", v1, v2);
        } else {
            printf("Version %s is newer than %s.\n", v2, v1);
        }
    
        return 0;
    }
    

    Explanation of the Code: Compare version numbers in embedded systems

    1. Splitting the version string:
      • We use strtok with "." as a delimiter to separate numbers like "1", "2", "10".
    2. Converting to integers:
      • Each token is converted using atoi().
      • "10" becomes 10 (so "1.10" > "1.2").
    3. Comparison logic:
      • If one number is greater, we immediately return the result.
      • If equal, we move to the next part.
      • If lengths differ (e.g., "1.2" vs "1.2.0.0"), missing parts are treated as 0.

    Example Output of C code for firmware version management

    For input:

    v1 = "1.2.10"
    v2 = "1.2.9"
    

    Output:

    Version 1.2.10 is newer than 1.2.9.
    

    Optimized Firmware Version Comparison in C (No strtok / No strdup)

    When writing firmware for resource-constrained embedded devices, we must minimize memory usage and avoid dynamic allocations like malloc, strdup, or even temporary token buffers.

    Instead of splitting the version string, we can parse it character by character, extracting numbers on the fly.

    Optimized C Code of Numeric comparison of version strings in C

    #include <stdio.h>
    #include <ctype.h>
    
    // Function to extract the next integer from version string
    int getNextNumber(const char **str) {
        int num = 0;
    
        // Parse until '.' or end of string
        while (**str && **str != '.') {
            if (isdigit(**str)) {
                num = num * 10 + (**str - '0');
            }
            (*str)++;
        }
    
        // Skip the '.' character
        if (**str == '.') {
            (*str)++;
        }
    
        return num;
    }
    
    // Compare two firmware version strings
    int compareVersions(const char *v1, const char *v2) {
        while (*v1 || *v2) {
            int num1 = getNextNumber(&v1);
            int num2 = getNextNumber(&v2);
    
            if (num1 > num2) return 1;   // v1 is greater
            if (num1 < num2) return -1;  // v2 is greater
        }
        return 0; // Versions are equal
    }
    
    int main() {
        const char *v1 = "2.10.3";
        const char *v2 = "2.9.15";
    
        int result = compareVersions(v1, v2);
    
        if (result == 0) {
            printf("Both versions are equal.\n");
        } else if (result > 0) {
            printf("Version %s is newer than %s.\n", v1, v2);
        } else {
            printf("Version %s is newer than %s.\n", v2, v1);
        }
    
        return 0;
    }
    

    How Compare software version strings in C Works

    1. getNextNumber function
      • Reads characters until a . or \0 (end of string).
      • Converts digits into an integer ("15"15).
      • Skips the dot (.) and prepares for the next segment.
    2. compareVersions function
      • Loops until both strings are fully read.
      • Extracts one integer from each version string.
      • Compares them immediately.
      • If equal, continues to the next part.
      • If different, returns the comparison result.
    3. No extra memory
      • Works directly on the input strings.
      • No heap allocation, no strdup, no strtok.

    C program to compare version numbers Example Run

    Input:

    v1 = "2.10.3"
    v2 = "2.9.15"

    Output:

    Version 2.10.3 is newer than 2.9.15.
    

    Advantages for Embedded Systems Compare version numbers in embedded systems

    • No dynamic memory allocation (safe for microcontrollers).
    • Faster execution since it parses directly.
    • Smaller memory footprint.
    • Works even if versions have different lengths ("1.2" vs "1.2.0.0").

    Real-World Use Cases of Compare version numbers in embedded systems

    • Over-the-Air (OTA) Updates: Check if the device needs a firmware upgrade.
    • Bootloaders: Ensure only newer firmware is flashed.
    • Diagnostics Tools: Display correct version hierarchy.
    • Version Management: Maintain compatibility in embedded systems.

    Final Thoughts of C code for firmware version management

    Comparing firmware version strings in C is more than a simple string check—it requires numeric comparison to handle multi-digit versions correctly. By splitting the string, converting to integers, and comparing each part step by step, you can build a robust firmware version checker for your embedded systems projects.

    Frequently Asked Questions (FAQ) | Firmware version comparison in C language

    1. Why can’t I compare firmware version strings using strcmp in C?

    Ans: strcmp performs a lexicographic (alphabetical) comparison, not numeric. For example, "1.10" would appear smaller than "1.2" because "1" and "10" are compared as text, not numbers. That’s why a numeric comparison is required.

    2. What is the correct way to compare firmware versions in C?

    Ans: The correct approach is to split the version string by dots (.), convert each part into an integer, and compare them one by one. This ensures "1.10" is correctly recognized as greater than "1.2".

    3. Which method is better: using strtok or parsing manually?

    Ans:
    strtok method
    : Easier for beginners, but uses extra memory and may not be ideal for embedded systems.
    Manual parsing: Reads characters directly, avoids dynamic memory, and is more efficient for resource-constrained devices.

    4. How do I handle firmware versions with different lengths, like "1.2" vs "1.2.0.0"?

    Ans: In proper version comparison, missing parts are treated as zero. So, "1.2" is considered equal to "1.2.0.0".

    5. Can this logic be used in embedded bootloaders?

    Ans: Yes. Bootloaders often need to check if the new firmware is newer than the current one before flashing. The optimized version comparison code (without malloc or strtok) is ideal for this purpose.

    6. How do I compare versions with suffixes like "1.2.3-beta"?

    Ans: The simple numeric comparison handles only numbers. If you need to compare suffixes like "alpha", "beta", or "rc", you’ll need to extend the logic with string handling rules for these labels.

    7. What are the real-world applications of firmware version comparison?

    Ans:
    Over-the-Air (OTA) updates
    Bootloader validation before flashing
    Diagnostics tools to report correct firmware version
    Embedded systems compatibility checks

    8. Does the optimized code work on all C compilers?

    Ans: Yes , The provided code uses standard C functions (isdigit, printf, basic loops), so it works across most C compilers and embedded toolchains.
    Compare firmware version strings in C
    Compare firmware version strings in C Master Embedded Coding (2025)
  • Firmware Test & Integration Engineer Latest Jobs in USA: Apply Now

    Are you looking to advance your career as a Firmware Test & Integration Engineer in the USA? Companies like EMO.energy are hiring talented engineers to test, validate, and integrate firmware for Battery Management Systems (BMS) and Electric Vehicle (EV) control units.

    About EMO.energy

    EMO.energy is a dynamic deep-tech startup revolutionizing electric mobility. From high-performance batteries to advanced EV control electronics, they are building next-generation electric vehicle systems. With rapid growth, EMO.energy is seeking passionate engineers to contribute to sustainable transportation solutions.

    Location: Bengaluru, Karnataka, India (On-site)
    Experience Required: 2–5 years
    Employment Type: Full-time

    Apply Here for Firmware Test & Integration Engineer at EMO.energy

    Job Role & Responsibilities

    As a Firmware Test & Integration Engineer, you will:

    • Design unit, integration, and system-level test cases for embedded firmware.
    • Conduct functional, regression, and stress testing on microcontroller-based systems.
    • Use lab tools like oscilloscopes, logic analyzers, and JTAG debuggers for debugging.
    • Develop automated test scripts using Python or C.
    • Validate CAN, I2C, SPI communication protocols for real-time performance.
    • Support hardware-firmware integration, board bring-up, and system-level validation.
    • Maintain detailed documentation for test execution and issues.

    Required Skills & Qualifications

    • Bachelor’s in Electronics, Electrical Engineering, Embedded Systems, or related fields.
    • 2–5 years of experience in embedded firmware testing and system integration.
    • Knowledge of ARM Cortex-M microcontrollers, RTOS, Autosar, or embedded Linux.
    • Hands-on experience with Python/C scripting, CI/CD for firmware testing.
    • Familiarity with communication protocols: CAN, I2C, SPI.
    • Experience with Battery Management Systems (BMS) or EV platforms is a plus.

    Why Apply?

    • Work with cutting-edge embedded systems and EV technology.
    • Gain hands-on experience in firmware testing, integration, and automated validation.
    • Opportunity for career growth in a high-demand sector.
    • Contribute to sustainable transportation solutions.

    How to Apply

    Click here to apply directly for the position:
    Firmware Test & Integration Engineer at EMO.energy – Apply Now

    Pro Tip: Update your resume with keywords like: “embedded firmware testing,” “microcontroller debugging,” “system integration,” “hardware-firmware validation,” and “CI/CD automation” to stand out to recruiters.

  • Reverse a Hex Number in C | Master Embedded Coding (2026)

    Reverse a Hex Number in C : If you are learning C programming, working with hexadecimal numbers is an important skill. One common task is to reverse a hex number – that means flipping its digits from last to first.Master the art of reversing a hexadecimal number with this beginner-friendly guide covering C++, Python, and Java. Learn what hex numbers are, how reversal works, and explore simple, step-by-step programs for each language. Perfect for students and programmers looking to practice string manipulation, number system basics, and improve problem-solving skills with real coding examples.
    In this tutorial, we will explain what a hex number is, how reversing works, and how to write C code to reverse a hexadecimal number step-by-step.

    What is a Hex Number?

    A hexadecimal number (or hex number) is a number system with base 16.
    It uses digits 0-9 and letters A-F:

    Hex: 0, 1, 2, ..., 9, A, B, C, D, E, F
    Decimal: 0, 1, 2, ..., 9, 10, 11, 12, 13, 14, 15
    

    Example:

    • Hex 1A3F in decimal is 6719.

    What Does “Reverse a Hex Number” Mean?

    Reversing a hex number means reading its hexadecimal digits from right to left.

    Example:

    Original: 1A3F  
    Reversed: F3A1
    

    Steps to Reverse a Hex Number in C

    We can reverse a hex number by:

    1. Reading the number as a string (so letters and numbers are preserved).
    2. Reversing the string by swapping characters.
    3. Printing the reversed hex number.

    1.C Program to Reverse a Hex Number

    #include <stdio.h>
    #include <string.h>
    
    int main() {
        char hex[100]; // To store hex number as string
        int length, i;
        char temp;
    
        // Step 1: Input hex number
        printf("Enter a hexadecimal number: ");
        scanf("%s", hex);
    
        // Step 2: Find length
        length = strlen(hex);
    
        // Step 3: Reverse the string
        for (i = 0; i < length / 2; i++) {
            temp = hex[i];
            hex[i] = hex[length - i - 1];
            hex[length - i - 1] = temp;
        }
    
        // Step 4: Output the reversed hex number
        printf("Reversed hexadecimal number: %s\n", hex);
    
        return 0;
    }
    

    Example Output

    Enter a hexadecimal number: 1A3F
    Reversed hexadecimal number: F3A1
    

    How Reverse a Hex Number Code Works

    • We store the hex number as a string to preserve both numbers and letters.
    • strlen() helps us find how many characters are in the input.
    • A loop swaps characters from start and end until the middle is reached.
    • Finally, we print the reversed result.

    Key Points of Reverse a Hex Number

    • Use char[] to store hex numbers with letters.
    • Always handle input as a string, not as an integer, when reversing.
    • Works for both uppercase (A-F) and lowercase (a-f) hex letters.

    2. Reverse a Hex Number in C++

    #include <iostream>
    #include <string>
    #include <algorithm>
    using namespace std;
    
    int main() {
        string hexNum;
    
        // Step 1: Input hex number
        cout << "Enter a hexadecimal number: ";
        cin >> hexNum;
    
        // Step 2: Reverse the string
        reverse(hexNum.begin(), hexNum.end());
    
        // Step 3: Output reversed hex
        cout << "Reversed hexadecimal number: " << hexNum << endl;
    
        return 0;
    }
    

    Explanation:

    • We use string to store the hex value.
    • The reverse() function from <algorithm> quickly reverses the characters.
    • Works for both uppercase and lowercase letters.

    3. Reverse a Hex Number in Python

    # Step 1: Input hex number
    hex_num = input("Enter a hexadecimal number: ")
    
    # Step 2: Reverse the string using slicing
    reversed_hex = hex_num[::-1]
    
    # Step 3: Output result
    print("Reversed hexadecimal number:", reversed_hex)
    

    Explanation:

    • Python treats strings as sequences, so slicing [::-1] reverses the string easily.
    • This method is the shortest and beginner-friendly.

    4. Reverse a Hex Number in Java

    import java.util.Scanner;
    
    public class ReverseHex {
        public static void main(String[] args) {
            Scanner sc = new Scanner(System.in);
    
            // Step 1: Input hex number
            System.out.print("Enter a hexadecimal number: ");
            String hexNum = sc.next();
    
            // Step 2: Reverse using StringBuilder
            String reversedHex = new StringBuilder(hexNum).reverse().toString();
    
            // Step 3: Output result
            System.out.println("Reversed hexadecimal number: " + reversedHex);
    
            sc.close();
        }
    }
    

    Explanation:

    • Java’s StringBuilder class has a built-in reverse() method.
    • Using toString() converts the reversed object back into a string.

    Example Run for Reverse a Hex Number in all Languages

    Enter a hexadecimal number: 1A3F
    Reversed hexadecimal number: F3A1
    

    Key Takeaways

    • Always store hex numbers as strings when reversing.
    • C++ uses reverse() from <algorithm>.
    • Python uses slicing [::-1].
    • Java uses StringBuilder.reverse().

    FAQ : Reverse a Hex Number in C

    Q1: What does it mean to reverse a hex number in C?

    Ans: Reversing a hex number means rearranging its hexadecimal digits in reverse order. For example, reversing 0x1A3F gives 0xF3A1. This is often used in embedded systems and low-level programming.

    Q2: How can I reverse a hex number in C?

    Ans: You can reverse a hex number by extracting each digit using bitwise operations or string manipulation, and then reconstructing the number in reverse order.

    Q3: Can I reverse a hex number using arrays or strings?

    Ans: Yes! You can convert the hex number to a string, reverse the string, and convert it back to a number. This method is simple and beginner-friendly.

    Q4: Is reversing a hex number different in C++ or Python?

    Ans: The concept is the same across languages, but the implementation differs. In C++, you can use std::string for easy manipulation. In Python, you can use slicing to reverse the string representation of a hex number.

    Q5: Why is reversing a hex number important in embedded systems?

    Ans: Reversing hex numbers is useful in memory management, communication protocols, endianness handling, and debugging, where the byte order matters.

    Q6: Are there any common mistakes to avoid when reversing hex numbers in C?

    Ans: Common mistakes include ignoring leading zeros, not handling negative numbers correctly, and mixing up bitwise operations with string manipulation methods.
  • QNX Operating System vs Linux | Master QNX RTOS A Beginner’s Guide (2026)

    QNX Operating System vs Linux : Discover the difference between the QNX Operating System and Linux in this beginner-friendly guide. Learn how BlackBerry QNX delivers real-time performance, safety, and reliability for automotive, medical, and industrial applications compared to Linux’s flexibility and open-source power.

    When it comes to choosing an operating system for embedded systems and mission-critical applications, two popular options are the QNX Operating System and Linux. Both have their strengths, but they are designed for different purposes.
    This article will help beginners understand what the QNX Operating System vs Linux is, how it compares to Linux, and where each one is best used.

    What is the QNX Operating System?

    The QNX Operating System is a real-time operating system (RTOS) developed by BlackBerry Limited. It is known for its high reliability, safety, and deterministic performance, making it ideal for environments where failure is not an option.

    Main features of the QNX Operating System:

    • Microkernel architecture — only essential services (like scheduling and interprocess communication) run in the kernel for improved stability.
    • Real-time capabilities — guarantees predictable responses within strict deadlines.
    • POSIX compliance — allows easier porting of software from other Unix-like systems.
    • Fault resilience — if one component fails, the rest of the system remains unaffected.

    Where the QNX Operating System is used:

    • Automotive infotainment and safety systems
    • Aerospace and defense equipment
    • Medical devices
    • Industrial automation systems

    What is Linux?

    Linux is a general-purpose, open-source operating system used on everything from smartphones to servers and IoT devices. Unlike the QNX Operating System, Linux uses a monolithic kernel and is maintained by a global open-source community.

    Main features of Linux:

    • Monolithic kernel — all core OS services run in kernel space.
    • Highly customizable — hundreds of distributions to suit different needs.
    • Large developer community — constant updates and support.
    • Wide hardware compatibility — runs on small IoT boards to large data centers.

    QNX Operating System vs Linux : Key Differences

    FeatureQNX Operating SystemLinux Operating System
    TypeReal-Time Operating System (RTOS)General-Purpose Operating System
    Kernel ArchitectureMicrokernelMonolithic kernel
    Real-Time CapabilityHard real-time, deterministicNot hard real-time (PREEMPT_RT patch adds soft real-time)
    LicensingCommercial (BlackBerry QNX)Open-source (GPL and others)
    ReliabilityExtremely high, fault-tolerantStable but less fault isolation
    CustomizationSafety-critical focusBroad customization options
    Typical Use CasesAutomotive, aerospace, medical, industrialServers, desktops, IoT, embedded devices
    Community SupportVendor-providedLarge open-source community

    Which One Should You Choose QNX & LINUX ?

    Choosing between the QNX Operating System and Linux depends on your project’s requirements, performance goals, and safety needs. Both are powerful, but they shine in different areas.

    When to Choose the QNX Operating System

    The QNX Operating System, developed by BlackBerry QNX, is the right choice when:

    • Your project demands strict real-time performance with predictable response times.
    • You are working on safety-critical systems that require certifications such as ISO 26262 (automotive), IEC 62304 (medical devices), or DO-178C (aerospace).
    • You need uninterrupted stability — if one software component crashes, the rest of the system should remain unaffected thanks to QNX’s microkernel architecture.
    • You’re developing for industries like automotive infotainment, industrial automation, aerospace, or defense, where downtime is unacceptable.

    In short, BlackBerry QNX is designed for environments where failure is not an option and real-time precision is critical.

    When to Choose Linux

    Linux is the right choice when:

    • You need flexibility and the freedom to customize the OS for different purposes.
    • You want the cost benefits of open-source software without paying licensing fees.
    • Your application benefits from a large ecosystem of tools, libraries, and developer support.
    • Real-time precision is not your top priority, or you can manage with soft real-time capabilities by using the PREEMPT_RT patch.
    • Your focus is on building servers, IoT devices, development platforms, or consumer electronics.

    Linux is ideal when you need versatility, fast development, and broad hardware compatibility rather than strict safety certifications.

    Bottom line:

    • Choose the QNX Operating System if you’re building mission-critical, real-time, and safety-certified applications.
    • Choose Linux if you want open-source flexibility, community support, and broad use cases.

    Conclusion QNX Operating System vs Linux

    The QNX Operating System and Linux both serve important roles in the world of technology.

    • QNX shines in real-time, safety-critical applications.
    • Linux excels in general-purpose and flexible environments.

    Your choice will depend on whether you prioritize deterministic performance or flexibility and cost-efficiency.

    1. What is the QNX Operating System used for?

    The QNX Operating System is mainly used in safety-critical and real-time applications such as automotive systems, aerospace equipment, medical devices, and industrial control systems. It is chosen for its high reliability, fault tolerance, and deterministic performance.

    2. Is the QNX Operating System open source?

    No, the QNX Operating System is a commercial product owned by BlackBerry Limited. It requires licensing for use, unlike Linux, which is open source and free to download.

    3. How is the QNX Operating System different from Linux?

    The QNX Operating System is a real-time microkernel-based OS, while Linux is a general-purpose monolithic kernel OS. QNX focuses on predictable execution and fault isolation, whereas Linux emphasizes flexibility, customization, and community support.

    4. Can Linux replace the QNX Operating System?

    In most real-time, safety-critical environments, Linux cannot fully replace the QNX Operating System because Linux does not provide the same level of hard real-time guarantees. However, with the PREEMPT_RT patch, Linux can handle some real-time workloads.

    5. Why do automotive companies prefer the QNX Operating System?

    Automotive companies use the QNX Operating System because it meets strict safety and reliability standards such as ISO 26262. It ensures that vehicle systems like infotainment, navigation, and driver assistance run without unexpected delays or failures.

    6. Is the QNX Operating System better than Linux?

    Neither is universally “better” — the QNX Operating System is better for time-sensitive, safety-critical applications, while Linux is better for general-purpose and cost-effective solutions.
    QNX Operating System vs Linux | Master QNX RTOS
    QNX Operating System vs Linux Master QNX RTOS A Beginner’s Guide (2025)
  • What Are the Typical Synchronization Mechanisms Used in an RTOS? | RTOS Interview Question (2026)

    Typical synchronization mechanisms used in an RTOS (Real-Time Operating System) are techniques that manage the coordination and safe sharing of resources among multiple tasks running concurrently. These mechanisms—such as semaphores, mutexes, event flags, message queues, mailboxes, and barriers—help prevent race conditions, ensure mutual exclusion, and maintain deterministic behavior in time-critical applications. By enabling controlled access to shared memory, devices, and data structures, they keep real-time systems stable, predictable, and efficient. Whether it’s signaling between tasks, protecting resources, or coordinating task execution, these synchronization tools are essential for reliable RTOS performance.

    Typical Synchronization Mechanisms Used in an RTOS

    In a Real-Time Operating System (RTOS), multiple tasks often run concurrently and may need to share resources such as memory, hardware devices, or data structures. Without proper control, two tasks could try to access the same resource at the same time, leading to race conditions or data corruption.

    This is where synchronization mechanisms come into play. They ensure safe, predictable, and coordinated access to shared resources, maintaining system stability in real-time environments.

    Why Synchronization is Important in RTOS

    In real-time systems, timing and reliability are critical. Synchronization helps to:

    • Prevent race conditions and data corruption
    • Ensure mutual exclusion (only one task can access a resource at a time)
    • Maintain task coordination and predictable behavior
    • Improve system stability and deterministic performance

    Typical Synchronization Mechanisms Used in RTOS

    1. Semaphores

    A semaphore is a signaling mechanism that controls access to resources.

    • Binary Semaphore: Works like an on/off flag. Useful for task signaling and simple mutual exclusion.
    • Counting Semaphore: Allows a fixed number of tasks to access a resource simultaneously.

    Example: In an RTOS-based printer control system, a counting semaphore can allow up to 3 print jobs to be queued at the same time.

    2. Mutex (Mutual Exclusion)

    A mutex ensures that only one task can access a shared resource at any given moment.

    • Often supports priority inheritance, which helps prevent priority inversion problems in real-time systems.

    Example: Protecting a shared log file from being written by multiple tasks at the same time.

    3. Event Flags

    Event flags (or event groups) allow tasks to wait for specific conditions to occur.

    • Multiple bits in a flag group can represent different events.
    • Tasks can wait for any or all events to be set before proceeding.

    Example: A task waits for both “data received” and “data processed” flags before sending the next packet.

    4. Message Queues

    Message queues allow safe communication between tasks by sending and receiving messages in FIFO (First In, First Out) order.

    • Helps decouple tasks — the sender and receiver do not need to run at the same time.
    • Supports data passing with built-in synchronization.

    Example: A sensor task sends temperature readings to a processing task via a message queue.

    5. Mailboxes

    A mailbox is like a message queue but usually designed for fixed-size messages and single message storage.

    • Suitable when tasks need to exchange small messages quickly.

    Example: A control task sends a command to a motor driver task using a mailbox.

    6. Barriers

    A barrier is a synchronization point where multiple tasks must wait until all have reached the barrier before continuing.

    • Useful for coordinating stages in multi-task processing.

    Example: In a multi-core RTOS system, all tasks wait at a barrier until data loading is complete.

    Choosing the Right Mechanism

    The right synchronization mechanism depends on:

    • Type of resource (shared memory, hardware device, data buffer)
    • Number of tasks accessing the resource
    • Real-time constraints and timing requirements
    • Data size and communication frequency

    Quick Guide:

    • Use mutex for exclusive access to a resource.
    • Use semaphore for signaling between tasks or controlling resource count.
    • Use event flags for multi-condition synchronization.
    • Use message queues/mailboxes for safe inter-task communication.
    • Use barriers for group synchronization.

    Final Thoughts

    In an RTOS, synchronization mechanisms are essential for building stable, predictable, and safe embedded applications. Whether you are working with FreeRTOS, QNX, VxWorks, or any other RTOS, mastering semaphores, mutexes, event flags, and message queues will significantly improve your ability to design efficient real-time systems.

    FAQ – Typical Synchronization Mechanisms in an RTOS

    1. What is synchronization in an RTOS?

    Synchronization in an RTOS ensures that multiple tasks can safely share resources without conflicts or data corruption. It helps coordinate task execution and maintain predictable system behavior.

    2. Why is synchronization important in real-time systems?

    In real-time systems, timing is critical. Synchronization prevents race conditions, ensures mutual exclusion, and keeps system performance consistent and deterministic.

    3. What are the most common synchronization mechanisms in RTOS?

    The most common synchronization mechanisms include:

    • Semaphores (binary and counting)
    • Mutexes
    • Event flags
    • Message queues
    • Mailboxes
    • Barriers

    4. What is the difference between a semaphore and a mutex in RTOS?

    A semaphore is a signaling mechanism that can be used by multiple tasks, while a mutex provides exclusive access to a resource and usually supports priority inheritance to avoid priority inversion.

    5. When should I use event flags in RTOS?

    Event flags are best when a task must wait for one or more conditions to occur before continuing execution—such as waiting for multiple sensors to signal readiness.

    6. What is a message queue used for in RTOS?

    A message queue allows tasks to send and receive data safely, even if they run at different times. It supports FIFO ordering and prevents data loss during task communication.

    7. Do all RTOS platforms support the same synchronization mechanisms?

    No. While most RTOS platforms support semaphores, mutexes, and message queues, advanced features like barriers or event flags may vary depending on the RTOS (e.g., FreeRTOS, QNX, VxWorks).

  • Architecture of CAN Bus System | Master CAN Interview Questions (2026)

    Architecture of CAN Bus System: The Controller Area Network (CAN) bus system is a popular communication protocol widely used in automotive and industrial applications. It allows multiple electronic control units (ECUs) to communicate with each other efficiently over just two wires. In this article, we will explain the basic architecture of a CAN bus system in simple terms, making it easy for beginners to understand.

    Learn the basic architecture of a CAN bus system in this beginner-friendly guide. Understand key components like ECUs, CAN-High and CAN-Low wiring, message framing, and arbitration. Perfect for anyone starting with automotive or embedded communication protocols.

    What is a CAN Bus System?

    A CAN bus system is a robust vehicle bus standard designed to allow microcontrollers and devices to communicate without a host computer. It is especially useful in environments with high electrical noise, like cars, where reliable communication between multiple ECUs is essential.

    Key Components of CAN Bus Architecture

    1. Nodes (Electronic Control Units – ECUs)

    Each device or node in a CAN bus system contains:

    • A Microcontroller (MCU) that processes data.
    • A CAN controller that manages message framing, error detection, and protocol handling.
    • A CAN transceiver that converts data to and from the physical bus lines.

    Nodes can both send and receive messages on the bus, making CAN a multi-master system.

    2. Bus Lines: CAN-High and CAN-Low

    Communication takes place over two wires called CAN-High (CAN-H) and CAN-Low (CAN-L). These wires carry differential signals, meaning one wire carries the inverse of the other. This helps the system resist electrical noise and improves data integrity.

    3. Termination Resistors

    At both ends of the CAN bus, 120-ohm resistors are connected to prevent signal reflections and ensure reliable communication.

    Layers in the Architecture of the CAN Bus

    CAN bus architecture follows international standards defined by ISO 11898. It primarily works on two layers of the OSI model:

    • Physical Layer (ISO 11898-2): Defines wiring, signal voltage levels, and data rates. The twisted pair of CAN-H and CAN-L cables operate at speeds up to 1 Mbps (Classical CAN) or higher in CAN FD.
    • Data Link Layer (ISO 11898-1): Handles message framing, arbitration (which node gets to transmit when multiple nodes start transmitting simultaneously), error detection, and message acknowledgment.

    How CAN Bus Communication Works

    • Message Framing:
      Messages, or frames, consist of an identifier, data length, data payload (up to 8 bytes in Classical CAN), CRC for error checking, and control bits.
    • Arbitration:
      When multiple nodes send messages simultaneously, the one with the highest priority (lowest identifier number) wins the bus without data loss. This process is called arbitration.
    • Error Handling:
      CAN automatically detects errors and retransmits faulty messages, ensuring reliable communication.

    CAN Bus Physical Design and Topology

    The standard CAN bus uses a linear topology, where all nodes are connected along a single pair of wires with termination resistors at each end. This layout reduces reflections and interference.

    CAN Protocol Block Diagram — Overview

    The CAN bus follows a multi-master bus architecture, which means that any node (or ECU) connected to the bus can send or receive messages at any time. It also has built-in error handling to keep communication reliable.

    The main part of the CAN system is called the CAN core. This core acts like a memory-mapped device to the host processor and is responsible for sending and receiving CAN messages (called frames). It can be integrated easily with the host using standard interfaces like APB (Advanced Peripheral Bus) or AHB-Lite (Advanced High-performance Bus Lite), depending on performance and power needs.

    Key Parts Inside the CAN Core

    • Acceptance Filters: These help the system decide which messages should be accepted or ignored, making sure the ECU only processes relevant data.
    • Interrupts: Programmable signals to alert the processor about new messages or errors.
    • Buffers: Memory areas for storing messages before sending or after receiving.
      • There are two types of transmit buffers:
        • Primary Transmission Buffer (PTB): Holds high-priority messages.
        • Secondary Transmission Buffer (STB): Stores lower-priority messages.
      • Buffers work in a First-In-First-Out (FIFO) manner in priority mode.

    CAN Bus Layered Architecture

    The CAN communication protocol is defined by the ISO 11898 standard and has two main layers:

    1. Data Link Layer:
      This layer manages how data is sent between nodes, error checking, and message prioritization. It has two sublayers:
      • MAC (Medium Access Control): Controls which node can use the bus at a given time and handles framing and error detection.
      • LLC (Logical Link Control): Handles flow control, error recovery, and acceptance filtering.
    2. Physical Layer:
      This layer defines how the data is physically transmitted over the wires — including voltage levels, timing, and connectors. It consists of:
      • PCS (Physical Coding Sublayer): Encodes and decodes the bits on the bus.
      • PMA (Physical Medium Attachment): Handles framing and synchronization of bits.
      • PMD (Physical Medium Dependent): Deals with actual transmission and reception of bits on the wire.
      • MDI (Medium Dependent Interface): The physical connection to the network medium (cables).

    How CAN Bus Works — Data Transmission and Arbitration

    • CAN Frames:
      Data is sent in packets called frames. Each frame includes a unique identifier (priority), control bits, data payload, and error-checking codes.
    • Multi-Master and Arbitration:
      Multiple nodes can try to send data at the same time. To avoid collisions, CAN uses arbitration — a method that prioritizes messages with lower identifier numbers. The node with the highest priority continues to send, while others wait.
    • Bit Monitoring:
      While sending data, each node listens to the bus to make sure the bit they sent matches what is on the bus. If not, it means another node has a higher priority message, so the lower priority node stops transmitting.

    Example of Arbitration in the Architecture of the CAN Bus

    Imagine two ECUs want to send messages simultaneously:

    • ECU 1 has an identifier 0x234
    • ECU 2 has an identifier 0x352

    CAN uses wired-AND logic, meaning a dominant bit (0) overrides a recessive bit (1). When both ECUs transmit the third bit, ECU 1 sends 0 and ECU 2 sends 1. The bus reads 0 (dominant). ECU 2 detects the difference and stops transmitting, letting ECU 1 continue because it has higher priority.

    Standard CAN Frame Format

    Here’s what a typical CAN message frame looks like (in the standard 11-bit format):

    FieldDescription
    SOF (Start of Frame)Indicates the beginning of a message (1 bit)
    IdentifierDefines message priority (11 bits)
    RTR (Remote Transmission Request)Distinguishes between data and remote frames (1 bit)
    Control FieldContains user-specified flags
    IDE (Identifier Extension)Indicates if frame is standard (11-bit) or extended (29-bit)
    DLC (Data Length Code)Specifies number of data bytes (4 bits)
    Data FieldContains up to 8 bytes of actual data
    CRC (Cyclic Redundancy Check)Error-checking code (15 bits)
    ACK (Acknowledgement)Confirms correct reception (2 bits)
    EoF (End of Frame)Marks the end of the message (7 bits)

    Summary Architecture of the CAN Bus

    CAN Bus ElementDescription
    Nodes (ECUs)Devices with MCU, CAN controller, and transceiver
    CAN-High and CAN-LowTwisted pair differential signaling wires
    Termination Resistors120 Ω resistors at bus ends to prevent reflections
    Physical Layer (ISO 11898-2)Defines wiring and signaling specifications
    Data Link Layer (ISO 11898-1)Manages message framing, arbitration, and error handling
    ArbitrationPriority-based bus access control

    Conclusion

    The CAN bus system is a simple yet powerful communication protocol enabling multiple devices to communicate over a shared two-wire bus efficiently. Its architecture combines robust physical wiring, standardized messaging, and smart arbitration techniques to ensure data integrity in noisy environments like vehicles. Understanding its basic components and working principle is essential for anyone diving into embedded systems or automotive electronics.

    1. What is the CAN bus system?

    The CAN (Controller Area Network) bus system is a robust communication protocol used primarily in automotive and industrial applications to allow microcontrollers and devices to communicate with each other without a host computer. It enables multiple nodes to share data efficiently over a single two-wire bus.

    2. How is the architecture of a CAN bus system structured?

    The CAN bus architecture consists of several nodes connected through a twisted pair cable. Each node contains a CAN controller and a transceiver. The controller manages data framing, error checking, and message filtering, while the transceiver converts the controller’s digital signals to differential signals for the bus.

    3. What are the main components of a CAN node?

    A typical CAN node has three main parts: the microcontroller (which runs the application), the CAN controller (which handles CAN protocol functions), and the CAN transceiver (which interfaces with the physical bus).

    4. What type of bus topology does CAN use?

    CAN uses a multi-master, broadcast communication bus topology. This means any node can start transmitting data when the bus is free, and messages are broadcast to all nodes simultaneously.

    5. How does CAN handle message priority?

    CAN uses message identifiers to determine priority. Lower numerical values of identifiers have higher priority on the bus, allowing critical messages to get transmitted first during bus arbitration.

    6. What is bus arbitration in CAN?

    Bus arbitration is the process by which multiple nodes attempt to transmit data simultaneously. CAN uses a nondestructive arbitration method based on message priority, ensuring the highest priority message gains bus access without data loss.

    7. How does CAN ensure data integrity and error handling?

    CAN includes several error detection mechanisms such as CRC (Cyclic Redundancy Check), bit stuffing, acknowledgment checks, and error flags. When an error is detected, nodes retransmit messages to maintain data reliability.

    8. Why is CAN preferred in automotive systems?

    CAN is highly reliable, efficient, and cost-effective. It supports real-time communication with robust error handling and allows many electronic control units (ECUs) to communicate over a simple two-wire bus, making it ideal for automotive applications.

    9. Can CAN bus systems support long distances and high speeds?

    CAN supports data rates up to 1 Mbps and bus lengths typically up to 40 meters at the highest speed. For longer distances, the speed is reduced to maintain signal integrity.

    10. What is the difference between CAN 2.0A and CAN 2.0B?

    CAN 2.0A supports standard frames with 11-bit identifiers, whereas CAN 2.0B supports extended frames with 29-bit identifiers, allowing for more message identifiers and better flexibility.
  • What is Bit Stuffing in CAN Bus Communication? | Master CAN Interview Questions (2026)

    Bit Stuffing in CAN (Controller Area Network) is a technique used to ensure reliable data transmission by inserting extra bits into the data stream. This prevents long sequences of identical bits, helping maintain synchronization between sender and receiver. In this article, we explain what bit stuffing is, why it’s essential in CAN communication, and how it works with real-world examples, making it easy for beginners and professionals to understand.

    Introduction – Bit Stuffing in CAN Bus

    If you’ve ever worked with CAN (Controller Area Network) bus communication, you may have come across the term bit stuffing. At first, it might sound like some tricky technical jargon, but in reality, it’s a clever way to keep communication smooth, synchronized, and error-free.

    In this article, we’ll break down what bit stuffing is, why it’s essential in CAN communication, and how it works — in plain, beginner-friendly language.

    1. What Is Bit Stuffing?

    Bit stuffing is a technique used in CAN communication where a complementary bit is inserted into the data stream after five consecutive identical bits.

    • If there are five 1s in a row → insert a 0.
    • If there are five 0s in a row → insert a 1.

    This happens automatically:

    • Transmitter: Adds the stuffed bit.
    • Receiver: Detects and removes it before processing the data.

    📌 Think of it like this:
    If a teacher is reading a long sentence without pauses, students might lose track. A small pause (bit stuffing) ensures everyone stays in sync.

    2. Why Is Bit Stuffing Used in CAN Bus?

    a) Clock Synchronization

    CAN is asynchronous, meaning it doesn’t send a separate clock signal.

    • Receivers synchronize their internal clocks by detecting changes (edges) in the signal.
    • If there are too many identical bits in a row, there are no edges, and synchronization is lost.
    • Bit stuffing ensures enough transitions for accurate timing.

    b) Preventing False Frame Detection

    Some bit patterns (like a long string of 0s or 1s) are used for special markers in CAN, such as Start of Frame (SOF) or End of Frame (EOF).

    • Without bit stuffing, these patterns might accidentally appear inside data.
    • Bit stuffing prevents that by breaking long identical sequences.

    c) Error Detection

    If the receiver finds more than 5 identical bits in a row without a stuffed bit, it knows an error occurred and raises a bit stuffing error.
    This is a built-in safety check.

    3. How Bit Stuffing in CAN Bus Works: Step-by-Step Example

    Original Data (before stuffing):

    1111101111100
    

    After Bit Stuffing:

    111110**0**111110**0**0
    

    Here’s what happened:

    1. Found five 1s → inserted 0.
    2. Found another five 1s → inserted another 0.

    The receiver will remove these inserted bits before processing.

    4. Bit Stuffing in Error Frames

    In CAN, bit stuffing is not applied to certain special fields like:

    • Stuff count fields
    • CRC delimiter
    • ACK delimiter
    • End of Frame (EOF)

    This prevents unnecessary changes to fixed-format parts of a message.

    Also, if bit stuffing is wrong (extra or missing stuffed bit), it triggers a stuff error, and the CAN error handling mechanism retransmits the frame.

    5. Key Takeaways for Beginners: Understanding Bit Stuffing in CAN Bus

    ✅ Bit stuffing inserts an opposite bit after five identical bits.
    ✅ It keeps CAN communication synchronized and error-free.
    ✅ Receivers automatically remove stuffed bits before processing.
    ✅ If stuffing is missing or wrong, CAN flags an error.

    Advantages of Bit Stuffing in CAN Bus

    1. Maintains Synchronization – Prevents loss of sync between transmitter and receiver by avoiding long sequences of identical bits.
    2. Error Detection Support – Helps identify frame errors if the stuffing rule is violated.
    3. Protocol Simplicity – Automatically handled by CAN controllers, requiring no manual intervention from developers.
    4. Works for Variable Data Patterns – Effective regardless of the actual message content.

    Disadvantages of Bit Stuffing in CAN Bus

    1. Increases Data Overhead – Extra stuffed bits make the transmitted frame longer.
    2. Slight Latency Impact – Additional bits increase transmission time, especially in large frames.
    3. Higher Bandwidth Usage – More bits mean slightly higher bus load, reducing available bandwidth for other messages.
    4. Complexity in Manual Analysis – Raw bitstreams are harder to read without decoding tools due to inserted bits.

    Real-Time Use Cases of Bit Stuffing

    • Automotive ECUs – Engine control units, ABS systems, and airbags rely on CAN bit stuffing for accurate high-speed data transfer.
    • Industrial Automation – PLCs and robotic arms use CAN for sensor and actuator communication with bit stuffing ensuring reliability.
    • Medical Equipment – Infusion pumps and diagnostic machines use CAN for safe and synchronized data exchange.
    • Aerospace Systems – Flight control and monitoring systems depend on CAN with bit stuffing to maintain data integrity in noisy environments.

    FAQs of Bit Stuffing in CAN

    Q1: Is bit stuffing the same for all protocols?

    Ans: No. While many protocols use bit stuffing, the rules (like the number of identical bits allowed) may differ.

    Q2: Does bit stuffing change the original message?

    Ans: No. Stuffed bits are removed before the data is processed, so the original message stays the same.

    Q3: Who handles bit stuffing in CAN — hardware or software?

    Ans: The CAN controller hardware automatically handles stuffing and destuffing.

    Conclusion

    Bit stuffing is a small yet powerful feature of CAN bus communication. It keeps devices in sync, prevents accidental message boundaries, and helps detect errors — all without affecting your actual data.

    So the next time you see a CAN message, remember: somewhere inside, bit stuffing is working quietly to keep the conversation going smoothly.

  • Find the Number That Appears Odd Number of Times | Master Beginner Friendly Tutorials (2026)

    Master the problem of finding the number that appears odd number of times in an array with this beginner-friendly guide. Learn step-by-step how the XOR operation works to solve this problem efficiently in O(n) time and O(1) space. Includes detailed explanations, example walkthroughs, and fully working code in C, C++, Java, and Python. Perfect for coding interview preparation, competitive programming, and improving problem-solving skills.

    In coding interviews and competitive programming, a popular problem is:

    Find the Number That Appears Odd Number of Times

    It’s a simple question, but there’s a clever trick to solve it efficiently. This article will explain the problem in depth, walk you through the logic step-by-step, and provide solutions in C, C++, Java, and Python.

    Problem Statement

    Given an array of integers, all numbers occur an even number of times except one. Your task is to find that number.

    Example:

    Input:  arr = [2, 3, 2, 3, 4]
    Output: 4
    Explanation: 2 appears twice, 3 appears twice, and 4 appears once (odd number of times).
    

    Naive Approach – Count Frequency

    A beginner might think:

    1. Loop through the array.
    2. Count how many times each number occurs.
    3. Return the number with an odd count.

    Problem:

    • Time Complexity → O(n²) (if we count for each number)
    • Not efficient for large datasets.

    Naive Solution

    int findOdd(int arr[], int n) {
    // Outer loop: pick each element one by one
    for (int i = 0; i < n; i++) {
    int count = 0; // reset count for the current element
    // Inner loop: compare the picked element with every element
        for (int j = 0; j < n; j++) {
            if (arr[i] == arr[j]) { // if both are same
                count++; // increase occurrence count
            }
        }
    
        // If the count is odd, return this number
        if (count % 2 != 0) {
            return arr[i];
        }
    }
    return -1; // if no odd occurrence found
    }

    How it works:

    1. Outer loop (i) → Selects each number in the array one by one.
    2. Inner loop (j) → Compares that number with all elements in the array.
    3. count++ → Every time it matches, we increase the counter.
    4. After the inner loop ends, we check:

    if (count % 2 != 0)

    If count is odd, that’s our answer.

    Efficient Approach – Using XOR

    The XOR ( ^ ) bitwise operator has special properties:

    • x ^ x = 0 → a number XORed with itself is 0.
    • x ^ 0 = x → a number XORed with 0 stays the same.
    • XOR is commutative and associative → order doesn’t matter.

    Logic:

    • If we XOR all elements in the array, numbers with even occurrences will cancel out to 0.
    • The result will be the number that occurs an odd number of times.

    Example:

    Array: [2, 3, 2, 3, 4]

    Step 1: 2 ^ 3 = 1
    Step 2: 1 ^ 2 = 3
    Step 3: 3 ^ 3 = 0
    Step 4: 0 ^ 4 = 4  ✅
    

    Code Examples in Multiple Languages

    1️⃣ C Program

    #include <stdio.h>
    
    int findOdd(int arr[], int n) {
        int result = 0;
        for (int i = 0; i < n; i++) {
            result ^= arr[i];
        }
        return result;
    }
    
    int main() {
        int arr[] = {2, 3, 2, 3, 4};
        int n = sizeof(arr) / sizeof(arr[0]);
        printf("Number appearing odd times: %d\n", findOdd(arr, n));
        return 0;
    }
    

    2️⃣ C++ Program

    #include <iostream>
    using namespace std;
    
    int findOdd(int arr[], int n) {
        int result = 0;
        for (int i = 0; i < n; i++) {
            result ^= arr[i];
        }
        return result;
    }
    
    int main() {
        int arr[] = {2, 3, 2, 3, 4};
        int n = sizeof(arr) / sizeof(arr[0]);
        cout << "Number appearing odd times: " << findOdd(arr, n) << endl;
        return 0;
    }
    

    3️⃣ Java Program

    public class OddOccurrence {
        static int findOdd(int[] arr) {
            int result = 0;
            for (int num : arr) {
                result ^= num;
            }
            return result;
        }
    
        public static void main(String[] args) {
            int[] arr = {2, 3, 2, 3, 4};
            System.out.println("Number appearing odd times: " + findOdd(arr));
        }
    }
    

    4️⃣ Python Program

    def find_odd(arr):
        result = 0
        for num in arr:
            result ^= num
        return result
    
    arr = [2, 3, 2, 3, 4]
    print("Number appearing odd times:", find_odd(arr))
    

    Key Takeaways

    • XOR provides the most efficient solution.
    • Time Complexity → O(n)
    • Space Complexity → O(1)
    • Works across all programming languages with the same logic.
    • Very useful in interviews and competitive coding.

    🔗 Read More Programming Tutorials: Embedded Prep Master