Blog

  • How to Modify Kernel Sources Like a Pro : Complete Tutorial (2026)

    Learn how to modify kernel sources step-by-step, with real driver examples and beginner-friendly guidance for Linux and embedded systems.

    If you’ve ever wondered what really happens inside Linux when hardware talks to software, you’re already thinking in the right direction. Modifying kernel sources is where Linux stops being just an operating system and starts becoming a tool you can shape.

    This guide is written for curious beginners. You don’t need to be a kernel wizard. You don’t need to memorize internal APIs. You just need patience, basic Linux knowledge, and the willingness to learn by doing.

    By the end of this article, you’ll clearly understand how to modifying kernel sources, why people do it, and how to do it safely without breaking your system.

    What Does Modifying Kernel Sources Really Mean?

    At a simple level, modifying kernel sources means changing the Linux kernel’s source code to adjust how the system behaves.

    This could mean:

    • Adding support for new hardware
    • Tweaking existing drivers
    • Adding logs for debugging
    • Changing scheduling or memory behavior
    • Learning kernel internals for career growth

    You’re not rewriting Linux from scratch. Most changes are small and focused. A few lines added. A condition adjusted. A feature enabled or disabled.

    That’s how everyone starts.

    Why Would Anyone Modify Kernel Sources?

    This is the first question beginners ask. And it’s a fair one.

    Here are the real reasons people modify kernel sources:

    1. Hardware Support

    Maybe your device isn’t fully supported by the stock kernel. Embedded boards, sensors, custom peripherals often need kernel tweaks.

    2. Learning Kernel Internals

    There’s no better way to understand the Linux kernel than reading and modifying its code. Tutorials help, but hands-on experience sticks.

    3. Debugging System Issues

    Sometimes logs aren’t enough. Adding custom debug prints inside kernel code helps trace tricky bugs.

    4. Performance Optimization

    In embedded and real-time systems, small kernel changes can make a big difference.

    5. Career Growth

    If you’re aiming for roles in embedded Linux, BSP development, or kernel engineering, knowing how to modifying kernel sources is a serious advantage.

    Before You Touch Kernel Code: Important Basics

    Let’s slow down for a moment.

    Modifying kernel sources is powerful, but careless changes can:

    • Prevent your system from booting
    • Break drivers
    • Cause silent bugs

    So before editing anything, make sure you understand these basics.

    You Should Be Comfortable With:

    • Basic Linux commands
    • Using a terminal
    • Editing files with vim or nano
    • Understanding C code at a basic level

    You don’t need to be a C expert. You just need to read code without panicking.

    Getting the Linux Kernel Source Code

    You can’t modify what you don’t have.

    Option 1: Download From kernel.org

    This is the clean, official source.

    wget https://cdn.kernel.org/pub/linux/kernel/v6.x/linux-6.6.tar.xz
    tar -xf linux-6.6.tar.xz
    cd linux-6.6
    

    Option 2: Use Git (Recommended)

    Git makes experimentation safer.

    git clone https://git.kernel.org/pub/scm/linux/kernel/git/stable/linux.git
    cd linux
    

    Using Git allows you to:

    • Track changes
    • Revert mistakes
    • Understand diffs clearly

    If you’re serious about modifying kernel sources, Git is your friend.

    Understanding the Kernel Source Tree (Without Getting Lost)

    At first glance, the kernel directory looks scary. Relax. You don’t need to understand everything.

    Here are the most important directories:

    arch/

    Architecture-specific code (ARM, x86, RISC-V)

    drivers/

    Device drivers (GPIO, I2C, SPI, USB, audio, network)

    fs/

    File systems (ext4, proc, sysfs)

    kernel/

    Core kernel logic (scheduler, timers, workqueues)

    include/

    Header files used across the kernel

    When learning how to modifying kernel sources, you’ll usually work inside drivers/ or kernel/.

    Start Small: The Best Way to Modify Kernel Sources

    Beginners often make the same mistake: trying to change something big.

    Don’t.

    Start small. Very small.

    Best Beginner Modifications

    • Add pr_info() logs
    • Modify an existing driver slightly
    • Change default values
    • Add a simple kernel parameter

    These teach you the workflow without risk.

    Example 1: Adding a Debug Log to Kernel Code

    Let’s say you want to see when a function runs.

    Open a kernel file, for example:

    drivers/base/core.c
    

    Add a log:

    #include <linux/printk.h>
    
    pr_info("Kernel core function executed\n");
    

    Rebuild the kernel, boot it, and check:

    dmesg | grep Kernel
    

    That’s it.
    You just modified kernel sources successfully.

    This is exactly how to modifying kernel sources in real life: small, intentional changes.

    Kernel Configuration Matters More Than You Think

    Many beginners modify code but forget configuration.

    Kernel features are controlled by .config.

    Run:

    make menuconfig
    

    Here you can:

    • Enable or disable drivers
    • Turn debugging options on
    • Control kernel behavior

    Sometimes, you don’t need to modify source code at all. A config change is enough.

    But when config isn’t enough, source modification comes into play.

    Rebuilding the Kernel After Modifications

    After modifying kernel sources, you must rebuild.

    Basic Build Steps

    make -j$(nproc)
    make modules
    make modules_install
    make install
    

    On embedded systems, you’ll usually cross-compile instead.

    Take your time here. Build errors are normal. They’re part of learning.

    Booting Your Modified Kernel Safely

    Never overwrite your working kernel without a backup.

    Best Practices:

    • Keep old kernel entries in GRUB
    • Test on a virtual machine first
    • Use a development board, not production hardware

    If the system fails to boot, you can always select the older kernel.

    This safety net makes modifying kernel sources stress-free.

    Common Mistakes Beginners Make

    Let me save you some frustration.

    1. Editing Without Understanding Context

    Always read surrounding code before modifying anything.

    2. Ignoring Kernel Logs

    dmesg is your best debugging tool.

    3. Making Multiple Changes at Once

    Change one thing. Test. Then move forward.

    4. Skipping Version Control

    Always commit changes. Even bad ones.

    Drivers are the most beginner-friendly area.

    Typical Driver Modifications:

    • Add support for new hardware IDs
    • Change probe behavior
    • Add logging
    • Fix initialization order

    If you’re into embedded systems, this is where you’ll spend most of your time.

    Understanding how to modifying kernel sources in drivers opens doors to BSP development and low-level debugging.

    Kernel debugging is different from user-space debugging.

    Tools You’ll Use:

    • dmesg
    • printk / pr_debug
    • dynamic_debug
    • Kernel panic messages

    Start with logs. Logs solve most problems.

    Performance and Safety Considerations

    Every kernel change affects the whole system.

    Keep in mind:

    • Avoid infinite loops
    • Be careful with memory allocation
    • Never sleep in atomic context
    • Respect locking rules

    You don’t need to master all this now. Just be aware.

    Learning Path After Your First Kernel Modification

    Once you’re comfortable with basic changes, move forward step by step.

    Next Things to Learn:

    • Writing a simple kernel module
    • Understanding kernel synchronization
    • Device tree basics
    • Sysfs interfaces
    • Debugfs usage

    Each builds naturally on modifying kernel sources knowledge.

    Is Modifying Kernel Sources Required for Everyone?

    No. And that’s okay.

    If you’re doing:

    • Application development
    • Web development
    • Simple scripting

    You may never need it.

    But if you’re in:

    • Embedded systems
    • Linux system programming
    • BSP or driver development

    Then learning how to modifying kernel sources is almost unavoidable.

    Real-World Advice From Experience

    Kernel development isn’t about genius. It’s about patience.

    You will:

    • Break builds
    • Trigger warnings
    • Cause crashes

    That’s normal.

    Every kernel developer you admire has been there.

    The key is to:

    • Read code slowly
    • Change less
    • Test more
    • Learn from failures

    What the Linux Kernel Actually Is ?

    Think of the Linux kernel as a middleman.

    • Hardware speaks in signals and registers
    • Applications speak in files, processes, sockets
    • The kernel translates between the two

    When you press a key, save a file, or play audio, the kernel is involved.

    So when we talk about modifying kernel sources, we mean:

    Changing how this middleman behaves.

    Not rewriting Linux.
    Not breaking everything.
    Just changing behavior where needed.

    What Does “Kernel Source Code” Mean in Simple Words?

    Linux is open source. That means:

    • The entire kernel is written in C
    • You can read it
    • You can modify it
    • You can rebuild it

    Kernel source code is just a huge collection of .c and .h files.

    The difference from normal programs is:

    • It runs in kernel space
    • Mistakes affect the whole system

    That’s why we move carefully.

    What Does Modifying Kernel Sources Actually Look Like?

    This is important.

    People imagine kernel modification as something dramatic. In reality, most changes look like this:

    • Adding a few lines
    • Changing a condition
    • Printing debug logs
    • Enabling or disabling a feature

    Example:

    pr_info("Driver initialized successfully\n");
    

    That single line is a kernel source modification.

    So yes, you are already capable of doing it.

    Why People Modify Kernel Sources (Real Reasons)

    Let’s remove theory and talk about real life.

    1. Hardware Doesn’t Work Properly

    Common in embedded systems.

    • GPIO not toggling
    • Audio codec not initializing
    • I2C device missing

    Often the driver exists but needs small changes.

    2. Debugging Deep Issues

    Sometimes user-space tools can’t tell you what’s wrong.

    Kernel logs can.

    So you add logging inside the kernel to understand flow.

    3. Learning Linux Internals

    Reading kernel code teaches:

    • Memory management
    • Scheduling
    • Synchronization
    • Driver architecture

    Nothing teaches better than touching real code.

    4. Career Growth

    If you work with:

    • Embedded Linux
    • BSP
    • Automotive Linux
    • System software

    Knowing how to modifying kernel sources is not optional.

    Fear Control: What Happens If You Mess Up?

    This fear stops most beginners.

    Here’s the reality:

    • Kernel code does not magically affect your system until you build and boot it
    • You can keep your old kernel
    • You can test on VM or dev board

    Worst case:

    • Kernel doesn’t boot
    • You select old kernel and move on

    So no, you won’t “destroy Linux forever”.

    Getting the Kernel Source (Why Git Is Better)

    You have two main ways.

    Tar File Method

    Simple download and extract. Fine for learning.

    Git Method (Better)

    Git gives you:

    • Change history
    • Diff view
    • Easy rollback
    • Patch creation

    When modifying kernel sources seriously, Git becomes essential.

    You’ll often do:

    git diff
    git status
    git checkout .
    

    These commands save lives.

    Understanding the Kernel Directory Structure (Without Panic)

    At first, the kernel source looks like chaos.

    It’s not.

    It’s organized by responsibility.

    drivers/

    This is where most beginners start.

    • GPIO
    • I2C
    • SPI
    • Audio
    • USB
    • Network

    If hardware is involved, it’s probably here.

    arch/

    CPU-specific code.

    ARM code is different from x86.
    You usually don’t touch this early on.

    kernel/

    Core logic:

    • Scheduling
    • Threads
    • Timers
    • Workqueues

    Advanced, but very educational.

    fs/

    File systems.

    include/

    Header files shared across the kernel.

    The Right Way to Start Modifying Kernel Sources

    This is critical advice.

    Never start by adding features.
    Start by observing behavior.

    Step 1: Read the Code

    Before editing:

    • Read function names
    • Read comments
    • Understand flow

    Step 2: Add Logs

    Logs teach you execution order.

    pr_info("Function X entered\n");
    

    Step 3: Build and Test

    Only after verifying logs should you change logic.

    This is the safest way to learn how to modifying kernel sources.

    Kernel Configuration: Why Code Alone Is Not Enough

    Many beginners modify code but forget configuration.

    The kernel uses Kconfig and .config.

    Some code won’t even compile unless enabled.

    make menuconfig lets you:

    • Enable drivers
    • Enable debug features
    • Control kernel behavior

    Sometimes:

    • You don’t need code changes
    • You just need config changes

    Understanding this saves days of confusion.

    Building the Kernel (What’s Really Happening)

    When you run:

    make
    

    The system:

    • Compiles thousands of files
    • Links them together
    • Produces a kernel image

    Build errors are normal.

    They mean:

    • Syntax issue
    • Missing config
    • Wrong include

    Errors are teachers. Don’t fear them.

    Booting the Modified Kernel Safely

    Golden rule:
    Never remove your working kernel.

    Keep:

    • Old kernel
    • New kernel

    GRUB lets you choose.

    On embedded boards:

    • Keep backup image
    • Use recovery mode

    This makes experimenting safe.

    Driver-Level Kernel Modifications (Beginner Sweet Spot)

    If you’re new, drivers are the best place to start.

    Why?

    • Isolated logic
    • Clear entry points
    • Hardware-related behavior

    Common beginner modifications:

    • Add print logs in probe function
    • Change initialization order
    • Fix timing issues

    This is where how to modifying kernel sources becomes practical.

    Kernel Debugging: How You Actually Find Problems

    Kernel debugging is not like GDB user-space debugging.

    Main tools:

    • dmesg
    • printk
    • Kernel panic logs

    When something fails:

    • Read logs
    • Identify last message
    • Trace backward

    Most kernel bugs are logical, not magical.

    Safety Rules You Should Respect (But Not Fear)

    Some rules matter:

    • Don’t sleep in atomic context
    • Lock shared data
    • Free allocated memory
    • Avoid infinite loops

    You don’t need to master these immediately.
    You’ll learn them naturally as issues appear.

    After Basics: Where Do You Go Next?

    Once you’re comfortable:

    • Write a simple kernel module
    • Add sysfs entries
    • Learn device tree basics
    • Explore debugfs
    • Read existing drivers deeply

    Each step builds confidence.

    Do You Need to Modify Kernel Sources Always?

    No.

    Many systems work fine with stock kernel.

    But when you need control, performance, or deep debugging, kernel modification becomes unavoidable.

    That’s why learning how to modifying kernel sources is a long-term investment.

    We’ll take a simple, realistic example that mirrors what happens in embedded projects.

    Scenario (Very Common in Embedded Systems)

    You have:

    • An embedded board
    • A GPIO-controlled LED
    • The GPIO driver exists
    • But you want:
      • Extra debug logs
      • Confirmation that GPIO is initialized correctly

    So you decide to modify the GPIO driver source.

    Step 1: Identify the Right Driver File

    GPIO drivers usually live here:

    drivers/gpio/
    

    Let’s assume your platform uses a GPIO controller driver like:

    drivers/gpio/gpio-xyz.c
    

    (Exact name depends on SoC, but workflow is identical.)

    Step 2: Understand the Driver Structure

    Open the file and don’t touch anything yet.

    You’ll usually see:

    • probe() function
    • remove() function
    • GPIO operations structure
    • Register initialization

    Example skeleton:

    static int xyz_gpio_probe(struct platform_device *pdev)
    {
        // resource allocation
        // register mapping
        // gpiochip registration
        return 0;
    }
    

    Probe function is key
    This runs when the kernel detects the GPIO hardware.

    Step 3: Add Debug Logs (Safest First Modification)

    Before changing logic, add logs to understand flow.

    Modify the probe function

    #include <linux/printk.h>
    
    static int xyz_gpio_probe(struct platform_device *pdev)
    {
        pr_info("XYZ GPIO: probe started\n");
    
        // existing code
    
        pr_info("XYZ GPIO: probe completed successfully\n");
        return 0;
    }
    

    That’s it.
    You’ve modified kernel source code safely.

    Step 4: Build and Deploy

    Rebuild:

    make -j$(nproc)
    make modules
    make dtbs
    

    Flash kernel and dtb to the board.

    Step 5: Verify Using dmesg

    After boot:

    dmesg | grep GPIO
    

    Expected output:

    XYZ GPIO: probe started
    XYZ GPIO: probe completed successfully
    

    If you see this, congratulations
    You just validated:

    • Driver probe executed
    • Kernel modification worked
    • Deployment pipeline is correct

    This is exactly how real kernel debugging starts.

    Step 6: Real Logic Modification Example (Small but Meaningful)

    Now let’s do a real change, not just logs.

    Suppose the GPIO direction is wrongly set by default.

    Original code:

    gpiochip_add_data(&chip, data);
    

    You want to force a GPIO as output during init.

    Modify:

    ret = gpiochip_add_data(&chip, data);
    if (ret)
        return ret;
    
    gpio_direction_output(LED_GPIO, 1);
    pr_info("XYZ GPIO: LED GPIO set as output\n");
    

    This is a real driver modification:

    • Small
    • Targeted
    • Hardware-aware

    This is how kernel work is actually done in companies.

    Step 7: Why This Example Matters

    From an interviewer’s perspective, this proves you understand:

    • Where drivers live
    • What probe does
    • How to debug kernel code
    • Safe kernel modification workflow

    Now let’s switch hats.

    Imagine you’re in an embedded Linux interview.
    These are actual questions interviewers ask.

    Q1: What do you mean by modifying kernel sources?

    Answer:

    Modifying kernel sources means changing the Linux kernel’s C source code to alter or extend kernel behavior, such as fixing drivers, adding debug logs, supporting new hardware, or optimizing system behavior. These changes are rebuilt and deployed as a new kernel image.

    Q2: When would you modify kernel code instead of user space?

    Answer:

    When the issue or feature is related to:

    • Hardware initialization
    • Device drivers
    • Interrupt handling
    • Power management
    • Performance-critical paths

    User space cannot fix problems that originate in kernel space.

    Q3: What is the safest way to start kernel modification?

    Answer:

    Start by:

    • Reading the existing code
    • Adding debug logs using pr_info or printk
    • Making small, isolated changes
    • Testing one change at a time

    This minimizes risk and helps understand execution flow.

    Q4: What is the role of the probe function in a driver?

    Answer:

    The probe function is called when the kernel matches a driver with a device. It is responsible for:

    • Allocating resources
    • Mapping registers
    • Initializing hardware
    • Registering the driver with kernel subsystems

    Most driver debugging starts in the probe function.

    Q5: How do you debug kernel modifications?

    Answer:

    Common methods include:

    • Using dmesg to read kernel logs
    • Adding printk or pr_info statements
    • Observing boot logs via serial console
    • Checking for kernel warnings or panics

    Kernel debugging relies heavily on logging.

    Q6: What is the difference between device tree changes and driver changes?

    Answer:

    • Device tree changes describe hardware configuration like pins, interrupts, and addresses.
    • Driver changes modify software logic like initialization sequence or feature handling.

    Most embedded issues should first be checked in the device tree.

    Q7: Can a wrong kernel modification brick a board?

    Answer:

    A wrong kernel can prevent boot, but boards are rarely permanently bricked. Keeping:

    • A backup kernel
    • Recovery method (UART, SD card, fastboot)

    makes kernel experimentation safe.

    Q8: Why is Git important in kernel development?

    Answer:

    Git helps:

    • Track changes
    • Revert mistakes
    • Create patches
    • Review differences

    Kernel development without version control is risky and unprofessional.

    Q9: What precautions do you take before modifying kernel code?

    Answer:

    • Understand hardware and requirements
    • Read related code paths
    • Enable required kernel config options
    • Keep a working kernel backup
    • Modify one thing at a time

    Q10: How do you explain kernel modification experience in interviews?

    Answer (Strong Answer):

    “I worked on embedded Linux boards where I modified kernel drivers to debug hardware issues, added logs in probe functions, adjusted initialization logic, and rebuilt and tested kernels using cross-compilation. I followed safe workflows with backups and incremental testing.”

    We’ll use a very realistic scenario that happens in embedded projects.

    The Scenario (Straight From Real Projects)

    You have:

    • An embedded Linux board
    • An I2C sensor or EEPROM
    • The driver exists in the kernel
    • But the device:
      • Sometimes doesn’t probe
      • Or works unreliably at boot

    Your task:

    Modify the I2C driver to debug and fix the issue.

    Step 1: Understand the I2C Stack (Simple Mental Model)

    Before touching code, understand the layers.

    User Space (i2c-tools, app)
            ↓
    I2C Client Driver (sensor, EEPROM)
            ↓
    I2C Core
            ↓
    I2C Controller Driver
            ↓
    Hardware (SoC I2C)
    

    Most modifications happen in the I2C client driver, not the controller.

    Step 2: Locate the I2C Driver Source File

    I2C client drivers usually live here:

    drivers/i2c/
    drivers/i2c/chips/
    drivers/i2c/busses/
    

    Example driver:

    drivers/i2c/chips/xyz_temp_sensor.c
    

    This file controls how the kernel talks to the I2C device.

    Step 3: Identify the Probe Function (Always the Starting Point)

    Open the driver and look for:

    static int xyz_probe(struct i2c_client *client,
                         const struct i2c_device_id *id)
    

    This function runs when:

    • Kernel detects an I2C device
    • Device tree or ACPI matches it

    Most I2C issues happen here.

    Step 4: Add Debug Logs to Confirm Probe Execution

    First modification should always be logging.

    Add logs at probe entry

    #include <linux/printk.h>
    
    static int xyz_probe(struct i2c_client *client,
                         const struct i2c_device_id *id)
    {
        pr_info("XYZ I2C: probe started, addr=0x%x\n", client->addr);
    
        // existing code
    
        pr_info("XYZ I2C: probe completed successfully\n");
        return 0;
    }
    

    Why this matters:

    • Confirms device detection
    • Confirms I2C address
    • Confirms probe completion

    This single change answers 50% of I2C debugging questions.

    Step 5: Real Problem: Device Needs Delay Before Register Access

    Very common issue.

    Some I2C devices:

    • Need power stabilization
    • Need reset time
    • Fail if accessed too early

    Original code:

    ret = i2c_smbus_read_byte_data(client, REG_ID);
    

    Device fails intermittently.

    Step 6: Modify Driver to Add Delay (Real Fix)

    Add a small delay before register access.

    #include <linux/delay.h>
    
    msleep(20);
    
    ret = i2c_smbus_read_byte_data(client, REG_ID);
    if (ret < 0) {
        pr_err("XYZ I2C: failed to read ID register\n");
        return ret;
    }
    
    pr_info("XYZ I2C: device ID read successfully\n");
    

    This is a real, production-grade fix.

    You didn’t change architecture.
    You respected hardware timing.

    Step 7: Improve Error Handling (Interview-Worthy Change)

    Many drivers fail silently.

    Let’s improve that.

    Original:

    if (ret < 0)
        return ret;
    

    Modified:

    if (ret < 0) {
        pr_err("XYZ I2C: register read failed, error=%d\n", ret);
        return ret;
    }
    

    Now debugging future issues becomes easier.

    Step 8: Verify Device Tree Is Correct (Critical Step)

    Before blaming driver, always verify DT.

    Example:

    i2c1: i2c@40066000 {
        status = "okay";
    
        xyz@48 {
            compatible = "vendor,xyz-temp";
            reg = <0x48>;
        };
    };
    

    Driver and DT must match:

    • compatible string
    • I2C address

    Many “driver bugs” are actually DT mistakes.

    Step 9: Build and Deploy Modified Kernel

    Rebuild kernel and device tree:

    make -j$(nproc)
    make dtbs
    

    Flash to board.

    Step 10: Validate Using i2c-tools and dmesg

    On the board:

    dmesg | grep XYZ
    

    Expected:

    XYZ I2C: probe started, addr=0x48
    XYZ I2C: device ID read successfully
    XYZ I2C: probe completed successfully
    

    You can also use:

    i2cdetect -y 1
    

    This confirms hardware visibility.

    Why This Example Is Gold for Interviews

    You demonstrated:

    • Understanding of I2C architecture
    • Proper probe debugging
    • Hardware-aware delay handling
    • Clean error reporting
    • Safe kernel modification workflow

    This is exactly what interviewers want.

    Bonus: Quick SPI Driver Modification Comparison

    SPI drivers are similar but with differences.

    SPI probe function:

    static int xyz_spi_probe(struct spi_device *spi)
    

    Common SPI modification:

    • Adjust SPI mode
    • Set max speed
    • Fix chip select behavior

    Example:

    spi->mode = SPI_MODE_0;
    spi->max_speed_hz = 1000000;
    spi_setup(spi);
    

    Same workflow. Different bus.

    Common Beginner Mistakes in I2C/SPI Modifications

    Avoid these:

    • Ignoring device tree
    • Modifying controller instead of client
    • Not checking return values
    • Adding delays blindly without reason
    • Changing multiple things at once

    If you work with Linux at anything below the application layer, sooner or later you run into one unavoidable topic: kernel configuration and compilation. It sounds heavy. It sounds scary. And honestly, most tutorials make it worse by throwing options, commands, and theory at you without context.

    Let’s fix that.

    In this guide, we’ll walk through kernel configuration and compilation step by step, in plain language. You’ll understand why we configure the kernel, how compilation actually works, and what matters in real embedded and Linux development. No fluff. No marketing talk. Just real understanding.

    What Is Kernel Configuration and Compilation?

    At a high level, kernel configuration and compilation is the process of:

    1. Selecting which features the Linux kernel should include
    2. Turning that configuration into a binary kernel image
    3. Installing that kernel so the system can boot with it

    The Linux kernel is not a single fixed binary. It’s more like a massive toolkit. You decide what tools you want, and then you build a kernel that fits your system.

    This is especially important for:

    • Embedded boards
    • Custom hardware
    • Performance-sensitive systems
    • Learning kernel internals properly

    Why Kernel Configuration Matters More Than You Think

    A common beginner mistake is assuming kernel configuration is optional or something only distro maintainers do. That’s not true.

    Here’s why kernel configuration matters:

    • Hardware support
      The kernel must know which drivers to include for your CPU, storage, display, network, and peripherals.
    • Boot time and size
      Including everything makes the kernel huge and slow. Embedded systems suffer badly from this.
    • Stability
      Wrong options can cause random crashes, boot failures, or subtle bugs.
    • Security
      Unused subsystems increase attack surface.

    Kernel configuration is about control. Compilation is just the final step.

    Understanding the Linux Kernel Source Tree

    Before touching configuration, you need to understand what you’re configuring.

    When you download Linux kernel source, you’ll see directories like:

    • arch/ – architecture-specific code (ARM, x86, RISC-V)
    • drivers/ – device drivers
    • fs/ – file systems
    • kernel/ – core kernel logic
    • net/ – networking stack
    • include/ – header files

    Kernel configuration doesn’t modify these files directly. Instead, it decides which parts get compiled.

    That decision lives in a file called .config.

    What Is the .config File?

    The .config file is the heart of kernel configuration and compilation.

    It contains thousands of options like:

    • CONFIG_USB=y
    • CONFIG_I2C=m
    • CONFIG_PREEMPT=y

    Each option tells the build system one of three things:

    • y – compile it into the kernel
    • m – compile it as a module
    • not set – don’t include it

    Everything you do during kernel configuration ultimately edits this file.

    Kernel Configuration Tools Explained Simply

    Linux gives you multiple ways to configure the kernel. They all do the same thing: generate a .config file.

    1. menuconfig

    This is the most popular option and the best for beginners.

    It gives you a text-based menu where you can:

    • Navigate categories
    • Enable or disable features
    • Search for specific options

    It feels like an old-school BIOS screen, and that’s a good thing.

    2. nconfig

    Similar to menuconfig, but more keyboard-friendly and modern.

    3. xconfig and gconfig

    Graphical interfaces using Qt or GTK. These are less common today, especially in embedded workflows.

    4. defconfig

    This uses a default configuration provided by the kernel or board vendor.

    For example:

    • x86_64_defconfig
    • arm_defconfig

    This is often your starting point.

    A Practical Kernel Configuration Workflow

    Let’s talk about how kernel configuration and compilation actually happens in real projects.

    Step 1: Start With a Base Configuration

    Never start from scratch unless you enjoy pain.

    For desktop systems:

    • Use your current kernel config from /boot/config-*

    For embedded boards:

    • Use vendor-provided defconfig
    • Or make ARCH=arm defconfig

    This ensures basic hardware support is already there.

    Step 2: Open the Configuration Menu

    Once you have a base config, you refine it.

    You usually do this with menuconfig.

    Inside the menu, you’ll see categories like:

    • Processor type and features
    • Device Drivers
    • Networking support
    • File systems

    Don’t randomly toggle options. Always ask:

    • Do I need this hardware?
    • Will this run as built-in or module?
    • Is this required at boot?

    Step 3: Understanding Built-in vs Modules

    This is one of the most important decisions in kernel configuration.

    • Built-in (y)
      Needed for boot-critical components like:
      • Root filesystem drivers
      • Storage controller drivers
      • CPU support
    • Module (m)
      Good for:
      • Optional hardware
      • USB devices
      • Development and debugging

    Embedded systems usually prefer built-in drivers for reliability.

    Common Kernel Configuration Mistakes Beginners Make

    Let’s save you some pain.

    Enabling Everything

    More features do not mean better kernel. It means:

    • Larger image
    • Slower boot
    • Harder debugging

    Disabling Something Without Knowing Dependencies

    Kernel options depend on each other. Disabling one thing can silently break another.

    Ignoring Architecture Settings

    The arch/ configuration is critical. Wrong CPU or memory model means the kernel won’t boot.

    From Configuration to Compilation: What Happens Next?

    Once the .config file is ready, kernel compilation begins.

    Kernel compilation is just a structured build process using:

    • GCC or Clang
    • Makefiles
    • Kbuild system

    But under the hood, it’s doing something very logical.

    Understanding the Kernel Compilation Process

    During kernel compilation:

    1. The build system reads .config
    2. It selects which source files to compile
    3. It compiles them into object files
    4. It links them into:
      • vmlinux (uncompressed kernel)
      • bzImage, zImage, or Image (bootable kernel)

    The exact output depends on architecture.

    This is why kernel configuration and compilation are inseparable. One drives the other.

    Kernel Compilation for Embedded Boards

    Embedded systems add a few extra steps.

    Cross Compilation

    Most embedded boards use ARM or RISC-V, not x86.

    This means:

    • Your compiler runs on x86
    • The output runs on ARM

    This is called cross compilation.

    You must set:

    • Architecture
    • Cross compiler prefix

    If these are wrong, compilation may succeed but the kernel won’t boot.

    Device Tree and Kernel Compilation

    Modern embedded Linux uses Device Tree.

    The kernel is compiled once, but hardware description lives in .dtb files.

    Kernel compilation often includes:

    • Kernel image
    • Device Tree Blob
    • Optional initramfs

    They work together at boot.

    Installing the Compiled Kernel

    After successful kernel compilation, you need to install it.

    On desktops:

    • Kernel image goes to /boot
    • Modules go to /lib/modules/<version>

    On embedded systems:

    • Kernel image goes to bootloader storage
    • Modules go to root filesystem

    Installation is where many first-time kernel builders panic. Take it slow.

    Verifying Your Kernel Build

    Before celebrating, always verify.

    Check:

    • Kernel version string
    • Boot logs
    • Loaded modules
    • Hardware detection

    If something doesn’t work, go back to configuration, not random patches.

    Debugging Kernel Configuration and Compilation Issues

    When things break, it’s usually due to:

    • Missing configuration option
    • Wrong built-in vs module choice
    • Architecture mismatch
    • Toolchain issues

    The fix is almost always in the configuration, not the code.

    This is why understanding kernel configuration and compilation deeply saves huge amounts of time.

    How Kernel Configuration Impacts Performance

    Kernel configuration is not just about making it work. It’s about making it work well.

    Good configuration can:

    • Reduce boot time
    • Improve latency
    • Lower memory usage
    • Improve power efficiency

    Bad configuration does the opposite.

    This is especially critical in automotive, IoT, and real-time systems.

    Real-World Use Case: Why Professionals Care

    In real embedded projects:

    • Kernel configuration is version-controlled
    • Changes are reviewed carefully
    • Compilation is automated using CI

    Nobody randomly edits the kernel. Every change has a reason.

    Learning kernel configuration and compilation puts you closer to professional kernel development.

    Interview Perspective: Why This Topic Matters

    Interviewers love this topic because it shows depth.

    They’re not testing memorization. They want to know:

    • Do you understand how Linux boots?
    • Can you support new hardware?
    • Can you debug low-level issues?

    If you can explain kernel configuration and compilation clearly, you stand out immediately.

    Best Practices for Kernel Configuration and Compilation

    Let’s wrap the technical part with solid habits.

    • Always keep your .config under version control
    • Document why options are enabled or disabled
    • Start from a known working config
    • Change one thing at a time
    • Test after every build

    These habits matter more than memorizing commands.

    Step 1: Set Up the Environment

    Before touching the kernel:

    1. Install required tools on your Linux host (x86 machine):
    sudo apt-get update
    sudo apt-get install build-essential libncurses-dev bison flex libssl-dev libelf-dev bc
    
    1. Install the cross-compiler for ARM (for BeagleBone Black, ARMv7):
    sudo apt-get install gcc-arm-linux-gnueabihf
    

    This is important: your host CPU is x86, but the board is ARM. We need a cross-compiler to generate ARM binaries.

    Step 2: Get the Kernel Source

    Download the kernel source from kernel.org or your board vendor:

    wget https://cdn.kernel.org/pub/linux/kernel/v6.x/linux-6.6.tar.xz
    tar -xvf linux-6.6.tar.xz
    cd linux-6.6
    

    Now you’re in the Linux source tree.

    Step 3: Start With a Base Configuration

    Boards usually provide a defconfig, a default config for the hardware. For BeagleBone Black:

    make ARCH=arm CROSS_COMPILE=arm-linux-gnueabihf- am335x_boneblack_defconfig
    
    • ARCH=arm tells the kernel you’re building for ARM architecture
    • CROSS_COMPILE=arm-linux-gnueabihf- tells it which compiler to use
    • am335x_boneblack_defconfig is the board’s default configuration

    This generates a .config file in the source directory.

    Step 4: Customize Configuration

    Now, let’s refine it using menuconfig:

    make ARCH=arm CROSS_COMPILE=arm-linux-gnueabihf- menuconfig
    

    You’ll see a menu with categories. Here’s what we usually do for BeagleBone Black:

    Key Sections to Check:

    1. Processor Type and Features
      • Confirm CPU type: Cortex-A8
      • Enable NEON and VFP if using floating-point intensive apps
    2. Device Drivers → I2C Support
      • Enable I2C as built-in or module (y or m)
      • Add support for specific devices if needed, e.g., I2C_TWL4030 for power management
    3. Device Drivers → SPI Support
      • Enable SPI master and relevant SPI devices
      • Useful if you plan to connect sensors or displays
    4. File Systems
      • Enable ext4 if your root filesystem uses it
      • Include FAT or VFAT if using SD card support
    5. Networking
      • Enable Ethernet driver for AM335x PHY
      • Optional: Wi-Fi or USB network if using modules
    6. USB Support
      • Enable USB host controller (EHCI) for peripherals
      • Enable USB Gadget if you want the board to act as a device
    7. Kernel Features
      • Enable Preemption Model: “Voluntary Preemption” for desktop-like responsiveness, or “No Preemption” for real-time reliability
      • Enable initramfs if you plan to embed modules inside kernel

    Once done, save .config and exit.

    Step 5: Compile the Kernel

    Now we build the kernel and modules:

    make ARCH=arm CROSS_COMPILE=arm-linux-gnueabihf- zImage modules dtbs -j$(nproc)
    
    • zImage – compressed kernel image
    • modules – all kernel modules (.ko)
    • dtbs – device tree blobs
    • -j$(nproc) – parallel compilation using all CPU cores

    Tip: For embedded boards, compilation can take several minutes to over an hour depending on your PC.

    Step 6: Install Modules and Kernel

    1. Create a folder for modules:
    mkdir -p ~/bbb-rootfs/lib/modules
    
    1. Copy modules:
    make ARCH=arm CROSS_COMPILE=arm-linux-gnueabihf- INSTALL_MOD_PATH=~/bbb-rootfs modules_install
    
    1. Copy kernel and device tree:
    cp arch/arm/boot/zImage ~/bbb-boot/
    cp arch/arm/boot/dts/am335x-boneblack.dtb ~/bbb-boot/
    

    Now your bootloader can load zImage and am335x-boneblack.dtb.

    Step 7: Boot and Verify

    1. Flash the bootloader and root filesystem if not already done.
    2. Boot the board.
    3. Check kernel version:
    uname -r
    
    1. Verify modules:
    lsmod
    
    1. Check hardware detection:
    dmesg | grep i2c
    dmesg | grep spi
    

    If everything works, congratulations! You’ve just done kernel configuration and compilation for an ARM board.

    Step 8: Common Pitfalls for Beginners

    • Wrong cross-compiler → Kernel builds but won’t boot
    • Missing essential drivers → Kernel panics on boot
    • Wrong device tree → Board boots but peripherals fail
    • Forgetting modules_install → Modules not available at runtime

    Step 9: Tips for Real Embedded Development

    • Keep a versioned .config file in Git
    • Test changes incrementally
    • Document why you changed any option
    • Use a CI system if working on multiple boards or kernels

    Optional: Quick SPI/I2C Driver Test

    If you enabled I2C or SPI in the kernel:

    # List I2C devices
    i2cdetect -y 1
    
    # List SPI devices
    ls /dev/spidev*
    

    This ensures kernel configuration matches your hardware setup.

    1. What is kernel configuration and compilation in Linux?

    Answer:
    Kernel configuration and compilation is the process of customizing the Linux kernel for your system by selecting which features, drivers, and modules to include, and then building a binary kernel image that your machine can run. Proper configuration ensures hardware compatibility, better performance, and system stability.

    2. Why is kernel configuration important for ARM boards?

    Answer:
    ARM boards have diverse hardware components like CPUs, I2C, SPI, and USB peripherals. Kernel configuration allows you to include only the necessary drivers and modules, reducing kernel size, improving boot time, and ensuring that all hardware works reliably.

    3. How do I start kernel configuration for an embedded board?

    Answer:
    The easiest way is to start with a defconfig provided by your board vendor. For example, for BeagleBone Black, you can use:
    make ARCH=arm CROSS_COMPILE=arm-linux-gnueabihf- am335x_boneblack_defconfig
    This gives you a solid starting point, which you can further refine using menuconfig or nconfig.

    4. What is the difference between built-in and module drivers in kernel configuration?

    Answer:

    • Built-in (y): Compiled directly into the kernel; necessary for boot-critical hardware.
    • Module (m): Compiled as a loadable kernel module; can be loaded or unloaded at runtime.
      Choosing the right type ensures efficient memory usage and system reliability.

    5. How do I compile the Linux kernel after configuration?

    Answer:
    After configuration, use the following command:

    make ARCH=arm CROSS_COMPILE=arm-linux-gnueabihf- zImage modules dtbs -j$(nproc)
    

    This builds the kernel image, modules, and device tree blobs for your ARM board.

    6. How do I install compiled kernel modules?

    Answer:
    Use modules_install with an installation path pointing to your root filesystem:

    make ARCH=arm CROSS_COMPILE=arm-linux-gnueabihf- INSTALL_MOD_PATH=~/rootfs modules_install
    

    This ensures all required modules are available when the kernel boots.

    7. What are the common mistakes to avoid during kernel configuration?

    Answer:

    • Enabling unnecessary features, which bloats the kernel
    • Disabling essential drivers or CPU support
    • Using the wrong architecture or cross-compiler
    • Forgetting to install modules
      Avoiding these mistakes saves hours of troubleshooting.

    8. How can I verify my compiled kernel is working correctly?

    Answer:
    After booting your board with the new kernel, check:

    • Kernel version: uname -r
    • Loaded modules: lsmod
    • Hardware detection: dmesg | grep i2c or dmesg | grep spi
      Proper verification ensures the configuration matches your hardware.

    9. Can kernel configuration improve system performance?

    Answer:
    Yes. A well-configured kernel reduces boot time, memory usage, and CPU overhead. By including only necessary features and drivers, you create a lean, fast, and secure kernel optimized for your embedded board.

    10. Is kernel configuration and compilation necessary for beginners?

    Answer:
    Absolutely. Even beginners benefit from learning kernel configuration and compilation. It builds a strong foundation in Linux system programming, helps debug hardware issues, and prepares you for advanced embedded development on ARM or other architectures.
    Read More about Process : What is is Process

    Read More about System Call in Linux : What is System call

    Read More about IPC : What is IPC

  • How to Master Essentials of Linux Kernel Architecture : Complete Guide with All Interview Questions (2026)

    Learn the Essentials of Linux Kernel Architecture with our comprehensive guide. Master core concepts, understand kernel components, and prepare for all Linux kernel interview questions. Perfect for beginners and professionals aiming to excel in Linux system programming.

    If you have ever used Linux, whether on a server, embedded device, Android phone, or development board, you have already relied on the Linux kernel. It works quietly in the background, managing hardware, memory, processes, and communication between software and devices. Yet for many beginners, the kernel feels mysterious and complex.

    This article breaks down the Essentials of Linux kernel architecture in a clear, human, and beginner-friendly way. Just real explanations that help you understand how the Linux kernel is designed, how its major components work together, and why this architecture has made Linux so powerful and popular.

    By the end of this guide, you will have a solid mental model of how the Linux kernel works internally and why its architecture matters in real-world systems.

    What Is the Linux Kernel?

    At its core, the Linux kernel is the heart of the operating system. It sits between user applications and the hardware.

    When you open a file, start a program, connect to the internet, or plug in a USB device, your application does not talk directly to the hardware. Instead, it makes a request to the kernel. The kernel decides what is allowed, manages resources, and communicates with the hardware safely.

    In simple terms:

    • Applications ask for services
    • Kernel manages and controls everything
    • Hardware does the actual physical work

    This layered design is the foundation of Linux kernel architecture.

    Why Linux Kernel Architecture Matter

    Understanding the Essentials of Linux kernel architecture is important for several reasons:

    • It helps you debug system-level problems
    • It improves performance tuning skills
    • It is essential for kernel development, device drivers, and embedded systems
    • It is a common interview topic for Linux and embedded roles

    Linux is used everywhere because its kernel architecture is modular, efficient, and scalable. The same kernel design runs on tiny microcontrollers and massive cloud servers.

    Monolithic Kernel Design in Linux

    Linux uses a monolithic kernel architecture, but with a modern twist.

    In a traditional monolithic kernel:

    • All core services run in kernel space
    • Memory management, process scheduling, file systems, and device drivers are part of the kernel

    Linux follows this approach, but it also supports loadable kernel modules, which makes it flexible.

    Why Linux Chose a Monolithic Kernel

    A monolithic kernel offers:

    • Faster performance due to fewer context switches
    • Direct communication between kernel components
    • Lower overhead compared to microkernels

    The downside is complexity, but Linux solves this with modular design.

    Kernel Space vs User Space

    One of the most important concepts in Linux kernel architecture is the separation between kernel space and user space.

    User Space

    User space is where applications run. Examples include:

    • Web browsers
    • Shells like bash
    • Media players
    • Your own C or Python programs

    Applications in user space have limited privileges. They cannot directly access hardware or critical memory.

    Kernel Space

    Kernel space is where the Linux kernel runs. Code here has:

    • Full access to hardware
    • Control over memory and CPU
    • Responsibility for system stability

    This separation improves security and stability. If an application crashes, it usually does not crash the whole system.

    System Calls: The Bridge Between User and Kernel

    Applications interact with the kernel using system calls.

    A system call is a controlled entry point into the kernel. Common examples include:

    • open() for files
    • read() and write() for I/O
    • fork() and exec() for process creation

    From a Linux kernel architecture point of view, system calls are critical because they define how user space safely requests kernel services.

    Process Management in Linux Kernel

    Process management is a core part of the Essentials of Linux kernel architecture.

    What Is a Process?

    A process is a running instance of a program. The kernel keeps track of each process using a structure called task_struct.

    This structure stores:

    • Process ID (PID)
    • State (running, sleeping, stopped)
    • Priority
    • Memory information
    • Open files

    Process Scheduling

    The Linux kernel uses a scheduler to decide which process runs on the CPU.

    Key features include:

    • Preemptive multitasking
    • Fair scheduling for interactive tasks
    • Support for real-time scheduling

    The Completely Fair Scheduler (CFS) is commonly used and aims to give each process a fair share of CPU time.

    Memory Management in Linux Kernel

    Memory management is another essential building block of Linux kernel architecture.

    Virtual Memory

    Linux uses virtual memory to give each process the illusion that it has its own private memory.

    Benefits include:

    • Process isolation
    • Efficient memory usage
    • Support for swapping

    Paging and Address Translation

    The kernel uses paging to map virtual addresses to physical memory. Hardware support from the MMU (Memory Management Unit) helps with fast translation.

    Kernel Memory vs User Memory

    The kernel carefully separates:

    • User process memory
    • Kernel memory

    This prevents applications from corrupting kernel data.

    File System Architecture

    Linux treats almost everything as a file. This philosophy is deeply embedded in Linux kernel architecture.

    Virtual File System (VFS)

    The Virtual File System is an abstraction layer that allows Linux to support multiple file systems.

    Examples include:

    • ext4
    • XFS
    • Btrfs
    • FAT

    VFS provides a common interface so applications do not need to know which file system is in use.

    Device Drivers and Hardware Interaction

    Device drivers are the glue between hardware and the kernel.

    In Linux kernel architecture:

    • Drivers run in kernel space
    • They expose standard interfaces to user space
    • They are often loadable as kernel modules

    This modular approach allows:

    • Dynamic loading and unloading of drivers
    • Smaller kernel images
    • Easier development and debugging

    Loadable Kernel Modules

    One of the most powerful features in the Essentials of Linux kernel architecture is support for Loadable Kernel Modules (LKMs).

    Modules allow you to:

    • Add functionality without rebooting
    • Develop drivers independently
    • Reduce kernel size

    Common examples include:

    • USB drivers
    • Network drivers
    • File system modules

    Interrupt Handling in Linux Kernel

    Hardware devices need a way to notify the CPU. This is done using interrupts.

    The Linux kernel:

    • Registers interrupt handlers
    • Responds quickly to hardware events
    • Uses deferred work mechanisms like softirqs and tasklets

    Efficient interrupt handling is critical for performance and responsiveness.

    Inter-Process Communication (IPC)

    Processes often need to communicate. Linux kernel architecture supports multiple IPC mechanisms:

    • Pipes
    • Signals
    • Message queues
    • Shared memory
    • Sockets

    Each method serves a different use case, from simple parent-child communication to high-performance data sharing.

    Networking Stack in the Linux Kernel

    The Linux kernel includes a full networking stack.

    Key layers include:

    • Network device drivers
    • IP layer
    • Transport protocols like TCP and UDP
    • Socket interface for applications

    This integrated design allows Linux to power everything from routers to cloud servers.

    Security Model in Linux Kernel Architecture

    Security is built into the kernel design.

    Important elements include:

    • User and group permissions
    • Capability-based security
    • Mandatory Access Control frameworks like SELinux and AppArmor

    The kernel enforces these rules consistently across the system.

    Kernel Preemption and Real-Time Support

    Linux supports different levels of kernel preemption.

    This is especially important for:

    • Embedded systems
    • Audio processing
    • Automotive and industrial applications

    Real-time patches further enhance deterministic behavior.

    Boot Process and Kernel Initialization

    Understanding kernel architecture also means understanding how Linux boots.

    High-level steps include:

    1. Bootloader loads the kernel
    2. Kernel initializes hardware
    3. Kernel mounts the root file system
    4. First user process (init or systemd) starts

    Each step relies on tightly coordinated kernel components.

    Why Linux Kernel Architecture Scales So Well

    One reason Linux dominates servers, cloud, and embedded systems is its scalable architecture.

    It supports:

    • Multiple CPU architectures
    • SMP and NUMA systems
    • Tiny embedded boards and massive servers

    This flexibility comes from clean internal abstractions and modular design.

    Common Misconceptions About Linux Kernel Architecture

    Let’s clear a few myths:

    • Linux is not a microkernel
    • Drivers do not always crash the system if written properly
    • Kernel development is hard but not impossible

    With the right understanding, the kernel becomes approachable.

    How Beginners Should Learn Linux Kernel Architecture

    If you are new, focus on:

    • Understanding kernel vs user space
    • Learning system calls
    • Exploring process and memory management
    • Writing simple kernel modules

    Reading code becomes much easier once the architecture makes sense.

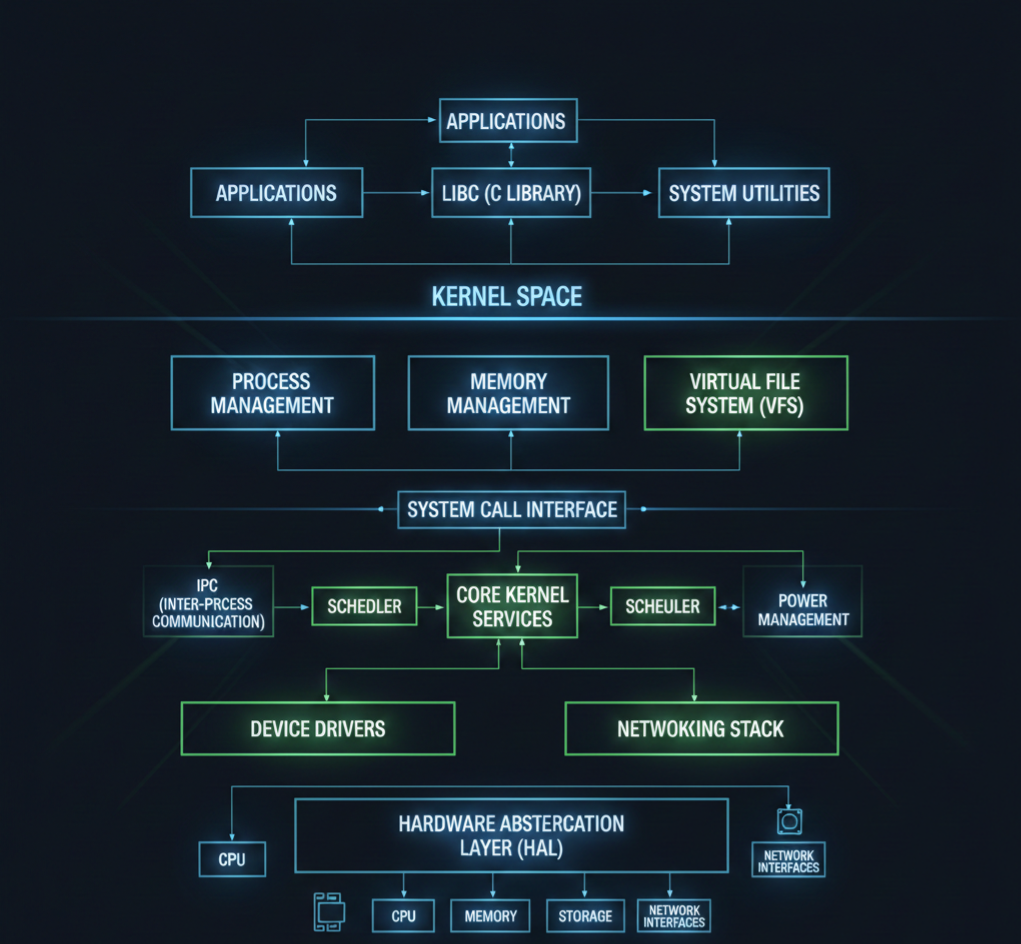
    Linux Kernel Architecture Diagram

    Think of Linux kernel architecture like a well-organized city. Applications live on the surface, hardware lives underground, and the kernel is the intelligent system running everything in between.

    Linux Kernel Architecture

    Let’s start with a simple logical diagram.

    Linux Kernel Architecture Diagram (Conceptual View)

    +--------------------------------------------------+
    |                  User Space                      |
    |                                                  |
    |  Applications (Browser, Editor, Media Player)    |
    |  Shell (bash, zsh)                               |
    |  System Utilities                                |
    |                                                  |
    +--------------------|-----------------------------+
                         | System Calls
    +--------------------v-----------------------------+
    |                  Kernel Space                    |
    |                                                  |
    |  +--------------------------------------------+  |
    |  |           System Call Interface             |  |
    |  +--------------------------------------------+  |
    |                                                  |
    |  Process Management   Memory Management          |
    |  (Scheduler, Tasks)   (Paging, Virtual Memory)   |
    |                                                  |
    |  File System (VFS)    Inter-Process Communication|
    |  (ext4, XFS)         (Pipes, Signals, Sockets)  |
    |                                                  |
    |  Networking Stack     Device Drivers             |
    |  (TCP/IP)             (USB, Audio, Display)     |
    |                                                  |
    |  Interrupt Handling   Power Management           |
    |                                                  |
    +--------------------|-----------------------------+
                         |
    +--------------------v-----------------------------+
    |                    Hardware                      |
    |  CPU | RAM | Disk | Network | USB | Display     |
    +--------------------------------------------------+
    

    Now let’s break this down layer by layer.

    1. User Space (Where Applications Live)

    This is the top layer of the Linux kernel architecture.

    What runs here?

    • Browsers
    • Media players
    • Text editors
    • Shells like bash
    • Your own C, C++, Python programs

    Important point:

    User space cannot directly access hardware.
    Everything must go through the kernel.

    This separation keeps the system safe and stable. If an app crashes, the kernel stays alive.

    2. System Call Interface (The Gateway)

    The system call interface is the bridge between user space and kernel space.

    When an application wants to:

    • Read a file
    • Allocate memory
    • Create a process
    • Send data over the network

    It makes a system call.

    Common system calls:

    • open()
    • read()
    • write()
    • fork()
    • exec()

    Think of system calls as a formal request form that applications submit to the kernel.

    3. Kernel Space (The Brain of the System)

    This is where the real work happens. The kernel runs with full privileges and controls all system resources.

    Let’s go component by component.

    4. Process Management

    Process management is a core pillar of Linux kernel architecture.

    What it handles:

    • Creating processes
    • Killing processes
    • Scheduling CPU time
    • Context switching

    The kernel uses internal structures to track each process and a scheduler to decide who runs and when.

    This is why Linux can run hundreds of processes smoothly.

    5. Memory Management

    Memory management ensures every process gets memory safely and efficiently.

    Key responsibilities:

    • Virtual memory
    • Paging
    • Memory protection
    • Kernel vs user memory separation

    Each process thinks it owns all the memory, but the kernel quietly manages the illusion.

    This design prevents one process from corrupting another.

    6. File System Layer (VFS)

    Linux supports many file systems, but applications don’t care which one you use.

    That’s because of the Virtual File System (VFS).

    What VFS does:

    • Provides a common interface for file operations
    • Allows ext4, XFS, FAT, and others to work together
    • Keeps applications portable

    This is a classic example of smart kernel architecture design.

    7. Device Drivers

    Device drivers are how the kernel talks to hardware.

    Examples:

    • Keyboard drivers
    • USB drivers
    • Audio drivers
    • Network card drivers

    Drivers run in kernel space and expose standard interfaces to user space.

    Linux supports loadable kernel modules, so drivers can be added or removed without rebooting.

    8. Networking Stack

    The Linux kernel includes a full networking implementation.

    Includes:

    • Network device drivers
    • IP layer
    • TCP and UDP
    • Socket interface

    This allows Linux to function as:

    • A desktop OS
    • A server OS
    • A router
    • A cloud platform

    All using the same kernel architecture.

    9. Inter-Process Communication (IPC)

    Processes often need to talk to each other.

    Linux kernel architecture supports multiple IPC mechanisms:

    • Pipes
    • Signals
    • Message queues
    • Shared memory
    • Sockets

    Each one exists because different problems need different communication styles.

    10. Interrupt Handling

    Hardware devices need attention from the CPU.

    They use interrupts to signal the kernel.

    The kernel:

    • Handles interrupts quickly
    • Defers heavy work
    • Keeps the system responsive

    Efficient interrupt handling is critical for performance.

    11. Hardware Layer

    This is the physical world:

    • CPU
    • RAM
    • Disk
    • Network card
    • Sensors
    • Displays

    The kernel is the only layer allowed to touch hardware directly.

    This design keeps hardware access controlled and secure.

    How All Layers Work Together

    Here’s a simple flow example:

    1. You click “Save” in a text editor
    2. The app makes a system call
    3. The kernel checks permissions
    4. VFS routes the request
    5. File system writes data
    6. Device driver talks to disk
    7. Hardware stores the data

    All of this happens in milliseconds.

    Why This Architecture Is So Powerful

    The Linux kernel architecture is:

    • Modular
    • Secure
    • High-performance
    • Scalable

    That’s why the same kernel runs on:

    • Android phones
    • Embedded boards
    • Servers
    • Supercomputers

    Basic Linux Kernel Programming Questions

    1. What is the Linux kernel and its primary responsibilities?
    2. What are the differences between user space and kernel space?
    3. Explain the process context vs interrupt context in Linux kernel.
    4. What are system calls? Give examples.
    5. How does the Linux kernel manage memory?
    6. What are kernel modules? How do you load and unload a module?
    7. Explain the proc filesystem and its usage.
    8. What are character devices and block devices?
    9. What is a major number and a minor number in Linux device drivers?
    10. What is init_module and cleanup_module in kernel modules?
    11. Explain the difference between static and dynamic kernel modules.
    12. What are kernel threads, and how do you create them?
    13. What is spinlock, and how is it different from a mutex?
    14. Explain preemption in Linux kernel.
    15. What is a wait queue? How is it used in kernel programming?

    Intermediate Linux Kernel Programming Questions

    1. What is the difference between copy_to_user() and copy_from_user()?
    2. Explain the kernel memory allocation methods (kmalloc, vmalloc, etc.).
    3. What is a task_struct, and why is it important?
    4. Explain the Linux process scheduling mechanism.
    5. What is the difference between hardirq and softirq?
    6. What are bottom halves, and what is their role?
    7. Explain workqueues and tasklets.
    8. What is interrupt handling in Linux kernel?
    9. What is a device driver, and what are the types of device drivers?
    10. How do you register a character device driver in Linux?
    11. What is the difference between blocking and non-blocking I/O in kernel space?
    12. Explain the Linux kernel logging mechanism (printk, KERN_INFO, etc.).
    13. What is a module parameter, and how do you pass parameters to a kernel module?
    14. What is kthread_stop, and how is it used?
    15. How do you handle race conditions in the kernel?

    Advanced Linux Kernel Programming Questions

    1. Explain Linux kernel memory management: page cache, slab allocator, buddy system.
    2. What are kernel namespaces, and how are they used?
    3. Explain Virtual File System (VFS) and its role.
    4. How does the Linux kernel handle file operations?
    5. Explain the kernel networking stack.
    6. What is a kobject, and how does it relate to sysfs?
    7. Explain reference counting in the Linux kernel.
    8. How does dynamic kernel tracing work (ftrace, perf)?
    9. What is a PCI device driver, and how do you write one?
    10. How do you implement I2C or SPI device drivers in Linux?
    11. Explain interrupt-driven vs polling mechanisms in kernel device drivers.
    12. How do you implement DMA in Linux kernel drivers?
    13. What is a kernel timer, and how do you implement it?
    14. Explain Linux kernel modules dependencies and symbol exports.
    15. How does user-space memory mapping (mmap) work in kernel drivers?
    16. How do you debug kernel modules using kgdb or printk?
    17. Explain the Linux kernel boot process.
    18. How does the scheduler handle real-time processes?
    19. What is NUMA, and how does the kernel handle memory in NUMA systems?
    20. How do you handle deadlocks in the kernel?

    Practical / Scenario-Based Questions

    1. How would you modify an existing Linux kernel driver?
    2. How do you implement read and write operations in a character driver?
    3. How would you trace a kernel panic?
    4. How do you profile a kernel module for performance?
    5. How do you implement interrupt handling for a GPIO device?
    6. How do you use procfs or sysfs to expose driver data to user space?
    7. How do you implement ioctl commands for a custom device?
    8. How would you handle concurrency in a multi-threaded kernel module?
    9. How do you simulate and test a driver in QEMU before using real hardware?
    10. How do you write a kernel module compatible with multiple kernel versions?

    Expert / Advanced Scenario Questions

    1. How would you implement zero-copy communication between kernel and user space?
    2. How do you optimize memory usage in kernel modules?
    3. How do you write a kernel driver for DMA buffer sharing between devices?
    4. Explain how kernel hot-plugging works.
    5. How do you handle interrupt storms in Linux?
    6. How do you implement suspend/resume operations for a device driver?
    7. How do you use kernel timers to schedule periodic tasks?
    8. How do you implement custom kernel syscalls?
    9. How do you handle kernel module security and permissions?
    10. How do you debug race conditions in kernel driver code?

    Final Thoughts

    The Essentials of Linux kernel architecture are not about memorizing code or data structures. They are about understanding how Linux thinks, how it manages resources, and how its components work together as one system.

    Once you grasp the architecture, Linux stops feeling like magic and starts feeling logical.

    Whether you are preparing for interviews, working on embedded systems, or simply curious about how operating systems work, learning Linux kernel architecture is one of the best investments you can make in your technical journey.

    FAQ : Linux Kernel Architecture

    1. What is Linux Kernel Architecture?
    Linux Kernel Architecture is the internal structure of the Linux operating system. It manages hardware, processes, memory, and system calls, acting as a bridge between software and hardware.

    2. Why is Linux Kernel important for developers?
    Understanding the Linux Kernel helps developers write efficient code, manage hardware resources, and develop device drivers or system-level applications.

    3. What are the main components of the Linux Kernel?
    The Linux Kernel consists of process management, memory management, file system, device drivers, network stack, and system calls.

    4. What is the difference between monolithic and microkernel in Linux?
    Linux uses a monolithic kernel, where all core services run in kernel space for performance. Microkernels run minimal services in kernel space and others in user space for modularity.

    5. How does process management work in the Linux Kernel?
    The kernel handles process creation, scheduling, and termination. It uses scheduling algorithms to manage CPU time efficiently among processes.

    6. What is a Linux Kernel module?
    A kernel module is a piece of code that can be loaded or unloaded into the kernel at runtime, like device drivers or system extensions.

    7. How is memory managed in Linux Kernel?
    Linux uses virtual memory, paging, and caching to efficiently allocate memory for processes and the system while isolating processes from each other.

    8. How can I prepare for Linux Kernel interview questions?
    Focus on kernel architecture, process and memory management, device drivers, file systems, and hands-on practice with kernel modules.

    9. Can I modify the Linux Kernel safely?
    Yes, by using a separate test environment or virtual machine. Kernel modifications require caution and understanding of dependencies.

    10. Where can I learn Linux Kernel Architecture from scratch?
    You can start with official Linux Kernel documentation, beginner-friendly tutorials, YouTube guides, and practical exercises like writing simple kernel modules.

    Read More about Process : What is is Process

    Read More about System Call in Linux : What is System call

    Read More about IPC : What is IPC

  • Linux System Programming Part 2 | Master Advanced Linux Concepts & IPC

    Linux System Programming Part 2 covers advanced concepts like IPC, signals, threads, synchronization, and real-world system programming examples for developers.

    Dive deeper into Linux system programming with Part 2 of our comprehensive guide, designed for developers aiming to master advanced Linux programming concepts. This part focuses on process synchronization, inter-process communication (IPC), file I/O operations, signals, threads, and advanced system calls. Learn how to write efficient, reliable, and secure Linux applications by exploring practical examples, real-world use cases, and performance optimization techniques. Whether you’re preparing for technical interviews or developing high-performance software, this guide equips you with the essential skills to handle complex Linux programming challenges.

    Key Topics Covered:

    • Advanced process management and lifecycle handling
    • Inter-process communication (IPC): Pipes, message queues, semaphores, shared memory
    • Thread programming: POSIX threads (pthreads), synchronization, and concurrency control
    • Signal handling and asynchronous programming
    • File I/O and advanced file system operations
    • System call optimization and debugging techniques

    Perfect for software engineers, embedded developers, and Linux enthusiasts, this guide provides step-by-step explanations and examples to help you write robust, high-performance Linux applications.

    Linux System Programming

    Introduction to Components of I/O Architecture

    Q1. What is I/O architecture in Linux?

    Answer:
    I/O architecture in Linux defines how data flows between user applications, kernel, and hardware devices. It provides a structured way to access devices like disks, keyboards, network cards, and displays using standard system calls such as read(), write(), and ioctl().

    Q2. What are the main components of Linux I/O architecture?

    Answer:
    The major components are:

    1. User Space
    2. System Call Interface
    3. Virtual File System (VFS)
    4. File System Layer
    5. I/O Cache (Page Cache & Buffer Cache)
    6. Block and Character Device Layer
    7. Device Drivers
    8. Hardware

    Q3. Why does Linux use a layered I/O architecture?

    Answer:
    Layered architecture provides:

    • Hardware independence
    • Code reusability
    • Easier maintenance
    • Support for multiple file systems
    • Secure access to devices

    Q4. What is the role of user space in I/O?

    Answer:
    User space contains applications that:

    • Request I/O using APIs (printf, fopen)
    • Cannot access hardware directly
    • Use system calls to interact with kernel

    Q5. What is the role of the kernel in I/O?

    Answer:
    The kernel:

    • Validates user requests
    • Manages file systems
    • Handles caching
    • Communicates with device drivers
    • Ensures protection and synchronization

    Objectives of Linux I/O Model

    Q6. What are the main objectives of the Linux I/O model?

    Answer:

    1. Uniform access to all devices
    2. High performance
    3. Hardware abstraction
    4. Security and protection
    5. Scalability
    6. Portability

    Q7. How does Linux provide uniform I/O access?

    Answer:
    Linux treats everything as a file, allowing the same system calls (open, read, write, close) to be used for:

    • Files
    • Devices
    • Pipes
    • Sockets

    Q8. How does Linux I/O model improve performance?

    Answer:
    Through:

    • Page cache
    • Read-ahead
    • Write buffering
    • Asynchronous I/O
    • DMA support

    Q9. How does Linux ensure secure I/O?

    Answer:
    Using:

    • File permissions
    • User/kernel mode separation
    • Capability checks
    • Access control lists (ACLs)

    Q10. What is portability in Linux I/O?

    Answer:
    Applications do not depend on hardware specifics. Device drivers handle hardware differences, making apps portable across platforms.

    Virtual File System (VFS)

    Q11. What is VFS in Linux?

    Answer:
    Virtual File System (VFS) is a kernel abstraction layer that provides a common interface to different file systems such as EXT4, FAT, NTFS, NFS, etc.

    Q12. Why is VFS needed?

    Answer:
    Because Linux supports multiple file systems and VFS:

    • Hides file system details
    • Allows switching file systems without changing applications

    Q13. What are the main data structures used by VFS?

    Answer:

    1. super_block
    2. inode
    3. dentry
    4. file

    Q14. What is a superblock?

    Answer:
    A superblock stores metadata about a file system, such as:

    • File system type
    • Block size
    • Mount status
    • Maximum file size

    Q15. What is a dentry?

    Answer:
    Dentry (Directory Entry) maps file names to inode numbers and helps speed up pathname lookup.

    Q16. How does VFS handle system calls?

    Answer:
    System calls go through VFS, which:

    • Identifies the file system
    • Invokes the appropriate file system operations

    File System Services

    Q17. What services does a file system provide?

    Answer:

    • File creation and deletion
    • Read/write operations
    • Directory management
    • Permission handling
    • Metadata management

    Q18. What is file metadata?

    Answer:
    Metadata includes:

    • File size
    • Ownership
    • Permissions
    • Timestamps
    • Block location

    Q19. How does Linux handle different file systems?

    Answer:
    Using:

    • File system drivers
    • VFS abstraction
    • Mount mechanism

    Q20. What is mounting?

    Answer:
    Mounting attaches a file system to a directory tree, making it accessible.

    Q21. What happens internally during file read?

    Answer:

    1. User calls read()
    2. Kernel checks file descriptor
    3. VFS locates inode
    4. Cache is checked
    5. Disk access if cache miss
    6. Data copied to user space

    I/O Cache

    Q22. What is I/O cache?

    Answer:
    I/O cache is memory used by the kernel to store frequently accessed disk data to reduce disk I/O.

    Q23. What is page cache?

    Answer:
    Page cache stores file data pages read from disk in RAM.

    Q24. What is buffer cache?

    Answer:
    Buffer cache stores block-based data, mainly metadata and raw blocks.

    Q25. Why is caching important?

    Answer:
    Caching:

    • Improves performance
    • Reduces disk access
    • Saves power
    • Enables faster reads

    Q26. What is write-back caching?

    Answer:
    Data is written to cache first and later flushed to disk asynchronously.

    Q27. What is write-through caching?

    Answer:
    Data is written to both cache and disk immediately.

    Q28. What is cache coherence?

    Answer:
    Ensures cached data matches data on disk.

    Understanding File Descriptors

    Q29. What is a file descriptor?

    Answer:
    A file descriptor is an integer handle used by a process to access an open file or I/O resource.

    Q30. Who assigns file descriptors?

    Answer:
    The kernel assigns them when open() is called.

    Q31. Standard file descriptors?

    Answer:

    FDMeaning
    0stdin
    1stdout
    2stderr

    Q32. Where are file descriptors stored?

    Answer:
    In the process file descriptor table.

    Q33. What does a file descriptor point to?

    Answer:
    It points to a struct file in kernel memory.

    Q34. Can multiple file descriptors point to the same file?

    Answer:
    Yes, via dup() or fork().

    Q35. What happens when a file is closed?

    Answer:
    Kernel:

    • Decrements reference count
    • Frees resources if count reaches zero

    Inode Structures

    Q36. What is an inode?

    Answer:
    An inode is a kernel data structure that stores metadata of a file, excluding its name.

    Q37. What information does inode contain?

    Answer:

    • File type
    • Permissions
    • Owner and group
    • Size
    • Timestamps
    • Data block pointers

    Q38. What does inode NOT store?

    Answer:
    File name
    Directory hierarchy

    Q39. How is file name linked to inode?

    Answer:
    Through directory entries (dentries).

    Q40. What is inode number?

    Answer:
    A unique identifier for a file within a file system.

    Q41. Can multiple filenames map to the same inode?

    Answer:
    Yes, through hard links.

    Q42. Difference between inode and file descriptor?

    Answer:

    InodeFile Descriptor
    File metadataProcess-specific handle
    PersistentTemporary
    File-system levelProcess level

    Q43. What happens to inode when file is deleted?

    Answer:
    Inode is freed only when link count and open count become zero.

    Q44. What is inode cache?

    Answer:
    Kernel cache that stores recently used inodes to speed up file access.

    Q45. How does inode improve performance?

    Answer:
    Avoids repeated disk reads for metadata.

    Final Interview Tips

    If interviewer asks “Explain Linux I/O flow in one answer”, say:

    Linux I/O starts from user space via system calls, passes through VFS which abstracts file systems, uses inode and dentry for metadata, leverages page cache for performance, and finally communicates with device drivers to access hardware.

    Linux I/O Architecture Interview Question

    Introduction to Components of I/O Architecture

    Beginner Level

    1. What is I/O in an operating system?
    2. Why is I/O required in Linux?
    3. What are the basic components of Linux I/O architecture?
    4. What is the role of hardware devices in I/O?
    5. What is a device driver?
    6. What is the role of the kernel in I/O operations?
    7. What is user space and kernel space?
    8. What is a system call?
    9. Why can’t user applications access hardware directly?
    10. What is buffering in I/O?

    Intermediate Level

    1. Explain the complete I/O data flow in Linux.
    2. What are I/O controllers?
    3. What is DMA (Direct Memory Access)?
    4. What is interrupt-driven I/O?
    5. What is polling-based I/O?
    6. Difference between blocking and non-blocking I/O?
    7. What is synchronous I/O?
    8. What is asynchronous I/O?
    9. What is memory-mapped I/O?
    10. Difference between character devices and block devices?

    Advanced / Expert Level

    1. Explain Linux I/O architecture with layers.
    2. How does Linux abstract hardware differences?
    3. What happens internally when read() is called?
    4. How does Linux handle concurrent I/O requests?
    5. What is zero-copy I/O?
    6. How does Linux optimize I/O performance?
    7. What role does the block layer play?
    8. How does Linux support multiple devices uniformly?
    9. How does virtualization affect Linux I/O?
    10. How does Linux ensure I/O reliability?

    Objectives of Linux I/O Model

    Beginner Level

    1. What is the Linux I/O model?
    2. Why does Linux need an I/O model?
    3. What problems does the Linux I/O model solve?
    4. What is device independence?
    5. What does “everything is a file” mean in Linux?

    Intermediate Level

    1. How does Linux provide a uniform I/O interface?
    2. How does Linux achieve portability using its I/O model?
    3. What is abstraction in Linux I/O?
    4. How does Linux support scalability in I/O?
    5. Why is buffering and caching important?

    Advanced / Expert Level

    1. How does Linux I/O model improve performance?
    2. How does Linux handle parallel I/O?
    3. How does the I/O model ensure security?
    4. Compare Linux I/O model with other OS models.
    5. How does Linux balance performance vs data safety?

    Virtual File System (VFS)

    Beginner Level

    1. What is Virtual File System (VFS)?
    2. Why is VFS needed?
    3. Is VFS a real file system?
    4. What problem does VFS solve?
    5. Name file systems supported by Linux via VFS.

    Intermediate Level

    1. How does VFS provide file system abstraction?
    2. What are the main VFS objects?
    3. What is a superblock?
    4. What is an inode?
    5. What is a dentry?
    6. What is a file object?
    7. How does VFS handle mount operations?
    8. How does VFS process open() system call?
    9. How does VFS support network file systems?
    10. What is pathname resolution?

    Advanced / Expert Level

    1. Explain VFS internal data structures.
    2. How does VFS cache dentries and inodes?
    3. How does VFS ensure file system independence?
    4. How are file operations registered in VFS?
    5. How does VFS handle permissions?
    6. What is lazy inode allocation?
    7. How does VFS interact with the block layer?
    8. How does a custom file system integrate with VFS?
    9. How does VFS work in containers?
    10. What are VFS performance bottlenecks?

    File System Services

    Beginner Level

    1. What are file system services?
    2. What basic services does a file system provide?
    3. What is file creation and deletion?
    4. What is file metadata?
    5. What is directory management?

    Intermediate Level

    1. How does a file system manage disk space?
    2. What is journaling?
    3. What is file locking?
    4. What is mounting and unmounting?
    5. Difference between hard link and soft link?
    6. What is file access control?
    7. What is quota management?
    8. What is sparse file?
    9. What is delayed allocation?
    10. What is extent-based storage?

    Advanced / Expert Level

    1. How does journaling improve crash recovery?
    2. How does file system recovery work after crash?
    3. What is copy-on-write?
    4. How does Linux support encryption at file system level?
    5. What is snapshotting?
    6. How does Linux handle large directories?
    7. What are scalability issues in file systems?
    8. How does Linux handle metadata consistency?
    9. What is file system fragmentation?
    10. Compare ext4, xfs, and btrfs internals.

    I/O Cache

    Beginner Level

    1. What is I/O cache?
    2. Why is caching needed?
    3. What is page cache?
    4. Difference between buffer cache and page cache?
    5. What data is cached in Linux?

    Intermediate Level

    1. How does Linux page cache work?
    2. What is read-ahead?
    3. What is write-back cache?
    4. What are dirty pages?
    5. What is cache eviction?
    6. What is LRU algorithm?
    7. Difference between write-through and write-back?
    8. What is sync()?
    9. What is fsync()?
    10. How does cache improve I/O performance?

    Advanced / Expert Level

    1. How does Linux manage cache pressure?
    2. How are dirty pages flushed to disk?
    3. What is O_DIRECT?
    4. How does mmap() use page cache?
    5. How does NUMA affect caching?
    6. How does Linux prevent data loss due to caching?
    7. What is readahead tuning?
    8. What happens under heavy I/O load?
    9. How does cache coherency work?
    10. Explain page cache vs direct I/O.

    Understanding File Descriptors

    Beginner Level

    1. What is a file descriptor?
    2. Why are file descriptors integers?
    3. What are standard file descriptors?
    4. What are STDIN, STDOUT, STDERR?
    5. How does open() create a file descriptor?

    Intermediate Level

    1. How does the kernel track file descriptors?
    2. What is per-process file descriptor table?
    3. Difference between file descriptor and file pointer?
    4. What happens when a file descriptor is closed?
    5. What is dup() and dup2()?
    6. What is file descriptor inheritance?
    7. How does fork() affect file descriptors?
    8. How does exec() affect file descriptors?
    9. What is close-on-exec flag?
    10. What is file descriptor leak?

    Advanced / Expert Level

    1. Explain kernel structures related to file descriptors.
    2. How does Linux prevent FD leaks?
    3. What is select(), poll(), epoll()?
    4. Difference between select and epoll?
    5. What is edge-triggered vs level-triggered I/O?
    6. How does epoll scale better?
    7. What is asynchronous I/O (AIO)?
    8. What is ulimit -n?
    9. How does kernel synchronize FD access?
    10. How is FD passing done between processes?

    Inode Structures

    Beginner Level

    1. What is an inode?
    2. What information does an inode store?
    3. What is an inode number?
    4. Are filenames stored in inode?
    5. What is the relationship between file and inode?

    Intermediate Level

    1. Difference between inode and file descriptor?
    2. What is inode table?
    3. What is link count?
    4. How do hard links work with inodes?
    5. How are permissions stored in inode?
    6. What is inode caching?
    7. How does Linux locate inode on disk?
    8. What happens to inode when file is deleted?
    9. What is an orphan inode?
    10. How does inode handle file size?

    Advanced / Expert Level

    1. Explain inode life cycle.
    2. How does Linux allocate inodes?
    3. What is lazy inode destruction?
    4. How does inode locking work?
    5. What are inode operations?
    6. How does VFS use inode operations?
    7. How does journaling affect inode updates?
    8. What is inode exhaustion?
    9. How does Linux handle millions of inodes?
    10. How does inode scalability impact performance?

    File Input/Output (I/O) operations form the backbone of any operating system’s interaction with storage devices. In Linux, understanding file I/O is essential not only for system programming but also for building robust applications that manage data efficiently. This article explores the concepts, APIs, and operations related to file handling in Linux, in clear, human-readable language.

    1. Introduction to File I/O Operations

    At its core, file I/O is the process of reading data from and writing data to files on a storage medium. Linux treats everything as a file, including regular files, directories, devices, and even network sockets. This abstraction allows developers to use a unified interface to interact with different types of resources.

    Key points to know about file I/O:

    • File Descriptors (FDs): Each file opened in Linux is assigned an integer called a file descriptor. The OS uses this FD to keep track of open files and their state.
      • 0 – Standard input (stdin)
      • 1 – Standard output (stdout)
      • 2 – Standard error (stderr)
    • File Modes: Files can be opened in various modes like read (r), write (w), append (a), or combinations (r+, w+).

    File I/O can be broadly divided into two types:

    1. Standard I/O (Buffered I/O using stdio.h)
    2. System-level I/O (Unbuffered I/O using system calls like open(), read(), write(), close())

    2. Introduction to Common File APIs

    Linux provides several APIs (Application Programming Interfaces) for interacting with files:

    2.1 System-Level File APIs

    These APIs work directly with file descriptors:

    FunctionDescription
    open()Opens a file and returns a file descriptor. Supports flags like O_RDONLY, O_WRONLY, O_RDWR, O_CREAT.
    read()Reads data from an open file into a buffer. Requires FD, buffer, and size.
    write()Writes data from a buffer to an open file.
    close()Closes the file descriptor and frees associated resources.
    lseek()Moves the file pointer to a specific location (random access).
    fsync()Ensures that all buffered data is written to disk.

    Example: Opening and reading a file:

    #include <fcntl.h>
    #include <unistd.h>
    #include <stdio.h>
    
    int main() {
        int fd = open("example.txt", O_RDONLY);
        if (fd < 0) {
            perror("Failed to open file");
            return 1;
        }
    
        char buffer[100];
        int bytesRead = read(fd, buffer, sizeof(buffer) - 1);
        if (bytesRead > 0) {
            buffer[bytesRead] = '\0';
            printf("File content:\n%s\n", buffer);
        }
    
        close(fd);
        return 0;
    }
    

    2.2 Standard I/O APIs (Buffered I/O)

    These are provided by the C library (stdio.h) and are higher-level, buffered I/O operations:

    FunctionDescription
    fopen()Opens a file and returns a FILE* pointer. Modes: "r", "w", "a", "r+" etc.
    fread()Reads binary data from a file stream.
    fwrite()Writes binary data to a file stream.
    fprintf()Writes formatted text to a file.
    fscanf()Reads formatted text from a file.
    fclose()Closes the file stream.
    fseek()Moves the file position indicator.
    fflush()Flushes the buffer to disk immediately.

    Example: Reading a file using standard I/O:

    #include <stdio.h>
    
    int main() {
        FILE *fp = fopen("example.txt", "r");
        if (fp == NULL) {
            perror("Failed to open file");
            return 1;
        }
    
        char line[256];
        while (fgets(line, sizeof(line), fp)) {
            printf("%s", line);
        }
    
        fclose(fp);
        return 0;
    }
    

    Key difference: Standard I/O is buffered, meaning it reads/writes larger blocks at once for efficiency, while system-level I/O works directly with the kernel.

    3. Accessing File Attributes

    Linux provides system calls to query file metadata stored in the filesystem. File attributes include size, permissions, ownership, timestamps, and type.

    • stat(): Returns metadata about a file.
    • fstat(): Returns metadata for an open file descriptor.
    • lstat(): Like stat(), but for symbolic links.

    Example: Reading file attributes:

    #include <sys/stat.h>
    #include <stdio.h>
    
    int main() {
        struct stat fileStat;
        if (stat("example.txt", &fileStat) < 0) {
            perror("stat failed");
            return 1;
        }
    
        printf("File Size: %ld bytes\n", fileStat.st_size);
        printf("Permissions: %o\n", fileStat.st_mode & 0777);
        printf("Owner UID: %d\n", fileStat.st_uid);
        printf("Last Modified: %ld\n", fileStat.st_mtime);
    
        return 0;
    }
    

    Important attributes:

    • st_mode → File type & permissions
    • st_size → File size in bytes
    • st_uid / st_gid → Owner user/group IDs
    • st_atime, st_mtime, st_ctime → Access, modification, creation times

    4. Standard File I/O Operations

    4.1 Reading from a file

    • Use read() or fread().
    • Always check the return value to know how many bytes were read.

    4.2 Writing to a file

    • Use write() or fwrite().
    • Ensure proper file permissions; use O_CREAT and O_TRUNC with open() if needed.

    4.3 Opening and closing files

    • Always close files after use to free system resources.
    • Standard I/O: fclose()
    • System-level: close()

    4.4 Moving the file pointer

    • lseek() or fseek() allows random access.
    • Example: Skip first 100 bytes before reading:
    lseek(fd, 100, SEEK_SET); // fd: file descriptor
    

    5. File Control Operations

    File control operations allow more fine-grained control over file behavior:

    5.1 fcntl()

    • Used to manipulate file descriptors.
    • Can change file status flags (blocking/non-blocking), file locks, and duplication of descriptors.
    #include <fcntl.h>
    int flags = fcntl(fd, F_GETFL);      // Get current flags
    fcntl(fd, F_SETFL, flags | O_NONBLOCK); // Set non-blocking mode
    

    5.2 File Locking

    • Use flock() or fcntl() to prevent simultaneous writes:
    struct flock lock;
    lock.l_type = F_WRLCK; // Write lock
    lock.l_whence = SEEK_SET;
    lock.l_start = 0;
    lock.l_len = 0; // Lock entire file
    fcntl(fd, F_SETLK, &lock);
    
    • Locks ensure data integrity in multi-process environments.

    5.3 File Descriptor Duplication

    • dup() or dup2() allows redirecting file descriptors:
    int new_fd = dup2(fd, 1); // Redirect stdout to file
    

    This is commonly used in shell programming or logging.

    6. Best Practices for File I/O

    1. Always check the return values of file operations (open, read, write, fopen, etc.) to handle errors.
    2. Close all file descriptors or streams to prevent resource leaks.
    3. Use buffering wisely for performance (fread/fwrite vs read/write).
    4. Use file locks when multiple processes may access the same file.
    5. Avoid using hardcoded file paths; use relative paths or configurable paths.
    6. For large files, prefer memory-mapped I/O (mmap) for efficiency.

    Linux File I/O Interview Questions and Answers

    1. Basics of File I/O

    Q1. What is File I/O in Linux?
    A: File I/O (Input/Output) in Linux refers to reading data from and writing data to files stored on a storage device. Linux treats almost everything as a file (regular files, directories, devices, sockets).

    Q2. What is a File Descriptor (FD)?
    A: A file descriptor is an integer that uniquely identifies an open file within a process.

    • 0 → Standard input (stdin)
    • 1 → Standard output (stdout)
    • 2 → Standard error (stderr)

    Q3. Difference between system-level I/O and standard I/O?

    FeatureSystem-level I/OStandard I/O
    APIopen(), read(), write()fopen(), fread(), fwrite()
    BufferingUnbufferedBuffered (faster for large data)
    Header<fcntl.h>, <unistd.h><stdio.h>
    ReturnNumber of bytes read/writtenNumber of elements read/written

    Q4. What are the different file opening modes?

    • O_RDONLY → Read-only
    • O_WRONLY → Write-only
    • O_RDWR → Read and write
    • O_CREAT → Create file if it doesn’t exist
    • O_TRUNC → Truncate file to 0 length
    • O_APPEND → Append writes to end of file

    Q5. How do you read from a file?

    • System I/O: read(fd, buffer, size)
    • Standard I/O: fread(buffer, size, count, FILE*)

    Q6. How do you write to a file?

    • System I/O: write(fd, buffer, size)
    • Standard I/O: fwrite(buffer, size, count, FILE*)

    2. File Attributes

    Q7. How can you access file attributes in Linux?

    • Using stat(), fstat(), or lstat().
    • Returns metadata like file size, permissions, owner, timestamps.

    Example:

    struct stat fileStat;
    stat("file.txt", &fileStat);
    printf("Size: %ld\n", fileStat.st_size);
    

    Q8. Difference between stat(), fstat(), and lstat()?

    FunctionDescription
    stat()Returns file metadata for a path.
    fstat()Returns metadata for an open file descriptor.
    lstat()Like stat(), but does not follow symbolic links.

    Q9. What is st_mode in struct stat?

    • st_mode indicates file type and permissions.
    • Example: S_IFREG → regular file, S_IFDIR → directory
    • Permissions: st_mode & 0777

    Q10. How do you check if a file is readable, writable, or executable?

    • Use access(path, mode) with R_OK, W_OK, X_OK.

    3. File Pointers and Random Access

    Q11. What is a file pointer?

    • A file pointer keeps track of the current read/write position in the file.
    • System I/O: controlled by lseek()
    • Standard I/O: controlled by fseek(), ftell()

    Q12. How do you move the file pointer?

    • lseek(fd, offset, SEEK_SET|SEEK_CUR|SEEK_END) → system I/O
    • fseek(fp, offset, SEEK_SET|SEEK_CUR|SEEK_END) → standard I/O

    Example: Move to 100th byte from the start:

    lseek(fd, 100, SEEK_SET);
    

    Q13. Difference between SEEK_SET, SEEK_CUR, and SEEK_END?

    • SEEK_SET → Offset from beginning of file
    • SEEK_CUR → Offset from current position
    • SEEK_END → Offset from end of file

    4. File Control Operations

    Q14. What is fcntl() in Linux?

    • fcntl() manipulates file descriptor properties.
    • Can set flags (non-blocking, append), duplicate FDs, or manage locks.

    Example: Set non-blocking mode:

    int flags = fcntl(fd, F_GETFL);
    fcntl(fd, F_SETFL, flags | O_NONBLOCK);
    

    Q15. What are file locks and why are they needed?

    • File locks prevent multiple processes from writing to a file simultaneously.
    • Types:
      • F_RDLCK → Read lock
      • F_WRLCK → Write lock
      • F_UNLCK → Unlock

    Example with fcntl():

    struct flock lock;
    lock.l_type = F_WRLCK;
    lock.l_whence = SEEK_SET;
    lock.l_start = 0;
    lock.l_len = 0;
    fcntl(fd, F_SETLK, &lock);
    

    Q16. What is dup() and dup2() used for?

    • Duplicates a file descriptor.
    • Commonly used for redirecting output:
    int new_fd = dup2(fd, 1); // Redirect stdout to file
    

    5. Advanced File I/O

    Q17. Difference between buffered and unbuffered I/O?

    TypeBufferedUnbuffered
    APIfread/fwriteread/write
    SpeedFaster for large dataSlower (system call overhead)
    ControlBuffer flushed automaticallyManual flush via fsync()

    Q18. What is fsync()?

    • Ensures all buffered data is physically written to disk.
    • Important for critical data to avoid loss in case of crash.

    Q19. What is memory-mapped I/O (mmap)?

    • Maps a file into process memory space.
    • Allows file data to be accessed like memory.
    • Efficient for large files or frequent random access.

    Q20. How do you check end-of-file (EOF) in standard I/O?

    • Use feof(FILE *fp) which returns non-zero if end of file is reached.

    Q21. Difference between text and binary file I/O?

    • Text I/O converts line endings (\n) to system format.
    • Binary I/O reads/writes raw bytes without modification.

    Q22. How do you handle errors in file I/O?

    • Check return values of all operations (open, read, write, fopen).
    • Use perror() or strerror(errno) for descriptive error messages.

    Q23. What happens if you forget to close a file?

    • File descriptor leak occurs.
    • OS may eventually close it on process exit, but can exhaust resources if too many files are open.

    Q24. Can you read/write files concurrently in Linux?

    • Yes, with proper file locks or atomic operations.
    • Use fcntl() or flock() to prevent race conditions.

    Q25. What are symbolic links vs hard links?

    • Hard link → Another name for the same inode. Both share same data.
    • Symbolic link → Pointer to the file path. Can cross filesystems.

    Q26. How does lseek() differ from fseek()?

    • lseek() → works on file descriptors (unbuffered).
    • fseek() → works on FILE* streams (buffered).
    • fseek() may not reflect actual disk position until fflush().

    Q27. How do you open a file for both reading and writing?

    • System I/O: open("file.txt", O_RDWR)
    • Standard I/O: fopen("file.txt", "r+")

    Q28. Difference between O_TRUNC and O_APPEND?

    • O_TRUNC → Truncates file to 0 bytes when opened.
    • O_APPEND → Writes always added to the end of the file.

    Q29. What is pread() and pwrite()?

    • pread() → Read from a file descriptor at a specific offset without changing file pointer.
    • pwrite() → Write to a file descriptor at a specific offset.
    • Useful in multithreaded applications.

    Q30. How does Linux handle I/O caching?

    • Linux caches file data in memory (page cache) to speed up access.
    • fsync() or sync() ensures cached data is written to disk.

    Signals in Linux are a fundamental mechanism that allow processes to receive asynchronous notifications about events or exceptions. Proper understanding of signal management is crucial for building robust and responsive applications. This guide will cover everything from basic concepts to advanced usage, with examples, data structures, and process communication.

    Introduction to Signals

    A signal is a software interrupt delivered to a process to notify it that a specific event occurred. Signals can be generated by the kernel, other processes, or by the process itself.

    Key points:

    • Signals are asynchronous, meaning they can occur at any time.
    • They are used for error handling, process control, and inter-process communication.
    • Every signal has a unique integer number and a default action associated with it (e.g., terminate, ignore, stop, continue).

    Example default actions:

    • SIGKILL → terminates the process (cannot be caught or ignored)
    • SIGTERM → requests termination (can be caught)
    • SIGSTOP → pauses the process
    • SIGCONT → resumes a paused process

    Linux Signal Types & Categories

    Linux provides over 30 predefined signals. These can be broadly categorized into:

    a) Termination Signals

    • Intended to terminate the process.
    • Examples: SIGKILL, SIGTERM.

    b) Stop Signals

    • Pause the process execution.
    • Examples: SIGSTOP, SIGTSTP.

    c) Continue Signals

    • Resume a stopped process.
    • Example: SIGCONT.

    d) Ignore Signals

    • Signals that the process can choose to ignore.
    • Example: SIGCHLD (child process status change).

    e) Core Dump Signals

    • Cause the process to terminate and generate a core dump for debugging.
    • Examples: SIGSEGV (segmentation fault), SIGABRT (abort).

    f) User-Defined Signals

    • Custom signals defined by the user for application-specific communication.
    • Examples: SIGUSR1, SIGUSR2.

    Signal Generation and Delivery

    Signals can be generated by:

    1. Kernel Events
      • Example: Division by zero (SIGFPE), invalid memory access (SIGSEGV).
    2. Other Processes
      • Using the kill() system call.
      • Example: kill(pid, SIGTERM);
    3. Self-Generated Signals
      • Using raise() in C.
      • Example: raise(SIGUSR1);

    Delivery Process:

    • The kernel marks the signal pending for the target process.
    • When the process executes, it checks for pending signals at safe points.
    • The signal is delivered according to its disposition (default action, ignored, or custom handler).

    Linux Signal Management Data Structures

    Linux internally uses a set of data structures for signal management:

    1. sigset_t – A bitmask representing a set of signals.
    2. sigaction – Structure to define a signal handler and flags.struct sigaction { void (*sa_handler)(int); void (*sa_sigaction)(int, siginfo_t *, void *); sigset_t sa_mask; int sa_flags; void (*sa_restorer)(void); };
    3. pending signals list – Tracks signals waiting to be delivered.
    4. Process task_struct (Linux kernel) – Contains signal_struct for signal info per process.

    Switching Signal Dispositions

    Each signal can have a disposition:

    1. Default Action (SIG_DFL)
    2. Ignore Signal (SIG_IGN)
    3. Custom Handler (function pointer)

    Example in C:

    #include <signal.h>
    #include <stdio.h>
    #include <unistd.h>
    
    void handler(int sig) {
        printf("Signal %d received!\n", sig);
    }
    
    int main() {
        signal(SIGUSR1, handler); // Custom handler
        raise(SIGUSR1);           // Generate signal
        return 0;
    }
    

    Writing Asynchronous Signal Handler

    Signal handlers are functions that execute when a signal is delivered. They are asynchronous and should be:

    • Fast: Avoid heavy computations
    • Reentrant: Safe to call even during interruption

    Example safe operations:

    • Writing to stdout
    • Setting a flag variable
    volatile sig_atomic_t flag = 0;
    
    void handler(int sig) {
        flag = 1; // safe modification
    }
    

    Using Signals for Process Communication

    Signals are often used for inter-process communication (IPC):

    • Notify a parent when a child exits (SIGCHLD)
    • Trigger events in daemon processes (SIGUSR1, SIGUSR2)
    • Control process execution (SIGSTOP, SIGCONT)

    Example: Waiting for a child to terminate:

    #include <sys/wait.h>
    #include <signal.h>
    #include <unistd.h>
    #include <stdio.h>
    
    void sigchld_handler(int sig) {
        int status;
        wait(&status);
        printf("Child process finished.\n");
    }
    
    int main() {
        signal(SIGCHLD, sigchld_handler);
        if (fork() == 0) { // child
            printf("Child running...\n");
            _exit(0);
        }
        pause(); // Wait for signal
        return 0;
    }
    

    Blocking & Unblocking Signal Delivery

    Processes can block signals temporarily to avoid interruption during critical sections:

    • sigprocmask() – Blocks or unblocks signals.
    • sigsuspend() – Temporarily waits for signals while changing mask.

    Example:

    sigset_t set;
    sigemptyset(&set);
    sigaddset(&set, SIGINT);      // Block SIGINT
    sigprocmask(SIG_BLOCK, &set, NULL);
    
    // Critical section code
    printf("SIGINT blocked here\n");
    
    sigprocmask(SIG_UNBLOCK, &set, NULL); // Unblock SIGINT
    printf("SIGINT unblocked\n");
    

    Linux Signal Management Interview Questions & Answers

    Beginner-Level Questions

    1. What is a signal in Linux?

    Answer:
    A signal is a software interrupt delivered to a process to notify it of an event. Signals are asynchronous and can be generated by the kernel, other processes, or the process itself. Each signal has a unique number and a default action (terminate, stop, ignore, etc.).

    2. What are the common signals in Linux?

    Answer:
    Common signals include:

    • SIGKILL → Force terminate (cannot be caught or ignored)
    • SIGTERM → Graceful terminate
    • SIGINT → Interrupt from keyboard (Ctrl+C)
    • SIGSTOP → Pause process
    • SIGCONT → Continue a paused process
    • SIGCHLD → Notify parent about child status
    • SIGUSR1 and SIGUSR2 → User-defined signals

    3. How can a process generate a signal?

    Answer:
    Signals can be generated by:

    1. Kernel events: e.g., SIGSEGV on segmentation fault.
    2. Other processes: Using kill(pid, signal).
    3. Self-generated: Using raise(signal) in C.

    4. What is the default action of a signal?

    Answer:
    Every signal has a default action, such as:

    • Terminate process (SIGKILL)
    • Stop process (SIGSTOP)
    • Ignore signal (SIGCHLD)
    • Core dump (SIGSEGV)

    5. How to catch signals in a process?

    Answer:
    You can catch signals using:

    1. signal() function – Simple way
    signal(SIGINT, handler);
    
    1. sigaction() – Advanced way, supports flags, masks, and extended info
    struct sigaction sa;
    sa.sa_handler = handler;
    sigaction(SIGINT, &sa, NULL);
    

    6. What are signal handlers?

    Answer:
    A signal handler is a function executed when a signal is delivered.

    • Must be fast and reentrant.
    • Can modify a global flag or perform simple actions.

    7. What are SIGUSR1 and SIGUSR2?

    Answer:
    These are user-defined signals. Applications can use them for custom inter-process communication or events.

    8. How do you ignore a signal?

    Answer:
    Use the SIG_IGN disposition:

    signal(SIGINT, SIG_IGN);
    

    This will ignore the signal instead of taking the default action.

    9. How do you block a signal?

    Answer:
    Signals can be blocked temporarily using sigprocmask():

    sigset_t set;
    sigemptyset(&set);
    sigaddset(&set, SIGINT);
    sigprocmask(SIG_BLOCK, &set, NULL);
    

    This prevents the signal from interrupting the process until unblocked.

    10. What is sigset_t?

    Answer:
    sigset_t is a bitmask representing a set of signals.

    • Used to block, unblock, or check pending signals.

    11. What is SIGCHLD?

    Answer:
    SIGCHLD is delivered to a parent process when a child process exits or stops.

    • Often used with wait() or waitpid() to clean up child processes.

    12. Difference between synchronous and asynchronous signals?

    Answer:

    • Synchronous: Generated due to a specific action by the process (e.g., SIGFPE, SIGSEGV).
    • Asynchronous: Can arrive anytime from outside events or other processes (e.g., SIGINT from Ctrl+C).

    13. What is the difference between signal() and sigaction()?

    Answer:

    Featuresignal()sigaction()
    FunctionalityBasic handlerAdvanced control
    FlagsLimitedYes (e.g., SA_RESTART)
    PortabilityLess reliableMore reliable
    Signal MaskingNoYes

    14. Can a process catch SIGKILL or SIGSTOP?

    Answer:

    • SIGKILL → Cannot be caught or ignored
    • SIGSTOP → Cannot be caught or ignored
    • All other signals can have custom handlers.

    15. How can signals communicate between processes?

    Answer:

    • Parent-child notification (SIGCHLD)
    • User-defined signals (SIGUSR1, SIGUSR2)
    • kill() system call to send signals to another process

    Advanced-Level Questions

    1. What are pending signals?

    Answer:
    When a signal is sent but blocked, it becomes pending. The kernel delivers it when the signal is unblocked.

    • Checked via sigpending() system call:
    sigset_t pending;
    sigpending(&pending);
    

    2. Explain sigaction structure

    Answer:
    sigaction allows advanced signal management:

    struct sigaction {
        void (*sa_handler)(int);
        void (*sa_sigaction)(int, siginfo_t *, void *);
        sigset_t sa_mask;
        int sa_flags;
        void (*sa_restorer)(void);
    };
    
    • sa_handler → basic handler
    • sa_sigaction → handler with extra info (siginfo_t)
    • sa_mask → signals blocked during handler
    • sa_flags → options (e.g., SA_RESTART)

    3. What is SA_RESTART?

    Answer:
    A flag in sigaction that automatically restarts interrupted system calls when a signal is delivered.
    Example: reading a file won’t fail with EINTR if SA_RESTART is set.

    4. What are reentrant functions in signal handlers?

    Answer:

    • Functions safe to call in signal handlers
    • Do not modify global state unexpectedly
    • Examples: write(), signal-safe functions
    • Unsafe: printf(), malloc()

    5. How do you use signals to pause/resume processes?

    Answer:

    • Use SIGSTOP to pause and SIGCONT to resume:
    kill -STOP <pid>
    kill -CONT <pid>
    
    • Useful for debugging or process control.

    6. How to send signals using kill, raise, and pthread_kill?

    Answer:

    • kill(pid, signal) → send signal to another process
    • raise(signal) → send signal to self
    • pthread_kill(thread_id, signal) → send signal to a specific thread

    7. Explain asynchronous-safe signal handling

    Answer:

    • Only use async-signal-safe functions in handlers
    • Set flags instead of performing I/O or memory allocation
    • Example:
    volatile sig_atomic_t flag = 0;
    void handler(int sig) { flag = 1; }
    

    8. How does the kernel manage signals internally?

    Answer:

    • Each process has a task_struct containing a signal_struct
    • Tracks pending signals, blocked signals, and signal masks
    • Delivery occurs at safe points, typically during context switches

    9. What is sigsuspend()?

    Answer:

    • Temporarily replaces signal mask and waits for signals
    • Useful in synchronous waiting for events
      Example:
    sigset_t mask;
    sigemptyset(&mask);
    sigsuspend(&mask);
    

    10. Difference between real-time and standard signals

    Answer:

    FeatureStandard SignalsReal-Time Signals
    Numbers1–3132–64
    QueuingNoYes (queued)
    Order DeliveryNot guaranteedFIFO guaranteed
    ExamplesSIGINT, SIGTERMSIGRTMIN + n

    11. How to handle multiple signals at the same time?

    Answer:

    • Use sigaction with sa_mask to block other signals during handler
    • Real-time signals can queue multiple occurrences
    • Helps prevent race conditions in multi-threaded programs

    12. How are signals used in multithreaded applications?

    Answer:

    • Signals can be delivered to specific threads using pthread_kill()
    • Signal masks are thread-specific
    • Useful for thread-level notifications

    13. How to debug signal-related issues?

    Answer:

    • Use strace to monitor signals:
    strace -e signal -p <pid>
    
    • Check pending signals with /proc/<pid>/status
    • Validate signal masks using sigprocmask

    14. How to handle signals safely in a critical section?

    Answer:

    • Block the signals during critical section using sigprocmask()
    • Unblock after completing the section

    15. Real-world use cases of signals

    Answer:

    • Daemon processes using SIGUSR1 to reload config
    • Parent process tracking child processes via SIGCHLD
    • Graceful termination of services using SIGTERM
    • Debugging with SIGSTOP and SIGCONT

    Concurrency is a fundamental concept in modern software development. With the rise of multi-core processors, networked applications, and real-time systems, understanding how to design concurrent applications has become essential for developers who want to build efficient, responsive, and scalable software.

    Introduction to Concurrent Applications

    A concurrent application is a software system designed to perform multiple tasks simultaneously. Unlike sequential programs, which execute one instruction at a time, concurrent applications overlap execution to improve performance and responsiveness.

    For example, consider a web server handling multiple client requests. If it processes requests sequentially, each client must wait for the previous request to complete. In a concurrent design, multiple requests are processed simultaneously, reducing wait times and improving user experience.

    Concurrency is not just about speed—it’s also about responsiveness and resource utilization. By enabling multiple operations to progress at the same time, concurrent applications can make optimal use of CPU cores, handle asynchronous events like network requests, and manage shared resources efficiently.

    Understanding the Need for Concurrent Applications

    There are several reasons why developers design applications to be concurrent:

    1. Performance Improvement
      Concurrency allows programs to use multiple processors or cores efficiently. Tasks that can run in parallel, like processing large datasets or handling multiple client requests, complete faster when executed concurrently.
    2. Responsiveness
      In applications such as user interfaces or real-time systems, concurrency ensures that the system remains responsive. For example, a video player can continue decoding frames while the user interacts with the interface, preventing the app from freezing.
    3. Resource Utilization
      Many systems involve I/O operations, such as reading from a disk or network. These operations are slow compared to CPU processing. Concurrent designs allow the CPU to perform other tasks while waiting for I/O, improving overall resource usage.
    4. Scalability
      In distributed systems or cloud-based applications, concurrency enables scaling. More tasks can run simultaneously, allowing the system to handle increased workload without significant performance degradation.
    5. Simplified Problem Modeling
      Some real-world problems are naturally concurrent. For example, modeling traffic signals, robotics, or simulations often involves multiple independent processes operating simultaneously. Designing a concurrent system can simplify mapping real-world behavior into software.

    Standard Concurrency Models

    Concurrency can be achieved using various design models. Each model has its own advantages, challenges, and typical use cases. The choice of model depends on the problem being solved, hardware architecture, and programming language.

    1. Thread-Based Concurrency

    • Concept: Threads are lightweight processes that share the same memory space within a process. Each thread executes a sequence of instructions independently but can access shared variables.
    • Advantages:
      • Efficient memory usage because threads share the same process memory.
      • Fine-grained parallelism for CPU-bound tasks.
    • Challenges:
      • Requires careful synchronization to avoid race conditions.
      • Deadlocks and starvation can occur if resources are not managed properly.
    • Use Cases: GUI applications, web servers, high-performance computing.

    2. Process-Based Concurrency

    • Concept: A process is an independent program with its own memory space. Processes communicate via inter-process communication (IPC) mechanisms like pipes, sockets, or shared memory.
    • Advantages:
      • Strong isolation; errors in one process do not affect others.
      • Suitable for distributed or multi-node systems.
    • Challenges:
      • Higher memory overhead compared to threads.
      • IPC can be slower than shared-memory communication.
    • Use Cases: Database servers, containerized microservices, operating system services.

    3. Event-Driven Concurrency

    • Concept: Event-driven programs respond to external events (e.g., user input, network messages) using a central event loop. Tasks are typically non-blocking, and execution is scheduled as events occur.
    • Advantages:
      • Efficient for I/O-bound applications.
      • Avoids the complexity of thread management.
    • Challenges:
      • Callback-based design can lead to “callback hell” if not managed properly.
      • Not suitable for CPU-bound tasks without additional threads.
    • Use Cases: Node.js servers, GUI frameworks, real-time web applications.

    4. Actor Model

    • Concept: In the actor model, the system consists of independent actors that communicate by sending messages. Each actor processes messages sequentially and can create new actors.
    • Advantages:
      • Avoids shared memory, reducing the risk of race conditions.
      • Highly scalable for distributed systems.
    • Challenges:
      • Requires careful design of message-passing protocols.
      • Debugging asynchronous message flows can be tricky.
    • Use Cases: Distributed systems, Erlang-based telecom systems, cloud microservices.

    5. Data-Parallel Model

    • Concept: This model focuses on performing the same operation simultaneously on multiple data elements. It is widely used in high-performance computing and GPU programming.
    • Advantages:
      • Highly efficient for numerical computations.
      • Ideal for tasks with repetitive operations on large datasets.
    • Challenges:
      • Limited to problems where data can be processed independently.
      • Synchronization overhead may occur if reductions or shared results are needed.
    • Use Cases: Scientific simulations, image processing, machine learning.

    6. Pipeline (Stream) Concurrency

    • Concept: Tasks are divided into stages, each running concurrently and passing results to the next stage, forming a processing pipeline.
    • Advantages:
      • Ideal for streaming data and continuous processing.
      • Improves throughput without requiring all stages to be completed sequentially.
    • Challenges:
      • Requires buffering between stages to handle variable processing speeds.
      • Error handling and backpressure management can be complex.
    • Use Cases: Video processing, data ingestion pipelines, compiler design.

    Best Practices in Designing Concurrent Applications

    1. Minimize Shared State
      Shared memory is a common source of bugs. Reducing shared state or using immutable data structures can prevent race conditions.
    2. Use Synchronization Primitives Wisely
      Locks, semaphores, and mutexes are necessary but should be used sparingly to avoid deadlocks and performance bottlenecks.
    3. Prefer Higher-Level Abstractions
      Languages like Java, C++, and Python provide thread pools, futures, and async frameworks that simplify concurrency management.
    4. Handle Exceptions Gracefully
      In concurrent systems, unhandled exceptions in one thread or task should not crash the entire application.
    5. Test for Concurrency Issues
      Use stress testing, race condition detection tools, and code reviews to catch subtle concurrency bugs early.

    Concurrent Application Design Interview Questions & Answers

    Beginner Level Questions

    1. What is a concurrent application?
    Answer:
    A concurrent application is designed to execute multiple tasks at the same time, either in parallel or overlapping in execution. This allows better performance, responsiveness, and resource utilization compared to sequential programs. Example: a web server handling multiple client requests simultaneously.

    2. Why do we need concurrency in applications?
    Answer:
    Concurrency is needed for:

    • Performance improvement – utilizing multi-core processors efficiently.
    • Responsiveness – keeping applications responsive while performing long tasks.
    • Better resource utilization – CPU can process other tasks while waiting for I/O.
    • Scalability – handling more tasks without performance degradation.
    • Natural modeling of real-world problems – like traffic lights, robotics, simulations.

    3. What is the difference between concurrency and parallelism?
    Answer:

    • Concurrency: Multiple tasks make progress independently, but not necessarily simultaneously (can be on a single core).
    • Parallelism: Tasks literally run at the same time on multiple processors or cores.
      Concurrency is about structure; parallelism is about execution.

    4. What are threads and processes?
    Answer:

    • Thread: Lightweight unit of execution within a process that shares the process memory.
    • Process: Independent program with its own memory space.
      Threads are faster to create and use less memory, but require synchronization. Processes provide isolation but are heavier and use IPC for communication.

    5. What are race conditions?
    Answer:
    A race condition occurs when two or more tasks access shared data at the same time, and the final outcome depends on the order of execution. Example: two threads incrementing a shared counter simultaneously.

    6. How do you prevent race conditions?
    Answer:

    • Use synchronization primitives like mutexes, semaphores, or locks.
    • Reduce shared state where possible.
    • Use atomic operations or thread-safe data structures.

    Intermediate Level Questions

    7. What are the standard concurrency models?
    Answer:

    1. Thread-based concurrency – multiple threads share memory within a process.
    2. Process-based concurrency – independent processes communicate via IPC.
    3. Event-driven concurrency – tasks are triggered by events using a main event loop.
    4. Actor model – actors communicate through messages; no shared state.
    5. Data-parallel model – same operation applied simultaneously on multiple data elements.
    6. Pipeline concurrency – tasks divided into stages, each running concurrently in a pipeline.

    8. What is an event-driven model, and when is it used?
    Answer:
    An event-driven model executes tasks in response to events, often using a central event loop. It’s ideal for I/O-bound applications like web servers or GUIs because tasks don’t block the system while waiting for input/output.

    9. Explain the Actor model.
    Answer:
    In the Actor model, each actor is an independent unit of computation that processes messages sequentially and can send messages to other actors. This avoids shared state, reducing race conditions, and is suitable for highly scalable distributed systems.

    10. What are synchronization primitives in concurrency?
    Answer:
    Synchronization primitives are tools to control access to shared resources:

    • Mutex – allows only one thread to access a resource at a time.
    • Semaphore – controls access based on a counter; allows multiple threads up to a limit.
    • Condition variable – allows threads to wait for certain conditions before proceeding.
    • Atomic operations – perform operations on shared data without interruption.

    11. What is deadlock, and how can it be prevented?
    Answer:
    A deadlock occurs when two or more tasks are waiting for each other to release resources, and none can proceed.
    Prevention techniques:

    • Avoid circular wait by acquiring resources in a fixed order.
    • Use timeout mechanisms when acquiring locks.
    • Minimize resource locking duration.

    12. What is a thread pool? Why is it used?
    Answer:
    A thread pool is a collection of pre-created threads ready to execute tasks.
    Advantages:

    • Reduces overhead of creating/destroying threads repeatedly.
    • Limits the number of concurrent threads to prevent resource exhaustion.
    • Improves application performance in high-load scenarios like servers.

    Advanced Level Questions

    13. What is the difference between blocking and non-blocking concurrency?
    Answer:

    • Blocking concurrency: Tasks wait until a resource or I/O operation completes (thread is idle).
    • Non-blocking concurrency: Tasks can continue executing other operations while waiting (event-driven or async tasks).
      Non-blocking designs improve CPU utilization and responsiveness.

    14. Explain pipeline (stream) concurrency with an example.
    Answer:
    Pipeline concurrency divides tasks into stages where each stage processes input and passes results to the next.
    Example: Video processing –

    • Stage 1: Decode frames
    • Stage 2: Apply filters
    • Stage 3: Display frames
      Each stage runs concurrently, improving throughput.

    15. How do you test a concurrent application?
    Answer:

    • Stress testing – simulate high load to check performance.
    • Race detection tools – detect race conditions in code.
    • Code reviews – check for proper locking and shared resource management.
    • Unit testing with multiple threads – verify thread-safe behavior.

    16. What is the difference between parallel and concurrent programming models in practice?
    Answer:

    • Concurrent programming focuses on task structuring, e.g., threads, events, or actors, allowing multiple tasks to make progress.
    • Parallel programming focuses on executing tasks simultaneously on multiple cores, often using data-parallelism or SIMD/GPU programming.
      Many modern systems combine both approaches.

    17. Explain data-parallel concurrency and its use cases.
    Answer:
    Data-parallel concurrency involves performing the same operation on multiple independent data elements simultaneously.
    Use cases:

    • Image processing (apply a filter to all pixels)
    • Machine learning (matrix multiplication, tensor operations)
    • Scientific simulations

    18. What are some best practices for designing concurrent applications?
    Answer:

    • Minimize shared state and side effects.
    • Use higher-level concurrency abstractions when available.
    • Carefully manage locks to avoid deadlocks.
    • Handle exceptions in all threads or tasks.
    • Test for concurrency-related bugs using tools and stress tests.

    19. Can concurrency improve single-threaded CPU-bound applications?
    Answer:
    Not always. For CPU-bound tasks on a single core, concurrency may not improve performance and may add overhead. True performance gains occur when tasks can be parallelized across multiple cores or involve I/O waiting.

    20. How does the choice of concurrency model affect scalability?
    Answer:

    • Thread-based: Good for moderate-scale multi-core tasks but may hit limits with thousands of threads.
    • Process-based: Better isolation; suitable for distributed systems but more resource-intensive.
    • Event-driven / async: Excellent for high I/O load, scales well with thousands of connections.
    • Actor model: Highly scalable in distributed environments due to message-based design.

    Concurrency Models

    Concurrency ModelAdvantagesDisadvantages / ChallengesCommon Use Cases
    Thread-Based– Lightweight; shares process memory- Efficient for CPU-bound tasks– Race conditions if shared state not managed- Risk of deadlocks, starvationGUI apps, web servers, high-performance computing
    Process-Based– Strong isolation- Faults in one process don’t affect others– High memory overhead- IPC can be slowerDatabase servers, OS services, microservices
    Event-Driven / Async– Efficient for I/O-bound apps- Avoids thread management complexity– Callback hell / complex async flow- Not ideal for CPU-bound tasksNode.js servers, GUIs, real-time web apps
    Actor Model– No shared memory; avoids race conditions- Highly scalable for distributed systems– Debugging async messages can be tricky- Designing message protocols is essentialDistributed systems, Erlang-based telecom, cloud microservices
    Data-Parallel– Efficient for operations on large datasets- Ideal for numerical computations– Only works for independent data- Synchronization for shared results neededMachine learning, image/video processing, scientific simulations
    Pipeline / Stream– High throughput- Continuous data processing- Each stage runs concurrently– Buffering between stages needed- Backpressure and error handling can be complexVideo streaming, compiler design, data processing pipelines

    Linux is a multitasking operating system where processes are the fundamental units of execution. Understanding process creation and management is critical for developers, system programmers, and those preparing for technical interviews. This guide covers everything from basic system calls to advanced kernel routines, memory optimization, and thread creation.

    1. Process Creation Calls in Linux

    In Linux, processes are created using system calls like fork(), vfork(), and execve(). Each serves a specific purpose.

    1.1 fork()

    The fork() system call is the standard way to create a new process. It creates a child process that is an almost exact copy of the parent process, including code, data, and stack.

    Syntax:

    #include <unistd.h>
    #include <stdio.h>
    #include <stdlib.h>
    
    int main() {
        pid_t pid = fork();
    
        if (pid < 0) {
            perror("fork failed");
            exit(1);
        } else if (pid == 0) {
            // Child process
            printf("Child process, PID: %d\n", getpid());
        } else {
            // Parent process
            printf("Parent process, PID: %d, Child PID: %d\n", getpid(), pid);
        }
    
        return 0;
    }
    

    Key Points:

    • Returns 0 in the child, the child PID in the parent, and -1 on failure.
    • Child inherits parent’s memory, file descriptors, and environment.
    • Uses Copy-on-Write (COW) to optimize memory (explained later).

    Use Cases: General-purpose process creation where the parent needs to continue execution alongside the child.

    1.2 vfork()

    vfork() is similar to fork() but optimized for situations where the child immediately calls execve() to run a new program. Unlike fork(), vfork() does not copy the parent’s address space; the child shares it temporarily, so the parent is suspended until the child exits or executes a new program.

    Syntax:

    #include <unistd.h>
    #include <stdio.h>
    #include <stdlib.h>
    
    int main() {
        pid_t pid = vfork();
    
        if (pid < 0) {
            perror("vfork failed");
            exit(1);
        } else if (pid == 0) {
            // Child process
            execlp("ls", "ls", "-l", NULL);
            _exit(0); // Always use _exit() after exec
        } else {
            // Parent resumes after child exec or exit
            printf("Parent process resumes, PID: %d\n", getpid());
        }
    
        return 0;
    }
    

    Key Points:

    • More efficient than fork() when child immediately executes another program.
    • Parent is suspended until the child exits or calls exec.
    • Must avoid modifying variables shared with the parent to prevent undefined behavior.

    1.3 execve()

    execve() replaces the current process image with a new program. It does not create a new process, so it is usually called by the child after fork() or vfork().

    Syntax:

    #include <unistd.h>
    #include <stdio.h>
    
    int main() {
        char *args[] = {"/bin/ls", "-l", NULL};
        execve("/bin/ls", args, NULL);
        perror("execve failed"); // Runs only if execve fails
        return 1;
    }
    

    Key Points:

    • Loads a new executable into the process memory.
    • File descriptors can be preserved if not closed before exec.
    • Frequently combined with fork() to spawn new programs.

    1.4 Differences Between fork(), vfork(), and execve()

    System CallCreates New ProcessCopies Address SpaceParent SuspendedUse Case
    fork()YesYes (COW)NoGeneral child process creation
    vfork()YesNo (shares memory)YesChild immediately execs another program
    execve()NoN/AN/AReplace process image with new program

    2. Monitoring Child Processes

    Once a process spawns children, it often needs to monitor and manage them.

    2.1 wait() and waitpid()

    wait() suspends the parent until any child terminates. waitpid() allows more precise control over which child to wait for.

    Example:

    #include <sys/wait.h>
    #include <unistd.h>
    #include <stdio.h>
    
    int main() {
        pid_t pid = fork();
    
        if (pid == 0) {
            // Child
            printf("Child running\n");
            _exit(42);
        } else {
            // Parent
            int status;
            pid_t wpid = waitpid(pid, &status, 0);
            if (WIFEXITED(status)) {
                printf("Child exited with status %d\n", WEXITSTATUS(status));
            }
        }
    
        return 0;
    }
    

    Key Points:

    • WIFEXITED(status) checks if the child exited normally.
    • WEXITSTATUS(status) retrieves exit code.
    • Non-blocking option: waitpid(pid, &status, WNOHANG) returns immediately if child hasn’t exited.
    • Signal handling: SIGCHLD can notify the parent asynchronously when a child terminates.

    2.2 Zombie Processes

    If a child exits but the parent does not read its status, it becomes a zombie process, holding PID and exit info. Handling zombies requires either:

    • Using wait()/waitpid().
    • Ignoring SIGCHLD signals: signal(SIGCHLD, SIG_IGN);.

    3. Linux Kernel Process Creation Routines

    Under the hood, the kernel uses do_fork() (and related routines) to create processes.

    3.1 do_fork()

    • Core routine invoked by fork() and vfork().
    • Allocates a task_struct, the kernel’s representation of a process.
    • Initializes process ID (PID), scheduling info, and kernel stack.
    • Sets up Copy-on-Write page tables to share memory with the parent.
    • Registers the process with the scheduler for execution.

    Task Struct Highlights:

    • Contains process state, PID, parent/child pointers.
    • Stores file descriptor tables, memory maps, and signal handlers.
    • Used by the kernel to manage scheduling, signals, and process lifecycle.

    4. Copy-on-Write (COW) Optimization

    Copy-on-Write (COW) is a memory optimization used during fork().

    4.1 How It Works

    • Child and parent share the same physical memory pages after fork.
    • Pages are marked read-only.
    • When either process writes to a shared page, the kernel creates a private copy for that process.
    • Reduces memory usage and speeds up process creation.

    Illustration:

    Parent Memory: | Page 1 | Page 2 | Page 3 |
    fork() → Child shares pages
    On write → Private copy created
    
    • Reference counts track how many processes share each page.

    5. Handling Child Process Termination

    Child process termination is detected using signals and wait system calls.

    5.1 SIGCHLD

    • Sent to parent when a child exits or is stopped.
    • Parent can catch it and call waitpid() to clean up the child process.
    • Prevents zombies if handled properly.

    Example:

    #include <signal.h>
    #include <sys/wait.h>
    #include <unistd.h>
    #include <stdio.h>
    
    void sigchld_handler(int sig) {
        int status;
        pid_t pid = waitpid(-1, &status, WNOHANG);
        if (pid > 0) {
            printf("Child %d terminated\n", pid);
        }
    }
    
    int main() {
        signal(SIGCHLD, sigchld_handler);
    
        if (fork() == 0) {
            _exit(0);
        }
    
        sleep(2); // Give child time to terminate
        return 0;
    }
    
    • Using WNOHANG ensures non-blocking cleanup.

    6. Linux Threads Interface: clone()

    Linux threads are lightweight processes sharing memory and other resources. They are created using clone().

    6.1 clone() System Call

    Syntax:

    #include <sched.h>
    #include <stdio.h>
    #include <stdlib.h>
    #include <unistd.h>
    
    int thread_func(void *arg) {
        printf("Thread says: %s\n", (char*)arg);
        return 0;
    }
    
    int main() {
        char *stack = malloc(1024*1024);
        if (stack == NULL) return 1;
    
        pid_t tid = clone(thread_func, stack + 1024*1024, SIGCHLD | CLONE_VM | CLONE_FS, "Hello from thread");
        if (tid < 0) {
            perror("clone failed");
            exit(1);
        }
    
        waitpid(tid, NULL, 0);
        free(stack);
        return 0;
    }
    

    Key Points:

    • clone() can share memory (CLONE_VM), file descriptors (CLONE_FILES), and signal handlers (CLONE_SIGHAND).
    • Provides fine-grained control over thread creation compared to pthread.
    • Threads created by clone() behave like processes but with shared resources.

    Summary

    Linux provides powerful mechanisms for process creation and management. Key takeaways:

    1. Process Creation: fork(), vfork(), and execve() are essential building blocks.
    2. Monitoring: Parents use wait(), waitpid(), and SIGCHLD to manage child processes.
    3. Kernel Routines: do_fork() creates task structures and schedules processes.
    4. Memory Optimization: Copy-on-Write reduces overhead during fork().
    5. Termination Handling: Proper handling prevents zombies and resource leaks.
    6. Threads: clone() enables lightweight threads sharing resources.

    Mastering these concepts is critical for system programming, embedded development, and interview success.

    Linux Process Creation & Management Interview Questions

    Section 1: Basic Process Creation

    Q1. What is a process in Linux?
    A: A process is a running instance of a program. It has a unique PID (Process ID), memory space, file descriptors, and execution context. Processes are the basic units of execution in Linux.

    Q2. What is the difference between fork() and execve()?
    A:

    Featurefork()execve()
    Creates a new process?YesNo (replaces current process)
    Copies memory?Yes (COW)N/A
    Typical UseCreate child to run codeRun a new program in current process
    Return Value0 in child, PID in parentOn failure returns -1, otherwise does not return

    Q3. Write a simple fork() example and explain the output.

    pid_t pid = fork();
    if (pid == 0) printf("Child\n");
    else printf("Parent, Child PID: %d\n", pid);
    

    Answer:

    • The parent prints its PID and child PID.
    • The child prints “Child”.
    • Both execute concurrently.

    Output may vary due to scheduling order.

    Q4. What is vfork() and how is it different from fork()?

    Answer:

    • vfork() is used when the child immediately executes another program using execve().
    • Unlike fork(), the child shares the parent’s memory and suspends the parent until it calls exec or _exit().
    • Faster than fork() because no memory copying occurs.

    Section 2: Monitoring Child Processes

    Q5. How can a parent process monitor its child processes?

    Answer:

    • Using wait() or waitpid().
    • wait() blocks until any child exits.
    • waitpid() allows waiting for a specific child and supports non-blocking waits using WNOHANG.

    Q6. Explain blocking vs non-blocking wait.

    Answer:

    • Blocking Wait: Parent halts execution until child exits (default behavior of wait()).
    • Non-Blocking Wait: Parent continues execution if child hasn’t exited (waitpid(pid, &status, WNOHANG)).

    Q7. What is a zombie process and how do you handle it?

    Answer:

    • A zombie occurs when a child has exited, but the parent has not read its exit status.
    • It still holds a PID and minimal kernel info.
    • Handle using wait(), waitpid(), or ignoring SIGCHLD signals.

    Section 3: Kernel Internals

    Q8. What kernel routine handles process creation?

    Answer:

    • The Linux kernel uses do_fork() to create a new process.
    • do_fork():
      • Allocates task_struct (process descriptor).
      • Sets up scheduling info, PID, parent/child pointers.
      • Copies memory tables (COW) or sets up shared memory for vfork().

    Q9. What is task_struct?

    Answer:

    • Kernel structure representing a process.
    • Contains:
      • PID, parent/children info
      • Process state
      • File descriptors and memory maps
      • Scheduling info
      • Signal handlers

    Section 4: Copy-on-Write (COW)

    Q10. What is Copy-on-Write (COW) and why is it important?

    Answer:

    • Memory optimization used in fork().
    • Parent and child initially share physical memory pages (read-only).
    • On write, a private copy is made.
    • Reduces memory consumption and speeds up fork.

    Q11. How does Linux implement COW?

    Answer:

    • Kernel uses page tables and reference counting.
    • Shared pages are marked read-only.
    • On write, a page fault triggers the kernel to copy the page for the writing process.

    Section 5: Child Process Termination

    Q12. How does a parent detect child termination?

    Answer:

    • Linux sends SIGCHLD to parent when a child exits or stops.
    • Parent can catch it and call waitpid() to get exit status.

    Q13. Write a small program that handles SIGCHLD to avoid zombies.

    #include <signal.h>
    #include <sys/wait.h>
    #include <stdio.h>
    #include <unistd.h>
    
    void sigchld_handler(int sig) {
        while(waitpid(-1, NULL, WNOHANG) > 0); // Cleanup all terminated children
    }
    
    int main() {
        signal(SIGCHLD, sigchld_handler);
        if (fork() == 0) _exit(0); // Child exits
        sleep(2); // Give time for signal
        return 0;
    }
    

    Section 6: Linux Threads (clone())

    Q14. How are threads different from processes?

    Answer:

    • Processes: Have separate memory, file descriptors, and PID.
    • Threads: Lightweight, share memory, file descriptors, signal handlers with parent.
    • Threads are implemented using clone() in Linux.

    Q15. Explain clone() and its flags.

    Answer:

    • clone() creates a process or thread with customizable shared resources.
    • Flags examples:
      • CLONE_VM: Share memory space
      • CLONE_FILES: Share file descriptors
      • CLONE_SIGHAND: Share signal handlers
      • SIGCHLD: Child termination signals parent

    Q16. Example of clone() usage:

    int thread_func(void *arg) {
        printf("Thread says: %s\n", (char*)arg);
        return 0;
    }
    
    char *stack = malloc(1024*1024);
    pid_t tid = clone(thread_func, stack + 1024*1024, SIGCHLD | CLONE_VM, "Hello");
    waitpid(tid, NULL, 0);
    
    • Creates a lightweight thread sharing memory (CLONE_VM) with parent.

    Section 7: Advanced Scenario Questions

    Q17. What happens if a child modifies a shared page in COW?

    • Kernel duplicates the page. Parent continues with original, child gets a private copy.

    Q18. How does Linux prevent zombie accumulation for orphaned children?

    • Orphaned children are adopted by init (PID 1), which automatically calls wait() to clean up.

    Q19. Why use vfork() instead of fork() in some cases?

    • Faster for creating a process that execs immediately because no memory copy is done.

    Q20. How do you implement a multi-threaded program without pthread?

    • Use clone() with CLONE_VM | CLONE_FILES to create threads sharing memory and file descriptors.

    Linux Process Creation & Management Cheat Sheet

    1. Key System Calls

    System CallPurposeReturnsNotes
    fork()Create a child process0 (child), PID (parent), -1 (error)Uses Copy-on-Write, parent continues immediately
    vfork()Optimized fork when child calls execve() immediately0 (child), PID (parent), -1 (error)Parent is suspended until child exits or execs
    execve()Replace current process image with new program-1 on failureUsually called by child after fork/vfork
    wait()Wait for any child to terminatePID of terminated child, -1 on errorBlocking wait
    waitpid()Wait for specific childPID, 0 if WNOHANG and child alive, -1 on errorSupports non-blocking (WNOHANG)
    clone()Create process/thread with shared resourcesPIDFine-grained resource sharing (CLONE_VM, CLONE_FILES)

    2. Copy-on-Write (COW)

    • Purpose: Optimize memory during fork.
    • How it works:
      1. Parent and child share pages read-only.
      2. Write triggers page duplication for the writing process.
    • Benefits: Faster fork, less memory usage.

    3. Signals

    SignalDescription
    SIGCHLDSent to parent when child terminates or stops.
    SIGKILLImmediately terminates process (cannot be caught).
    SIGTERMRequests graceful termination.

    Handling SIGCHLD:

    signal(SIGCHLD, sigchld_handler);
    
    • Avoids zombies.
    • Combine with waitpid(-1, &status, WNOHANG) to clean multiple children.

    4. Zombie & Orphan Processes

    • Zombie: Child exited, parent did not call wait.
    • Orphan: Parent exits before child; child adopted by init (PID 1).
    • Cleanup: Always use wait()/waitpid() or handle SIGCHLD.

    5. Process Creation Patterns

    Fork Example:

    pid_t pid = fork();
    if(pid == 0) printf("Child\n");
    else if(pid > 0) printf("Parent, Child PID: %d\n", pid);
    else perror("fork failed");
    

    Fork + Exec Example:

    pid_t pid = fork();
    if(pid == 0) execve("/bin/ls", args, NULL);
    

    vfork Example:

    pid_t pid = vfork();
    if(pid == 0) {
        execlp("ls","ls","-l",NULL);
        _exit(0);
    }
    

    6. Waiting for Children

    int status;
    pid_t child = waitpid(-1, &status, WNOHANG); // Non-blocking
    if(WIFEXITED(status)) printf("Exit code: %d\n", WEXITSTATUS(status));
    
    • -1 → wait for any child.
    • WNOHANGnon-blocking.

    7. Linux Kernel Internals

    • do_fork(): Kernel routine to create process/task.
    • task_struct: Kernel process descriptor. Contains PID, parent, state, memory, scheduling info.
    • Scheduler: Adds the new process to run queue after creation.

    8. Linux Threads with clone()

    • Threads: Lightweight processes sharing memory.
    • clone() flags:
    FlagPurpose
    CLONE_VMShare memory space
    CLONE_FSShare filesystem info
    CLONE_FILESShare open file descriptors
    CLONE_SIGHANDShare signal handlers
    SIGCHLDSignal parent on termination

    Example:

    int thread_func(void *arg){ printf("%s\n", (char*)arg); return 0; }
    char *stack = malloc(1024*1024);
    pid_t tid = clone(thread_func, stack + 1024*1024, SIGCHLD | CLONE_VM, "Hello Thread");
    waitpid(tid,NULL,0);
    

    9. Advanced Tips

    • Use vfork() + exec for maximum efficiency.
    • Always handle SIGCHLD to prevent zombies.
    • Use COW concept to understand fork memory efficiency in interviews.
    • clone() allows implementing threads without pthread.

    10. Quick Memory Map After fork()

    Parent Memory: | Code | Data | Stack | Heap |
    fork() → Child: shares pages (COW)
    On write → kernel copies the page for writing process
    

    Interview Quick Facts:

    • fork() → 2 processes, same memory until write (COW).
    • vfork() → faster, parent suspended.
    • execve() → replaces process memory.
    • waitpid(-1, &status, WNOHANG) → non-blocking wait.
    • Zombie → exists until parent reads exit status.
    • Orphan → adopted by init (PID 1).
    • clone() → lightweight threads sharing resources.

    FAQ Linux System Programming

    1. What is Linux System Programming?

    Linux System Programming is the practice of writing programs that directly interact with the Linux operating system using system calls and low-level APIs. It allows developers to control processes, memory, files, signals, and inter-process communication for building efficient and high-performance applications.

    2. Why is Linux System Programming important for embedded and system developers?

    Linux System Programming gives developers full control over hardware and OS resources. It is essential for embedded systems, device drivers, servers, and performance-critical applications where efficiency, reliability, and low latency are required.

    3. What is the difference between system programming and application programming in Linux?

    System programming works close to the Linux kernel using system calls like fork(), exec(), read(), and write(), while application programming relies on high-level libraries and frameworks. System programming focuses on performance, resource management, and OS behavior.

    4. What are system calls in Linux, and why are they used?

    System calls are special functions that allow user programs to request services from the Linux kernel, such as file access, process creation, or memory allocation. They provide a safe and controlled way to interact with kernel space.

    5. Which programming language is best for Linux System Programming?

    C is the most commonly used language for Linux System Programming because it provides direct access to system calls and memory. C++ is also used when object-oriented design is required, while still maintaining low-level control.

    6. How does process management work in Linux System Programming?

    Linux uses system calls like fork(), exec(), wait(), and exit() to create, manage, and terminate processes. Understanding process states, parent-child relationships, and scheduling is crucial for writing robust system-level programs.

    7. What is Inter-Process Communication (IPC) in Linux?

    IPC allows multiple processes to communicate and synchronize with each other. Linux supports IPC mechanisms such as pipes, message queues, shared memory, semaphores, and sockets, each designed for specific use cases.

    8. How is memory managed in Linux System Programming?

    Linux memory management involves concepts like virtual memory, paging, stack, heap, and memory mapping using malloc(), free(), and mmap(). Proper memory handling prevents leaks, fragmentation, and performance issues.

    9. What role do signals play in Linux System Programming?

    Signals are software interrupts used to notify processes about events like termination, illegal memory access, or timer expiration. Handling signals correctly is important for process control, debugging, and graceful shutdowns.

    10. How can beginners start learning Linux System Programming effectively?

    Beginners should start by learning C programming, Linux command-line basics, and core concepts like processes, files, and memory. Practicing small programs using system calls and reading manual pages (man) helps build strong fundamentals.

    Read More : IPC in Linux from basics to advanced concepts every developer should know.

  • Master POSIX Threads (pthreads) in Linux (2026)

    Learn POSIX Threads (pthreads) in Linux: thread creation, synchronization, mutexes, condition variables, and advanced concepts with practical examples & interview tips.

    Multithreading is a fundamental concept in modern software development, especially in high-performance, real-time, and concurrent applications. POSIX Threads, commonly called pthreads, is the standard threading library in Unix/Linux systems. This article will give you a complete understanding of pthreads from basics to advanced concepts, with examples, diagrams, and interview tips.

    1. Introduction to POSIX Threads

    What are Threads?

    • A thread is the smallest unit of execution within a process.
    • Multiple threads can exist within the same process, sharing code, data, and resources like file descriptors and heap memory.
    • Each thread has its own stack, program counter (PC), and registers.

    Example: A web server can use one thread per client request, sharing the same memory space for efficient communication.

    Difference Between Processes and Threads

    FeatureProcessThread
    MemorySeparate memory spaceShares memory with other threads
    OverheadHigher (context switching)Lower
    CommunicationInter-process communication (IPC)Direct memory access
    Creationfork()pthread_create()
    Use-caseIsolation, heavy tasksLightweight, concurrent tasks

    Interview Tip: Be ready to explain why threads are faster than processes for certain tasks, citing shared memory and low creation overhead.

    Advantages and Use-Cases of Multithreading

    Advantages:

    1. Responsiveness: GUI apps remain responsive while performing background tasks.
    2. Resource sharing: Threads share process memory, enabling easy communication.
    3. Better CPU utilization: Threads can run concurrently on multiple cores.
    4. Simplified program structure: Tasks like I/O and computation can run in parallel.

    Use-Cases:

    • Web servers and database servers
    • Real-time embedded systems
    • Parallel computation tasks (matrix multiplication, video processing)
    • Producer-consumer pipelines

    2. POSIX Threads Library Overview

    What is pthreads?

    • POSIX Threads is a standard API for multithreading on Unix-like systems.
    • Implemented in <pthread.h>.
    • Supports thread creation, synchronization, attributes, cancellation, and real-time scheduling.

    Including pthread library in C/C++ programs

    #include <pthread.h>
    #include <stdio.h>
    #include <stdlib.h>
    
    • Compiling programs requires linking the pthread library:
    gcc myprogram.c -o myprogram -lpthread
    

    3. Thread Creation and Termination

    Using pthread_create()

    void* thread_function(void* arg) {
        printf("Hello from thread! Received: %d\n", *(int*)arg);
        pthread_exit((void*) arg);  // Exit thread and return value
    }
    
    int main() {
        pthread_t tid;
        int value = 42;
    
        // Create a thread
        if (pthread_create(&tid, NULL, thread_function, (void*)&value) != 0) {
            perror("pthread_create failed");
            exit(1);
        }
    
        void* ret_val;
        pthread_join(tid, &ret_val); // Wait for thread to finish
    
        printf("Thread returned: %d\n", (int)(long)ret_val);
        return 0;
    }
    

    Explanation:

    1. pthread_t tid: Thread ID.
    2. pthread_create(): Creates a thread.
      • Arguments: Thread ID, attributes (NULL = default), thread function, arguments.
    3. pthread_exit(): Ends the thread.
    4. pthread_join(): Waits for a thread and retrieves its return value.

    Interview Tip: Know the difference between pthread_exit() and return in a thread function.

    4. Thread Attributes

    • pthread_attr_t is used to customize threads.

    Common attributes:

    • Stack size: pthread_attr_setstacksize()
    • Detach state: Joinable or detached (pthread_attr_setdetachstate())
    • Scheduling policy: SCHED_FIFO, SCHED_RR, SCHED_OTHER

    Example:

    pthread_attr_t attr;
    pthread_attr_init(&attr);
    pthread_attr_setstacksize(&attr, 1024*1024); // 1 MB
    pthread_attr_setdetachstate(&attr, PTHREAD_CREATE_DETACHED);
    pthread_create(&tid, &attr, thread_function, (void*)&value);
    pthread_attr_destroy(&attr);
    

    5. Thread Detachment

    • Joinable Threads: Must be joined using pthread_join().
    • Detached Threads: Resources are automatically released when the thread exits.
    pthread_detach(tid); // Detaches a joinable thread
    

    Interview Tip: Explain the memory/resource leak problem if detached threads are not properly used.

    6. Thread Synchronization

    Multithreading introduces the risk of race conditions. Synchronization primitives prevent this.

    Mutexes (pthread_mutex_t)

    pthread_mutex_t lock = PTHREAD_MUTEX_INITIALIZER;
    
    pthread_mutex_lock(&lock);   // Acquire lock
    // Critical section
    pthread_mutex_unlock(&lock); // Release lock
    pthread_mutex_destroy(&lock);
    
    • Recursive Mutex: Same thread can lock multiple times.

    Condition Variables (pthread_cond_t)

    • Used for signaling between threads.
    pthread_cond_t cond = PTHREAD_COND_INITIALIZER;
    pthread_mutex_t lock = PTHREAD_MUTEX_INITIALIZER;
    
    // Thread A waits
    pthread_mutex_lock(&lock);
    pthread_cond_wait(&cond, &lock); // Releases lock and waits
    pthread_mutex_unlock(&lock);
    
    // Thread B signals
    pthread_mutex_lock(&lock);
    pthread_cond_signal(&cond);
    pthread_mutex_unlock(&lock);
    
    • Broadcast wakes all waiting threads: pthread_cond_broadcast()

    Reader-Writer Locks

    pthread_rwlock_t rwlock = PTHREAD_RWLOCK_INITIALIZER;
    pthread_rwlock_rdlock(&rwlock); // Acquire read lock
    pthread_rwlock_wrlock(&rwlock); // Acquire write lock
    pthread_rwlock_unlock(&rwlock);
    

    7. Thread-Specific Data (TSD)

    • Each thread can have its own private data using pthread_key_t.
    pthread_key_t key;
    pthread_key_create(&key, free);
    
    void* val = malloc(sizeof(int));
    *(int*)val = 100;
    pthread_setspecific(key, val);
    
    int* myval = (int*)pthread_getspecific(key);
    printf("Thread-specific data: %d\n", *myval);
    

    8. Thread Cancellation and Cleanup

    Thread Cancellation

    pthread_cancel(tid); // Request thread termination
    
    • Types: Asynchronous (immediate) or Deferred (at cancellation points)

    Cleanup Handlers

    void cleanup(void* arg) { printf("Cleaning: %s\n", (char*)arg); }
    pthread_cleanup_push(cleanup, "Thread resources");
    pthread_cleanup_pop(1); // Execute cleanup
    

    9. Advanced Thread Topics

    Scheduling Policies and Priorities

    • SCHED_FIFO: First-in-first-out real-time
    • SCHED_RR: Round-robin real-time
    • SCHED_OTHER: Default Linux timesharing

    Signal Handling

    • Signals can be masked per-thread using pthread_sigmask().

    Deadlocks

    • Avoid nested locks
    • Use pthread_mutex_trylock() to prevent waiting forever
    • Lock ordering strategy

    10. Best Practices and Interview Tips

    1. Always initialize and destroy mutexes, condition variables.
    2. Prefer joinable threads if you need a return value.
    3. Avoid sharing mutable global variables without synchronization.
    4. Minimize critical section to improve performance.
    5. Use thread-specific data to avoid data races.
    6. Understand pthread attribute usage for real-time and embedded systems.
    7. Be ready to explain common pitfalls like deadlocks, resource leaks, and race conditions.

    11. Example Programs

    Simple Thread Creation

    #include <pthread.h>
    #include <stdio.h>
    
    void* say_hello(void* arg) {
        printf("Hello from thread!\n");
        return NULL;
    }
    
    int main() {
        pthread_t tid;
        pthread_create(&tid, NULL, say_hello, NULL);
        pthread_join(tid, NULL);
        return 0;
    }
    

    Producer-Consumer Problem

    #include <pthread.h>
    #include <stdio.h>
    #include <stdlib.h>
    
    #define BUFFER_SIZE 5
    int buffer[BUFFER_SIZE], count = 0;
    pthread_mutex_t lock = PTHREAD_MUTEX_INITIALIZER;
    pthread_cond_t not_empty = PTHREAD_COND_INITIALIZER;
    pthread_cond_t not_full = PTHREAD_COND_INITIALIZER;
    
    void* producer(void* arg) {
        for (int i=0;i<10;i++){
            pthread_mutex_lock(&lock);
            while(count == BUFFER_SIZE) pthread_cond_wait(&not_full, &lock);
            buffer[count++] = i;
            printf("Produced: %d\n", i);
            pthread_cond_signal(&not_empty);
            pthread_mutex_unlock(&lock);
        }
        return NULL;
    }
    
    void* consumer(void* arg) {
        for(int i=0;i<10;i++){
            pthread_mutex_lock(&lock);
            while(count == 0) pthread_cond_wait(&not_empty, &lock);
            int val = buffer[--count];
            printf("Consumed: %d\n", val);
            pthread_cond_signal(&not_full);
            pthread_mutex_unlock(&lock);
        }
        return NULL;
    }
    
    int main() {
        pthread_t p, c;
        pthread_create(&p, NULL, producer, NULL);
        pthread_create(&c, NULL, consumer, NULL);
        pthread_join(p, NULL);
        pthread_join(c, NULL);
        return 0;
    }
    

    Thread-Specific Data Example

    pthread_key_t key;
    
    void* thread_func(void* arg) {
        int* val = malloc(sizeof(int));
        *val = *(int*)arg;
        pthread_setspecific(key, val);
        printf("Thread-specific data: %d\n", *(int*)pthread_getspecific(key));
        return NULL;
    }
    

    POSIX Threads (pthreads) Interview Questions

    1. Basics of Threads and Pthreads

    Beginner Questions

    1. What is a thread? How does it differ from a process?
    2. What are the advantages of using threads over processes?
    3. Explain multithreading with an example.
    4. What is POSIX Threads (pthreads)? Why is it used?
    5. How do you include pthread library in a C/C++ program?
    6. How do you compile a pthread program in Linux? (-lpthread)
    7. What is the difference between user-level threads and kernel-level threads?
    8. Can threads share memory? Which resources are shared, and which are private?

    Intermediate Questions
    9. Explain the thread lifecycle (New, Runnable, Running, Waiting, Terminated).
    10. What is a thread ID (pthread_t)? How is it used?
    11. What is a joinable thread vs a detached thread?

    Advanced Questions
    12. Explain the differences between POSIX threads and Windows threads.
    13. What are some common pitfalls when using threads in Linux?

    2. Thread Creation and Termination

    Beginner Questions

    1. How do you create a thread in pthreads? Explain pthread_create() arguments.
    2. What is the prototype of a thread function?
    3. How do threads terminate? Difference between pthread_exit() and returning from thread function.
    4. How do you wait for a thread to finish? Explain pthread_join().

    Intermediate Questions
    5. Can a thread return a value? How?
    6. What happens if pthread_join() is not called for a joinable thread?
    7. What is the effect of calling exit() inside a thread?

    Advanced Questions
    8. How can you handle multiple threads returning different data types?
    9. Explain thread stack allocation and stack size management.

    3. Thread Attributes (pthread_attr_t)

    Beginner Questions

    1. What are thread attributes? Why are they used?
    2. How do you initialize and destroy thread attributes? (pthread_attr_init, pthread_attr_destroy)

    Intermediate Questions
    3. How do you set a thread as detached using attributes?
    4. How do you set a custom stack size?
    5. How do you set scheduling policy using attributes? (SCHED_FIFO, SCHED_RR, SCHED_OTHER)

    Advanced Questions
    6. What are real-time thread attributes and their significance?
    7. How do thread attributes affect performance and memory usage?

    4. Thread Detachment

    Beginner Questions

    1. What is the difference between detached and joinable threads?
    2. How do you detach a thread after creation? (pthread_detach)

    Intermediate Questions
    3. What happens if a detached thread calls pthread_exit()?
    4. Can you join a detached thread? Why or why not?

    Advanced Questions
    5. When should you use detached threads in real-world applications?

    5. Thread Synchronization

    Mutexes

    Beginner Questions

    1. What is a mutex? Why is it needed?
    2. How do you initialize, lock, unlock, and destroy a mutex?
    3. What happens if a thread tries to unlock a mutex it does not own?

    Intermediate Questions
    4. What is a recursive mutex? When is it used?
    5. Explain deadlocks with an example in multithreaded programs.
    6. How can deadlocks be avoided in pthread programs?

    Advanced Questions
    7. Explain priority inversion and how to handle it in pthreads.

    Condition Variables

    Beginner Questions

    1. What is a condition variable?
    2. How do pthread_cond_wait(), pthread_cond_signal(), and pthread_cond_broadcast() work?

    Intermediate Questions
    3. Why do you need a mutex with condition variables?
    4. What is spurious wakeup, and how do you handle it?

    Advanced Questions
    5. Explain producer-consumer problem using mutex and condition variables.

    Reader-Writer Locks

    Beginner Questions

    1. What is a reader-writer lock (pthread_rwlock_t)?
    2. How is it different from a mutex?

    Intermediate Questions
    3. How do you acquire read and write locks? (pthread_rwlock_rdlock, pthread_rwlock_wrlock)
    4. What happens if multiple writers try to acquire the lock simultaneously?

    6. Thread-Specific Data (TSD)

    Beginner Questions

    1. What is thread-specific data?
    2. How do you create a pthread_key_t?

    Intermediate Questions
    3. How do you set and get thread-specific data? (pthread_setspecific, pthread_getspecific)
    4. How is thread-specific data useful in real applications?

    Advanced Questions
    5. How do you cleanup thread-specific data automatically?

    7. Thread Cancellation and Cleanup

    Beginner Questions

    1. How do you cancel a thread? (pthread_cancel)
    2. What is the difference between asynchronous and deferred cancellation?

    Intermediate Questions
    3. How do you set a thread as cancellable or non-cancellable?
    4. What are cleanup handlers? (pthread_cleanup_push, pthread_cleanup_pop)

    Advanced Questions
    5. How do you ensure resources are freed when a thread is cancelled?

    8. Advanced Thread Topics

    Scheduling and Real-time

    Beginner Questions

    1. What are the POSIX thread scheduling policies? (SCHED_FIFO, SCHED_RR, SCHED_OTHER)
    2. How do you set thread priority?

    Intermediate Questions
    3. How is real-time scheduling different from normal scheduling?
    4. What are the limitations of real-time threads in Linux?

    Signal Handling in Threads

    1. How are signals delivered in multithreaded programs?
    2. How do you block/unblock signals for a thread? (pthread_sigmask)

    Deadlocks

    1. What is a deadlock?
    2. How can you detect and prevent deadlocks?
    3. Explain lock hierarchy and timeout-based strategies.

    9. Best Practices Questions

    1. What are common pitfalls in pthread programming?
    2. How do you avoid race conditions?
    3. How should multithreaded programs be structured for safety and efficiency?
    4. How do you optimize performance in multithreaded programs?
    5. How do you debug pthread programs? (gdb, helgrind, valgrind)

    10. Practical and Coding Questions (Interview-Focused)

    1. Write a simple program that creates multiple threads and prints messages.
    2. Implement a producer-consumer problem using mutexes and condition variables.
    3. Implement a thread-safe counter using mutex or atomic operations.
    4. Demonstrate using thread-specific data.
    5. Write a program where threads are detached and cannot be joined.
    6. Simulate deadlock and show how to fix it.
    7. Demonstrate cancelling a thread and cleaning up resources.
    8. Implement a reader-writer scenario using pthread_rwlock_t.

    Conclusion

    • POSIX threads allow efficient, lightweight multithreading in Linux.
    • Key interview topics: pthread_create, pthread_join, mutexes, condition variables, thread attributes, thread cancellation, TSD, and deadlock avoidance.
    • Practice coding small multithreaded programs, and always reason about synchronization and data sharing.
    • Advanced topics: Real-time scheduling, signal handling, and performance optimization are often asked in senior-level interviews.

    Recommended Resources:

    • “Programming with POSIX Threads” by David R. Butenhof
    • Linux man pages: man pthread_create, man pthread_mutex_lock
    • Online tutorials and example repositories on GitHub

    FAQ : POSIX Threads (pthreads)

    1. What are POSIX Threads (pthreads) in Linux?

    Answer:
    POSIX Threads, or pthreads, are a standardized way to create and manage multithreaded programs in Linux. Threads allow a program to execute multiple tasks concurrently within the same process, sharing memory and resources while maintaining separate execution contexts.

    2. How do I create a thread using pthreads in C/C++?

    Answer:
    You create a thread using pthread_create(). It requires a thread ID, optional thread attributes, the thread function, and an argument. Example:

    pthread_t tid;
    pthread_create(&tid, NULL, thread_function, (void*)&arg);
    

    This starts a new thread executing thread_function.

    3. What is the difference between processes and threads?

    Answer:

    • Processes have separate memory spaces, heavier to create, and use IPC to communicate.
    • Threads share the same memory space, are lightweight, and communicate directly through shared variables.
      Threads are ideal for concurrent execution, while processes are better for isolation and fault tolerance.

    4. How can I wait for a thread to finish in pthreads?

    Answer:
    Use pthread_join() to wait for a joinable thread to complete and optionally retrieve its return value:

    void* retval;
    pthread_join(tid, &retval);
    

    Detached threads cannot be joined, and their resources are automatically freed after completion.

    5. What are pthread mutexes and why are they important?

    Answer:
    A mutex (mutual exclusion) is a synchronization primitive used to prevent race conditions when multiple threads access shared data. Operations include lock, unlock, and destroy:

    pthread_mutex_t lock = PTHREAD_MUTEX_INITIALIZER;
    pthread_mutex_lock(&lock); // Critical section
    pthread_mutex_unlock(&lock);
    

    6. What is the purpose of condition variables in pthreads?

    Answer:
    Condition variables allow threads to wait for certain conditions before proceeding, typically used with mutexes. They support signaling one or all threads when a condition changes:

    pthread_cond_wait(&cond, &mutex);
    pthread_cond_signal(&cond);
    pthread_cond_broadcast(&cond);
    

    Use-case: Implementing producer-consumer problems.

    7. What is thread-specific data (TSD) in pthreads?

    Answer:
    Thread-specific data allows each thread to store its own private data using a key (pthread_key_t), even if multiple threads run the same function:

    pthread_key_t key;
    pthread_setspecific(key, data);
    void* val = pthread_getspecific(key);
    

    This is useful for per-thread storage in libraries or reusable modules.

    8. How do you cancel a thread safely in pthreads?

    Answer:
    Use pthread_cancel() to request thread termination. Threads can be asynchronous or deferred cancellable, and you can use cleanup handlers to release resources:

    pthread_cleanup_push(cleanup_function, arg);
    pthread_cleanup_pop(1);

    9. What are detached threads and how are they different from joinable threads?

    Answer:

    • Joinable threads require pthread_join() to free resources.
    • Detached threads free resources automatically when they finish.
      Use pthread_detach(tid) to detach a thread. Detached threads are ideal for background tasks where you don’t need the return value.

    10. What are common pitfalls in pthread programming?

    Answer:

    1. Race conditions due to unsynchronized shared memory.
    2. Deadlocks caused by nested or circular locking.
    3. Forgetting to destroy mutexes/condition variables.
    4. Improper use of detached threads leading to memory/resource leaks.
    5. Ignoring thread cancellation and cleanup.

    Best Practice: Always use mutexes, condition variables, and cleanup handlers for safe multithreaded programs.

    Read More : IPC in Linux

  • IPC in Linux | Master Beginner-to-Expert Guide for System Programmers (2026)

    Learn IPC in Linux from beginner to expert ! Explore pipes, message queues, shared memory, semaphores, and signals with examples, diagrams, and interview-focused tips. Master process communication, synchronization, and race condition prevention in Linux system programming.

    Inter-Process Communication (IPC) in Linux is a fundamental concept that allows processes to exchange data and synchronize their actions efficiently. Whether you are a beginner trying to understand how processes interact or an expert looking to deepen your knowledge of advanced IPC mechanisms, this guide covers everything. From pipes, message queues, and shared memory to semaphores and signals, we break down each IPC method with practical examples, diagrams, and real-world use cases. Learn how to prevent race conditions, manage concurrent processes, and optimize performance in Linux-based systems. This comprehensive tutorial is designed for developers, embedded engineers, and system programmers preparing for interviews or building robust, high-performance applications. Master IPC in Linux and elevate your system programming skills from beginner to expert.

    Imagine you’re sitting with a friend over coffee, discussing Linux programming. You bring up a scenario: you have multiple programs running on your Linux system, and sometimes these programs need to talk to each other. How do they share data or coordinate actions safely and efficiently? That’s where IPC in Linux comes in.

    Inter-Process Communication (IPC) is a set of mechanisms that allows processes to communicate and synchronize their actions. Whether you’re writing a small utility or a complex system, understanding IPC is crucial for Linux programming and system design. In this article, we’ll cover everything from beginner-friendly basics to advanced concepts, with practical examples and interview-focused tips. We’ll dive into Message Queues, Semaphores, and Shared Memory in detail, so you’ll have a complete picture of IPC in Linux.What is IPC in Linux?

    At its core, IPC in Linux refers to techniques that allow one process to send data to another or coordinate tasks. Processes in Linux are isolated—they have their own memory spaces—so direct access to another process’s memory isn’t possible. IPC mechanisms solve this problem.

    Think of processes as separate offices. Without IPC, each office works in isolation. IPC is like the internal mail system, shared bulletin boards, or signaling devices that allow offices to communicate safely.

    Key objectives of IPC include:

    1. Data Sharing: Allow processes to exchange information safely.
    2. Synchronization: Coordinate processes so they execute in a specific order.
    3. Resource Management: Prevent conflicts when multiple processes access shared resources.

    In Linux, IPC is implemented through several mechanisms. The most commonly used are:

    • Message Queues
    • Semaphores
    • Shared Memory
    • Sockets and Pipes (less common in kernel-level IPC discussion)

    In this guide, we’ll focus on the first three since they are widely used and often asked about in interviews.

    Why IPC is Important in Linux

    You might wonder why processes can’t just access each other’s memory. The reason is process isolation. Isolation ensures that a bug in one process doesn’t crash others, enhancing security and stability. But isolation also means that processes need structured ways to communicate—enter IPC.

    Here’s why IPC matters:

    • Multi-tasking systems: Modern Linux systems run multiple programs at the same time. IPC ensures smooth interaction.
    • Performance optimization: Using IPC efficiently avoids unnecessary delays and resource conflicts.
    • Kernel-level programming: Many Linux services use IPC internally. Understanding it is key to systems programming.
    • Interview relevance: Most Linux or embedded systems interviews ask about IPC mechanisms, differences, and implementations.

    Types of IPC in Linux

    Linux provides both System V IPC and POSIX IPC. The concepts are similar, but POSIX IPC is more modern and portable.

    IPC TypeSystem VPOSIXDescription
    Message QueueAllows sending messages between processes asynchronously.
    SemaphoreUsed to control access to shared resources and synchronize processes.
    Shared MemoryFastest IPC method; allows processes to share a memory segment.
    Pipes & FIFOSimplest form; for parent-child or unrelated process communication.
    SocketsNetwork-aware IPC, useful for inter-machine communication.

    For interviews and practical systems programming, the three main pillars are Message Queues, Semaphores, and Shared Memory, which we will explore in detail.

    1. Message Queue in Linux

    What is a Message Queue?

    A message queue is a kernel-managed queue that allows processes to exchange messages. Unlike shared memory, processes do not directly access the same memory area. Instead, the kernel mediates the transfer, ensuring data integrity and synchronization.

    Think of it as a post office: processes can “send letters” (messages), and the kernel ensures they reach the correct recipient.

    Features of Message Queues

    • Asynchronous communication
    • Kernel-managed storage
    • Messages can be prioritized
    • Safe for multiple readers and writers

    System Calls for Message Queues

    In Linux, the key system calls for System V message queues are:

    • msgget() – create or access a message queue
    • msgsnd() – send a message
    • msgrcv() – receive a message
    • msgctl() – control operations (delete, query, set permissions)

    Example: Using Message Queues

    #include <sys/ipc.h>
    #include <sys/msg.h>
    #include <stdio.h>
    #include <string.h>
    
    struct msg_buffer {
        long msg_type;
        char msg_text[100];
    };
    
    int main() {
        key_t key = ftok("progfile", 65);
        int msgid = msgget(key, 0666 | IPC_CREAT);
    
        struct msg_buffer message;
        message.msg_type = 1;
        strcpy(message.msg_text, "Hello from Process 1");
    
        // Send message
        msgsnd(msgid, &message, sizeof(message.msg_text), 0);
        printf("Message sent: %s\n", message.msg_text);
    
        // Receive message
        msgrcv(msgid, &message, sizeof(message.msg_text), 1, 0);
        printf("Message received: %s\n", message.msg_text);
    
        // Delete the message queue
        msgctl(msgid, IPC_RMID, NULL);
        return 0;
    }
    

    Interview Tip: Be ready to explain how message queues differ from pipes (asynchronous vs synchronous, kernel-managed storage, message prioritization).

    2. Semaphore in Linux

    What is a Semaphore?

    A semaphore is a synchronization tool used to control access to shared resources by multiple processes. It can be thought of as a traffic light:

    • Green light (1): Process can enter the critical section.
    • Red light (0): Process must wait.

    Semaphores prevent race conditions and ensure that resources like files or shared memory are accessed safely.

    Types of Semaphores

    1. Binary Semaphore: Only 0 or 1; used for mutual exclusion (mutex).
    2. Counting Semaphore: Holds a non-negative integer; useful for managing multiple identical resources.

    System Calls for Semaphores

    • semget() – create/get semaphore set
    • semop() – perform operations (wait/signal)
    • semctl() – control semaphore (delete, query, set values)

    Example: Semaphore Usage

    #include <stdio.h>
    #include <sys/ipc.h>
    #include <sys/sem.h>
    
    int main() {
        key_t key = ftok("semfile", 65);
        int semid = semget(key, 1, 0666 | IPC_CREAT);
    
        // Initialize semaphore to 1
        semctl(semid, 0, SETVAL, 1);
    
        struct sembuf sb = {0, -1, 0}; // Wait operation
        semop(semid, &sb, 1);
        printf("Critical section entered\n");
    
        sb.sem_op = 1; // Signal operation
        semop(semid, &sb, 1);
        printf("Critical section exited\n");
    
        semctl(semid, 0, IPC_RMID); // Remove semaphore
        return 0;
    }
    

    Interview Tip: Be ready to explain how semaphores prevent race conditions, and difference between mutex vs semaphore.

    3. Shared Memory in Linux

    What is Shared Memory?

    Shared memory allows multiple processes to access the same memory segment. It is the fastest IPC mechanism because processes read/write directly, without kernel-mediated copies like message queues.

    Think of shared memory as a shared whiteboard: everyone can write and read from it, but you need rules (synchronization) to avoid conflicts.

    Key Features

    • Fastest IPC method
    • Direct memory access
    • Requires synchronization (usually via semaphores)
    • Suitable for large data exchange

    System Calls for Shared Memory

    • shmget() – create/get shared memory segment
    • shmat() – attach shared memory to process address space
    • shmdt() – detach shared memory
    • shmctl() – control operations (delete, query)

    Example: Shared Memory Usage

    #include <stdio.h>
    #include <sys/ipc.h>
    #include <sys/shm.h>
    #include <string.h>
    
    int main() {
        key_t key = ftok("shmfile", 65);
        int shmid = shmget(key, 1024, 0666 | IPC_CREAT);
    
        char *str = (char*) shmat(shmid, (void*)0, 0);
        strcpy(str, "Hello from shared memory");
    
        printf("Data written to shared memory: %s\n", str);
        shmdt(str);
        shmctl(shmid, IPC_RMID, NULL);
        return 0;
    }
    

    Interview Tip: Know why semaphores are often paired with shared memory, and the performance trade-offs between shared memory and message queues.

    IPC in Linux: System V vs POSIX

    It’s important to know that Linux supports System V IPC (older, traditional) and POSIX IPC (modern, portable). Differences include:

    FeatureSystem VPOSIX
    Identifierint keystring name
    Creation & deletionmsgget/shmget/semgetmq_open/shm_open/sem_open
    Message handlingmsgsnd/msgrcvmq_send/mq_receive
    StandardizationLegacy, UnixPortable, standardized

    Interview Tip: Many interviewers ask which IPC mechanism is preferred today and why. POSIX is usually favored for portability and standardization.

    Practical Use Cases of IPC in Linux

    • Message Queues: Chat applications, logging systems, task queues
    • Semaphores: Controlling access to printer, shared files, or database
    • Shared Memory: High-performance systems like video processing, trading platforms

    Interview Questions on IPC in Linux

    Here’s a list of common interview questions from beginner to expert level:

    1. What is IPC in Linux and why is it used?
    2. Explain the difference between threads and processes.
    3. What is the difference between message queues, semaphores, and shared memory?
    4. How do you prevent race conditions in shared memory?
    5. Write a simple C program to demonstrate a semaphore.
    6. How does msgsnd() differ from write() to a pipe?
    7. Compare System V IPC and POSIX IPC.
    8. How do you synchronize access to shared memory between processes?
    9. What are the advantages and disadvantages of each IPC mechanism?
    10. Explain an interview scenario where message queues are better than shared memory.

    1. What is IPC in Linux and why is it used?

    IPC (Inter-Process Communication) in Linux is a set of techniques that allows multiple processes to communicate and share data with each other.

    • Why we need it:
      Each process in Linux has its own private memory space. If one process wants to share data with another or coordinate actions, it cannot directly access the other process’s memory. IPC solves this by providing safe, structured ways to exchange information and synchronize tasks.
    • Common uses of IPC:
      • Sharing data between processes (like configuration or computation results)
      • Synchronizing tasks to avoid conflicts
      • Coordinating resource usage, e.g., multiple processes accessing a printer or database

    Key takeaway: Without IPC, processes would be isolated and unable to cooperate effectively, limiting system functionality and efficiency.

    2. Explain the difference between threads and processes

    FeatureProcessThread
    Memory SpaceEach process has its own address spaceThreads share the same memory space
    Creation OverheadHigher (more resource-intensive)Lower (lighter weight)
    CommunicationNeeds IPC (message queue, shared memory)Direct memory access (shared data)
    IsolationStrong isolationLess isolation; a crash can affect all threads in the process
    SchedulingOS schedules each process separatelyOS schedules threads of a process individually

    In short: Processes are like separate offices, while threads are like employees in the same office sharing resources.

    3. What is the difference between message queues, semaphores, and shared memory?

    IPC MechanismDescriptionKey Points
    Message QueueKernel-managed queue where processes can send/receive messages asynchronouslySafe, handles small messages, supports prioritization
    SemaphoreSynchronization tool to control access to resourcesPrevents race conditions, can be binary (mutex) or counting
    Shared MemoryMemory segment accessible by multiple processesFastest method, requires synchronization (usually via semaphores)

    Analogy:

    • Message Queue → Post office
    • Semaphore → Traffic light
    • Shared Memory → Whiteboard shared by multiple people

    4. How do you prevent race conditions in shared memory?

    Race condition: Occurs when two or more processes access shared data simultaneously and at least one is writing. Resulting behavior becomes unpredictable.

    Ways to prevent it:

    1. Use semaphores:
      Wrap read/write operations in wait() and signal() to ensure only one process modifies shared memory at a time.
    2. Mutexes (in POSIX threads):
      If threads share memory within the same process, use pthread_mutex_lock() and pthread_mutex_unlock().
    3. Careful design:
      Minimize shared memory access and design processes to avoid simultaneous writes.

    Example:

    // Pseudocode for using semaphore with shared memory
    wait(sem);       // lock
    shared_data++;   // critical section
    signal(sem);     // unlock
    

    5. Write a simple C program to demonstrate a semaphore

    Here’s a beginner-friendly C example using System V semaphore:

    #include <stdio.h>
    #include <sys/ipc.h>
    #include <sys/sem.h>
    
    int main() {
        key_t key = ftok("semfile", 65);
        int semid = semget(key, 1, 0666 | IPC_CREAT);
    
        // Initialize semaphore to 1
        semctl(semid, 0, SETVAL, 1);
    
        struct sembuf sb = {0, -1, 0}; // wait (P operation)
        semop(semid, &sb, 1);
        printf("Inside critical section\n");
    
        sb.sem_op = 1; // signal (V operation)
        semop(semid, &sb, 1);
        printf("Exited critical section\n");
    
        semctl(semid, 0, IPC_RMID); // delete semaphore
        return 0;
    }
    

    Explanation:

    • semget() creates a semaphore
    • semop() performs wait (-1) or signal (+1) operations
    • semctl() deletes the semaphore after use

    6. How does msgsnd() differ from write() to a pipe?

    Featuremsgsnd() (Message Queue)write() (Pipe)
    Communication typeAsynchronousSynchronous
    Kernel involvementKernel manages queue storageKernel handles stream directly
    Message structurePreserves message boundariesNo inherent message boundary
    AccessCan be read by multiple processesTypically FIFO (first-in, first-out)
    PrioritizationYes, messages can have priorityNo

    Key point: msgsnd() is more structured and suitable for complex, asynchronous communication, while pipes are simpler but linear.

    7. Compare System V IPC and POSIX IPC

    FeatureSystem V IPCPOSIX IPC
    Identifierint keystring name
    APImsgget(), semget(), shmget()mq_open(), sem_open(), shm_open()
    PortabilityLess portable, older Unix systemsHighly portable, standardized
    FlexibilityModerateHigh, supports robust options
    ExamplesTraditional Linux IPC programsModern Linux applications, cross-platform

    Interview Tip: POSIX IPC is generally preferred today due to standardization and portability.

    8. How do you synchronize access to shared memory between processes?

    • Use semaphores or mutexes to lock the shared memory during a read/write operation.
    • Steps:
      1. Attach the shared memory using shmat()
      2. Lock using semaphore (semop())
      3. Perform read/write
      4. Unlock (semop())
      5. Detach shared memory using shmdt()

    Example:

    wait(sem);          // lock semaphore
    shared_data = 100;  // write to shared memory
    signal(sem);        // unlock semaphore
    

    Tip: Never access shared memory without synchronization to avoid race conditions.

    9. What are the advantages and disadvantages of each IPC mechanism?

    IPC MechanismAdvantagesDisadvantages
    Message QueueAsynchronous, safe, supports prioritiesSlower than shared memory, kernel overhead
    SemaphorePrevents race conditions, simple controlDoes not store data, only for synchronization
    Shared MemoryFastest IPC, ideal for large dataRequires synchronization, more complex, can cause race conditions

    10. Explain an interview scenario where message queues are better than shared memory

    Scenario: Imagine a logging system where multiple processes generate logs and a single process writes them to a file.

    • Using shared memory would require semaphores to avoid race conditions.
    • Using a message queue, each process can send messages asynchronously, and the logging process can read messages in order without worrying about locks.

    Why message queue is better here:

    • Maintains order automatically
    • No explicit locking required
    • Safer and easier to manage when multiple producers exist

    Best Practices for IPC in Linux

    • Always handle errors in IPC system calls.
    • Clean up resources after use (delete message queues, semaphores, shared memory).
    • Pair shared memory with semaphores to avoid race conditions.
    • Use POSIX IPC for portability across Unix systems.
    • Limit message size in queues to avoid memory issues.
    • Document the communication protocol between processes clearly.

    Conclusion

    Mastering IPC in Linux is crucial for any programmer working with processes, system programming, or Linux internals. Understanding message queues, semaphores, and shared memory equips you to design robust and efficient applications. For interviews, make sure you can write small programs, explain trade-offs, and reason about synchronization.

    Think of IPC as the language processes use to coordinate—a skill that separates beginner programmers from advanced Linux developers. Start with message queues, experiment with semaphores, and then tackle shared memory. Once you understand these, you’ll be ready to handle almost any Linux IPC challenge.

    Frequently Asked Questions (FAQ) – IPC in Linux

    Q1: What is IPC in Linux?
    A: IPC (Inter-Process Communication) in Linux is a set of mechanisms that allow processes to communicate, share data, and synchronize their execution. Common IPC methods include pipes, message queues, shared memory, semaphores, and signals.

    Q2: Why is IPC important in Linux?
    A: IPC is crucial for building efficient, high-performance applications where multiple processes need to coordinate tasks or exchange data. Without IPC, processes would run independently and could not share information safely.

    Q3: What are the types of IPC in Linux?
    A: Linux supports several IPC mechanisms:

    • Pipes and Named Pipes (FIFO) – for simple communication between processes.
    • Message Queues – to send and receive structured messages.
    • Shared Memory – for high-speed data exchange.
    • Semaphores – for process synchronization.
    • Signals – to notify processes of events or interrupts.

    Q4: What is the difference between pipes and message queues?
    A: Pipes allow sequential data transfer between related processes, while message queues let processes send/receive discrete messages in a queue, supporting asynchronous communication and priority-based handling.

    Q5: How does shared memory work in Linux IPC?
    A: Shared memory allows multiple processes to access the same memory segment, enabling fast data exchange. Synchronization tools like semaphores are used to prevent race conditions when multiple processes read/write simultaneously.

    Q6: What is a semaphore and why is it used?
    A: A semaphore is a synchronization tool used to control access to shared resources. It prevents race conditions by ensuring that only a limited number of processes can access a critical section at a time.

    Q7: How do signals help in IPC?
    A: Signals are notifications sent to a process to indicate events like termination, interrupts, or timers. They provide a lightweight way for processes to respond to events asynchronously.

    Q8: How to choose the right IPC method in Linux?
    A: The choice depends on the use case:

    • Use pipes for simple, linear data transfer.
    • Use message queues for structured, asynchronous messaging.
    • Use shared memory for high-speed, large data exchange.
    • Use semaphores for synchronization of shared resources.
    • Use signals for event notifications and process control.

    Q9: Can IPC cause performance issues?
    A: Yes, improper use of IPC can lead to bottlenecks, deadlocks, or race conditions. Choosing the right mechanism and proper synchronization is key to optimal performance.

    Q10: Is IPC used in embedded Linux systems?
    A: Absolutely. IPC is widely used in embedded Linux for real-time communication, process synchronization, and efficient resource sharing between processes and threads.

    Read More : Linux System Programming

  • Linux System Programming Part 1: Master Beginner’s Guide (2026)

    Linux System Programming explained clearly for beginners, covering core concepts, real system behavior, and practical foundations to build strong low-level Linux skills.

    Linux System Programming Part 1 is a beginner-friendly guide designed to help developers understand how software directly interacts with the Linux operating system. This part focuses on the core foundations of system programming, explaining essential concepts such as processes, system calls, file handling, memory layout, and user space vs kernel space in a simple and practical way.

    If you are preparing for embedded systems roles, Linux interviews, or low-level programming jobs, this series will help you build strong fundamentals step by step. Real-world examples, clear explanations, and practical insights make complex topics easy to grasp, even for beginners.

    By the end of Part 1, you will have a solid understanding of how Linux programs execute, how resources are managed, and how applications communicate with the kernel. This knowledge forms the base for advanced topics like device drivers, multithreading, and performance optimization covered in later parts.

    Perfect for students, working professionals, and anyone serious about mastering Linux system programming.

    Q1: What is GCC and what are its main components?
    A1: GCC (GNU Compiler Collection) is a compiler system that supports multiple programming languages such as C, C++, and Fortran. Its main components include:

    • Preprocessor (cpp): Handles macros, header inclusion, and conditional compilation.
    • Compiler (cc1): Converts preprocessed source code into assembly code.
    • Assembler (as): Converts assembly code into machine code object files.
    • Linker (ld): Combines object files and libraries into a final executable.

    Q2: What are the basic stages of compilation in GCC?
    A2: The stages are:

    1. Preprocessing: Handles #include, #define, and conditional compilation.
    2. Compilation: Converts preprocessed code into assembly code.
    3. Assembly: Converts assembly into object code (.o files).
    4. Linking: Combines object files and libraries into an executable binary.
    5. Explain Compile & Build Process

    Q3: What is the difference between compiling and building?
    A3:

    • Compiling: Transforming source code into object files (machine code) without producing a complete executable.
    • Building: The complete process including compilation, assembly, and linking to generate the final executable.

    Q4: What are some common flags used in GCC to control compilation?
    A4:

    • -c: Compile only, do not link.
    • -o <file>: Specify output file name.
    • -Wall: Enable all warnings.
    • -g: Include debugging information.
    • -O / -O2 / -O3: Optimization levels.

    What is Toolchain ?

    Q5: What is a cross-compilation toolchain?
    A5: A cross-compilation toolchain allows compiling code on one platform (host) to run on a different platform (target). It typically includes:

    • Cross-compiler (e.g., arm-none-eabi-gcc)
    • Assembler
    • Linker
    • Libraries and headers for the target architecture.

    Q6: What is the role of binutils in a toolchain?
    A6: binutils is a collection of binary tools like as (assembler), ld (linker), objdump, nm, and ar, which help in generating, inspecting, and managing object files and executables.

    Explain Object File Analysis ?

    Q7: How can you analyze an object file generated by GCC?
    A7: Object files (.o) can be analyzed using:

    • nm <file> → Lists symbols (functions and variables).
    • objdump -d <file> → Disassembles code into assembly.
    • readelf -h <file> → Shows ELF header information.
    • size <file> → Shows memory size used by code, data, and bss.

    Q8: What is the difference between .text, .data, and .bss sections in an object file?
    A8:

    • .text → Contains executable code.
    • .data → Contains initialized global/static variables.
    • .bss → Contains uninitialized global/static variables (zero-initialized at runtime).

    What is Executable Images ?

    Q9: What is an ELF executable?
    A9: ELF (Executable and Linkable Format) is a standard binary format used in Linux for executables, object files, and shared libraries. It contains sections for code, data, symbol tables, dynamic linking info, and headers.

    Q10: How does the linker resolve symbols while creating an executable?
    A10: The linker combines object files and libraries, resolves undefined symbols by matching references with definitions, and adjusts addresses to produce a single executable. It also handles relocation and dynamic linking information if needed.

    Q11: How can you check the dependencies of an executable in Linux?
    A11: Using ldd <executable> to list shared libraries required by the executable.

    What is toolchain ?

    A toolchain is essentially a set of programming tools used to develop software for a particular platform or processor. It’s called a “chain” because each tool in the chain passes its output to the next tool, ultimately producing a final executable program.

    Key Points about a Toolchain:

    1. Purpose:
      To take source code and turn it into a binary executable that can run on a target system.
    2. Components of a Typical Toolchain:
      For C/C++ development (especially with GCC), a toolchain usually includes:
      • Compiler (e.g., gcc, g++) → Converts source code into assembly or object files.
      • Assembler (as) → Converts assembly code into machine code (object files .o).
      • Linker (ld) → Combines multiple object files and libraries into a single executable.
      • Libraries → Precompiled code you can use (like libc, math libraries).
      • Debugger (gdb) → Helps analyze and debug the program.
      • Other Utilities (binutils) → Tools like objdump, nm, readelf, ar for managing object files and binaries.
    3. Cross-Compilation Toolchain:
      When the development machine (host) is different from the target machine, you need a cross-compiler toolchain. For example:
      • arm-none-eabi-gcc → Compiles code on x86 Linux for ARM microcontrollers.
    4. Flow of the Toolchain:Source Code (.c/.cpp) → Compiler → Assembly (.s) → Assembler → Object File (.o) → Linker → Executable
    5. Why It’s Important:
      • Ensures the program runs correctly on the target platform.
      • Allows debugging, optimization, and analysis of code.
      • Supports embedded development where the target hardware is not the same as the host.

    Example: On a Linux system, a simple toolchain flow for C could be:

    gcc main.c -o main
    

    Here, gcc acts as a compiler + linker, internally invoking the assembler and linker to generate the executable main.

    What is a Library?

    A library is a collection of precompiled code, functions, classes, or routines that you can use in your programs without rewriting them.
    Libraries help you reuse code, modularize applications, and reduce compilation time.

    • Example: printf() in C comes from the standard C library (libc).

    Types of Libraries

    1. Static Libraries (.a in Linux, .lib in Windows)
      • Code is copied into the executable at compile-time.
      • Advantages: Faster execution, no dependency at runtime.
      • Disadvantages: Larger executable, need to recompile to update.
    2. Shared / Dynamic Libraries (.so in Linux, .dll in Windows)
      • Code is linked at runtime.
      • Advantages: Smaller executables, easy to update library without recompiling programs.
      • Disadvantages: Requires library to be present at runtime.

    Creating Libraries

    2.1 Creating a Static Library

    1. Write your functions in a .c file. Example: mylib.c
    // mylib.c
    #include <stdio.h>
    
    void greet() {
        printf("Hello from library!\n");
    }
    
    1. Compile the object file:
    gcc -c mylib.c -o mylib.o
    
    1. Create the static library:
    ar rcs libmylib.a mylib.o
    
    • ar → archive tool
    • rcs → replace, create, index
    1. Use it in your program:
    // main.c
    void greet();
    int main() {
        greet();
        return 0;
    }
    
    1. Compile with library:
    gcc main.c -L. -lmylib -o main
    

    Interview Tip:

    • Question: Difference between .a and .so?
      • .a → static, linked at compile-time
      • .so → shared, linked at runtime

    Creating a Shared / Dynamic Library

    1. Write your functions (same as above).
    2. Compile as Position Independent Code (PIC):
    gcc -fPIC -c mylib.c -o mylib.o
    
    1. Create the shared library:
    gcc -shared -o libmylib.so mylib.o
    
    1. Compile your program with shared library:
    gcc main.c -L. -lmylib -o main
    
    1. Run your program (make sure library path is set):
    export LD_LIBRARY_PATH=.:$LD_LIBRARY_PATH
    ./main
    

    Interview Tip:

    • Question: Why -fPIC is needed for shared libraries?
      • Answer: To generate position-independent code, so library can be loaded anywhere in memory at runtime.

    Using Libraries

    Static Library Usage

    • Link at compile-time using -l and -L options.
    • Example: gcc main.c -L. -lmylib -o main

    Dynamic Library Usage

    • Link at compile-time, but code is loaded at runtime.
    • Example: gcc main.c -L. -lmylib -o main
    • Use LD_LIBRARY_PATH or /etc/ld.so.conf to locate shared libraries.

    Dynamic Loading at Runtime (Optional / Advanced)

    • Use dlopen(), dlsym(), dlclose() in Linux.
    #include <dlfcn.h>
    #include <stdio.h>
    
    int main() {
        void *handle = dlopen("./libmylib.so", RTLD_LAZY);
        void (*greet)() = dlsym(handle, "greet");
        greet();
        dlclose(handle);
        return 0;
    }
    

    Interview Tip:

    • Question: Difference between compile-time and runtime linking?
      • Compile-time → Static / shared linked at compilation
      • Runtime → Dynamic loading with dlopen

    Managing Libraries

    4.1 Dynamic Library Search Paths

    • Environment variable: LD_LIBRARY_PATH
    • System-wide path: /etc/ld.so.conf
    • Run ldconfig to update cache

    4.2 Versioning of Libraries

    • Shared libraries often use version numbers: libmylib.so.1.0
    • Symbolic link example:
    libmylib.so -> libmylib.so.1
    libmylib.so.1 -> libmylib.so.1.0
    

    4.3 Tools for Library Management

    • ldd <executable> → check linked libraries
    • nm <library> → list symbols
    • objdump -x <library> → examine library structure

    1. What is a library?

    A library is a collection of precompiled functions or code that can be used in multiple programs.

    • Purpose: Code reuse, modularity, easier maintenance.
    • Example: printf() in C comes from libc.

    Interview Tip: Mention both static and dynamic libraries when asked.

    2. Difference between static and dynamic library

    FeatureStatic Library (.a / .lib)Dynamic / Shared Library (.so / .dll)
    LinkingAt compile-timeAt runtime
    Executable SizeLarger (contains library code)Smaller (code loaded at runtime)
    UpdateRequires recompilation to update libraryCan update library without recompiling
    DependencyNo dependency at runtimeLibrary must be present at runtime
    Examplelibmylib.alibmylib.so

    3. Advantages of using libraries

    • Reuse of code → avoid rewriting functions.
    • Reduce development time.
    • Modular programming.
    • Easier to maintain and update.
    • Can share commonly used functions across multiple programs.

    4. How do you create a static library in C/C++?

    1. Write code: mylib.c
    #include <stdio.h>
    
    void greet() {
        printf("Hello from static library!\n");
    }
    
    1. Compile object file:
    gcc -c mylib.c -o mylib.o
    
    1. Create static library:
    ar rcs libmylib.a mylib.o
    

    5. How to link static library while compiling?

    gcc main.c -L. -lmylib -o main
    
    • -L. → library search path
    • -lmylib → link libmylib.a

    6. Why executable size increases with static library?

    • Because all code from the library is copied into the executable at compile-time.
    • Even if your program uses only one function, all referenced library code is included.

    7. How to create a shared library?

    1. Write functions (same as above).
    2. Compile with Position Independent Code (PIC):
    gcc -fPIC -c mylib.c -o mylib.o
    
    1. Create shared library:
    gcc -shared -o libmylib.so mylib.o
    

    8. What is Position Independent Code (PIC)?

    • Code that can run at any memory address without modification.
    • Required for shared libraries because they can be loaded at different addresses in different programs.
    • Compile with: -fPIC.

    9. How dynamic linking works at runtime?

    • The dynamic linker loads the shared library into memory when the program runs.
    • Program uses symbols from the library.
    • Benefits: smaller executables, library can be updated without recompiling.

    10. How to set LD_LIBRARY_PATH?

    export LD_LIBRARY_PATH=/path/to/library:$LD_LIBRARY_PATH
    
    • This tells the loader where to find shared libraries at runtime.

    11. What is ldconfig?

    • Updates the cache of shared libraries used by the dynamic linker.
    • Example:
    sudo ldconfig
    
    • Ensures programs find shared libraries in system paths.

    12. Difference between .so and .a

    • .so → Shared library, linked at runtime, uses PIC
    • .a → Static library, linked at compile-time, copied into executable

    13. How to version a shared library?

    • Use symbolic links:
    libmylib.so -> libmylib.so.1
    libmylib.so.1 -> libmylib.so.1.0
    
    • This allows multiple versions to coexist.

    14. How to check which libraries are linked?

    ldd ./executable
    
    • Shows shared libraries used by the executable.

    15. Difference between dlopen and static linking

    FeatureStatic Linkingdlopen
    LinkingCompile-timeRuntime
    FlexibilityFixedCan load/unload dynamically
    Examplegcc main.c -lmylibdlopen("libmylib.so")

    16. What are undefined symbols? How to resolve?

    • Undefined symbols: Functions or variables referenced but not defined in the program or linked libraries.
    • Resolution:
      • Link with correct library
      • Check function spelling
      • Use nm to see symbols in library

    17. What is weak vs strong symbol in library?

    • Strong symbol: Must have one definition, linker uses it first.
    • Weak symbol: Can be overridden by another definition.
    • Useful for providing default implementations in libraries.

    What is a Symbol?

    A symbol is a name (function or global variable) that the linker resolves.

    Example:

    int count;        // symbol: count
    void foo();       // symbol: foo
    

    Strong Symbol

    A strong symbol has a definite definition.

    Examples:

    int x = 10;          // strong global variable
    void foo() { }       // strong function
    

    Rules:

    • Only one strong definition allowed
    • Two strong symbols with same name → linker error
    multiple definition of `foo`
    

    Weak Symbol

    A weak symbol is an optional / overridable definition.

    Examples:

    __attribute__((weak)) void foo() { }
    

    or (common case):

    int x;     // tentative definition (weak)
    

    Rules:

    • Weak symbol can be overridden by a strong one
    • Multiple weak symbols → no linker error
    • Used as default implementation

    Linker Resolution Rules (IMPORTANT)

    SituationResult
    Strong + Strong❌ Linker error
    Weak + Weak✔ One chosen
    Weak + Strong✔ Strong wins
    Only Weak✔ Weak used

    Why Weak Symbols Are Used in Libraries

    1️⃣ Default Implementation (Override allowed)

    // library.c
    __attribute__((weak))
    void log_message() {
        printf("Default log\n");
    }
    
    // user.c
    void log_message() {
        printf("Custom log\n");
    }
    

    ✔ User version overrides library version

    2️⃣ Optional Features / Hooks

    • Startup code (_init)
    • OS hooks
    • Driver overrides
    • Embedded systems

    3️⃣ Reduce Hard Dependencies

    Library provides fallback behavior if symbol is not defined.

    Weak Symbols in Shared Libraries

    • Weak symbols are resolved at runtime
    • Strong symbols in application override shared library weak symbols

    Example:

    App strong foo → overrides libfoo.so weak foo
    

    How to Check Weak vs Strong Symbols

    nm libfoo.so
    

    Output:

    W foo     # Weak symbol
    T bar     # Strong symbol (text)
    

    One-Line Interview Answer

    A strong symbol must have exactly one definition, while a weak symbol provides a default definition that can be overridden by a strong one during linking.

    Common Pitfalls

    • Weak symbols hide missing implementations
    • Debugging override issues can be tricky
    • Overuse leads to unclear ownership

    18. How to handle dependencies between shared libraries?

    • Use LD_LIBRARY_PATH, rpath, or system-wide paths
    • Example: -Wl,-rpath,/path/to/libs during compilation
    • Ensure dependent libraries are available at runtime

    Shared libraries often depend on other shared libraries. These dependencies must be correctly resolved at build time and runtime.

    We define dependencies in common.mk only if they are shared across multiple targets; target-specific libraries should be defined in their respective Makefiles.

    19. How does the linker search for libraries?

    1. Compile-time: -L/path
    2. Runtime:
      • LD_LIBRARY_PATH
      • /etc/ld.so.conf + ldconfig
      • Default system paths like /lib, /usr/lib

    20. How can static and shared libraries coexist in a project?

    • Use static libraries for critical code that must be embedded
    • Use shared libraries for common code that may be updated or reused across programs
    • Compile and link appropriately:
    gcc main.c -L. -lmylib -static-libgcc -o main

    Process Management is a fundamental function of an operating system (OS).

    It is responsible for:

    1. Creating, scheduling, and terminating processes
    2. Managing process execution and resources
    3. Ensuring efficient CPU utilization and system stability

    Simply put, process management is how the OS keeps track of all running programs and decides who runs, when, and for how long.

    Objectives of Process Management

    1. Efficient CPU Utilization:
      • Maximize CPU usage by scheduling multiple processes efficiently.
    2. Process Isolation and Protection:
      • Ensure processes don’t interfere with each other’s memory or resources.
    3. Synchronization and Communication:
      • Manage inter-process communication (IPC) and prevent race conditions.
    4. Deadlock Prevention:
      • Detect and handle situations where processes wait indefinitely for resources.
    5. Resource Allocation:
      • Allocate CPU, memory, I/O devices fairly to all processes.

    Components of Process Management

    A. Process Creation

    • Processes can be created by:
      • User requests (running a program)
      • Parent process creating child (fork in Linux)
    • Example in Linux:
    pid_t pid = fork();  // Creates a child process
    if(pid == 0) {
        // Child process
    } else {
        // Parent process
    }
    

    B. Process Termination

    • When a process finishes execution:
      • Releases memory, CPU, and other resources
      • Parent may collect exit status (using wait() in Linux)
    • Types of termination:
      1. Normal termination: Process completes normally
      2. Abnormal termination: Due to error or signal

    C. Process Scheduling

    • Determines which process runs next on the CPU.
    • Two main types:
      1. Long-term scheduling: Decides which job enters the ready queue.
      2. Short-term scheduling: Decides which ready process gets CPU next.
    • Schedulers in Linux:
      • CFS (Completely Fair Scheduler) for normal tasks
      • RT (Real-Time) Scheduler for high-priority real-time tasks

    D. Process States

    • New: Process created but not yet admitted to ready queue
    • Ready: Waiting to get CPU
    • Running: Currently executing
    • Waiting/Blocked: Waiting for I/O or event
    • Terminated: Finished execution

    E. Process Control Block (PCB)

    • OS keeps a PCB for every process, containing:
      1. Process ID (PID)
      2. Process state
      3. Program counter (PC)
      4. CPU registers
      5. Memory pointers
      6. Open files
      7. Scheduling info

    PCB acts as a process identity card in the OS.

    F. Inter-Process Communication (IPC)

    • Process management also ensures processes can communicate safely:
      • Shared memory
      • Message queues
      • Pipes
      • Signals

    G. Context Switching

    • When CPU switches from one process to another:
      1. Save current process’s context (registers, PC)
      2. Load next process’s context
    • Overhead exists, but it allows multitasking

    4. Importance in Linux

    • Linux is a multi-tasking, multi-user OS.
    • Process management ensures:
      • Fair CPU distribution
      • Isolation between user processes
      • Efficient handling of thousands of processes simultaneously

    Summary Table

    FeatureDescription
    Process CreationForking, exec, user requests
    Process TerminationNormal/Abnormal, releasing resources
    SchedulingLong-term, short-term, CFS, RT
    Process StatesNew, Ready, Running, Waiting, Terminated
    PCBStores process info for OS
    IPCCommunication between processes
    Context SwitchingSave/restore CPU state for multitasking

    Introduction to Program Loading

    Program loading is the process of taking a program from disk storage and making it ready to run in memory (RAM).

    Key Steps in Program Loading:

    1. Compile and link:
      • Source code (.c) → Object file (.o) → Executable (a.out or .elf)
    2. Program is stored on disk:
      • As executable files.
    3. Loader reads the executable:
      • Loads text (code), data, bss, heap, and stack into memory.
    4. Dynamic linking (if required):
      • Links shared libraries at load time.
    5. Program execution begins:
      • Sets up stack, heap, and registers.
      • Jumps to the program’s entry point (like main() in C).

    Interview Tip:

    • Be ready to explain static vs dynamic linking in this context.
    • Mention ELF format in Linux for executables.

    Process: Defined

    A process is a running instance of a program.

    • Think of a program as a passive entity, and a process as an active entity that executes the code.
    • It includes:
      1. Program code
      2. Process stack (function calls, local variables)
      3. Heap (dynamic memory allocation)
      4. Data segment (global/static variables)
      5. Registers, program counter (PC), status
      6. Process control block (PCB)

    Characteristics of a process:

    • Has a unique PID (Process ID)
    • Exists in process states: New → Ready → Running → Waiting → Terminated

    Interview Tip:

    • Be ready to explain difference between process and thread:
      • Process: Own memory space
      • Thread: Shares memory with other threads in the same process

    Understanding Process Address Space

    Every process has a virtual memory space, which is divided as follows:

    +-------------------+  <-- Higher memory
    | Stack             |  (Function calls, local variables)
    +-------------------+
    | Heap              |  (Dynamic memory: malloc/new)
    +-------------------+
    | BSS               |  (Uninitialized global/static vars)
    +-------------------+
    | Data              |  (Initialized global/static vars)
    +-------------------+
    | Text (Code)       |  (Instructions)
    +-------------------+  <-- Lower memory
    

    Key Points:

    • Each process has its own isolated virtual address space.
    • Memory protection prevents one process from modifying another process’s memory.
    • Linux uses paging and MMU (Memory Management Unit) to map virtual addresses to physical addresses.

    Interview Tip:

    • Explain stack grows downward, heap grows upward.
    • Can mention difference between user space and kernel space.

    Kernel Process Descriptor

    The kernel process descriptor is a data structure in the Linux kernel that represents a process internally.

    • In Linux, it’s called task_struct.
    • Stored in the kernel memory for every process.
    • Contains:
      1. Process ID (PID)
      2. Parent PID
      3. State (Running, Waiting, etc.)
      4. Pointers to memory segments (code, data, stack, heap)
      5. File descriptors (open files)
      6. CPU scheduling info (priority, timeslice)
      7. Signals and signal handlers
      8. Accounting info (CPU time, memory usage)

    Interview Tip:

    • Always mention task_struct in Linux when asked about kernel representation of processes.
    • Bonus: Can talk about thread_info structure for lightweight threads.

    Introduction to Linux Process Scheduler

    The Linux scheduler decides which process runs on the CPU and for how long.

    Key Points:

    • Linux supports preemptive multitasking.
    • Every process has a priority.
    • The scheduler maintains ready queue and waiting queue.
    • Common process states in Linux:
      • TASK_RUNNING: Ready or running
      • TASK_INTERRUPTIBLE: Waiting for an event, can be interrupted
      • TASK_UNINTERRUPTIBLE: Waiting, cannot be interrupted
      • TASK_STOPPED: Stopped by signal
      • TASK_ZOMBIE: Process terminated but not cleaned up

    Schedulers in Linux:

    1. Completely Fair Scheduler (CFS)
      • Default for normal processes
      • Uses red-black tree to maintain fair CPU distribution
      • Ensures no starvation
    2. Real-Time Scheduler (RT)
      • SCHED_FIFO: First in, first out
      • SCHED_RR: Round-robin for real-time tasks

    Interview Tip:

    • Mention priority, timeslice, preemption, and fairness.
    • Be able to explain difference between CFS and RT scheduler.

    Summary Table for Interview

    ConceptKey Points
    Program LoadingLoader reads executable → memory → dynamic linking → execution
    ProcessActive program; PID, stack, heap, data, text; process states
    Process Address SpaceVirtual memory: Text, Data, BSS, Heap, Stack; isolated per process
    Kernel Process Descriptortask_struct in Linux; holds all process info
    Linux Process SchedulerDecides CPU allocation; CFS (fair), RT (real-time), uses queues, priority

    Definition:
    A stack is a LIFO (Last In First Out) data structure used in memory to store temporary data such as function calls, local variables, and return addresses.

    • LIFO: Last item pushed is the first item popped.
    • Primary Use: Function calls, recursion, local variables, CPU context during interrupts, and expression evaluation.

    Memory layout:

    • Stack usually grows downwards in most architectures (from high memory to low memory).
    • It is a part of process memory layout, along with code/text, heap, and data segments.

    Interview Q: Why is stack used in function calls?
    Answer: Stack stores function parameters, return addresses, and local variables, allowing nested or recursive function calls to execute correctly.

    How Stack Grows and Shrinks

    Stack Growth:

    • Push operation: Adds data to the stack → stack grows downward (in most systems) toward lower memory addresses.
    • Pop operation: Removes data from the stack → stack shrinks upward toward higher memory addresses.

    Example (x86 32-bit):

    High Memory
    |           |
    |           |
    |           |
    |           |
    |-----------| <- Stack starts here (top)
    | Local var | <- Push
    | Return Addr|
    | Parameters|
    Low Memory
    
    • Registers Involved:
      • ESP / RSP → Stack Pointer (points to the top of the stack)
      • EBP / RBP → Base Pointer (used to reference function frame)

    Interview Q: Does stack grow upward or downward?
    Answer: Usually downward in most architectures like x86, but it depends on CPU architecture.

    How Function Parameters Are Passed

    Function parameters can be passed:

    1. Via Stack (common in x86, C default calling conventions)
      • Push parameters right-to-left.Function reads them relative to the base pointer.
    void foo(int a, int b);
    foo(10, 20);

    Stack layout before foo executes:

    [b = 20]   <- top of stack
    [a = 10]
    [Return Address]
    [Old EBP]

    Via Registers (common in ARM, x64)

    • Parameters passed through registers (r0-r3 in ARM, RCX, RDX, R8, R9 in x64 Windows).

    Interview Q: Why sometimes parameters are passed in registers instead of stack?
    Answer: Registers are faster than memory access, so small number of parameters are passed in registers for efficiency.

    4. Stack Frame (Activation Record)

    Definition:
    A stack frame is a block of memory created on the stack for a function call. It stores:

    • Function parameters
    • Local variables
    • Return address
    • Saved base pointer (old EBP / RBP)

    Structure of a stack frame (x86):

    Higher Memory
    -----------------
    Function Params  <- passed by caller
    Return Address
    Old Base Pointer <- EBP of previous function
    Local Variables
    -----------------
    Lower Memory
    

    Creation of stack frame (function call):

    1. Caller pushes parameters.
    2. Caller executes CALL instruction → pushes return address.
    3. Callee:
      • Pushes old EBP
      • Sets EBP = ESP
      • Allocates space for local variables (ESP -= locals_size)

    Destruction of stack frame (function return):

    1. Restore ESP = EBP
    2. Pop old EBP
    3. Return using RET → pops return address from stack

    Interview Q: What is an activation record?
    Answer: Another name for stack frame, stores all info needed for a function execution.

    5. Step-by-Step Example

    int sum(int a, int b) {
        int c = a + b;
        return c;
    }
    
    int main() {
        int result = sum(10, 20);
        return 0;
    }
    

    Execution Stack (simplified):

    1. Before calling sum():
    main() stack frame:
    [Return Address to OS]
    [Old EBP]
    [main locals: result]
    1. During sum():
    sum() stack frame:
    [Return Address to main]
    [Old EBP of main]
    [a = 10]
    [b = 20]
    [c = 30]
    • sum() executes → returns 30 → stack frame destroyed → back to main.

    6. How Stack Is Managed by CPU

    • Stack Pointer (SP / ESP / RSP): Points to top of stack
    • Base Pointer (BP / EBP / RBP): Points to base of current stack frame
    • Push/Pop Instructions: Automatically update SP.
    • CALL Instruction: Pushes return address, jumps to function.
    • RET Instruction: Pops return address, resumes execution.

    Interview Q: What registers are used in stack management?
    Answer: Stack Pointer (SP) for top of stack, Base Pointer (BP) to access local variables/parameters, Instruction Pointer (IP) for return addresses.

    7. Common Interview Questions (with Answers)

    Q1: Difference between stack and heap?
    A:

    FeatureStackHeap
    AllocationAutomaticManual (malloc/free)
    SizeLimitedLarger
    AccessFastSlower
    LifetimeFunction lifetimeUntil freed
    GrowthDownwardUpward

    Q2: What happens if stack overflows?
    A: Stack overflow occurs when recursion or deep function calls exceed stack memory → usually crashes program or triggers segmentation fault.

    Q3: Can local variables be accessed after function returns?
    A: No, they exist only in the stack frame. After return, memory is reclaimed.

    Q4: How recursion uses stack?
    A: Each recursive call creates a new stack frame storing its parameters and local variables. Base case stops recursion to avoid overflow.

    Q5: What is difference between stack and static memory?

    • Stack: Dynamic, automatic, LIFO, local variables
    • Static: Fixed, global/static variables, exist throughout program lifetime

    Q6: How is stack different from queue?

    • Stack: LIFO (last in, first out)
    • Queue: FIFO (first in, first out)

    Q7: What are saved registers in stack frame?

    • Usually callee-saved registers (like EBX, ESI in x86) are saved to maintain state across function calls.

    1. What is an API? (Definition)

    API (Application Programming Interface) is a set of functions, rules, and protocols that allows one software component to communicate with another without knowing its internal implementation.

    In simple words:
    API = Contract between software components

    Example:

    int open(const char *pathname, int flags);
    

    You don’t know how open() works internally in the kernel — you just use it.

    2. Why Do We Need an API? (Understanding the Need)

    Problem without APIs

    • Applications would directly access hardware or kernel internals
    • Very unsafe
    • Hardware dependent
    • No portability
    • Difficult to maintain

    APIs solve these problems

    ProblemHow API helps
    Hardware complexityHides hardware details
    SecurityPrevents direct kernel access
    PortabilitySame API works across platforms
    MaintainabilityInternal changes don’t affect apps
    ReusabilitySame API used by multiple apps

    Interview Line

    APIs provide abstraction, safety, portability, and standardization for application development.

    3. Types of APIs (Interview Important)

    User-Space APIs

    Used by applications in user mode

    Examples:

    • POSIX APIs (printf(), malloc(), open())
    • C standard library (libc)
    • Qt, Android APIs

    Kernel APIs (Internal)

    Used inside the kernel, not by applications

    Examples:

    • kmalloc()
    • schedule()
    • copy_to_user()

    User applications cannot directly call kernel APIs

    4. API vs System Calls

    FeatureAPISystem Call
    LevelHigh-levelLow-level
    ModeUser modeSwitches to kernel mode
    Who providesLibraries (glibc)OS Kernel
    PortabilityHighLow
    Direct hardware access❌ No✅ Yes

    Example Flow

    printf("Hello");
    

    Internally:

    printf() → write() → system call → kernel → device driver
    

    Key Interview Point

    APIs may internally use system calls, but APIs are NOT system calls themselves.

    5. What is a System Call? (Quick Recap)

    A system call is a controlled entry point that allows a user-space program to request services from the kernel.

    Examples:

    • read()
    • write()
    • fork()
    • exec()

    System calls require mode switching.

    6. User Mode vs Kernel Mode (Core OS Concept)

    User Mode

    • Limited privileges
    • Cannot access hardware
    • Runs applications

    Kernel Mode

    • Full privileges
    • Direct hardware access
    • Runs OS kernel & drivers
    FeatureUser ModeKernel Mode
    Hardware access
    Crash impactOnly appEntire OS
    SecuritySafeCritical

    7. User Mode → Kernel Mode Transition (Step-by-Step)

    How does it happen?

    1. Application calls an API
    2. API invokes a system call
    3. CPU executes a software interrupt / syscall instruction
    4. CPU switches to kernel mode
    5. Kernel performs requested operation
    6. Control returns to user mode

    Architecture Example (x86)

    • Instruction: syscall / int 0x80

    Interview Diagram (Explain verbally)

    Application (User Mode)
            ↓
         API Call
            ↓
       System Call
            ↓
    Kernel Mode Execution
            ↓
         Return Result
    

    8. Why Applications Cannot Call System Calls Directly?

    ReasonExplanation
    SecurityPrevent unauthorized access
    StabilityAvoid OS crashes
    Hardware protectionPrevent misuse
    StandardizationAPIs abstract OS differences

    9. APIs and Application Portability (VERY IMPORTANT)

    What is Portability?

    Ability of software to run on multiple platforms with minimal changes

    How APIs Enable Portability

    • Same API interface across OSes
    • Internals change, API stays same

    Example:

    printf("Hello");
    

    Runs on:

    • Linux
    • QNX
    • Android
    • Embedded Linux

    Because:

    • printf() API is standardized (POSIX / C standard)

    Without APIs

    • Direct system calls
    • Hardware-specific code
    • Rewrite application for every OS

    Interview Line

    APIs act as a platform-independent layer, enabling application portability.

    10. API Example in Embedded / QNX Context

    Since you work on QNX & embedded systems, this is gold for interviews

    Example:

    read(fd, buffer, size);
    
    • Application doesn’t know:
      • Whether data comes from UART
      • SPI
      • Audio device
    • QNX kernel handles it via drivers

    This allows same application to run on different SoCs.

    11. Real-World Analogy (Interview Friendly)

    API = Restaurant Menu

    • Menu = API
    • Kitchen = Kernel
    • Customer = Application

    Customer doesn’t enter kitchen
    Customer orders via menu (API)

    12. Common Interview Questions & Answers

    Q1: Are APIs platform dependent?

    APIs are platform-independent
    System calls are platform-dependent

    Q2: Can API exist without system calls?

    Yes (pure user-space APIs like math libraries)

    Q3: Does every API call result in a system call?

    No
    Example:

    strlen()
    

    Works entirely in user space

    Q4: Why not expose system calls directly to applications?

    • Security risks
    • Portability issues
    • Kernel instability

    Complete Interview Questions & Answers

    What is an API?

    Answer:
    An API (Application Programming Interface) is a set of predefined functions, rules, and protocols that allows an application to communicate with another software component or the operating system without knowing internal implementation details.

    Why do we need APIs?

    Answer:
    APIs are needed to:

    • Hide hardware and kernel complexity
    • Provide security and controlled access
    • Improve code reusability
    • Enable portability across platforms
    • Simplify application development

    What problems would occur without APIs?

    Answer:
    Without APIs:

    • Applications would directly access hardware
    • Security would be compromised
    • System crashes would increase
    • Code would be hardware-dependent
    • Applications would not be portable

    What are the main advantages of APIs?

    Answer:

    • Abstraction
    • Security
    • Portability
    • Maintainability
    • Scalability
    • Reusability

    What are the different types of APIs?

    Answer:

    1. User-space APIs – Used by applications
    2. Kernel APIs – Used internally by the OS kernel
    3. Library APIs – Provided by libraries like libc, Qt
    4. Web APIs – REST, HTTP APIs

    What is a User-Space API?

    Answer:
    User-space APIs are functions that run in user mode and are called directly by applications.

    Examples:
    printf(), malloc(), open()

    What is a Kernel API?

    Answer:
    Kernel APIs are internal functions used inside the kernel to manage memory, processes, and hardware.

    Example:
    kmalloc(), schedule()

    Can user applications access kernel APIs directly?

    Answer:
    No
    User applications cannot directly access kernel APIs due to security and stability reasons.

    What is a System Call?

    Answer:
    A system call is a mechanism that allows a user-space program to request services from the kernel by switching from user mode to kernel mode.

    Examples of System Calls?

    Answer:

    • read()
    • write()
    • fork()
    • exec()
    • exit()

    API vs System Call

    FeatureAPISystem Call
    LevelHigh-levelLow-level
    ModeUser modeKernel mode
    PortabilityHighLow
    Hardware accessNoYes
    SafetySaferRisky

    Are API and system call the same?

    Answer:
    No
    APIs may internally use system calls, but APIs themselves are not system calls.

    Does every API call invoke a system call?

    Answer:
    No
    Example:

    strlen()
    

    This works completely in user space.

    Why not allow applications to use system calls directly?

    Answer:

    • Security risks
    • OS instability
    • No abstraction
    • Poor portability

    What is User Mode?

    Answer:
    User mode is a restricted CPU mode where applications run with limited privileges and no direct hardware access.

    What is Kernel Mode?

    Answer:
    Kernel mode is a privileged CPU mode where the OS has full control over hardware, memory, and processes.

    Difference between User Mode and Kernel Mode?

    FeatureUser ModeKernel Mode
    PrivilegesLimitedFull
    Hardware accessNoYes
    Crash impactApp onlyWhole OS

    Why do we need two modes?

    Answer:
    To:

    • Protect the system
    • Prevent faulty applications from crashing the OS
    • Enforce security boundaries

    How does user mode to kernel mode transition happen?

    Answer (Step-by-step):

    1. Application calls API
    2. API triggers system call
    3. CPU executes syscall instruction
    4. CPU switches to kernel mode
    5. Kernel performs operation
    6. Control returns to user mode

    Which CPU instruction is used for mode switching?

    Answer:

    • syscall
    • sysenter
    • int 0x80 (older x86)

    What is an API Wrapper?

    Answer:
    An API wrapper is a library function that wraps a system call and provides a user-friendly interface.

    Example:

    printf() → write() → syscall
    

    What is libc?

    Answer:
    libc is the C standard library that provides APIs for:

    • File handling
    • Memory management
    • Process control

    How does API improve portability?

    Answer:
    APIs provide a standard interface, allowing the same application code to run on different platforms without modification.

    Why are system calls not portable?

    Answer:
    Because system calls are:

    • OS-specific
    • Architecture-dependent
    • Kernel-implementation dependent

    What is POSIX API?

    Answer:
    POSIX is a standardized API specification that ensures portability across UNIX-like operating systems.

    Example of portability using APIs?

    Answer:

    read(fd, buf, size);
    

    Works on:

    • Linux
    • QNX
    • Android
    • Embedded Linux

    API vs Driver

    Answer:

    • API → Application-facing interface
    • Driver → Hardware-facing interface

    Can an API exist without kernel involvement?

    Answer:
    Yes
    Example:

    • Math APIs
    • String APIs

    What happens if an API fails?

    Answer:
    API returns:

    • Error codes
    • NULL pointers
    • errno values

    What is errno?

    Answer:
    errno is a global variable set by APIs to indicate the cause of failure.

    Role of APIs in Embedded Systems?

    Answer:

    • Hardware abstraction
    • RTOS portability
    • Driver isolation
    • Faster development

    API usage in QNX (Interview Bonus)

    Answer:
    QNX uses POSIX-compliant APIs allowing applications to remain portable across different SoCs and BSPs.

    What is the biggest benefit of APIs?

    Answer:
    Abstraction + Portability

    One-line API definition for interviews?

    Answer:

    An API is a standardized interface that allows applications to interact with the operating system safely and portably.

    Virtual Address Space & Process Memory Management

    1. Introduction to Virtual Address Space

    Q1. What is a Virtual Address?

    A virtual address is an address generated by a program during execution.
    It does not directly point to physical RAM.

    Instead:

    • Virtual Address → MMU (Memory Management Unit) → Physical Address

    Each process sees its own private virtual address space.

    Q2. What is Virtual Address Space (VAS)?

    Virtual Address Space is the range of virtual addresses available to a process.

    Example:

    • 32-bit system → 4 GB virtual address space
    • 64-bit system → theoretically 2⁶⁴ bytes (OS limits it)

    Q3. Why do we need Virtual Address Space?

    Key reasons:

    1. Process isolation – one process cannot access another’s memory
    2. Security – prevents accidental/malicious access
    3. Memory abstraction – programs don’t care about physical RAM layout
    4. Efficient memory usage – supports paging & swapping
    5. Simplifies programming – same address layout for all processes

    Q4. Difference between Virtual Address and Physical Address

    Virtual AddressPhysical Address
    Used by programUsed by hardware
    Process-specificSystem-wide
    Translated by MMUActual RAM location
    Not directly accessibleAccessed by CPU

    2. Managing Process Address Space

    Q5. What is a Process Address Space?

    It is the entire memory layout assigned to a process.

    Typical layout (Linux):

    High Address
    -----------------
    Stack
    -----------------
    Memory Mapped Region
    -----------------
    Heap
    -----------------
    BSS
    -----------------
    Data
    -----------------
    Text (Code)
    -----------------
    Low Address
    

    Q6. Who manages the process address space?

    • Kernel manages it
    • Uses:
      • Page tables
      • MMU
      • Virtual memory subsystem

    Each process has its own page table.

    Q7. What is Page Table?

    A page table maps:

    • Virtual Page Number → Physical Frame Number

    Used by MMU during address translation.

    Q8. What happens during context switch related to memory?

    • Kernel switches:
      • Page table base register
      • TLB entries may be flushed
    • New process sees its own virtual memory

    3. Stack Allocations

    Q9. What is Stack Memory?

    Stack is a memory region used for:

    • Function calls
    • Local variables
    • Function parameters
    • Return addresses

    Q10. How does Stack grow?

    • On most architectures (x86, ARM):
      • Grows downward (high → low address)

    Q11. What is Stack Frame?

    A stack frame is created for each function call and contains:

    • Function parameters
    • Local variables
    • Saved registers
    • Return address

    Q12. Who allocates and deallocates stack memory?

    • Automatically managed
    • Allocated when function is called
    • Deallocated when function returns

    Q13. Stack vs Heap (Interview Favorite)

    StackHeap
    FastSlower
    Auto-managedProgrammer-managed
    Limited sizeLarger
    Function scopeGlobal scope
    Risk: Stack overflowRisk: Memory leak

    Q14. What is Stack Overflow?

    Occurs when:

    • Deep recursion
    • Large local variables

    Leads to segmentation fault.

    4. Heap & Data Segment Management

    Q15. What is Heap Memory?

    Heap is used for:

    • Dynamic memory allocation at runtime

    Allocated using:

    • malloc(), calloc(), realloc()

    Q16. How does Heap grow?

    • Grows upward (low → high address)

    Q17. What is Data Segment?

    Stores global and static variables.

    Q18. Types of Data Segment

    Initialized Data Segment

    int a = 10;
    static int b = 5;
    

    Uninitialized Data Segment (BSS)

    int x;
    static int y;
    

    Q19. Why is BSS important?

    • Occupies no space in executable
    • Initialized to zero at runtime
    • Saves disk space

    5. Memory Maps

    Q20. What is a Memory Map?

    A memory map shows how a process’s virtual address space is laid out.

    Q21. How to view process memory map in Linux?

    cat /proc/<pid>/maps
    

    Q22. What does /proc/pid/maps show?

    • Address ranges
    • Permissions (rwx)
    • Mapped files
    • Stack, heap, shared libraries

    Example:

    00400000-00452000 r-xp /bin/app
    00652000-00653000 rw-p heap
    

    Q23. What is Memory-Mapped I/O?

    Mapping files or devices directly into process address space using:

    mmap()
    

    Used for:

    • Shared memory
    • File I/O optimization
    • Device access

    6. Dynamic Memory Allocation & De-allocation

    Q24. What is Dynamic Memory Allocation?

    Allocating memory at runtime from heap.

    Q25. Functions used in C

    FunctionPurpose
    malloc()Allocate uninitialized memory
    calloc()Allocate zero-initialized memory
    realloc()Resize memory
    free()Deallocate memory

    Q26. Difference between malloc and calloc

    malloccalloc
    UninitializedZero-initialized
    FasterSlightly slower
    Single blockMultiple blocks

    Q27. What is Memory Leak?

    Occurs when:

    • Allocated memory is not freed

    Effects:

    • Increased RAM usage
    • System slowdown
    • Crash in embedded systems

    Q28. What is Dangling Pointer?

    Pointer referencing memory that has been freed.

    Q29. What is Fragmentation?

    • Internal fragmentation – unused memory inside allocated block
    • External fragmentation – free memory split into small pieces

    Q30. How does OS allocate heap memory internally?

    Uses:

    • brk() / sbrk() → heap extension
    • mmap() → large allocations

    7. Memory Locking

    Q31. What is Memory Locking?

    Prevents memory pages from being:

    • Swapped out to disk

    Q32. Why is Memory Locking required?

    Used in:

    • Real-time systems
    • Audio/video processing
    • Embedded & QNX/Linux RTOS

    Ensures deterministic performance.

    Q33. Functions used for Memory Locking

    mlock()
    munlock()
    mlockall()
    munlockall()
    

    Q34. What does mlockall() do?

    Locks:

    • All current and future memory pages of process
    mlockall(MCL_CURRENT | MCL_FUTURE);
    

    Q35. What happens if memory is not locked in RT systems?

    • Page faults
    • Unpredictable latency
    • Missed deadlines

    Q36. Any limitations of Memory Locking?

    • Requires privileges
    • Limited by system settings
    • Excessive locking affects overall system

    8. Interview Rapid-Fire Questions

    Q37. Can two processes have same virtual address?

    Yes
    But mapped to different physical memory

    Q38. Who translates virtual to physical address?

    MMU with page tables

    Q39. What causes Segmentation Fault?

    • Invalid memory access
    • Stack overflow
    • Dereferencing NULL pointer

    Q40. What is Copy-on-Write (CoW)?

    • Memory shared until modification
    • Used during fork()

    Q41. Heap vs mmap allocation – when used?

    • Small allocations → Heap
    • Large allocations → mmap

    9. One-Line Interview Summary

    Virtual memory provides each process an isolated address space where stack, heap, data, and mapped regions are managed by the kernel using paging, ensuring security, efficiency, and deterministic behavior when required.

    Conclusion

    Linux System Programming builds a strong foundation for understanding how software truly works on a Linux system. By learning Linux System Programming, developers gain clarity on process behavior, memory usage, system calls, and kernel interaction, which are essential for writing efficient and reliable programs. These fundamentals not only improve coding confidence but also help in debugging real-world issues and performing better in technical interviews. Whether you are a beginner or an experienced developer, mastering Linux System Programming opens the door to advanced topics like embedded Linux, device drivers, and high-performance system software, making it a valuable skill for long-term career growth.

    Frequently Asked Questions (FAQ) : Linux System Programming

    1. What is Linux System Programming?

    Linux System Programming involves writing programs that interact directly with the Linux operating system using system calls and low-level interfaces.

    2. Why is Linux System Programming important?

    Linux System Programming helps developers understand how applications communicate with the Linux kernel, improving performance, reliability, and debugging skills.

    3. Who should learn Linux System Programming?

    Linux System Programming is ideal for embedded engineers, Linux developers, backend programmers, and students preparing for system-level interviews.

    4. What are the core topics in Linux System Programming?

    Linux System Programming covers processes, system calls, file handling, memory management, signals, and user space vs kernel space concepts.

    5. Is Linux System Programming beginner-friendly?

    Linux System Programming can be learned by beginners with basic C knowledge when explained step by step with practical examples.

    6. Which language is used for Linux System Programming?

    Linux System Programming is primarily done using the C programming language because of its close interaction with the Linux kernel.

    7. Is Linux System Programming required for embedded systems?

    Yes, Linux System Programming is essential for embedded Linux development and understanding low-level system behavior.

    8. How does Linux System Programming differ from application programming?

    Linux System Programming focuses on low-level OS interaction, while application programming focuses on high-level user functionality.

    9. Does Linux System Programming help in debugging?

    Linux System Programming improves debugging skills by giving insight into process execution, memory usage, and system resources.

    10. Can Linux System Programming improve career opportunities?

    Yes, Linux System Programming skills are highly valued in embedded systems, Linux development, and system software roles.

    Read More : Audio Device Driver Interview Questions & Answers

  • Audio Custom Player: Master Step-by-Step Guide to Build in Yocto (2026)

    Learn how to build a real Audio Custom Player using Yocto, with ALSA support, custom layers, and flashing steps for embedded Linux boards.

    This step-by-step guide shows how to build a real Audio Custom Player using the Yocto build system, explained in clear and practical language. You’ll learn how to create an ALSA-based audio player similar to aplay, set up the correct Yocto folder structure, write a custom layer and recipe, enable embedded Linux audio support, build the Yocto image, and flash it onto a BeagleBone or other embedded boards. The article is written for beginners who want hands-on understanding and for experienced engineers looking for a clean, production-ready audio player workflow. Everything is explained from real embedded development experience, without theory overload or copy-paste tutorials.

    Why Build an Audio Custom Player Instead of Using aplay?

    If you have worked with Linux audio even a little, you already know aplay. It works, but it is not designed for production systems.

    Here is why real embedded products avoid plain aplay:

    • No UI or control layer
    • No fade-in or fade-out
    • No volume ramping
    • No error recovery
    • No device hot-plug handling
    • No service-style startup
    • No customization

    A custom Audio Custom Player gives you:

    • Full control over audio playback
    • Feature parity or better than aplay
    • Clean integration with Yocto
    • Predictable behavior on embedded hardware
    • Production-ready audio flow

    This is exactly why automotive, industrial, and consumer devices never ship aplay as-is.

    What We Are Building (Big Picture)

    By the end of this guide, you will understand how to:

    • Build a custom audio player similar to aplay
    • Integrate it into a Yocto build
    • Enable ALSA audio support
    • Cross-compile the player
    • Package it as a Yocto recipe
    • Flash the image on BeagleBone or similar board
    • Boot and play audio automatically

    This applies to any embedded Linux board, not just BeagleBone.

    Audio Architecture in Embedded Linux (Simple View)

    Before coding anything, let’s understand the audio flow.

    Audio File (WAV)
       ↓
    Custom Audio Player
       ↓
    ALSA PCM Interface
       ↓
    ALSA Driver
       ↓
    Codec (I2S)
       ↓
    Speaker / Headphone
    

    Your Audio Custom Player sits above ALSA and talks directly to the PCM interface, just like aplay, but with your own logic.

    Choosing ALSA (And Not PulseAudio)

    For embedded systems, ALSA is usually the right choice.

    Why ALSA works best in Yocto:

    • Lightweight
    • Deterministic
    • No daemon dependency
    • Real-time friendly
    • Easy to debug
    • Direct hardware access

    PulseAudio is useful on desktops, but for embedded audio player Yocto builds, ALSA keeps things simple and reliable.

    Designing the Audio Custom Player Features

    We want feature parity with aplay plus more.

    Core Features

    • WAV file playback
    • Device selection
    • Sample rate handling
    • Channel handling (mono/stereo)
    • Error handling

    Advanced Features

    • Volume control
    • Fade-in and fade-out
    • Loop playback
    • Graceful stop
    • Signal handling
    • Service-style execution

    This turns your player into a production-ready embedded audio application.

    Writing the Audio Custom Player (Core Logic)

    At the heart, your player will:

    1. Open WAV file
    2. Parse header
    3. Configure ALSA PCM
    4. Stream audio buffers
    5. Handle underruns
    6. Clean exit

    Basic Flow (Conceptual)

    open_pcm_device();
    configure_hw_params();
    configure_sw_params();
    
    while (read_audio_data()) {
        write_pcm_frames();
    }
    
    drain_and_close();
    

    This is the same logic used by aplay, but now you own the behavior.

    Making It Better Than aplay

    Here’s where your Audio Custom Player shines.

    Fade-In Example (Concept)

    Instead of blasting audio instantly:

    • Start with low volume
    • Increase gradually per buffer
    • Avoid speaker pops

    This matters a lot in real hardware.

    Volume Control

    You can implement:

    • Software gain
    • ALSA mixer control
    • Runtime volume changes

    This makes your player usable in real products.

    Cross-Compiling the Audio Player

    Your host system is x86. Your target is ARM.

    So we cross-compile.

    Toolchain Source

    Yocto provides the toolchain automatically.

    You never manually download GCC.

    Compile Example

    $CC audio_player.c -lasound -o audio_player
    

    In Yocto, this happens inside a recipe.

    Setting Up Yocto Build Environment

    Now let’s move into Yocto.

    Step 1: Clone Yocto

    git clone git://git.yoctoproject.org/poky
    cd poky
    

    Step 2: Initialize Build Environment

    source oe-init-build-env
    

    This creates the build directory.

    Selecting the Board (BeagleBone Example)

    For BeagleBone:

    MACHINE = "beaglebone"
    

    This goes into local.conf.

    Enabling Audio in Yocto

    Yocto does not enable everything by default.

    Add ALSA support:

    IMAGE_INSTALL:append = " alsa-utils alsa-lib"
    

    This ensures:

    • ALSA libraries
    • Mixer tools
    • PCM support

    Creating a Yocto Recipe for Audio Custom Player

    This is where beginners usually struggle.

    Recipe Structure

    audio-custom-player/
     ├── audio-custom-player.bb
     └── files/
         └── audio_player.c
    

    Sample Recipe

    SUMMARY = "Custom Audio Player"
    LICENSE = "MIT"
    
    SRC_URI = "file://audio_player.c"
    
    S = "${WORKDIR}"
    
    DEPENDS = "alsa-lib"
    
    do_compile() {
        ${CC} audio_player.c -lasound -o audio_player
    }
    
    do_install() {
        install -d ${D}${bindir}
        install -m 0755 audio_player ${D}${bindir}
    }
    

    Now your Audio Custom Player becomes part of the Yocto build.

    Adding the Player to the Image

    In local.conf:

    IMAGE_INSTALL:append = " audio-custom-player"
    

    This ensures your player is available on the target filesystem.

    Building the Yocto Image

    Now the long but satisfying step.

    bitbake core-image-minimal
    

    Depending on your system, this may take time.

    Flashing the Image on BeagleBone

    Once build finishes, you will get an image file.

    Flashing Using SD Card

    sudo dd if=core-image-minimal-beaglebone.wic of=/dev/sdX bs=4M status=progress
    sync
    

    Insert SD card into BeagleBone and power on.

    Boot and System Setup

    After boot:

    login: root
    

    Check audio devices:

    aplay -l
    

    Now test your custom player:

    audio_player test.wav
    

    If you hear sound, your Yocto audio player build is successful.

    Yocto Folder Structure

    Before writing code, understand where things live.

    yocto/
     ├── poky/
     │   ├── meta/
     │   ├── meta-poky/
     │   ├── meta-yocto-bsp/
     │   └── build/
     │       ├── conf/
     │       │   ├── local.conf
     │       │   └── bblayers.conf
     │       └── tmp/
     └── meta-custom/
         └── recipes-audio/
             └── audio-custom-player/
                 ├── audio-custom-player.bb
                 └── files/
                     └── audio_player.c
    

    Rule:

    • Code goes in files/
    • Build logic goes in .bb
    • Custom layer keeps Yocto clean

    Step 1: Clone Yocto (Poky)

    git clone git://git.yoctoproject.org/poky
    cd poky
    

    Checkout a stable branch (recommended):

    git checkout kirkstone
    

    Step 2: Initialize Yocto Build Environment

    source oe-init-build-env
    

    This creates:

    poky/build/
    

    All builds happen here.

    Step 3: Create Your Own Yocto Layer

    Never modify Poky directly.

    bitbake-layers create-layer ../meta-custom
    

    Add the layer:

    bitbake-layers add-layer ../meta-custom
    

    Verify:

    bitbake-layers show-layers
    

    Step 4: Create Recipe Folder Structure

    cd ../meta-custom
    mkdir -p recipes-audio/audio-custom-player/files
    

    Now create the recipe:

    touch recipes-audio/audio-custom-player/audio-custom-player.bb
    

    Step 5: Complete Audio Custom Player C Code

    File:
    meta-custom/recipes-audio/audio-custom-player/files/audio_player.c

    This is a minimal but real ALSA PCM player.

    #include <stdio.h>
    #include <stdlib.h>
    #include <alsa/asoundlib.h>
    
    #define PCM_DEVICE "default"
    
    int main(int argc, char *argv[])
    {
        snd_pcm_t *pcm_handle;
        snd_pcm_hw_params_t *params;
        FILE *wav;
        int rate = 44100;
        int channels = 2;
        int rc;
        int size;
        char buffer[4096];
    
        if (argc < 2) {
            printf("Usage: %s <audio.wav>\n", argv[0]);
            return -1;
        }
    
        wav = fopen(argv[1], "rb");
        if (!wav) {
            perror("WAV open failed");
            return -1;
        }
    
        /* Skip WAV header (44 bytes) */
        fseek(wav, 44, SEEK_SET);
    
        /* Open PCM device */
        rc = snd_pcm_open(&pcm_handle, PCM_DEVICE,
                          SND_PCM_STREAM_PLAYBACK, 0);
        if (rc < 0) {
            printf("Unable to open PCM device\n");
            return -1;
        }
    
        snd_pcm_hw_params_malloc(&params);
        snd_pcm_hw_params_any(pcm_handle, params);
    
        snd_pcm_hw_params_set_access(pcm_handle, params,
                                     SND_PCM_ACCESS_RW_INTERLEAVED);
        snd_pcm_hw_params_set_format(pcm_handle, params,
                                     SND_PCM_FORMAT_S16_LE);
        snd_pcm_hw_params_set_channels(pcm_handle, params, channels);
        snd_pcm_hw_params_set_rate_near(pcm_handle, params, &rate, 0);
    
        snd_pcm_hw_params(pcm_handle, params);
        snd_pcm_hw_params_free(params);
    
        snd_pcm_prepare(pcm_handle);
    
        while ((size = fread(buffer, 1, sizeof(buffer), wav)) > 0) {
            rc = snd_pcm_writei(pcm_handle, buffer,
                                size / (channels * 2));
            if (rc == -EPIPE) {
                snd_pcm_prepare(pcm_handle);
            }
        }
    
        snd_pcm_drain(pcm_handle);
        snd_pcm_close(pcm_handle);
        fclose(wav);
    
        return 0;
    }
    

    This already works like aplay.

    Step 6: Write Yocto Recipe (.bb)

    File:
    meta-custom/recipes-audio/audio-custom-player/audio-custom-player.bb

    SUMMARY = "Audio Custom Player using ALSA"
    DESCRIPTION = "Simple ALSA-based audio player similar to aplay"
    LICENSE = "MIT"
    LIC_FILES_CHKSUM = "file://${COMMON_LICENSE_DIR}/MIT;md5=0835ade698e0bcf8506ecda2f7b4f302"
    
    SRC_URI = "file://audio_player.c"
    
    S = "${WORKDIR}"
    
    DEPENDS = "alsa-lib"
    
    do_compile() {
        ${CC} audio_player.c -lasound -o audio_player
    }
    
    do_install() {
        install -d ${D}${bindir}
        install -m 0755 audio_player ${D}${bindir}
    }
    

    Step 7: Enable ALSA in Image

    File:
    poky/build/conf/local.conf

    Add:

    IMAGE_INSTALL:append = " alsa-lib alsa-utils audio-custom-player"
    

    For BeagleBone:

    MACHINE = "beaglebone"
    

    Step 8: Build Yocto Image

    bitbake core-image-minimal
    

    First build takes time.

    Step 9: Flash Image to SD Card

    After build completes:

    cd tmp/deploy/images/beaglebone/
    

    Flash:

    sudo dd if=core-image-minimal-beaglebone.wic of=/dev/sdX bs=4M status=progress
    sync
    

    Replace /dev/sdX correctly.

    Step 10: Boot BeagleBone

    • Insert SD card
    • Power ON
    • Login as root

    Check audio device:

    aplay -l
    

    Step 11: Test Audio Custom Player

    Copy a WAV file:

    scp test.wav root@<board-ip>:/root/
    

    Run:

    audio_player /root/test.wav
    

    Sound plays = SUCCESS

    How This Is Better Than aplay

    Your Audio Custom Player can now easily add:

    • Fade-in / fade-out
    • Volume ramping
    • Logging
    • Service startup
    • Device selection
    • Error recovery

    This is exactly how real products work.

    Common Beginner Mistakes (Avoid These)

    • Forgetting alsa-lib in DEPENDS
    • Wrong WAV format
    • No codec driver enabled
    • Mixer volume muted
    • Wrong MACHINE value

    Real-World Next Enhancements

    Once this works, you can:

    • Add systemd service
    • Add command-line options
    • Add volume control
    • Port to QNX
    • Add Bluetooth audio
    • Support multiple codecs

    Handling Common Audio Problems

    No Sound

    • Check I2S pinmux
    • Check codec power
    • Check mixer volume

    XRUN Errors

    • Increase buffer size
    • Tune period size

    Distorted Audio

    • Sample rate mismatch
    • Wrong bit depth

    These are normal issues in embedded audio development.

    Making It Production Ready

    To make your Audio Custom Player ready for real products:

    • Add logging
    • Add watchdog handling
    • Handle device removal
    • Add config file support
    • Run as systemd service

    Yocto makes all of this manageable.

    Why This Approach Scales

    Once you understand this flow, you can:

    • Port to QNX
    • Add Bluetooth audio
    • Add multi-zone audio
    • Add network streaming
    • Support multiple codecs

    This is why companies invest in custom embedded audio players.

    Final Thoughts

    Building an Audio Custom Player using Yocto is not about reinventing aplay.
    It is about control, reliability, and production quality.

    If you can:

    • Write a simple ALSA PCM loop
    • Create a Yocto recipe
    • Flash and boot your board

    You are already ahead of most engineers who only know theory.

    This skill directly maps to automotive audio, industrial Linux, and consumer embedded products.

    Read More: Embedded Audio Interview Questions & Answers | Set 1
    Read More : Embedded Audio Interview Questions & Answers | Set 2
    Read More : Top Embedded Audio Questions You Must Master Before Any Interview
    Read More : What is Audio and How Sound Works in Digital and Analog Systems
    Read More : Digital Audio Interface Hardware
    Read More : Advanced Linux Sound Architecture for Audio and MIDI on Linux
    Read More : What is QNX Audio
    Read more : Complete guide of ALSA
    Read More : 50 Proven ALSA Interview Questions
    Read More : ALSA Audio Interview Questions & Answers
    Read More :ALSA Audio Interview Questions & Answers SET 2
    Read More : Advanced Automotive & Embedded Audio Interview Questions
    Read More : Audio Device Driver Interview Questions & Answers
  • Audio Device Driver Interview Questions & Answers | Crack Embedded Audio Interviews (2026)

    Audio Device Driver interview guide covering ALSA, ASoC, DMA, debugging, and real embedded audio questions to help crack interviews in 2026.

    Preparing for an embedded audio interview can be challenging, especially when the discussion moves beyond theory and into real-world driver behavior, debugging, and system-level design. This guide on Audio Device Driver Interview Questions & Answers (2026) is created specifically for engineers who want to crack embedded Linux and automotive audio interviews with confidence.

    The content focuses on practical audio driver knowledge that interviewers actually test how audio works inside the Linux kernel, how ALSA and ASoC drivers are structured, and how real production audio issues are handled. Instead of generic explanations, each question is answered from an implementation and debugging perspective, reflecting what experienced embedded audio engineers deal with on actual projects.

    This resource covers critical topics such as PCM open flow, DMA-based audio streaming, buffer underruns, interrupt handling, mixer controls, DAPM-based power management, and codec vs machine driver responsibilities. It also explains how audio paths are powered, how clocks and sample rates are configured, and how user-space applications interact with kernel drivers through ALSA APIs.

    For engineers targeting automotive audio roles, the guide highlights concepts like deterministic audio behavior, low-latency design, fail-safe audio paths, and production-ready debugging practices. These are areas where many candidates struggle during senior-level interviews, especially when asked scenario-based or troubleshooting questions.

    The explanations are written in clear, human language, making complex driver flows easy to understand even if you are transitioning from application development to kernel-level audio. Whether you are preparing for roles involving Yocto-based systems, custom audio boards, or SoC-level audio integration, this content helps you connect theory with hands-on experience.

    If you are aiming to crack embedded audio interviews in 2026, strengthen your understanding of Linux audio device drivers, and confidently answer deep technical questions, this guide will serve as a solid interview companion and a practical learning reference.

    An audio device driver is a low-level software component that acts as a bridge between the operating system and the audio hardware (like a sound card, codec, DAC, ADC, or audio SoC).

    In simple terms:
    It allows the OS and applications to play, record, and control sound using audio hardware.

    Why is an Audio Device Driver Needed?

    Applications (media players, VoIP apps, system sounds) cannot directly access hardware.
    The audio driver:

    • Understands hardware registers
    • Controls audio data flow
    • Manages timing and buffering
    • Ensures smooth playback and recording

    What Does an Audio Device Driver Do?

    An audio driver typically handles:

    1. Hardware Initialization
      • Configure audio codec, clocks, DMA, and interfaces (I2S, TDM, PCM)
    2. Audio Data Transfer
      • Move audio samples between memory and hardware using DMA
    3. Format Handling
      • Sample rate (44.1kHz, 48kHz)
      • Bit depth (16-bit, 24-bit)
      • Channels (Mono, Stereo)
    4. Buffer Management
      • Prevent glitches like XRUN (underrun/overrun)
    5. Volume & Mute Control
      • Hardware mixer or software controls
    6. Power Management
      • Suspend/resume audio hardware

    Where Does It Sit in the Audio Stack?

    Application
       ↓
    Audio Framework (ALSA / PulseAudio / QNX Audio)
       ↓
    Audio Device Driver
       ↓
    Audio Hardware (Codec / DAC / ADC)
    

    Audio Device Driver in Linux (Example)

    In Linux, audio drivers are usually part of ALSA (Advanced Linux Sound Architecture):

    • PCM driver → handles audio streaming
    • Codec driver → configures audio codec
    • Machine driver → board-specific audio routing

    Real-World Example

    When you play music:

    1. App sends audio data to ALSA
    2. ALSA calls the audio device driver
    3. Driver programs DMA + codec
    4. Hardware outputs sound via speaker/headphones

    One-Line Interview Answer

    An audio device driver is a low-level software layer that enables the operating system to communicate with audio hardware for sound playback, recording, and control.

    Interview Answer

    An audio codec is a hardware IC or software component that converts audio signals between analog and digital formats for playback and recording.

    • Playback: Digital → Analog
    • Recording: Analog → Digital

    Most audio codecs contain both DAC and ADC in a single chip.

    What Does an Audio Codec Do?

    • Converts digital audio data to analog signals (speaker/headphones)
    • Converts analog mic signals to digital data
    • Controls volume, gain, mute
    • Handles sample rate and bit depth
    • Interfaces with SoC using I2S / TDM / PCM

    Real Example

    • TLV320
    • WM8960
    • PCM6020-Q1

    One-Line Answer

    An audio codec is a device that converts analog audio signals to digital and vice versa for audio input and output.

    Interview Answer

    A DAC converts digital audio data (binary samples) into an analog electrical signal that can drive speakers or headphones.

    Where is DAC Used?

    • Music playback
    • System sounds
    • Media players

    Example Flow

    Digital Audio (PCM) → DAC → Amplifier → Speaker
    

    Key Parameters

    • Resolution: 16-bit / 24-bit
    • Sample rate: 44.1kHz / 48kHz
    • Output noise and distortion

    One-Line Answer

    DAC converts digital audio data into an analog signal for sound output.

    Interview Answer

    An ADC converts analog audio signals (from microphone or line-in) into digital data so the system can process or store it.

    Where is ADC Used?

    • Voice recording
    • Calls
    • Audio capture

    Example Flow

    Microphone → ADC → Digital PCM Data → Application
    

    Key Parameters

    • Sampling rate
    • Resolution
    • Signal-to-Noise Ratio (SNR)

    One-Line Answer

    ADC converts analog audio signals into digital data for processing or storage.

    FeatureAudio CodecDSP
    PurposeSignal conversionSignal processing
    Converts Analog ↔ DigitalYesNo
    Performs audio effectsLimitedYes
    ExamplesWM8960, TLV320Qualcomm Hexagon, TI C66x
    Handles EQ, Noise cancel
    Position in pipelineNear hardwareBetween app & hardware

    Simple Explanation

    • Codec → “Translator” (Analog ↔ Digital)
    • DSP → “Audio Brain” (Enhancement & Processing)

    Real Audio Pipeline

    Mic → ADC (Codec) → DSP (NR, EC, EQ) → DAC (Codec) → Speaker
    

    One-Line Interview Difference

    A codec converts audio signals between analog and digital domains, while a DSP processes digital audio data to enhance or modify it.

    Short Answer

    An audio driver controls and communicates with the audio hardware, while an audio framework provides a higher-level interface for applications to use audio features easily.

    What is an Audio Driver?

    Definition

    An audio driver is a low-level software component that directly interacts with audio hardware such as:

    • Audio codec
    • DAC / ADC
    • DMA
    • I2S / TDM / PCM interfaces

    Responsibilities of an Audio Driver

    • Initialize audio hardware
    • Configure sample rate, bit depth, channels
    • Set up DMA buffers
    • Handle interrupts
    • Control volume, mute, power
    • Prevent underrun/overrun (XRUN)

    Examples

    • Linux: ALSA PCM driver, Codec driver
    • QNX: io-audio driver
    • Windows: WDM audio driver

    One-Line Answer

    An audio driver directly manages audio hardware operations.

    Definition

    An audio framework is a higher-level software layer that provides standard APIs and policies for applications to play, record, mix, and route audio.

    Responsibilities of an Audio Framework

    • Provide user-friendly APIs
    • Mix multiple audio streams
    • Per-application volume control
    • Audio routing (speaker / headset / Bluetooth)
    • Resampling and format conversion
    • Device selection and policy management

    Examples

    • Linux: PulseAudio, PipeWire
    • Android: AudioFlinger
    • QNX: QNX Audio Framework
    • Windows: WASAPI

    One-Line Answer

    An audio framework manages audio policies and provides APIs for applications.

    Audio Driver vs Audio Framework

    FeatureAudio DriverAudio Framework
    LevelLow-levelHigh-level
    Talks to hardwareYesNo (via driver)
    Used by applicationsIndirectDirect
    Handles mixingNoYes
    Audio routingNoYes
    Power managementYesMostly
    Hardware knowledgeRequiredAbstracted

    Where Do They Sit in the Stack?

    Application
       ↓
    Audio Framework (PulseAudio / PipeWire / AudioFlinger)
       ↓
    Audio Driver (ALSA / io-audio)
       ↓
    Audio Hardware (Codec / DAC / ADC)
    

    Interview Tricky Follow-Up Questions

    Q: Can applications directly use audio drivers?
    Yes (e.g., ALSA hw device), but not recommended for desktop systems.

    Q: What happens if audio framework crashes?
    Hardware driver still exists, but apps lose audio services.

    Q: Why not use only drivers?
    Drivers cannot handle mixing, policies, and routing efficiently.

    One-Line Smart Answer

    The audio driver handles hardware-specific operations, while the audio framework manages application-level audio policies and stream management.

    Definition

    I2S is a serial communication protocol specifically designed for digital audio data transfer between:

    • SoC ↔ Audio Codec
    • DSP ↔ Codec
    • MCU ↔ DAC / ADC

    It is unidirectional per data line and optimized for continuous audio streaming.

    I2S Signals

    I2S typically uses 3 or 4 lines:

    SignalMeaning
    MCLKMaster Clock (optional but common)
    BCLKBit Clock
    LRCLK / WSLeft-Right Clock (Word Select)
    SDSerial Data

    How I2S Works

    • Audio data is sent bit-by-bit
    • Left and right channel data are time-multiplexed
    • Data is MSB first
    • LRCLK determines left or right channel

    Timing Example

    LRCLK = 0 → Left Channel
    LRCLK = 1 → Right Channel
    

    Typical I2S Use Case

    • Stereo audio (2 channels)
    • Simple playback / recording
    • Low latency

    One-Line Interview Answer

    I2S is a serial audio protocol used to transfer PCM audio data between processors and audio codecs.

    Definition

    TDM is an audio interface that allows multiple audio channels to be transmitted over a single data line by dividing data into time slots.

    Why TDM?

    I2S supports only 2 channels
    TDM supports 4, 8, 16 or more channels

    TDM Signals

    SignalMeaning
    BCLKBit Clock
    FSYNC / LRCLKFrame Sync
    SDSerial Data
    MCLKMaster Clock

    How TDM Works

    • One frame = multiple time slots
    • Each time slot carries one channel’s audio data
    • All channels share the same clocks

    Example

    Frame:
    | Ch1 | Ch2 | Ch3 | Ch4 | Ch5 | Ch6 | Ch7 | Ch8 |
    

    Where TDM Is Used

    • Automotive infotainment
    • Multi-mic arrays
    • Surround sound systems

    One-Line Interview Answer

    TDM is a digital audio interface that carries multiple audio channels over a single data line using time slots.

    Audio clocks control timing and synchronization of audio data.

    MCLK (Master Clock)

    Definition

    • High-frequency reference clock
    • Used internally by codec for oversampling and PLL

    Typical Values

    • 12.288 MHz → for 48kHz family
    • 11.2896 MHz → for 44.1kHz family

    Formula

    MCLK = Sample Rate × 256 (or 384 / 512)
    

    Interview Line

    MCLK is the master reference clock used by the codec for internal audio processing.

    BCLK (Bit Clock)

    Definition

    • Clock for each bit of audio data

    Formula

    BCLK = Sample Rate × Bit Depth × Channels
    

    Example

    48kHz, 16-bit, Stereo:

    BCLK = 48,000 × 16 × 2 = 1.536 MHz
    

    Interview Line

    BCLK clocks individual audio bits on the data line.

    LRCLK / FSYNC (Left-Right Clock)

    Definition

    • Indicates channel boundary
    • Also equals sample rate

    Values

    • 44.1kHz
    • 48kHz

    Interview Line

    LRCLK indicates left or right channel and defines the audio sample rate.

    Clock Relationship Summary

    ClockRole
    MCLKReference clock
    BCLKBit timing
    LRCLKFrame / channel timing

    Case 1: Sample Rate Mismatch

    • Codec expects 48kHz
    • SoC sends 44.1kHz

    Result

    • Audio speed change
    • Pitch distortion
    • Chipmunk / slow audio

    Case 2: BCLK Mismatch

    • Wrong bit clock frequency

    Result

    • Crackling noise
    • Distorted audio
    • Random pops

    Case 3: LRCLK Mismatch

    • Channel alignment breaks

    Result

    • Left/right swapped
    • Missing channels
    • Noise bursts

    Case 4: MCLK Missing or Wrong

    • Codec PLL fails to lock

    Result

    • No audio output
    • Codec not detected
    • Audio driver fails to start

    XRUNs Due to Clock Issues

    • Clock drift causes buffer underrun/overrun
    • Common in async clock domains

    One-Line Killer Answer

    Clock mismatch leads to distortion, noise, pitch errors, or complete audio failure due to loss of synchronization between SoC and codec.

    Real-World Debugging (Bonus)

    • Check clock tree (SoC datasheet)
    • Verify ALSA hw_params
    • Use scope / logic analyzer on BCLK/LRCLK
    • Confirm codec PLL lock

    Final Summary

    • I2S → 2-channel audio
    • TDM → Multi-channel audio
    • MCLK/BCLK/LRCLK → Timing backbone
    • Clock mismatch → Audio corruption or silence

    Modern embedded Linux audio (Qualcomm, TI, NXP, STM32MP, BeagleBone, etc.) uses ASoC instead of legacy ALSA drivers.
    ASoC splits audio responsibilities cleanly into Machine, Codec, Platform, and DAI, with DAPM for power management.

    What is a Machine Driver?

    Interview Definition

    A Machine Driver describes the actual audio hardware board and connects CPU ↔ Codec ↔ Platform together.

    Why Machine Driver Exists

    • Same SoC + Codec can be used on multiple boards
    • Audio wiring (headphone, mic, speaker, clocks, GPIOs) is board-specific
    • Machine driver handles this board-level knowledge

    What Machine Driver Does

    • Defines audio card
    • Describes audio routing (mic → ADC → CPU → DAC → speaker)
    • Connects DAIs between CPU and Codec
    • Configures clocks, GPIOs, regulators
    • Handles jack detection, buttons
    • Selects I2S / TDM / PCM format

    Key Structures

    struct snd_soc_card
    struct snd_soc_dai_link
    

    Example

    CPU DAI (I2S)  <---->  Codec DAI (I2S)
    

    Interview One-Liner

    Machine driver is board-specific glue code that ties CPU, codec, and platform drivers into a working audio card.

    Interview Definition

    A Codec Driver controls the audio codec IC that performs ADC, DAC, mixers, PGA, and audio routing.

    What is an Audio Codec IC?

    Examples:

    • PCM5102, WM8960, PCM6020, TLV320, CS43L22

    It converts:

    • Analog Mic → Digital PCM (ADC)
    • Digital PCM → Analog Speaker (DAC)

    What Codec Driver Handles

    • ADC / DAC configuration
    • Mixer controls (volume, mute)
    • Power blocks (ADC, DAC, PGA)
    • Audio paths inside codec
    • Registers via I2C / SPI
    • DAPM widgets & routes

    Key Structures

    struct snd_soc_codec_driver
    struct snd_soc_dai_driver
    

    Example

    • Sets DAC volume
    • Enables headphone amp
    • Powers down ADC when unused

    Interview One-Liner

    Codec driver controls the audio IC responsible for ADC, DAC, mixers, and power blocks.

    Interview Definition

    A Platform Driver handles DMA and PCM data transfer between CPU memory and audio interface.

    Why Platform Driver Exists

    • Audio streaming requires high-speed DMA
    • Codec doesn’t know about memory
    • Platform driver bridges PCM ↔ DMA ↔ CPU

    What Platform Driver Does

    • Allocates audio buffers
    • Handles DMA start/stop
    • Manages period & buffer size
    • Handles interrupts (XRUN)
    • Exposes PCM devices to ALSA

    Key Structures

    struct snd_soc_platform_driver
    struct snd_pcm_ops
    

    Example

    • Qualcomm LPAIF DMA
    • TI McASP DMA
    • i.MX SAI DMA

    Interview One-Liner

    Platform driver manages PCM data flow and DMA between memory and audio hardware.

    Interview Definition

    A DAI represents the digital audio link between CPU and Codec.

    Why DAI Exists

    • Audio data must be synchronized
    • Format, clocks, and direction must match
    • DAI abstracts I2S, TDM, PCM, DSP modes

    What DAI Defines

    • Audio format (I2S / TDM / LJ / RJ)
    • Master/slave (clock provider)
    • Sample rate & bit depth
    • Clock polarity
    • Number of channels

    Types of DAI

    TypeExample
    CPU DAII2S controller
    Codec DAICodec audio port
    DAI LinkConnection between both

    Key Structure

    struct snd_soc_dai_link
    

    Interview One-Liner

    DAI defines the digital audio connection and protocol between CPU and codec.

    Interview Definition

    DAPM (Dynamic Audio Power Management) automatically powers ON/OFF audio blocks based on audio usage.

    Why DAPM Exists

    • Embedded systems are power-sensitive
    • Codec has many blocks (ADC, DAC, mixer, amp)
    • Power only what’s needed

    What DAPM Does

    • Powers DAC only when playback active
    • Powers ADC only when capture active
    • Manages audio paths dynamically
    • Saves battery & reduces heat

    DAPM Components

    ComponentMeaning
    WidgetsDAC, ADC, Mixer, Mic
    RoutesConnections between widgets
    PinsExternal connections

    Example

    • Headphone unplugged → DAC OFF
    • Mic disabled → ADC OFF

    Interview One-Liner

    DAPM dynamically manages power of audio components based on active audio routes.

    How Everything Connects (INTERVIEW GOLD)

    User App
       ↓
    ALSA PCM
       ↓
    Platform Driver (DMA)
       ↓
    CPU DAI (I2S/TDM)
       ↓
    Codec DAI
       ↓
    Codec Driver (ADC/DAC)
       ↓
    Speaker / Mic
    

    Machine Driver sits on top and binds everything.

    One-Shot Comparison Table

    ComponentResponsibility
    Machine DriverBoard-specific integration
    Codec DriverAudio IC control
    Platform DriverPCM & DMA handling
    DAIDigital audio protocol
    DAPMPower optimization

    Final Interview Summary

    In ASoC, the machine driver glues CPU, codec, and platform drivers together.
    The codec driver manages ADC/DAC and mixers, the platform driver handles DMA and PCM streams, DAI defines the digital interface like I2S/TDM, and DAPM ensures power-efficient operation by enabling only active audio paths.

    Power management in audio drivers is critical because audio hardware (codec, amps, clocks) consumes power even when silent.

    Why power management is needed

    • Audio devices are always connected (speakers, mic, codec)
    • Keeping them ON drains battery (especially mobile/automotive)
    • Audio usage is bursty (play → stop → idle)

    Power Management Layers in Audio

    Runtime PM (RPM)

    Used when audio device is idle but system is ON

    Flow:

    • No active PCM stream → driver callspm_runtime_put()
    • Kernel suspends codec, clocks, regulators
    • When playback starts:pm_runtime_get()

    Interview line:

    Runtime PM dynamically powers audio hardware ON/OFF based on active streams.

    System PM (Suspend / Resume)

    Triggered during:

    • suspend-to-RAM
    • suspend-to-disk

    Driver callbacks:

    .suspend()
    .resume()
    

    Responsibilities:

    • Save codec registers
    • Disable clocks
    • Mute amps (avoid pop noise)

    DAPM (Dynamic Audio Power Management)

    ASoC-specific smart power management

    DAPM powers only required audio blocks, not full codec.

    Example:

    • Playing music → DAC + Headphone path ON
    • Mic path → OFF

    Interview killer point:

    DAPM works at signal path level, not device level.

    Clock & Regulator Control

    Audio driver controls:

    • MCLK
    • BCLK
    • Power rails (AVDD, DVDD)

    Clocks enabled only when needed.

    Summary for Interview

    Audio power management is handled using Runtime PM, System PM, and DAPM. DAPM intelligently powers audio components based on signal routing, while runtime PM handles stream-based power transitions.

    When application calls:

    snd_pcm_open()
    

    Kernel audio stack performs multiple steps.

    Step-by-Step Flow

    User Space

    snd_pcm_open("hw:0,0")
    

    ALSA PCM Core

    • Finds PCM device
    • Calls driver’s:
    .open()
    

    Driver open() Callback

    Typical responsibilities:

    Power up hardware

    pm_runtime_get()
    

    Allocate runtime structures

    substream->runtime
    

    Set supported formats

    runtime->hw = snd_pcm_hardware
    

    Example:

    • Supported rates
    • Formats (S16_LE, S24_LE)
    • Channels

    No Hardware Start Yet

    • DMA not started
    • Codec not programmed
    • Just capability setup

    Interview trap:

    open() does NOT start audio playback.

    What Happens Next (Not open)

    CallPurpose
    hw_paramsAllocate buffers
    prepareProgram codec
    trigger(START)Start DMA

    Interview Summary

    During PCM open, ALSA initializes the stream, powers up the device, and advertises hardware capabilities but does not start DMA or audio transfer.

    DMA = Direct Memory Access
    Moves audio data without CPU involvement.

    Why DMA is Mandatory

    • Audio is continuous
    • CPU copying samples → XRUNs
    • DMA ensures real-time transfer

    Audio DMA Architecture

    User Buffer → Kernel Buffer → DMA → Audio FIFO → DAC
    

    DMA Buffer Structure

    • Circular (ring) buffer
    • Divided into periods

    Example:

    • Buffer size = 4096 frames
    • Period size = 1024 frames
    • 4 periods

    Playback DMA Flow

    • App writes audio
    • DMA reads period
    • Hardware plays samples
    • DMA interrupt fired
    • ALSA updates pointer
    • Next period processed

    Capture DMA (Mic)

    Reverse flow:

    ADC → DMA → Memory → App
    

    Interview Gold Line

    DMA allows zero-copy, real-time audio streaming by transferring data directly between memory and audio hardware.

    Definition

    Buffer underrun happens when:

    Audio hardware needs data but DMA buffer is empty.

    Why It Happens

    • App too slow
    • High CPU load
    • Small buffer size
    • Wrong clock configuration
    • DMA interrupt delayed

    Symptoms

    • Crackling sound
    • Audio gap
    • ALSA error:
    XRUN detected
    

    Overrun (Capture Side)

    • Mic data produced
    • App didn’t read
    • Data overwritten

    Recovery

    snd_pcm_prepare()
    

    Interview Answer

    Buffer underrun occurs when playback DMA cannot fetch data in time, causing audio glitches. Proper buffer sizing and real-time scheduling help prevent XRUNs.

    Interrupts ensure timing accuracy.

    Interrupt Source

    • DMA controller
    • Fired after each period

    Interrupt Flow

    • Period playback complete
    • DMA generates IRQ
    • ISR executes
    • Update DMA pointer
    • Notify ALSA core
    • ALSA wakes app (poll())

    Typical ISR Code

    snd_pcm_period_elapsed(substream);
    

    This is the MOST IMPORTANT LINE in audio ISR.

    Why Interrupts Are Important

    • Keeps audio continuous
    • Synchronizes app + hardware
    • Detects XRUN

    Interview Summary

    Audio interrupts are generated by DMA after period completion to notify ALSA, update playback pointers, and wake user-space applications.

    This is must-know for embedded audio roles.

    ASoC Components

    1.Codec Driver

    • DAC, ADC, mixer
    • Register programming (I2C/SPI)
    • DAPM widgets

    2.Platform Driver

    • DMA handling
    • PCM operations

    3.Machine Driver

    • Board-specific wiring
    • Connects CPU ↔ Codec

    ASoC Driver Bring-Up Flow

    Step 1.Write Codec Driver

    snd_soc_register_codec()
    
    • Controls hardware registers
    • Defines DAPM widgets

    Step 2.Write Platform Driver

    snd_soc_register_component()
    
    • Implements:
      • open
      • hw_params
      • trigger
    • DMA configuration

    Step 3.Write Machine Driver

    snd_soc_register_card()
    
    • Defines DAI links
    • Audio routing

    Step 4.Device Tree Binding

    sound {
      compatible = "simple-audio-card";
    }
    

    Step 5.Playback Tes

    aplay -D hw:0,0 test.wav
    

    Interview One-Line Killer

    ASoC separates audio drivers into codec, platform, and machine drivers to enable hardware reuse and clean abstraction.

    Final Interview Cheat Summary

    TopicOne-Line
    Power MgmtRuntime PM + DAPM control power efficiently
    PCM openInitializes stream, no audio start
    DMAHardware transfers audio without CPU
    UnderrunDMA starves due to late data
    InterruptPeriod completion notification
    ASoC FlowCodec + Platform + Machine

    Definition:

    • Endianess refers to how multi-byte data (like 16-bit or 32-bit audio samples) is stored in memory.
    • In audio, this matters because PCM samples are often 16-bit or 24-bit, and the byte order must match the hardware or software expectations.

    Little Endian (LE):

    • Least significant byte (LSB) comes first in memory.
    • For example, 16-bit sample 0x1234 → stored as 34 12.
    • Most x86 architectures and ALSA drivers typically use little endian.

    Big Endian (BE):

    • Most significant byte (MSB) comes first in memory.
    • For example, 16-bit sample 0x1234 → stored as 12 34.
    • Used in some network protocols or older DSPs/SoCs.

    Why it matters in audio:

    • If endianess mismatch occurs between hardware and software:
      • Audio will sound distorted or noisy.
      • PCM data will be interpreted incorrectly.
    • ALSA has hw_params like SND_PCM_FORMAT_S16_LE or SND_PCM_FORMAT_S16_BE to define endianess.

    Interview Follow-up Q:

    • How do you convert between little and big endian in driver code?
      • Use macros like cpu_to_le16() or cpu_to_be16() in kernel code.

    Definition:

    • Noise floor is the lowest level of noise in an audio system below which signals cannot be distinguished.
    • Represents the intrinsic noise of the system (analog circuits, ADC/DAC, environment).

    In simple terms:

    • If you record silence, the small signal that you still see is the noise floor.

    Key Points:

    • Measured in dBFS (decibels relative to full scale).
    • Lower noise floor → higher audio fidelity.
    • Factors affecting noise floor:
      • ADC/DAC resolution
      • Power supply noise
      • Analog front-end design
      • Grounding and PCB layout

    Interview follow-up Q:

    • How to reduce noise floor in audio hardware?
      • Use better ADC/DAC
      • Shielding, filtering, and proper grounding
      • Use differential signals (balanced lines)

    ALSA codec driver is part of ASoC (ALSA System on Chip) framework. It controls the actual audio codec chip.

    Step-by-step:

    1. Identify Codec:
      • Check datasheet for registers, I2C/SPI addresses, power modes, clocks.
    2. Create snd_soc_codec_driver structure:
      • Contains operations (like probe, remove) and control elements.
    3. Register Controls (Mixer):
      • Add volume, mute, switches via snd_kcontrol_new.
      • Example: SND_SOC_SINGLE("Master Volume", REG, SHIFT, MAX, INV)
    4. DAI (Digital Audio Interface) Setup:
      • Define snd_soc_dai_driver structure:
        • Supported formats: I2S, TDM, LEFT_J, etc.
        • Sample rates: 8kHz–192kHz
        • Data width: 16/24/32-bit
    5. Implement hw_params, startup, shutdown callbacks:
      • hw_params: configure clocks, format, and sample size.
      • startup: enable PLLs, clocks, or power-on codec.
      • shutdown: disable clocks, power off.
    6. Power Management:
      • Implement suspend and resume if needed.
      • Reduce power consumption when idle.
    7. Register Codec Driver with ASoC:
      • snd_soc_register_codec(&codec_driver);

    Interview Tip:

    • Know difference: Codec driver handles hardware chip, machine driver connects codec with CPU DAI.

    Machine driver is responsible for linking the CPU (SoC) with the Codec.

    Step-by-step:

    1. Define snd_soc_card structure:
      • name: Name of the card
      • owner: Module owner
    2. Define CPU DAI & Codec DAI links:static struct snd_soc_dai_link audio_dai[] = { { .name = "I2S Audio", .cpu_dai_name = "soc-dai-cpu", .codec_dai_name = "codec-dai", .platform_name = "soc-platform", .codec_name = "codec-name", }, };
    3. Assign DAI format & capabilities:
      • I2S, TDM, sample rates, bit width.
    4. Add Controls (optional):
      • Volume, mute, switches if needed at the machine level.
    5. Register the machine driver:snd_soc_register_card(&snd_soc_card);

    Interview Tip:

    • Machine driver does hardware integration. Codec driver is device-specific, machine driver is board-specific.

    Step-by-step process:

    1. Power & Clock Initialization:
      • Enable codec power, PLL, master clock (MCLK).
    2. Configure I2S/TDM:
      • Match bit clock (BCLK), frame sync (LRCLK), data format with codec.
    3. Write/Load Codec Driver:
      • Verify communication over I2C/SPI.
    4. Write/Load Machine Driver:
      • Connect CPU DAI to codec DAI.
    5. Load ALSA Modules:
      • modprobe snd_soc_<driver>
    6. Test PCM Device:
      • aplay -D hw:0,0 test.wav
    7. Validate Power Management:
      • Suspend/resume, check low-power modes.

    Interview follow-up Q:

    • What if audio output is distorted?
      • Check endianess, clock mismatch, buffer size, I2S configuration.

    Validation Steps:

    1. Basic Playback/Recording Test:
      • aplay / arecord or tinycap / tinyplay.
      • Check for noise, distortion, pops, clicks.
    2. Check PCM Parameters:
      • Sample rates, bit width, channels via aplay -D hw:0,0 --dump-hw-params.
    3. Test Interrupt Handling:
      • Playback and capture should trigger interrupts correctly.
    4. Stress Test:
      • Continuous playback/record for hours, varying formats.
    5. Power Management Validation:
      • Suspend/resume, runtime PM.
    6. Check Buffer Underrun/Overrun:
      • Monitor XRUNs.
      • Adjust buffer size, period size.
    7. Audio Quality Metrics:
      • THD+N (Total Harmonic Distortion + Noise)
      • Signal-to-noise ratio (SNR)
      • Noise floor measurement
    8. Cross-validation with Multiple Tools:
      • arecord / aplay / speaker-test / tinycap / tinyplay.
    9. Integration Test:
      • Play audio while CPU load is high.
      • Check for pops, clicks, and latency.

    Interview Tip:

    • Be prepared to explain XRUN, buffer size, period size, and how to tune ALSA parameters for stable audio.

    Summary:

    • Endian: Little vs Big endian affects PCM interpretation.
    • Noise Floor: Minimum detectable audio signal, key for audio fidelity.
    • ALSA Codec Driver: Controls the audio hardware chip.
    • ASoC Machine Driver: Integrates codec with CPU DAI on the board.
    • Bringing up Hardware: Initialize power, clocks, DAI, and ALSA drivers.
    • Validation: Playback tests, stress tests, XRUN monitoring, SNR/noise floor checks.

    In ALSA/ASoC, mixer controls allow software (user-space apps) to control hardware parameters like volume, mute, or input selection.

    Steps to add a mixer control:

    1. Define the control in the codec driver or DAPM widget:
      • Use the SOC_SINGLE, SOC_DOUBLE_R, SOC_ENUM macros in your codec driver.
      static const struct snd_kcontrol_new my_controls[] = { SOC_SINGLE("Master Playback Volume", 0x02, 0, 255, 0), SOC_ENUM("Input Source", my_input_enum) };
    2. Register the control with ALSA:snd_soc_add_codec_controls(codec, my_controls, ARRAY_SIZE(my_controls));
    3. Integrate with DAPM (Dynamic Audio Power Management):
      • Connect mixer controls to DAPM widgets to enable/disable audio paths dynamically.
    4. Test via alsamixer or amixer:
      • Ensure volume, mute, and selection work correctly.

    Interview Tip: Be ready to explain difference between mixer control and DAPM widget, and how they impact power management.

    DAPM widgets represent functional blocks (DAC, ADC, MUX, amplifier) in the audio path. They control power efficiently.

    Steps to add a DAPM widget:

    1. Define the widget in the codec or machine driver:static const struct snd_soc_dapm_widget my_widgets[] = { SND_SOC_DAPM_OUTPUT("Speaker"), SND_SOC_DAPM_INPUT("Mic"), SND_SOC_DAPM_MUX("Input Mux", SND_SOC_NOPM, 0, 0, &my_mux_enum) };
    2. Define routes connecting widgets:static const struct snd_soc_dapm_route my_routes[] = { {"Speaker", NULL, "DAC"}, {"DAC", NULL, "Input Mux"}, {"Input Mux", NULL, "Mic"}, };
    3. Register widgets and routes in codec driver:snd_soc_dapm_new_controls(codec->dapm, my_widgets, ARRAY_SIZE(my_widgets)); snd_soc_dapm_add_routes(codec->dapm, my_routes, ARRAY_SIZE(my_routes));
    4. Enable DAPM updates dynamically:snd_soc_dapm_sync(codec->dapm);

    Interview Tip: Know widgets vs controls, routes, and how DAPM reduces power consumption by shutting unused paths.

    Supporting multiple sample rates ensures your hardware can work with standard audio formats like 44.1 kHz, 48 kHz, 96 kHz.

    Steps:

    1. Check codec hardware limits:
      • Supported rates are often in datasheet (min, max, discrete rates).
    2. Update hardware params in hw_params() callback:static int my_codec_hw_params(struct snd_pcm_substream *substream, struct snd_pcm_hw_params *params, struct snd_soc_dai *dai) { int rate = params_rate(params); switch(rate) { case 44100: case 48000: case 96000: // configure codec registers break; default: return -EINVAL; } return 0; }
    3. Update ALSA DAI:
      • Add supported rates in snd_soc_dai_driver:
      .supported_rates = SNDRV_PCM_RATE_44100 | SNDRV_PCM_RATE_48000, .rates = SNDRV_PCM_RATE_44100 | SNDRV_PCM_RATE_48000 | SNDRV_PCM_RATE_96000,
    4. Test with aplay or arecord:aplay -D hw:0,0 -r 48000 test.wav

    Interview Tip: Be ready to explain why unsupported sample rates cause xruns or poor audio quality.

    Multi-channel audio (stereo, 5.1, 7.1) requires configuring multiple DACs/ADCs and correct DMA routing.

    Steps:

    1. Update DAI format and channel count:.playback = { .channels_min = 2, .channels_max = 8, },
    2. Configure codec for multi-channel output:
      • Map DAC channels to speaker outputs.
      • For 5.1, ensure L/R/Center/Sub/Rear channels are correctly routed.
    3. Configure ALSA PCM hardware parameters:snd_pcm_hw_params_set_channels(substream, params, 6); // 5.1
    4. Update DMA buffer layout:
      • Interleaved vs non-interleaved frames.
      • Ensure correct byte alignment for each channel.
    5. Test with multi-channel audio files:
      • Use aplay -D hw:0,0 -c 6 test_5_1.wav.

    Interview Tip: Understand interleaved vs non-interleaved audio data and DMA buffer mapping for multiple channels.

    Audio power optimization is key in battery-operated devices.

    Key strategies:

    1. Enable DAPM properly:
      • Shut down unused paths (DACs, ADCs, amplifiers).
    2. Use runtime suspend/resume:snd_soc_runtime_suspend(dai->component->card->dev); snd_soc_runtime_resume(dai->component->card->dev);
    3. Dynamic clock gating:
      • Stop MCLK/BCLK/LRCLK when no audio.
    4. Reduce active channels if possible:
      • Only enable necessary playback/record channels.
    5. Optimize DMA bursts and buffer sizes:
      • Larger buffers reduce CPU wakeups.
      • Align DMA to cache lines for efficiency.
    6. Interview Tip: Be ready to explain DAPM, runtime PM, and clock management together as a unified power-saving strategy.

    Upstreaming means submitting your driver to the mainline Linux kernel.

    Steps:

    1. Follow kernel coding style:
      • Use checkpatch.pl to check coding style.
      • Follow ALSA and ASoC guidelines.
    2. Test driver thoroughly:
      • Validate multi-rate, multi-channel, DAPM, power management.
      • Ensure no memory leaks or warnings.
    3. Prepare patch series:
      • Split patches logically:
        1. Core driver changes.
        2. Codec driver.
        3. Machine driver.
        4. Documentation and DTS updates.
    4. Use git send-email or patchwork workflow:git format-patch -N git send-email --to=linux-kernel@vger.kernel.org *.patch
    5. Respond to review feedback:
      • Be ready to iterate and fix issues raised by maintainers.
    6. Include Documentation:
      • Update Documentation/sound/alsa/ with codec details, mixer controls, and DAPM info.

    Interview Tip: Mention why upstreaming matters (standardization, maintainability, fewer maintenance headaches, community testing).

    Summary for Interview:

    TopicKey Points
    Mixer controlDefine in codec, register with ALSA, test via alsamixer
    DAPM widgetRepresent audio blocks, define widgets & routes, reduces power usage
    Sample rate supportUpdate hw_params, DAI driver, test via aplay
    Multi-channel audioConfigure channels in codec & PCM, map DMA, test multi-channel streams
    Power optimizationUse DAPM, runtime suspend, dynamic clocks, optimize DMA
    Upstreaming driverFollow kernel style, split patches, test thoroughly, submit to LKML

    In QNX, audio is managed via a modular, layered audio framework that allows applications to access audio hardware through standardized APIs.

    Key components:

    1. Audio Driver Layer:
      • Handles communication with audio hardware (DAC, ADC, I2S/TDM interfaces).
      • Can be ASoC-like drivers on QNX, often called QNX audio drivers.
    2. Audio Services / Audio Server:
      • Provides a user-space interface for applications to play/record audio.
      • Examples: audioengine, alsa-like services in QNX.
      • Handles mixing, routing, and buffering.
    3. Application Layer:
      • Apps interact via Audio API (like AudioStream, AudioDriver, or POSIX-style APIs).
      • Can request sample rates, channels, and formats.
    4. How it works (flow):Application -> Audio API -> Audio Service -> Audio Driver -> Hardware (DAC/ADC)
    5. QNX specific features:
      • Deterministic scheduling ensures low-latency audio.
      • Supports DMA-based transfers for efficient audio streaming.
      • Priority inheritance ensures critical audio threads get CPU on time.
    Feature / LayerALSA (Linux)QNX Audio Framework
    Kernel vs User-spaceKernel-space driver + user-space librariesUser-space audio server + kernel driver
    Hardware AbstractionALSA Codec & Machine driverQNX audio driver (usually POSIX-style)
    Audio APIsPCM, Mixer, Control APIsAudioStream, AudioDriver APIs, POSIX read/write
    Dynamic Power ManagementDAPM widgetsManual or service-level power control
    Mixing / RoutingALSA plugin (dmix), PulseAudio on topAudio Server handles mixing and routing
    Determinism / LatencyNon-deterministic kernel schedulerReal-time, deterministic scheduling

    Key takeaway: QNX audio is more real-time and deterministic, ideal for automotive and industrial systems.

    In QNX, Graph Key represents the audio routing graph – a data structure defining how audio flows from source to sink.

    • Source: Input like Mic, line-in, or file.
    • Sink: Output like DAC, I2S interface, or speaker.
    • Node: Each processing block – amplifier, mixer, DSP, volume control.

    Example routing graph:

    Mic -> ADC -> Mixer -> EQ DSP -> DAC -> Speaker
    
    • Graph Key allows dynamic audio path reconfiguration.
    • Useful in automotive / embedded systems where multiple inputs/outputs exist.

    Interview Tip: Be ready to explain Graph Key vs DAPM routing, and how Graph Key allows deterministic, low-latency routing.

    QNX uses init scripts or startup configuration to launch audio services early in boot.

    Steps:

    1. Place binaries in filesystem: /usr/bin/audioengine or /usr/lib/audio/.
    2. Add service to startup-script (rc or init file):#!/bin/sh # Start audio service /usr/bin/audioengine -d &
    3. Set priority for real-time execution:schedtool -R -p 99 $$audioengine
    4. Check service startup:ps -A | grep audioengine
    • Early boot: For deterministic low-latency audio, services may be loaded before user-space GUI or application layer.
    1. Copy binaries to QNX filesystem:
      • Typically /lib, /usr/bin, or custom path in the boot image.
    2. Add to startup-script or init config:
      • Modify etc/system/startup or etc/rc.d/ scripts.
    3. Ensure driver dependencies load first:
      • I2S/TDM drivers must be initialized before audio service starts.
    4. Optional: Build into QNX image:
      • Modify QNX Momentics build system to include audio binaries in boot image.

    Interview Tip: Know difference between service at runtime vs early boot integration.

    • Definition: Audio playback/recording happens with predictable timing, with minimal jitter or delay.
    • Why important: Critical in automotive, industrial, or professional audio where timing errors are unacceptable.
    • How achieved:
      • Real-time scheduling (RT threads in QNX)
      • DMA for audio transfer
      • Pre-allocated buffers
      • Priority inheritance

    Interview Tip: Be ready to give examples like ADAS, in-car infotainment, or VoIP.

    Steps and best practices:

    1. Use DMA for audio transfers:
      • Minimizes CPU intervention.
    2. Optimize buffer size and period:
      • Smaller periods → lower latency, but risk of underrun.
      • Balance latency vs CPU overhead.
    3. Use real-time threads:
      • Audio service threads should have highest priority.
      pthread_setschedparam(pthread_self(), SCHED_RR, &rt_priority);
    4. Minimize copying:
      • Use zero-copy buffers where possible.
    5. Clock synchronization:
      • Ensure MCLK/BCLK/LRCLK match codec requirements.
    6. Preload audio binaries in early boot:
      • Avoid delays caused by dynamic loading.
    7. Avoid unnecessary processing:
      • DSP processing should be optimized or offloaded.
    8. Deterministic routing:
      • Graph Key or DAPM should provide predictable path.
    9. Measure latency:
      • Use oscilloscope or logic analyzer to check end-to-end latency.

    Example: For 48 kHz stereo with 128-sample period:

    • Latency = (128 samples / 48000 samples/sec) ≈ 2.67 ms
    • Smaller buffer → lower latency.

    Quick Summary Table: QNX Audio

    TopicKey Points
    Audio in QNXAudio driver + service + app; deterministic; DMA-based
    ALSA vs QNXKernel vs user-space, real-time in QNX, DAPM vs Graph Key
    Graph Key / RoutingAudio graph: source → nodes → sink; dynamic routing
    Audio service bootstartup-script, early binary loading, RT scheduling
    Early boot binariesCopy to filesystem, modify rc/init, driver dependency
    Deterministic audioPredictable timing; real-time threads, DMA, pre-allocated buffers
    Low-latency designDMA, RT threads, small buffers, zero-copy, clock sync

    Definition:
    Audio safety in automotive refers to designing the in-car audio system in a way that does not compromise driver attention, vehicle control, or critical notifications. It ensures audio signals are delivered safely and safely managed in emergencies.

    Key Points:

    • Safety-critical audio: Alerts like seatbelt warnings, collision alerts, or lane departure warnings must override music or media audio.
    • Volume normalization: Audio systems should prevent sudden loud sounds that may startle the driver.
    • Prioritization of channels: Alerts from safety systems must have higher priority over entertainment streams.
    • Fail-safe mechanisms: In case of audio hardware failure, critical alerts should still be delivered via backup paths.
    • Compliance standards: Systems often adhere to ISO 26262 (functional safety for automotive electronics).

    Example Interview Answer:

    “Audio safety ensures that the driver always receives critical auditory alerts without distraction. This involves prioritizing warning signals, limiting entertainment volume, and designing backup paths in case of audio failure, following ISO 26262 guidelines.”

    Definition:
    A fail-safe audio path is a dedicated or redundant audio route that ensures critical alerts reach the driver even if the main audio system fails.

    Key Points:

    • Redundancy: Uses a separate amplifier or speaker path for critical signals.
    • Hardware and software monitoring: Detects main audio system failure and automatically switches alerts to fail-safe path.
    • Examples of critical signals: Collision warnings, engine failure alerts, emergency braking sounds.
    • Implementation in cars: Often, the instrument cluster speakers or a dedicated buzzer serves as the fail-safe path.

    Example Interview Answer:

    “A fail-safe audio path is a backup audio route for delivering safety-critical alerts. If the main audio system fails, the fail-safe path ensures that warnings like collision alerts are still delivered to the driver reliably.”

    Definition:
    Multi-zone audio is the capability to play different audio streams in different areas of the car, e.g., front seats, rear seats, or separate zones for driver and passengers.

    Key Points:

    • Zone definition: Car cabin divided into multiple audio zones.
    • Independent volume control: Each zone can have separate volume and audio source control.
    • Source routing: Audio streams routed through DSP (Digital Signal Processor) to specific zones.
    • Hardware requirements: Multi-channel amplifier, separate speaker sets for each zone.
    • Software considerations:
      • DSP handles mixing, volume, equalization, and balance per zone.
      • Supports priority overrides: safety alerts can mute or duck entertainment audio in all or selected zones.

    Example Interview Answer:

    “Multi-zone audio allows different audio streams in different cabin zones with independent volume control. DSPs manage routing, mixing, and priority alerts. Safety alerts override entertainment audio to ensure driver attention.”

    Definition:
    Echo cancellation removes the undesired reflected audio that is picked up by microphones, especially during hands-free calls or in-car voice assistants.

    Key Points:

    • Problem: Speaker audio is captured by the microphone, causing echo for the listener.
    • Components:
      1. Reference signal – the original audio sent to speakers.
      2. Microphone input – includes both speaker signal and voice.
    • Algorithm:
      • Estimates the echo path (how speaker sound travels to mic).
      • Subtracts the estimated echo from mic input to leave only the user’s voice.
    • Techniques: Adaptive filters like LMS (Least Mean Squares) or NLMS (Normalized LMS) are commonly used.
    • Applications in cars: Hands-free calls, voice recognition, in-car conferencing.

    Example Interview Answer:

    “Echo cancellation removes reflected speaker audio captured by microphones. It uses adaptive filters to estimate and subtract the echo, ensuring clear communication during hands-free calls or voice assistant usage.”

    Definition:
    AEC is a signal processing technique that specifically cancels acoustic echo in audio systems.

    Key Points:

    • Relation to echo cancellation: AEC is the automotive implementation of echo cancellation for acoustic environments.
    • Workflow:
      1. Capture the microphone signal.
      2. Identify the speaker signal reflected back to the mic.
      3. Remove the echo using adaptive filtering.
    • Hardware/software requirements: DSP or dedicated audio processors handle real-time AEC.
    • Automotive importance:
      • Improves call quality in noisy cabins.
      • Essential for voice-controlled infotainment systems.
      • Works alongside noise suppression and gain control.

    Example Interview Answer:

    “AEC, or Acoustic Echo Cancellation, is a process that removes speaker-reflected sound picked up by car microphones. It uses adaptive filters to provide clear hands-free communication and ensures voice commands are recognized accurately in a vehicle environment.”

    Tips for Interviews:

    • Always relate technical answers to safety and usability in vehicles.
    • Mention standards like ISO 26262 where relevant.
    • Give examples from real-world automotive scenarios, like hands-free calling, multi-zone music, or collision alerts.

    Definition:
    Noise suppression (NS) is a signal processing technique that reduces unwanted background noise in audio, such as engine noise, road noise, or passenger chatter, to improve clarity.

    Key Points:

    • Purpose: Improves voice call quality, speech recognition, and in-car voice assistant performance.
    • Types:
      1. Spectral subtraction – estimates noise spectrum and subtracts it from the microphone signal.
      2. Adaptive filtering – continuously adjusts filter parameters based on detected noise.
      3. Machine learning approaches – use deep neural networks to separate speech from noise.
    • Applications: Hands-free calling, in-cabin voice assistants, conference calls.
    • Interaction with AEC: Often combined with AEC for clearer audio.

    Example Interview Answer:

    “Noise suppression removes background noise from microphone input to improve speech clarity in cars. It works with adaptive filtering or spectral subtraction and is often used alongside AEC for hands-free calling and voice assistants.”

    Definition:
    Beamforming is a microphone array technique that focuses on sound coming from a particular direction while suppressing other sounds.

    Key Points:

    • Microphone array: Multiple microphones capture the sound field.
    • Signal processing: Delays and weights signals to enhance sound from the target direction and reduce noise from others.
    • Types:
      1. Delay-and-sum – simple method aligning microphone signals.
      2. Adaptive beamforming – dynamically adjusts to track moving sound sources.
    • Applications in automotive:
      • Hands-free calls.
      • Voice recognition for driver/passenger commands.
      • Noise reduction in specific cabin zones.

    Example Interview Answer:

    “Beamforming uses multiple microphones to focus on a sound source, like the driver’s voice, while reducing noise from other directions. It improves call quality and voice recognition in automotive cabins.”

    Definition:
    Audio-video synchronization ensures that sound matches video playback, critical for infotainment systems, rear-seat entertainment, and ADAS alerts.

    Key Points:

    • Challenges:
      • Different processing delays in audio and video pipelines.
      • Variable network or bus latency (in streaming).
    • Techniques:
      1. Timestamps: Assign timestamps to audio and video frames for alignment.
      2. Buffering: Introduce delay to match audio with video.
      3. Clock synchronization: Use a common master clock for audio and video (e.g., PTP, PCM clocks).
    • Standards: AV sync in automotive often follows IEEE 1588/Audio Video Bridging (AVB) for precise timing.

    Example Interview Answer:

    “Audio-video sync ensures sound matches on-screen events. We use timestamps, buffering, and a common master clock to align audio and video, often following AVB or IEEE 1588 standards in automotive systems.”

    Definition:
    Clock recovery is the process of synchronizing audio sampling clocks between devices to avoid glitches, drift, or pops.

    Key Points:

    • Problem: Audio DAC/ADC clocks and source clocks may differ, causing drift.
    • Solution:
      1. PLL (Phase-Locked Loop) – adjusts local clock to match reference.
      2. Adaptive rate conversion – slightly changes playback rate to sync with source.
      3. Master-slave configuration – one device acts as clock master for all components.
    • Application: Critical for multi-device setups like head unit + amplifier + rear speakers.

    Example Interview Answer:

    “Clock recovery synchronizes audio clocks across devices to avoid drift and glitches. It uses PLLs, adaptive rate conversion, or a master-slave clock system, ensuring smooth playback across all speakers.”

    Definition:
    A scalable audio architecture supports different hardware configurations, features, and use cases without major redesigns.

    Key Points:

    • Modular design: Separate drivers, HAL, DSP, and applications.
    • Layered architecture:
      • Hardware abstraction layer (HAL)
      • Audio framework (OS/audio server)
      • Applications
    • Support multiple audio streams: Music, voice, alerts, multi-zone audio.
    • Configurable DSP pipelines: Easily add new processing like AEC, noise suppression, or equalization.
    • Safety integration: Safety-critical alerts override entertainment audio.
    • Scalability examples: Adding more zones, supporting new codecs, or integrating new input/output devices without changing core framework.

    Example Interview Answer:

    “A scalable audio architecture is modular, layered, and configurable. It separates hardware, drivers, DSP, and applications so new features, zones, or devices can be integrated without redesigning the system, while maintaining safety-critical audio support.”

    Definition:
    HAL (Hardware Abstraction Layer) sits between the audio framework and hardware drivers, providing a uniform interface to higher layers.

    Key Points:

    • Responsibilities:
      • Abstract hardware specifics.
      • Provide standard APIs to OS or audio framework.
      • Handle format conversion, routing, and basic control.
    • Typical stack:Applications -> Audio Framework -> HAL -> Codec/Platform Driver -> Hardware
    • Automotive relevance: HAL allows the same audio framework to run on different hardware platforms.

    Example Interview Answer:

    “The audio HAL sits between the framework and hardware drivers, abstracting hardware specifics. It provides a uniform interface for routing, format conversion, and control, enabling the same framework to work across different automotive platforms.”

    Definition:
    Real-time (RT) scheduling ensures audio tasks execute with predictable timing, critical for low-latency playback and recording.

    Key Points:

    • Low latency: RT threads ensure audio buffers are processed before underflows.
    • Priority: Safety-critical audio or interactive audio (voice commands) runs at higher RT priority than background tasks.
    • Effects of non-RT scheduling:
      • Buffer underruns/overruns.
      • Glitches, pops, or delayed audio.
    • Implementation:
      • In QNX/Linux RTOS, audio services often run as real-time threads.
      • Combined with DMA for audio data transfer for minimal CPU blocking.

    Example Interview Answer:

    “RT scheduling guarantees timely execution of audio tasks. High-priority audio threads prevent buffer underruns, ensure low-latency playback, and maintain reliable delivery of safety-critical alerts in automotive systems.”

    Tips for Interviews:

    • Always relate your answers to real automotive scenarios, e.g., hands-free calls, multi-zone audio, safety alerts.
    • Mention hardware/software techniques and standards where relevant.
    • Use examples like DSP, HAL, or QNX/Linux audio services to demonstrate practical knowledge.

    1. What is an audio device driver in embedded Linux?

    An audio device driver in embedded Linux is a kernel-level software component that enables communication between the operating system and audio hardware such as codecs, amplifiers, DSPs, and audio interfaces (I2S, TDM, PCM).
    In Linux, audio drivers are typically implemented using the ALSA (Advanced Linux Sound Architecture) framework, especially the ASoC (ALSA System on Chip) layer for embedded platforms.

    2. What is the role of ALSA in audio driver development?

    ALSA provides the core infrastructure for audio in Linux, including PCM playback/capture, mixer controls, audio routing, and power management.
    For embedded systems, ALSA ASoC separates the audio stack into codec drivers, CPU/DAI drivers, and machine drivers, allowing clean hardware abstraction and reuse across platforms.

    3. What happens when an application opens a PCM audio device?

    When an application opens a PCM device:

    • ALSA validates the device and stream type (playback/capture)
    • Hardware parameters (sample rate, format, channels) are negotiated
    • DMA buffers are allocated
    • The audio path is powered up via DAPM
    • Interrupts or DMA callbacks are prepared
      This step is critical because most audio failures originate from incorrect open or hw_params handling.

    4. What is DMA and why is it important in audio drivers?

    DMA (Direct Memory Access) allows audio data to be transferred directly between memory and audio hardware without CPU intervention.
    In audio drivers, DMA ensures:

    • Low latency playback
    • Minimal CPU usage
    • Continuous audio streaming
      Improper DMA configuration often leads to buffer underruns or audio glitches.

    5. What is a buffer underrun or overrun in audio systems?

    A buffer underrun occurs when the audio hardware runs out of data to play, causing silence or clicks.
    A buffer overrun happens when capture buffers overflow before data is read.
    Common causes include incorrect buffer sizes, scheduling delays, or inefficient interrupt handling.

    6. What is DAPM and why is it used in ASoC?

    DAPM (Dynamic Audio Power Management) automatically powers audio components on and off based on active audio routes.
    It reduces power consumption by ensuring that only required blocks (DAC, ADC, amplifiers) are enabled during playback or capture—critical for battery-powered embedded devices.

    7. What is the difference between a codec driver and a machine driver?

    • Codec driver: Controls the audio codec IC (registers, mixers, power states).
    • Machine driver: Defines how the CPU and codec are connected on a specific board and sets up audio routing.
      This separation allows the same codec driver to be reused across multiple products.

    8. How do you add a new mixer control in an ALSA driver?

    Mixer controls are added using ALSA control APIs (snd_kcontrol_new) in the codec driver.
    They allow userspace tools like alsamixer to control volume, mute, gain, and audio paths.
    Correct mixer design is essential for production-ready audio systems.

    9. How do you debug audio issues in embedded Linux?

    A structured debugging approach includes:

    • Checking sound cards using aplay -l
    • Verifying mixer settings with alsamixer
    • Enabling ALSA kernel logs
    • Validating DMA and clock configuration
    • Using oscilloscope or logic analyzer on I2S lines
      Real-world audio debugging often requires both software and hardware analysis.

    10. What skills are expected for embedded audio driver roles in 2026?

    In 2026, companies expect:

    • Strong ALSA & ASoC fundamentals
    • Experience with I2S, TDM, and DMA
    • Debugging skills across kernel and hardware
    • Knowledge of power management and real-time audio
    • Exposure to automotive or QNX audio stacks
      Interviewers focus heavily on real project experience, not just theory.
    Read More: Embedded Audio Interview Questions & Answers | Set 1
    Read More : Embedded Audio Interview Questions & Answers | Set 2
    Read More : Top Embedded Audio Questions You Must Master Before Any Interview
    Read More : What is Audio and How Sound Works in Digital and Analog Systems
    Read More : Digital Audio Interface Hardware
    Read More : Advanced Linux Sound Architecture for Audio and MIDI on Linux
    Read More : What is QNX Audio
    Read more : Complete guide of ALSA
    Read More : 50 Proven ALSA Interview Questions
    Read More : ALSA Audio Interview Questions & Answers
    Read More :ALSA Audio Interview Questions & Answers SET 2
    Read More : Advanced Automotive & Embedded Audio Interview Questions
  • Advanced Automotive & Embedded Audio Interview Questions | Crack Expert-Level Audio Interviews (2026)

    Master Advanced Automotive & Embedded Audio with expert insights on Yocto Linux integration, ALSA driver development, low-latency design, multi-zone audio, and troubleshooting. Prepare for senior-level projects and interviews with practical tips and best practices.

    Audio issues on Linux systems can range from silent playback, distorted sound, device detection failures, XRUNs, latency problems, to driver/kernel misconfigurations. As an embedded audio engineer, being systematic in your approach will separate you from others in interviews and in practice.

    Let’s walk through everything you need to know in depth from device enumeration to low‑level hardware verification.

    Silent audio despite a successful playback command is one of the most common interview and real‑world problems. The key is to isolate where the audio pipeline is failing: user space → middleware → kernel → hardware.

    1.1 Step 1 — Confirm the Playback Path

    • Does the playback even reach the audio subsystem?
    • Use verbose commands to confirm:aplay -vvv myfile.wav paplay --verbose myfile.wav This shows which device is selected and what parameters are negotiated.

    1.2 Step 2 — Identify Which Audio System is in Use

    Linux may have:

    • ALSA (Advanced Linux Sound Architecture)
    • PulseAudio
    • PipeWire (in newer distros, replacing PulseAudio)

    Determine what’s running:

    ps aux | grep -E "pulseaudio|pipewire|alsa"
    

    1.3 Step 3 — Check Device Availability

    If the device isn’t present, sound will be silent:

    aplay -l
    

    Expect output listing cards and devices.

    1.4 Step 4 — Check Mixer Levels

    Common cause of silence is a muted or zero‑gain mixer:

    alsamixer
    

    Verify the playback volume and unmute with M.

    1.5 Step 5 — Bypass Middleware

    PulseAudio or PipeWire can mask problems. Bypass them:

    pasuspender -- aplay test.wav
    

    If it works here, the issue is in PulseAudio/PipeWire.

    1.6 Step 6 — Inspect Kernel Logs

    Device detection, driver initialization issues, and firmware errors are visible in dmesg:

    dmesg | grep -i audio
    

    1.7 Step 7 — Try Another Output

    If using headphones, try speakers; if HDMI, try analog; this helps detect routing issues.

    Identifying audio hardware helps locate where the problem resides.

    2.1 Using ALSA Tools

    List cards and devices:

    aplay -l   # Playback devices
    arecord -l # Capture devices
    

    Example output:

    card 0: AudioPCI [HDA Intel], device 0: ALC887 Analog [ALC887 Analog]
    

    2.2 Using cat /proc/asound/cards

    A simple view of cards:

    cat /proc/asound/cards
    

    2.3 Using lspci and lsusb

    For bus enumeration:

    lspci | grep -i audio
    lsusb | grep -i audio
    

    2.4 PulseAudio & PipeWire Device Lists

    For PulseAudio:

    pactl list sinks
    pactl list sources
    

    For PipeWire:

    pw-cli list-objects Node

    Understanding the tools you use is critical.

    CommandAudio SystemUse Case
    aplayALSADirect playback to ALSA devices
    paplayPulseAudioPlayback via PulseAudio server

    3.1 When to Use aplay

    • Debug raw ALSA problems
    • Verify device PCM support
    • Bypassing PulseAudio

    Example

    aplay -D hw:0,0 sound.wav
    

    3.2 When to Use paplay

    • Desktop systems with PulseAudio
    • Routing via PulseAudio preferences

    Example

    paplay --device=alsa_output.pci-0000_00_1b.0.analog-stereo music.wav
    

    3.3 Key Differences

    • aplay talks directly to ALSA.
    • paplay goes through the PulseAudio server; if the server isn’t running, playback will fail.

    ALSA issues often involve PCM devices, mixer settings, or plugin configurations.

    4.1 PCM Device Issue

    4.1.1 List PCM Devices

    aplay -L
    

    Shows alias names like default, front, surround51.

    4.1.2 Attempt Playback on Specific PCM

    Try all devices to isolate:

    aplay -D hw:0,0 test.wav
    

    4.1.3 Check Sample Rates & Formats

    Mismatch can cause silence:

    aplay --dump-hw-params test.wav
    

    4.2 Mixer Issues

    • Unmuted channels
    • Correct output path (headphones vs speakers)
      Use alsamixer:
    alsamixer -c 0
    

    Navigate with left/right, use M to toggle mute.

    4.3 ALSA Plugin Problems

    ALSA uses plugins like dmix/dshare for sharing device access.

    Check default config:

    cat /etc/asound.conf ~/.asoundrc
    

    Common mistake: missing or misconfigured dmix block.

    Example dmix:

    pcm.dmixed {
        type dmix
        ipc_key 1024
        slave {
            pcm "hw:0,0"
            rate 44100
        }
    }
    

    4.4 Dump ALSA State

    amixer contents
    

    Helpful for interviews; shows all controls.

    PulseAudio adds complexity — a server with sinks (outputs), sources (inputs), clients, and contexts.

    5.1 Confirm PulseAudio is Running

    systemctl --user status pulseaudio
    

    5.2 List Sinks (Playback Outputs)

    pactl list sinks short
    

    Example:

    0   alsa_output.pci-...   RUNNING
    

    5.3 List Sources (Recording Inputs)

    pactl list sources short
    

    5.4 Check Client List

    pactl list clients
    

    Clients sending audio to PulseAudio.

    5.5 Inspect Sink Inputs

    Displays which audio streams go to which sink:

    pactl list sink-inputs
    

    5.6 Restart PulseAudio

    Often solves routing glitches:

    pulseaudio -k
    pulseaudio --start
    

    5.7 Volume and Mute

    PulseAudio mixers are separate from ALSA:

    pavucontrol
    

    5.8 Look at PulseAudio Logs

    Increase verbosity:

    pulseaudio -k
    pulseaudio --verbose
    

    For embedded systems, kernel and drivers are crucial.

    6.1 Confirm the Driver is Loaded

    lsmod | grep snd
    

    6.2 Check dmesg Logs after Probe

    dmesg | tail -n 50
    

    Look for:

    • Device probing
    • Firmware loading
    • Driver errors

    6.3 Enable Dynamic Debug

    For deeper insight into driver internals:

    echo 'module snd_soc_* +p' > /sys/kernel/debug/dynamic_debug/control
    

    Then reproduce the behavior and review logs.

    6.4 Watch for Errors

    Look for:

    • Failed to load firmware
    • Probe failed
    • Codec not found

    6.5 Validate Device Tree / ACPI

    For SoC platforms:

    • Ensure correct sound card nodes
    • Clock and pinctrl settings

    Hardware codecs (often over I2C) have registers controlling paths, volumes, clocking.

    7.1 Identifying the Codec

    Typically read via I2C:

    i2cdetect -l
    

    7.2 Reading/Writing Registers

    Use i2cget/i2cset:

    i2cget -y 1 0x1a 0x02
    

    Where:

    • 1 = bus number
    • 0x1a = device address
    • 0x02 = register

    7.3 Datasheet Reference

    Match register values to expected defaults:

    • Clocking mode
    • Interface format (I2S, TDM)
    • Output enable bits

    7.4 Verify Codec Clock Configuration

    If codec expects different master/slave or sample rate:

    • Wrong clock = no sound

    7.5 Log Codec Initialization in Kernel

    Add debug prints to driver:

    dev_info(component->dev, "Register 0x%02x = 0x%02x\n", reg, val);
    

    For embedded systems, digital audio interface integrity is critical.

    8.1 I2S Basics

    • WS (Word Select): Left/Right frame
    • SCK/Bit clock
    • SD (Serial Data)

    8.2 What to Check on an Oscilloscope

    • Clock presence
      • Is SCK toggling?
    • Correct polarity
      • WS switches at frame boundaries
    • Data transitions
      • Data valid on correct clock edge

    8.3 Logic Analyzer Setup

    Configure digital channels for:

    • Bit clock
    • Word clock
    • Data lines
      Capture and decode using tools (e.g., Sigrok, Saleae software).

    8.4 TDM Verification

    More lanes; ensure:

    • Correct time slots
    • Frame sync

    8.5 Common Issues

    • Clock not enabled
    • Incorrect pin mux
    • Noise at the interface

    XRUNs are common in ALSA/ASoC; they indicate the DSP or CPU couldn’t keep up with data.

    9.1 Understanding XRUN

    • Overrun: Producer too fast
    • Underrun: Consumer starved of data

    Triggered when buffer pointers exceed limits.

    9.2 Symptoms

    • Pops/clicks
    • Silence
    • Repeated XRUN messages

    9.3 Check ALSA Debug

    Enable verbose ALSA:

    echo 1 > /proc/asound/card0/pcm0p/sub0/status
    

    9.4 Adjust Buffer Parameters

    Increase periods or buffer size:

    aplay -D hw:0,0 --buffer-size=8192 --period-size=1024 test.wav
    

    9.5 System Load

    High CPU utilization can starve audio:

    top
    

    9.6 Real‑Time Scheduling

    Grant real‑time priority to audio threads:

    chrt -f 50 myaudioapp
    

    Latency can manifest as delayed playback or recording.

    10.1 Identify Path

    Latency can come from:

    • ALSA buffer sizes
    • PulseAudio buffering
    • DSP processing

    10.2 Measure Latency

    Use loopback tests with timestamped audio.

    10.3 Reduce Buffer Sizes

    Smaller buffers = lower latency (risk XRUNs):

    aplay -D hw:0,0 --period-size=256 --buffer-size=1024 file.wav
    

    10.4 Check Middleware

    PulseAudio has defaults that add latency:

    pactl list | grep latency
    

    10.5 Check CPU and Power Settings

    CPU frequency scaling can introduce jitter.

    Here are some practical snippets you should know.

    11.1 Check All Devices

    aplay -l && arecord -l
    

    11.2 ALSA Mixer

    alsamixer -c 0
    

    11.3 PulseAudio Reset

    pulseaudio -k && pulseaudio --start
    

    11.4 Read Kernel Logs

    dmesg | grep -i snd
    

    11.5 Codec Register Check

    i2cget -y 1 0x1a 0x0f

    12.1 Tips

    • Always capture logs at the point of failure
    • Use verbose modes
    • Compare known‑good systems

    12.2 Common Pitfalls

    • Ignoring mixer mute states
    • Assuming PulseAudio equals ALSA
    • Overlooking clocking mismatches

    12.3 Best Practices

    • Document your environment
    • Automate capture of ALSA and PulseAudio states
    • Apply incremental changes

    Audio integration in embedded Linux using Yocto is a topic that comes up frequently in interviews for embedded software roles, particularly those involving multimedia, automotive, and IoT systems. To succeed, you need a thorough understanding of ALSA, PulseAudio, systemd integration, device trees, kernel drivers, and Yocto recipe management. Below, I explain these concepts step by step with practical examples and common pitfalls.

    1. How ALSA is Enabled in Yocto

    ALSA (Advanced Linux Sound Architecture) is the primary framework for audio in Linux. In Yocto, enabling ALSA involves selecting the correct layers, including recipes, and configuring the kernel.

    Step 1: Include the Right Layers

    Yocto uses layers to organize recipes. For ALSA, the important layers are:

    • meta-oe (from OpenEmbedded): contains ALSA utilities and libraries.
    • meta-alsa (optional, sometimes included in meta-openembedded): contains ALSA drivers, utilities, and configuration examples.
    • Your BSP layer (meta-myboard): contains board-specific ALSA configurations and kernel drivers.

    Example:

    bitbake-layers add-layer ../meta-openembedded/meta-oe
    bitbake-layers add-layer ../meta-myboard
    

    Step 2: Include ALSA Packages in Your Image

    To include ALSA support in your Yocto image, you need to add the relevant packages in your IMAGE_INSTALL:

    IMAGE_INSTALL += "alsa-utils alsa-lib"
    
    • alsa-lib: Core ALSA library.
    • alsa-utils: Command-line utilities like aplay, arecord, and alsamixer.

    These recipes reside in meta-oe or meta-openembedded/meta-oe.

    Step 3: Configure Kernel for ALSA

    The kernel must include ALSA support for your platform. This involves setting the following options:

    1. Sound subsystem: Device Drivers → Sound card support
    2. ALSA drivers: Advanced Linux Sound Architecture → PCI/SoC/USB sound devices
    3. Codec drivers: Enable support for your audio codec chip (e.g., CODEC_AK4558).

    If your driver is out-of-tree, you may need to include it as a module via Yocto:

    IMAGE_INSTALL += "my-alsa-codec-module"
    

    Pitfall: Forgetting to enable the SoC-specific I2S/TDM interface in the kernel can result in ALSA being present but no sound output.

    Step 4: Configure ALSA Defaults

    Sometimes, you may need a .asoundrc or /etc/asound.conf file to define default playback/capture devices, especially if your board has multiple audio interfaces. This can be done in Yocto via a recipe or ROOTFS_OVERLAY.

    Interview Tip: Be ready to explain the difference between user-space ALSA configuration (.asoundrc) and kernel-level device support.

    2. How PulseAudio is Added in Yocto

    PulseAudio is a user-space sound server that runs on top of ALSA, providing mixing, per-application volume control, and network audio.

    Step 1: Include the Correct Layer

    PulseAudio recipes are generally available in meta-oe:

    bitbake-layers add-layer ../meta-openembedded/meta-oe
    

    Step 2: Add PulseAudio Packages

    Include the main server and utilities in your image:

    IMAGE_INSTALL += "pulseaudio pulseaudio-utils pulseaudio-module-alsa"
    
    • pulseaudio: Core daemon.
    • pulseaudio-utils: CLI tools like pactl and pacmd.
    • pulseaudio-module-alsa: Allows PulseAudio to interface with ALSA.

    Step 3: Configure ALSA-PulseAudio Integration

    PulseAudio requires ALSA devices to be available. The pulseaudio-module-alsa provides a virtual ALSA device:

    • Ensure alsa-lib is included before PulseAudio.
    • Verify module loading order via systemd (PulseAudio must start after ALSA devices are initialized).

    Step 4: Run PulseAudio as a System Service

    For embedded devices, you often run PulseAudio in system mode:

    • Create a systemd service file (or use the one in the recipe).
    • Ensure it depends on alsa-restore.service to restore ALSA mixer state.

    Common Pitfalls:

    • Forgetting pulseaudio-module-alsa results in “No ALSA devices” error.
    • PulseAudio in system mode requires proper permissions (pulse user/group).

    Interview Tip: Understand when PulseAudio is required (e.g., multi-zone audio, network streaming) versus when bare ALSA is sufficient (low-latency playback in automotive systems).

    3. Difference Between IMAGE_INSTALL and DEPENDS

    Understanding these two Yocto recipe directives is critical for interviews.

    IMAGE_INSTALL

    • Specifies runtime packages to include in the final image.
    • Examples: IMAGE_INSTALL += "alsa-utils my-audio-app"
    • Only affects the root filesystem; does not affect build-time dependencies.

    DEPENDS

    • Specifies build-time dependencies that must be built first.
    • Examples: DEPENDS = "alsa-lib"
    • Ensures that libraries or modules are available for compilation but does not install them automatically in the final image.

    Example in a custom audio app recipe:

    DEPENDS = "alsa-lib pulseaudio"
    RDEPENDS_${PN} = "alsa-utils pulseaudio-module-alsa"
    
    • DEPENDS: ensures your app can compile against ALSA headers.
    • RDEPENDS: ensures necessary packages are installed in the final root filesystem.

    Interview Tip: Always differentiate build-time versus runtime dependencies; interviewers often ask this in Yocto contexts.

    4. How Systemd Services Are Enabled in Yocto

    Embedded systems use systemd to manage service initialization. For audio services, enabling them properly ensures deterministic startup.

    Step 1: Create a Systemd Service File

    Example for an audio service:

    [Unit]
    Description=My Custom Audio Service
    After=alsa-restore.service sound.target
    
    [Service]
    Type=simple
    ExecStart=/usr/bin/my-audio-app
    Restart=always
    
    [Install]
    WantedBy=multi-user.target
    

    Step 2: Include in a Recipe

    If your audio app is packaged as a Yocto recipe:

    inherit systemd
    
    SYSTEMD_SERVICE_${PN} = "my-audio-service.service"
    SYSTEMD_AUTO_ENABLE = "enable"
    
    • inherit systemd allows Yocto to handle enabling and installing the service.
    • SYSTEMD_AUTO_ENABLE ensures the service starts automatically on boot.

    Step 3: Build and Deploy

    When building your image:

    bitbake core-image-minimal
    

    The service will be installed in /etc/systemd/system/ and enabled for boot.

    Common Pitfalls:

    • Forgetting After=alsa-restore.service can cause your audio service to start before the ALSA devices are ready.
    • Using Type=forking incorrectly when your app doesn’t daemonize.

    Interview Tip: Be able to explain WantedBy, After, and Type in systemd in the context of embedded audio initialization.

    5. How Audio Services Start at Boot

    The startup sequence is critical for audio systems:

    1. Kernel initialization: Initializes drivers for I2S/TDM and audio codecs.
    2. ALSA device creation: Kernel modules expose /dev/snd/* devices.
    3. ALSA restore: alsa-restore.service loads mixer state from /var/lib/alsa/asound.state.
    4. PulseAudio (optional): Starts after ALSA is ready.
    5. Custom audio services: Start via systemd, usually depending on sound.target.

    Practical Insight

    • For deterministic startup, ensure kernel modules and device tree are correct.
    • Use systemctl list-dependencies to verify the order of services.
    • For extremely low-latency audio (e.g., automotive infotainment), sometimes ALSA apps start before PulseAudio or without it entirely.

    Interview Tip: Describe how you debug boot-time audio issues using journalctl, aplay -l, and lsmod.

    6. How Device Tree Affects Audio

    The device tree (DT) defines hardware for the Linux kernel. Audio is heavily dependent on DT.

    Step 1: Define Codec Node

    Example DT snippet for a WM8960 codec:

    &i2c1 {
        wm8960: codec@1a {
            compatible = "wlf,wm8960";
            reg = <0x1a>;
            #sound-dai-cells = <0>;
        };
    };
    
    &i2s1 {
        status = "okay";
        pinctrl-names = "default";
        pinctrl-0 = <&i2s1_pins>;
        codec-handle = <&wm8960>;
    };
    
    • compatible: identifies the codec driver.
    • reg: I2C address.
    • #sound-dai-cells: defines DAI cells for ALSA.

    Step 2: Connect DAI to CPU

    The cpu node for I2S/TDM must reference the codec:

    sound {
        compatible = "simple-audio-card";
        simple-audio-card,name = "MyAudioCard";
        simple-audio-card,format = "i2s";
        simple-audio-card,cpu {
            sound-dai = <&i2s1>;
        };
        simple-audio-card,codec {
            sound-dai = <&wm8960>;
        };
    };
    

    Pitfalls:

    • Incorrect clock settings in DT can result in -EINVAL errors in ALSA.
    • Missing or misconfigured #sound-dai-cells prevents the driver from binding.

    Interview Tip: Be ready to explain simple-audio-card and how it maps CPU DAI to codec DAI.

    7. How to Enable Codec Driver in Kernel

    Audio codecs often require kernel modules.

    Step 1: Enable in Kernel Config

    Use menuconfig:

    Device Drivers → Sound card support → Advanced Linux Sound Architecture → SoC Audio support
    

    Enable your codec:

    • Built-in: <*>
    • Module: <M>

    Step 2: Yocto Kernel Recipe

    If using Yocto:

    KERNEL_FEATURES += "audio"
    

    Or, patch your BSP layer:

    SRC_URI += "file://my_codec_defconfig"
    

    Then:

    bitbake virtual/kernel
    

    Step 3: Load Module

    • Built-in: automatically initialized at boot.
    • Module: load via /etc/modules-load.d/ or systemd .service.

    Pitfalls:

    • Forgetting dependent drivers (I2S, clock framework) results in the codec driver failing.
    • Not enabling interrupts in kernel can prevent DMA operation.

    8. How to Add a Custom Audio Application Recipe

    For embedding your own audio app:

    Step 1: Create a Recipe File

    meta-myboard/recipes-audio/my-audio-app/my-audio-app.bb:

    DESCRIPTION = "Custom Audio Application"
    LICENSE = "CLOSED"
    SRC_URI = "file://my-audio-app.tar.gz"
    
    DEPENDS = "alsa-lib pulseaudio"
    RDEPENDS_${PN} = "alsa-utils pulseaudio-module-alsa"
    
    S = "${WORKDIR}/my-audio-app"
    
    do_install() {
        install -d ${D}${bindir}
        install -m 0755 my-audio-app ${D}${bindir}/
    }
    

    Step 2: Install Service File

    Include systemd service in the recipe:

    FILES_${PN} += "/lib/systemd/system/my-audio-service.service"
    SYSTEMD_SERVICE_${PN} = "my-audio-service.service"
    SYSTEMD_AUTO_ENABLE = "enable"
    

    Step 3: Add Recipe to Image

    IMAGE_INSTALL += "my-audio-app"
    

    Practical Tips:

    • Ensure DEPENDS includes all compile-time libraries.
    • Use RDEPENDS for runtime packages your app needs.
    • Test locally with bitbake -c devshell my-audio-app before building the image.

    Interview Tip: Be prepared to explain do_install, ${D}, and ${bindir}—common Yocto interview questions.

    Practical Best Practices and Pitfalls

    1. Debugging Audio Issues:
      • aplay -l shows ALSA devices.
      • aplay test.wav -D hw:0,0 tests direct hardware playback.
      • journalctl -u my-audio-service for service logs.
    2. Common Pitfalls:
      • Not enabling clocks in DT results in silent playback.
      • PulseAudio must start after ALSA devices are ready.
      • Kernel modules for codecs must match the DT configuration.
    3. Interview Tips:
      • Be ready to explain end-to-end initialization: kernel → ALSA → PulseAudio → user app.
      • Know the difference between compile-time (DEPENDS) and runtime (RDEPENDS / IMAGE_INSTALL) dependencies.
      • Demonstrate knowledge of DTS binding, systemd sequencing, and module loading.

    Summary Table for Interview Quick Recall

    TopicKey Points
    ALSA in Yoctometa-oe/meta-alsa layers, alsa-lib, alsa-utils, kernel support, DT binding
    PulseAudio in Yoctometa-oe, pulseaudio + pulseaudio-module-alsa, depends on ALSA
    IMAGE_INSTALL vs DEPENDSIMAGE_INSTALL → runtime packages; DEPENDS → build-time dependencies
    Systemd Servicesservice files, inherit systemd, enable via SYSTEMD_AUTO_ENABLE
    Audio Service Boot Sequencekernel modules → ALSA devices → PulseAudio → custom audio apps
    Device Treesimple-audio-card, codec & CPU DAI nodes, clocks, I2S/TDM
    Codec DriverKconfig options, built-in vs module, dependency on clocks/I2S
    Custom Audio Recipe.bb file, DEPENDS & RDEPENDS, do_install, systemd integration

    In my Linux audio project, the primary goal was to develop a robust, flexible, and low-latency audio playback and control system for embedded devices, like infotainment systems in automotive or consumer audio products. The requirements were:

    • Support for multiple audio outputs (internal speakers, external USB or Bluetooth devices).
    • Smooth volume control and audio transitions.
    • Fault-tolerance for hotplug events and service crashes.
    • Scalable design for future integration with advanced features like multi-zone audio, DSP effects, and real-time processing.

    Architecture Overview:

    I designed the system in three layers:

    1. Application Layer:
      • Handles user interactions, playback requests, and volume control.
      • Provides APIs for other software components to request audio playback.
      • Implements features like fade-in/fade-out, device selection, and error recovery.
    2. Audio Service Layer:
      • A dedicated service responsible for managing audio devices and streams.
      • Interfaces with the audio backend (PulseAudio or ALSA).
      • Provides abstraction to handle hardware-specific quirks and hotplug events.
    3. Audio Backend Layer:
      • Uses PulseAudio as the main audio server.
      • Manages PCM devices, mixing multiple streams, and routing audio to the correct output.
      • Provides low-level access to ALSA for cases where hardware-level control is required.

    Overall Design Decisions:

    • Modularity: Separate application logic from audio service to ensure maintainability.
    • Event-driven: All device events, volume changes, and playback requests are handled asynchronously to reduce latency and avoid blocking the main application.
    • Stateful management: Each device has a state machine—available, playing, muted, removed—to manage audio flow gracefully.

    Example:
    In one of my automotive infotainment projects, we had internal dashboard speakers and external Bluetooth audio. The service would automatically route media to Bluetooth when connected, but fallback to internal speakers if the device was removed. This required robust device enumeration and real-time event handling.

    Choosing PulseAudio over direct ALSA access is often debated in embedded systems. Here’s my reasoning:

    Advantages of PulseAudio:

    • Hardware abstraction: PulseAudio handles differences in multiple sound cards and output devices. For example, a USB audio dongle and onboard I2S codec can have completely different ALSA device names. PulseAudio abstracts this for the application.
    • Mixing multiple streams: ALSA doesn’t provide software mixing by default. PulseAudio can mix multiple streams in software, avoiding the need for custom mixer code.
    • Network transparency: Although not always used in embedded, PulseAudio allows streaming to remote devices if needed.
    • Dynamic device management: PulseAudio supports hotplug events natively, allowing seamless switching between devices.

    Trade-offs:

    • Latency: PulseAudio adds a small overhead due to software mixing and buffering. For strict real-time applications, this might be a concern.
    • Complexity: Integrating with PulseAudio requires understanding its asynchronous API and callback model, which is more complex than ALSA’s blocking PCM interface.

    Integration Considerations:

    • When latency is critical (e.g., voice prompts in automotive), I reduce PulseAudio buffer sizes and ensure real-time threads handle playback.
    • For hardware effects like equalization or DSP offloading, we sometimes bypass PulseAudio and talk directly to ALSA.

    Practical Example:
    In a music playback feature, PulseAudio allowed us to mix navigation prompts over background music without tearing or glitches—something that would have required significant custom code using pure ALSA.

    Selecting the correct output device involves enumeration, priority rules, and fallback mechanisms.

    Device Enumeration:

    • PulseAudio provides a list of available sinks (pa_context_get_sink_info_list).
    • ALSA provides devices as hw:X,Y or plughw:X,Y.

    Selection Strategy:

    1. Priority-based:
      • User-preferred device (e.g., Bluetooth headphones).
      • Internal speaker.
      • Default ALSA device if nothing else is available.
    2. Fallback Mechanisms:
      • If a Bluetooth device disconnects, the system immediately switches to the next available device without interrupting playback.
      • State machine ensures the application is aware of the current device and handles re-routing smoothly.

    Practical Example:
    During development, we discovered that some USB audio devices would enumerate slowly after hotplug, causing initial playback to fail. To handle this, we implemented a short retry mechanism before falling back to the default device.

    Pitfall to Avoid:
    Never assume hw:0,0 is always the correct device—embedded systems often have multiple sound cards. Always enumerate dynamically.

    Volume management is split into software control and hardware control.

    Software Control:

    • Implemented via PulseAudio APIs (pa_context_set_sink_volume_by_index) or ALSA mixer APIs.
    • Allows smooth volume adjustments, fade-in/fade-out, and non-linear scaling to match human perception (logarithmic volume curve).

    Hardware Control:

    • Some audio codecs provide hardware gain control through I2C or SPI registers.
    • Hardware control is preferable when software volume scaling might degrade audio quality.

    Edge Cases:

    • Avoid clipping when combining software and hardware volume changes.
    • Handle min/max limits to prevent user from exceeding hardware specifications.
    • Ensure volume state persists across service restarts.

    Example:
    In a car infotainment project, navigation prompts were mixed over music with a temporary gain increase. We used hardware mute/unmute on the music codec while adjusting software gain for the prompt to ensure no distortion.

    Smooth transitions enhance user experience and prevent audio artifacts.

    Algorithm:

    • Calculate step size: (target_volume - current_volume) / num_steps.
    • Apply the volume increment at fixed intervals using a timer or dedicated thread.
    • For linear fade, use equal steps; for perceptual fade, apply a logarithmic curve.

    Implementation:

    • Software Timer: A high-resolution timer triggers volume adjustment callbacks.
    • Threaded Approach: Dedicated low-priority thread updates volume to avoid blocking playback threads.

    Practical Consideration:

    • Avoid too small intervals which increase CPU load.
    • Avoid too large intervals which make the fade abrupt.
    • Combine fade-out of one stream and fade-in of another to crossfade.

    Example:
    For a media player, when switching tracks, the old track faded out over 500ms while the new track faded in, creating a smooth listening experience.

    Device removal is common in embedded and automotive environments. Handling it gracefully is critical.

    Hotplug Detection:

    • PulseAudio emits sink_input_removed or sink_removed events.
    • ALSA udev events can also be monitored for low-level detection.

    State Management:

    • Maintain a state table of active devices and streams.
    • On removal:
      1. Pause or stop the affected stream.
      2. Re-route to the next available device.
      3. Notify the application layer for UI updates.

    Recovery:

    • Automatically resume playback if the device returns.
    • Implement a retry mechanism for slow-enumerating devices.

    Pitfall:
    Never assume the device is permanently removed; USB devices may reconnect quickly. Improper handling leads to crashes or silent audio failures.

    Audio services may crash or require updates. The system must be resilient.

    Graceful Shutdown:

    • Stop all active streams and save playback state.
    • Disconnect from PulseAudio context without abrupt termination.

    Reconnection Strategy:

    • On restart, enumerate devices again.
    • Restore previous playback session: device, volume, and mute state.
    • Notify application layer and UI for consistency.

    User Experience Considerations:

    • Avoid long interruptions; a few milliseconds of pause is acceptable, but abrupt silence is not.
    • Use background threads for reconnection to avoid blocking UI.

    Example:
    During development, a bug in PulseAudio caused service crashes. Implementing automatic reconnection with state restoration eliminated user complaints.

    Production readiness requires robustness, scalability, and maintainability.

    Best Practices:

    • Robustness:
      • Handle all error paths, including device failures, buffer underruns, and invalid configuration.
      • Use watchdog timers to detect and restart stuck threads.
    • Scalability:
      • Modular design allows adding new outputs, codecs, or audio effects.
      • Support multiple concurrent streams without significant CPU overhead.
    • Logging & Diagnostics:
      • Maintain structured logs for device events, stream errors, and latency metrics.
      • Expose diagnostics through APIs or web interfaces.
    • Maintainability:
      • Separate hardware-specific code from application logic.
      • Use standardized APIs (PulseAudio, ALSA) for portability.
      • Include unit tests for all critical modules.

    Example:
    In one embedded system, logging audio routing and buffer states helped identify subtle latency issues caused by multiple clients writing to the same sink.

    Porting a Linux audio system to QNX requires understanding differences in the audio stack and real-time constraints.

    Key Differences:

    • QNX uses audio framework based on Photon / Audio HAL, not PulseAudio.
    • ALSA-like low-level drivers exist but are more deterministic.
    • Real-time threads and strict scheduling must be respected.

    Porting Strategy:

    1. Replace PulseAudio calls with QNX audio service APIs.
    2. Implement sink/device management using QNX audio channels.
    3. Reimplement fade-in/fade-out and volume control with real-time safe algorithms.
    4. Adjust thread priorities to meet RT constraints.

    Example:
    We ported an infotainment audio system from Linux to QNX. Using AudioSession objects and audio_dev_ctl commands, we were able to replicate device enumeration and volume control in a real-time safe manner.

    Real-time safety is critical in embedded systems, especially for automotive.

    Strategies:

    • Thread Priorities: Playback threads should have higher priority than UI threads.
    • Locking Strategies: Avoid mutexes in critical paths; use lock-free queues or spinlocks for audio buffers.
    • Avoid Blocking Calls: File I/O, network requests, or logging should be offloaded to lower-priority threads.
    • Pre-allocate Buffers: Prevent dynamic memory allocation in the audio path.

    Pitfall:
    Improper locking or priority inversion can lead to audio glitches even with high-end hardware.

    Efficient CPU usage ensures smooth playback and battery efficiency.

    Techniques:

    • Buffer Management: Use double or triple buffering to prevent frequent context switches.
    • Efficient Mixing: Use SIMD instructions or DSP offload for software mixing.
    • Avoid Busy Loops: Use event-driven playback instead of polling for PCM availability.
    • Dynamic Load Adjustment: Lower sample rate or processing quality if CPU usage spikes.

    Example:
    Switching from a busy-loop ALSA read/write to an event-driven poll() mechanism reduced CPU usage by ~20% in a consumer audio device.

    Testing audio systems is non-trivial due to real-time and hardware dependencies.

    Unit Testing:

    • Mock ALSA or PulseAudio APIs to test volume, fade-in/out, and routing logic.
    • Test state machines for device handling and hotplug events.

    Integration Testing:

    • Automated tests with loopback devices or virtual sinks.
    • Validate audio quality, latency, and error recovery.

    Continuous Testing:

    • Use CI pipelines to run audio tests on hardware-in-the-loop (HIL) setups.
    • Include automated logging, error capture, and regression tests.

    Example:
    We created a CI pipeline where every build triggered audio playback tests via virtual ALSA sinks, verifying correct routing, fade transitions, and volume limits.

    1. What are common senior-level project questions in embedded audio systems?

    Senior-level project questions usually focus on designing, optimizing, and debugging complex audio pipelines. Examples include:

    • How do you design low-latency audio systems for embedded Linux?
    • How would you integrate an ALSA-based codec driver in a custom board?
    • How do you handle multi-zone audio in automotive systems?
    • How do you implement fail-safe audio paths and ensure audio deterministic behavior?

    Tip: Interviewers look for your ability to link hardware, software, and real-time constraints efficiently.

    2. How do you integrate audio drivers using Yocto for embedded Linux?

    Integration steps include:

    1. Layer setup: Add meta-layers for your SoC, audio codec, and drivers.
    2. Kernel configuration: Enable ALSA, ASoC, and relevant drivers using menuconfig.
    3. Recipe creation: Write recipes for codec driver, machine driver, and audio service binaries.
    4. Build & deploy: Compile the image and test audio functionality on target hardware.

    Best Practices: Use BitBake logging for build debugging, and always validate .dtb device tree settings for audio peripherals.

    3. Why is Yocto important for embedded audio development?

    Yocto allows:

    • Custom Linux images with only required packages (reducing memory footprint).
    • Seamless integration of audio middleware (ALSA, PulseAudio, PipeWire).
    • Reproducible builds, critical for production-level embedded audio systems.

    4. How do you debug audio issues in Linux-based embedded systems?

    Common debugging steps:

    1. Check audio devices: Use aplay -l or arecord -l.
    2. Verify kernel logs: dmesg | grep audio for driver errors.
    3. Test driver functionality: Run ALSA loopback tests.
    4. Monitor PCM streams: Use alsaloop or arecord | aplay.
    5. Check resource conflicts: Ensure DMA channels and IRQs are not shared incorrectly.

    Tip: Always test with different sample rates and device removal scenarios.

    5. How do you handle device hotplug and audio service restart?

    • Use udev rules or systemd units to detect audio device insertion/removal.
    • Implement auto-reconnect logic in your audio service.
    • Ensure thread-safe handling of mixer, PCM, and pipeline states.

    Example: Restart PulseAudio gracefully without dropping ongoing playback using pulseaudio --kill && pulseaudio --start.

    6. What are key performance considerations for embedded audio?

    • CPU usage: Optimize DMA transfer and avoid polling loops.
    • Latency: Use real-time scheduling (SCHED_FIFO) for critical threads.
    • Power management: Suspend audio peripherals intelligently without losing state.
    • Memory: Allocate buffers statically for deterministic performance.

    7. What are common pitfalls in embedded audio projects?

    • Incorrect buffer size causing underruns or overruns.
    • Ignoring endianness differences between codec and CPU.
    • Not validating clock and sample rate synchronization, leading to glitches.
    • Overlooking multi-zone audio and fail-safe paths in automotive or industrial systems.

    8. How do you port Linux audio services to QNX?

    • Map ALSA concepts to QNX audio framework, including PCM and mixer handling.
    • Adapt device drivers using QNX resource managers.
    • Implement audio pipelines with real-time threads to maintain deterministic behavior.
    • Validate using loopback and external audio hardware for timing and synchronization.

    9. How do you implement debugging and troubleshooting in embedded audio projects?

    • Use hardware tools: Oscilloscopes, logic analyzers, and multimeters to validate audio signals.
    • Log ALSA/driver events with snd_pcm_open, snd_pcm_writei tracepoints.
    • Analyze kernel dumps and stack traces when audio services crash.
    • Test under edge cases: device removal, high CPU load, multiple streams.

    10. How can I prepare for senior-level embedded audio interview questions?

    • Master ALSA, ASoC, and PulseAudio internals.
    • Learn Yocto layer management, kernel configs, and recipes.
    • Practice debugging real hardware using DMA, IRQ, and buffer analysis.
    • Be ready to discuss low-latency, fail-safe, and multi-zone audio design.
    Read More: Embedded Audio Interview Questions & Answers | Set 1
    Read More : Embedded Audio Interview Questions & Answers | Set 2
    Read More : Top Embedded Audio Questions You Must Master Before Any Interview
    Read More : What is Audio and How Sound Works in Digital and Analog Systems
    Read More : Digital Audio Interface Hardware
    Read More : Advanced Linux Sound Architecture for Audio and MIDI on Linux
    Read More : What is QNX Audio
    Read more : Complete guide of ALSA
    Read More : 50 Proven ALSA Interview Questions
    Read More : ALSA Audio Interview Questions & Answers
    Read More : ALSA Audio Interview Questions & Answers SET 2
  • Master ALSA Audio Interview Questions & Answers | Crack Embedded Audio Interviews (SET-2)

    Master ALSA Audio Interview Questions with SET-2. Learn buffer size, period size, XRUNs, mixing, and real-world ALSA concepts to crack embedded audio interviews.

    Are you preparing for an Embedded Audio Engineer interview and want to master ALSA audio concepts beyond the basics?
    This SET-2 of ALSA Audio Interview Questions & Answers is designed for serious embedded professionals who want clear, practical, and interview-ready explanations.

    In this part, we go deeper into real-world ALSA internals the kind of questions interviewers ask to test your hands-on experience, not just theory. Every concept is explained in a simple, logical, and practical way, with focus on how ALSA actually works inside Linux systems.

    What you’ll learn in this video/article:

    • Advanced ALSA PCM concepts and stream handling
    • Period size, buffer size, latency & XRUN scenarios
    • How ALSA manages multiple audio streams
    • Software vs hardware mixing (dmix, dsnoop, softvol)
    • ALSA plugins and real-life debugging tips
    • Common ALSA interview traps and how to answer confidently
    • This content is especially useful for:
    • Embedded Linux Developers
    • Audio Driver Engineers
    • BSP & Platform Developers
    • Automotive / Multimedia Audio Engineers
    • Freshers & experienced professionals switching to audio domain

    If you want to crack embedded audio interviews, understand ALSA from an interviewer’s perspective, and speak with confidence and clarity, this SET-2 is a must-watch/read.

    Don’t forget to check SET-1 to build a strong foundation before diving into advanced topics.

    ALSA (Advanced Linux Sound Architecture) is the core audio framework in the Linux kernel that provides low-level access to audio hardware such as sound cards, codecs, DSPs, and interfaces (I2S, PCM, HDMI, USB audio).

    In short:
    ALSA = kernel drivers + user-space library that together control audio hardware

    High-Level ALSA Architecture Diagram

    Application
       |
       |  (ALSA API - libasound)
       |
    User Space
    -----------------------------
    Kernel Space
       |
       |  ALSA Core
       |     ├── PCM
       |     ├── Mixer (Control)
       |     ├── MIDI
       |     ├── Timer
       |
       |  Sound Card Driver
       |     ├── ASoC (Embedded)
       |     ├── PCI / USB
       |
       |  Codec + Platform + Machine Drivers
       |
    Audio Hardware
    

    User Space: ALSA Library (libasound)

    What it does

    • Provides APIs for applications
    • Hides kernel complexity
    • Handles audio routing, plugins, and configuration

    Used by

    • aplay, arecord
    • Media players
    • PulseAudio / PipeWire
    • Embedded audio apps

    Key responsibilities

    • Open audio devices (hw:0,0, plughw)
    • Configure:
      • Sample rate
      • Bit depth
      • Channels
      • Buffer & period size
    • Plugin system:
      • dmix (software mixing)
      • dsnoop
      • plug

    Interview line:

    Applications never talk directly to hardware; they go through libasound.

    Kernel Space: ALSA Core

    The heart of ALSA inside the Linux kernel.

    ALSA Core Responsibilities

    • Manage sound cards
    • Expose devices as /dev/snd/*
    • Handle:
      • Buffer management
      • Interrupts
      • DMA
      • Synchronization

    Important ALSA Subsystems

    PCM (Pulse Code Modulation)

    • Handles audio playback & capture
    • Streams digital audio samples
    • Manages:
      • Ring buffers
      • Period interrupts
      • XRUN (underrun/overrun)

    Most interview questions focus here.

    Control (Mixer)

    • Controls:
      • Volume
      • Mute
      • Input source
      • Gain
    • Exposed via:
      • alsamixer
      • amixer

    Example:

    Master Volume
    Mic Gain
    Playback Switch
    

    MIDI

    • Musical Instrument Digital Interface
    • Used for keyboards, synths (less common in embedded)

    Timer

    • Provides accurate timing for audio events
    • Used for synchronization

    Sound Card Drivers

    Each physical or virtual sound card has a driver.

    Types of drivers

    • PCI / USB audio
    • ASoC (Audio SoC) – Embedded systems

    Embedded Linux interviews mostly focus on ASoC.

    ASoC (Audio System on Chip) Architecture

    ASoC is designed for embedded platforms (Qualcomm, NXP, TI, STM).

    ASoC splits the audio driver into 3 parts:

    Machine Driver
           |
    Codec Driver ---- Platform Driver
    

    Codec Driver

    • Controls external/internal audio codec (e.g. PCM6020, WM8960)
    • Handles:
      • I2C/SPI register programming
      • DAC/ADC
      • Analog paths

    Platform Driver

    • Controls SoC audio controller
    • Handles:
      • I2S / TDM / PCM
      • DMA
      • Clocking

    Machine Driver

    • Board-specific glue
    • Connects:
      • Codec ↔ Platform
    • Defines:
      • Audio routes
      • DAI links
      • Use cases

    Interview killer line:

    ASoC separates hardware control to improve reusability and scalability.

    Audio Hardware Layer

    This is the physical layer:

    • Codec (DAC / ADC)
    • Amplifier
    • Speaker
    • Mic
    • Headphones

    ALSA ensures data flows reliably from:

    App → PCM Buffer → DMA → Codec → Speaker
    

    Data Flow Example (Playback)

    App (aplay)
       ↓
    libasound
       ↓
    ALSA PCM
       ↓
    DMA Buffer
       ↓
    I2S/TDM
       ↓
    Codec DAC
       ↓
    Speaker
    

    Where PulseAudio / PipeWire Fits

    App
     ↓
    PulseAudio / PipeWire
     ↓
    ALSA (lib + kernel)
     ↓
    Hardware
    

    ALSA is mandatory, PulseAudio is optional.

    Common Follow Up Interview Questions

    Q: Is ALSA user space or kernel?
    Both (libasound in user space + ALSA core in kernel)

    Q: Can ALSA mix multiple streams?
    Kernel: No
    User space: Yes (dmix)

    Q: What is /dev/snd/pcmC0D0p?
    PCM playback device for card 0, device 0

    Q: Why ASoC?
    Embedded systems have complex analog routing

    One-Line Summary

    ALSA is the Linux kernel’s low-level audio framework that manages sound hardware using kernel drivers and exposes standardized APIs to user-space applications via libasound.

    A PCM device in ALSA represents a digital audio data stream interface used for playback or capture of audio samples between an application and the audio hardware.

    In simple terms:
    A PCM device is the path through which raw audio samples flow from software to hardware (speaker) or from hardware (mic) to software.

    Why is it called PCM?

    PCM (Pulse Code Modulation) is the standard digital representation of audio:

    • Audio is represented as discrete samples
    • Each sample has:
      • Sample rate (e.g., 44.1 kHz)
      • Bit depth (e.g., 16-bit)
      • Channels (mono, stereo)

    ALSA PCM devices handle only PCM data, not compressed formats like MP3 or AAC.

    PCM Device Types

    Playback PCM

    • Sends audio to hardware
    • Used for speakers, headphones

    Example:

    aplay music.wav
    

    Device name:

    /dev/snd/pcmC0D0p
    

    (p = playback)

    Capture PCM

    • Receives audio from hardware
    • Used for microphones

    Example:

    arecord voice.wav
    

    Device name:

    /dev/snd/pcmC0D0c
    

    (c = capture)

    PCM Device in ALSA Architecture

    Application
       ↓
    ALSA PCM API (libasound)
       ↓
    Kernel ALSA PCM Layer
       ↓
    DMA Buffer
       ↓
    I2S / TDM / PCM Bus
       ↓
    Audio Codec
    

    Key Responsibilities of a PCM Device

    A PCM device manages:

    • Audio buffers (ring buffers)
    • Sample format (S16_LE, S24_LE, etc.)
    • Sample rate & channels
    • Period size & buffer size
    • DMA transfers
    • Interrupt-driven data flow

    Interview line:

    A PCM device ensures continuous, real-time audio streaming using buffer and DMA management.

    • Buffer: Total memory holding audio samples
    • Period: Small chunk inside buffer
    • Interrupt occurs after each period

    Example:

    Buffer = 4096 frames
    Period = 1024 frames
    → Interrupt every 1024 frames
    

    If data is late → XRUN occurs.

    PCM States

    A PCM device transitions through states:

    OPEN → SETUP → PREPARED → RUNNING → XRUN → STOP
    

    If an app fails to feed data on time → Underrun (Playback XRUN)

    Hardware vs Plugin PCM Devices

    TypeExamplePurpose
    Hardware PCMhw:0,0Direct hardware access
    Plugin PCMplughw:0,0Auto format conversion
    dmixdefaultSoftware mixing

    Embedded systems often use hw PCM for low latency.

    Sound CardPCM Device
    Physical or logical cardAudio data stream
    Has controls & mixersOnly streaming
    One card → multiple PCMsEach PCM = one stream

    One-Line Definition

    A PCM device in ALSA is a logical audio stream interface that transfers raw digital audio samples between applications and audio hardware using buffers and DMA.

    Bonus: Embedded Interview Tips

    In ASoC systems, each PCM device is created by:

    • DAI links in the Machine Driver
    • Connected via Codec + Platform drivers

    Both hw:x,y and plughw:x,y are ALSA PCM device names, but they differ in how strictly they talk to hardware.

    hw:x,y (Hardware PCM)

    What it is

    hw:x,y provides direct, raw access to the audio hardware.

    • x → sound card number
    • y → PCM device number

    Example:

    hw:0,0
    

    Characteristics

    • No software conversion
    • No resampling
    • No format/channel conversion
    • Lowest latency
    • Application must match exact hardware format

    Interview line:

    hw:x,y fails if the app format doesn’t exactly match what the hardware supports.

    Example failure

    Hardware supports:

    48kHz, S16_LE, Stereo
    

    App tries:

    44.1kHz, S24_LE
    

    Open fails

    plughw:x,y (Plugin + Hardware PCM)

    What it is

    plughw:x,y wraps hw:x,y with ALSA’s plug plugin, which performs automatic format conversion.

    What it does automatically

    • Sample rate conversion
    • Bit-depth conversion
    • Channel conversion (mono ↔ stereo)

    Characteristics

    • Easier for applications
    • More flexible
    • Slightly higher latency
    • Extra CPU usage

    Interview line:

    plughw:x,y guarantees audio playback by converting the stream to match hardware capabilities.

    Side-by-Side Comparison

    Featurehw:x,yplughw:x,y
    Hardware accessDirectVia plug plugin
    Format conversionNoYes
    ResamplingNoYes
    LatencyLowestSlightly higher
    CPU usageMinimalMore
    Failure chanceHigh (strict)Low (flexible)
    Embedded usePreferredUsed if needed

    Real Command Example

    Strict hardware access

    aplay -D hw:0,0 test.wav
    

    Auto-convert if needed

    aplay -D plughw:0,0 test.wav
    

    When to Use What? (Interview Scenario)

    Use hw:x,y when:

    • Writing embedded audio services
    • Low-latency is critical
    • Format is known and fixed
    • Debugging driver / codec

    Use plughw:x,y when:

    • Writing generic applications
    • Format may vary
    • You want playback to “just work”

    Common Interview Trap

    Is plughw software mixing?
    No.

    • plughw → format conversion only
    • dmix → software mixing (multiple apps)

    One-Line Final Answer

    hw:x,y gives direct, low-latency access to audio hardware and requires an exact format match, while plughw:x,y uses ALSA plugins to automatically convert audio formats so playback always succeeds.

    An ALSA plugin is a user-space software layer in libasound that modifies, routes, or processes audio streams before they reach the actual hardware PCM device.

    In simple words:
    ALSA plugins sit between the application and hardware to make audio work even when formats, rates, or usage don’t match hardware limitations.

    Where ALSA Plugins Sit in the Stack

    Application
       ↓
    ALSA Plugin (libasound)
       ↓
    Hardware PCM (hw:x,y)
       ↓
    Kernel → Codec → Speaker
    

    Plugins are NOT in the kernel – they are user-space only.

    Why ALSA Plugins Exist

    Hardware PCM devices are strict and limited:

    • Fixed sample rates
    • Fixed bit depth
    • Usually single-client access
    • ALSA plugins solve this by:
    • Converting formats
    • Resampling audio
    • Allowing multiple apps
    • Routing audio streams

    plug Plugin (Most Important)

    Used by: plughw:x,y

    What it does:

    • Sample rate conversion
    • Bit-depth conversion
    • Channel conversion

    Interview line:

    The plug plugin ensures the audio format always matches hardware capabilities.

    dmix Plugin (Software Mixing)

    Used by: default

    What it does:

    • Allows multiple applications to play audio simultaneously
    • Mixes streams in software

    Important:

    • Mixing is NOT done in kernel
    • Happens in user space

    dsnoop Plugin

    What it does:

    • Allows multiple apps to record from the same mic

    softvol Plugin

    What it does:

    • Provides software volume control
    • Useful when hardware mixer doesn’t exist

    route Plugin

    What it does:

    • Custom channel routing
    • Example: Stereo → Mono mapping

    hw vs Plugin PCM (Quick Reminder)

    PCM TypePlugin UsedBehavior
    hw:x,y❌ NoneStrict, low latency
    plughw:x,y✔ plugAuto conversion
    default✔ plug + dmixMixing + conversion

    ALSA Configuration & Plugins

    Plugins are defined in:

    /etc/asound.conf
    ~/.asoundrc
    

    Example:

    pcm.!default {
        type plug
        slave.pcm "hw:0,0"
    }
    

    This tells ALSA:

    “Use plug plugin before sending audio to hardware.”

    Embedded System Perspective

    In embedded products:

    • Audio services often use hw:x,y
    • Plugins may be disabled for:
      • Lower latency
      • Predictable timing
      • Lower CPU usage

    But during development & debugging, plugins are very useful.

    Common Interview Questions

    1.Are ALSA plugins kernel drivers?
    No, they are user-space components in libasound.

    2.Can plugins affect latency?
    Yes, plugins increase latency slightly.

    3.Does ALSA mix audio in kernel?
    No, mixing is done by dmix plugin in user space.

    One-Line Interview Answer

    An ALSA plugin is a user-space software component in libasound that processes, converts, or routes audio streams before they are sent to the hardware PCM device.

    dmix is an ALSA user-space plugin that enables software mixing, allowing multiple applications to play audio simultaneously on hardware that supports only one playback stream.

    In simple words:
    dmix mixes audio from multiple apps in software before sending it to the hardware.

    Why dmix is Needed

    Most audio hardware:

    • Supports only one PCM playback stream
    • Cannot mix multiple audio sources in hardware

    Without dmix:

    • First app plays audio
    • Second app → “Device busy” error

    With dmix:

    • Both apps play audio together

    Where dmix Sits in the Audio Stack

    App1 ─┐
          ├─► dmix (software mixing)
    App2 ─┘
              ↓
           hw:x,y
              ↓
           Kernel → Codec → Speaker
    

    dmix runs in user space (libasound), not in the kernel.

    How dmix Works (Interview Explanation)

    1. Each application writes audio to its own buffer
    2. dmix resamples streams to a common format
    3. Audio samples are summed (mixed)
    4. Mixed stream is written to the hardware PCM

    Mixing happens per audio frame.

    Key Characteristics of dmix

    • Allows multiple playback streams
    • Software-based (CPU usage)
    • Slightly higher latency
    • Not real-time safe for hard RT constraints
    • Playback only (not capture)

    dmix vs Hardware Mixing

    FeaturedmixHardware Mixing
    LocationUser spaceAudio codec / DSP
    StreamsMultipleMultiple
    CPU usageHigherLow
    LatencyHigherLower
    Embedded usageLimitedPreferred

    dmix vs plughw (Common Interview Trap)

    Featuredmixplug
    PurposeMixingFormat conversion
    Multiple apps✔ Yes❌ No
    Resampling✔ Yes✔ Yes
    Used by default✔ Yes✔ Yes

    default PCM usually = plug + dmix

    Device Names Using dmix

    Common default device:

    default
    

    Explicit dmix usage:

    dmix
    

    Example:

    aplay -D default song.wav
    

    Embedded Interview Insight

    In embedded systems:

    • dmix is often disabled
    • Audio services use hw:x,y
    • Mixing is done by:
      • DSP
      • Audio framework
      • Application layer

    One-Line Perfect Interview Answer

    dmix is an ALSA user-space plugin that performs software mixing, allowing multiple applications to play audio simultaneously on single-stream hardware.

    Common Follow-Up Interview Questions

    1.Does dmix work for capture?
    No → dsnoop is used for capture

    2.Is dmix part of kernel ALSA?
    No, it is part of libasound

    Short Interview Answer

    dsnoop is an ALSA plugin that allows multiple applications to capture audio simultaneously from the same input device (mic).

    Why dsnoop is needed

    • By default, hardware capture devices support only one open handle
    • If one app uses the mic, another app fails with “device busy”
    • dsnoop solves this by duplicating (snooping) the capture stream

    How dsnoop works

    • One master capture stream reads from hardware
    • dsnoop copies the data to multiple applications
    • All apps receive the same audio data

    Real-world example

    • Zoom + Recorder app using the same microphone
    • Without dsnoop → second app fails
    • With dsnoop → both apps record audio

    Key Points for Interview

    • Used for capture (input) only
    • Software-based plugin
    • Adds slight latency
    • Opposite concept of dmix (which is for playback)

    Short Interview Answer

    asym is an ALSA plugin that allows using different devices or plugins for playback and capture.

    Why asym is needed

    • Some hardware:
      • Supports playback only
      • Or capture only
    • Or you want:
      • Playback via dmix
      • Capture via dsnoop

    How asym works

    • Combines two independent PCM devices:
      • One for playback
      • One for capture

    Example

    Playback → dmix (speakers)
    Capture  → dsnoop (microphone)
    

    Key Points for Interview

    • asym = asymmetric
    • Playback and capture are configured separately
    • Common in default ALSA device configuration

    Short Interview Answer

    softvol is an ALSA plugin that provides software-based volume control when hardware volume control is not available.

    Why softvol is needed

    • Many codecs or HDMI outputs:
      • Have no hardware mixer
    • ALSA mixer commands won’t work
    • softvol adds a virtual volume control

    How softvol works

    • Audio samples are scaled in software
    • Volume change happens before audio reaches hardware

    Important Note

    • softvol reduces dynamic range
    • High volume may cause clipping
    • Hardware volume is always preferred

    Key Points for Interview

    • Software volume control
    • Works even when no hardware mixer exists
    • Can introduce distortion if misused

    Short Interview Answer

    The ALSA mixer is the component that controls audio parameters like volume, mute, and input gain for sound devices.

    What ALSA mixer controls

    • Master volume
    • PCM volume
    • Mic gain
    • Mute/unmute
    • Input source selection

    Types of ALSA Mixer Controls

    TypeDescription
    PlaybackSpeaker / headphone volume
    CaptureMic input gain
    SwitchMute / unmute
    EnumSelect input source

    Mixer Access Tools

    • alsamixer (terminal UI)
    • amixer (command line)
    • ALSA API (snd_mixer_*)

    Important Interview Clarification

    ALSA mixer does NOT mix audio streams
    It only controls gain and routing

    Quick Interview Comparison Table

    ConceptPurposeDirection
    dsnoopShare mic between appsCapture
    dmixMix multiple playback streamsPlayback
    asymDifferent devices for play & captureBoth
    softvolSoftware volume controlPlayback
    ALSA mixerVolume & gain controlBoth

    One-Line Memory Tricks

    • dsnoopDuplicate mic input
    • dmixMix speaker output
    • asymDifferent devices for in/out
    • softvolFake volume in software
    • MixerControls volume, doesn’t mix

    dsnoop – Tricky Q&A

    Q: Why can’t multiple apps open a capture device directly?
    A: Hardware capture devices usually support only one open handle, so ALSA blocks others.

    Q: Does dsnoop modify audio data?
    A: No, dsnoop duplicates the same captured samples to all clients.

    Q: Is dsnoop hardware or software?
    A: dsnoop is a software ALSA plugin.

    Q: Does dsnoop add latency?
    A: Yes, due to buffering and copying in software.

    Q: Can dsnoop be used for playback?
    A: No, dsnoop is capture-only; playback uses dmix.

    asym – Tricky Q&A

    Q: Why is asym used in default ALSA devices?
    A: It allows separate configuration of playback and capture paths.

    Q: Can asym combine dmix and dsnoop?
    A: Yes, commonly dmix for playback and dsnoop for capture.

    Q: Does asym do audio processing?
    A: No, asym only routes streams, it doesn’t process audio.

    Q: How does asym help half-duplex hardware?
    A: It allows playback and capture to use different PCM devices.

    Q: Can playback and capture run at different sample rates in asym?
    A: Yes, if underlying plugins or hardware support it.

    softvol – Tricky Q&A

    Q: Why is softvol worse than hardware volume?
    A: It scales samples in software, reducing dynamic range.

    Q: Can softvol cause clipping?
    A: Yes, increasing software gain can overflow samples.

    Q: Why is softvol used with HDMI or USB audio?
    A: Many such devices lack hardware mixer controls.

    Q: Does softvol appear in alsamixer?
    A: Yes, as a virtual mixer control.

    Q: Does softvol increase CPU usage?
    A: Slightly, because audio is processed in software.

    ALSA Mixer – Tricky Q&A

    Q: Does ALSA mixer mix multiple audio streams?
    A: No, it only controls volume, mute, and routing.

    Q: Difference between Master and PCM volume?
    A: Master controls overall output, PCM controls stream level.

    Q: Why does mixer volume sometimes not affect sound?
    A: Because output may be using dmix or a fixed hardware path.

    Q: Can mixer controls exist without hardware support?
    A: Yes, via software controls like softvol.

    Q: How are mixer controls exposed to user space?
    A: Through ALSA control interface (snd_ctl / snd_mixer APIs).

    Ultra-Tricky Interview Killers Q&A

    Q: Why does amixer show controls but sound doesn’t change?
    A: The active PCM path bypasses that mixer control.

    Q: What happens if dsnoop buffer size is wrong?
    A: You may get latency, dropouts, or XRUNs.

    Q: Why does softvol increase CPU usage?
    A: Because every sample is multiplied in software.

    Q: What happens if asym playback fails but capture works?
    A: Only playback path fails; capture continues independently.

    Q: How do ALSA plugins interact with hardware?
    A: Plugins sit above the hardware PCM driver and pass processed data down.

    Final Interview Line

    “ALSA plugins handle sharing, routing, and software control, while the hardware driver does the actual I/O.”

    One-Line Interview Definition

    Hardware Mixer

    A hardware mixer controls audio volume and routing using codec/DAC registers, without modifying samples in software.

    Software Mixer

    A software mixer mixes or scales audio in software before sending it to hardware.

    Detailed Comparison

    FeatureHardware MixerSoftware Mixer
    LocationInside audio codec / DSPInside CPU / ALSA plugins
    ImplementationRegister-basedSample processing
    CPU usage❌ No CPU usage✅ Uses CPU
    Audio quality✅ Best (no clipping)⚠️ Can degrade
    Dynamic rangePreservedReduced at high gain
    LatencyVery lowHigher
    Power consumptionLowHigher
    Works without codec support❌ No✅ Yes
    ExampleCodec volume registerdmix, softvol

    Hardware Mixer Examples

    Examples in ALSA

    • Codec volume control (PCM, Master)
    • Mic gain registers
    • Mute switches
    • Controlled via:
      • alsamixer
      • amixer
      • snd_mixer_*

    Software Mixer Examples

    PluginPurpose
    dmixMix multiple playback streams
    softvolSoftware volume control
    dsnoopShare capture streams

    Tricky Interview Q&A

    Q: Does ALSA mixer always mean hardware mixer?
    A: No, ALSA mixer can expose both hardware and software controls.

    Q: Why is hardware mixer preferred?
    A: It preserves audio quality and dynamic range.

    Q: When is software mixer mandatory?
    A: When hardware does not support mixing or volume control.

    Q: Can software mixer cause clipping?
    A: Yes, due to sample scaling in software.

    Q: Why does HDMI audio often use software volume?
    A: HDMI devices usually lack hardware volume registers.

    Ultra-Short Memory Lines (Interview Gold)

    • Hardware mixerCodec register control
    • Software mixerCPU-based sample processing
    • Hardware = quality
    • Software = flexibility

    Final Interview Statement (Say This)

    “Hardware mixers are lossless and efficient, while software mixers trade CPU and quality for flexibility.”

    dmix is an ALSA user-space plugin that enables software mixing, allowing multiple applications to play audio simultaneously on hardware that supports only one playback stream.

    In simple words:
    dmix mixes audio from multiple apps in software before sending it to the hardware.

    Why dmix is Needed

    Most audio hardware:

    • Supports only one PCM playback stream
    • Cannot mix multiple audio sources in hardware

    Without dmix:

    • First app plays audio
    • Second app → “Device busy” error

    With dmix:

    • Both apps play audio together

    Where dmix Sits in the Audio Stack

    App1 ─┐
          ├─► dmix (software mixing)
    App2 ─┘
              ↓
           hw:x,y
              ↓
           Kernel → Codec → Speaker
    

    dmix runs in user space (libasound), not in the kernel.

    How dmix Works (Interview Explanation)

    1. Each application writes audio to its own buffer
    2. dmix resamples streams to a common format
    3. Audio samples are summed (mixed)
    4. Mixed stream is written to the hardware PCM

    Mixing happens per audio frame.

    Key Characteristics of dmix

    ✔ Allows multiple playback streams
    ✔ Software-based (CPU usage)
    ✔ Slightly higher latency
    ❌ Not real-time safe for hard RT constraints
    ❌ Playback only (not capture)

    dmix vs Hardware Mixing

    FeaturedmixHardware Mixing
    LocationUser spaceAudio codec / DSP
    StreamsMultipleMultiple
    CPU usageHigherLow
    LatencyHigherLower
    Embedded usageLimitedPreferred

    dmix vs plughw (Common Interview Trap)

    Featuredmixplug
    PurposeMixingFormat conversion
    Multiple appsYesNo
    ResamplingYesYes
    Used by defaultYesYes

    default PCM usually = plug + dmix

    Device Names Using dmix

    Common default device:

    default
    

    Explicit dmix usage:

    dmix
    

    Example:

    aplay -D default song.wav
    

    Embedded Interview Insight

    In embedded systems:

    • dmix is often disabled
    • Audio services use hw:x,y
    • Mixing is done by:
      • DSP
      • Audio framework
      • Application layer

    One-Line Perfect Interview Answer

    dmix is an ALSA user-space plugin that performs software mixing, allowing multiple applications to play audio simultaneously on single-stream hardware.

    Common Follow-Up Interview Questions

    1.Does dmix work for capture?
    No → dsnoop is used for capture

    2.Is dmix part of kernel ALSA?
    No, it is part of libasound

    One-Line Interview Answer

    snd_pcm_open() opens an ALSA PCM device for playback or capture and returns a PCM handle.

    What it actually does

    • Connects user space app to:
      • Hardware PCM (hw:0,0)
      • Or plugin PCM (default, plughw)
    • Allocates internal ALSA structures
    • Does NOT start audio yet

    Prototype (for understanding)

    int snd_pcm_open(
        snd_pcm_t **pcm,
        const char *name,
        snd_pcm_stream_t stream,
        int mode
    );
    

    Key Interview Points

    • Must be called before any PCM configuration
    • Returns a snd_pcm_t* handle
    • Can fail if device is busy or not found

    One-Line Interview Answer

    snd_pcm_hw_params() configures hardware-dependent parameters of a PCM device.

    What it configures

    • Sample rate
    • Channels
    • Sample format (S16_LE, S24_LE, etc.)
    • Period size
    • Buffer size
    • Access type (interleaved / non-interleaved)

    Typical Flow

    snd_pcm_hw_params_alloca(&hw);
    snd_pcm_hw_params_any(pcm, hw);
    snd_pcm_hw_params_set_rate(pcm, hw, 48000, 0);
    snd_pcm_hw_params_set_channels(pcm, hw, 2);
    snd_pcm_hw_params_set_format(pcm, hw, SND_PCM_FORMAT_S16_LE);
    snd_pcm_hw_params(pcm, hw);
    

    Key Interview Points

    • Affects DMA, hardware buffers
    • Negotiated with driver
    • Must be set before sw_params

    One-Line Interview Difference

    hw_params configure hardware capabilities, while sw_params configure runtime software behavior.

    Interview Comparison Table (Very Important)

    Featurehw_paramssw_params
    ScopeHardwareSoftware
    AffectsCodec, DMA, buffersApp ↔ driver behavior
    Set orderFirstAfter hw_params
    Sample rate✅ Yes❌ No
    Format✅ Yes❌ No
    Channels✅ Yes❌ No
    Buffer size✅ Yes❌ No
    Start threshold❌ No✅ Yes
    Avail min❌ No✅ Yes
    XRUN handling❌ No✅ Yes
    Changes after start❌ No✅ Limited

    What are sw_params used for? (Interview Add-On)

    Examples:

    • When playback should start
    • When app wakes up to write/read data
    • How ALSA handles underrun / overrun
    snd_pcm_sw_params_set_start_threshold(pcm, sw, threshold);
    snd_pcm_sw_params_set_avail_min(pcm, sw, period_size);
    

    Tricky Follow-Up Q&A

    Q: Can you change hw_params while PCM is running?
    A: No, the stream must be stopped.

    Q: Why are hw_params negotiated?
    A: Hardware may not support exact requested values.

    Q: Can sw_params affect latency?
    A: Yes, via start threshold and avail_min.

    Q: Which params control XRUN behavior?
    A: Mainly sw_params.

    Final Interview Line (Say This)

    snd_pcm_open() opens the device, hw_params define what the hardware can do, and sw_params define how the application interacts with it.”

    One-line definition (Interview ready):
    period size is the amount of audio data (frames) processed by ALSA in one interrupt or wake-up cycle.

    Explanation (simple):

    • Audio buffer is divided into multiple periods
    • Each period = one chunk of audio
    • After one period is played/recorded, ALSA notifies the application

    Why it matters:

    • Smaller period size → lower latency
    • Larger period size → safer playback, less CPU load

    Example:

    Period size = 256 frames
    Sample rate = 48 kHz
    → Wake-up every ~5.3 ms
    

    19.What is Buffer Size?

    One-line definition (Interview ready):
    Buffer size is the total amount of audio data (in frames) stored between the application and the hardware.

    Explanation:

    • Buffer = multiple periods
    • Holds audio to prevent glitches
    • Acts as a shock absorber between app & hardware

    Relationship:

    Buffer size = Period size × Number of periods
    

    Example:

    Period size = 256 frames
    Periods = 4
    Buffer size = 1024 frames
    

    Why it matters:

    • Large buffer → stable audio, higher latency
    • Small buffer → low latency, higher XRUN risk

    One-line definition (Interview ready):
    XRUN happens when audio data is not delivered or consumed in time.

    Types of XRUN:

    TypeMeaning
    UnderrunPlayback buffer becomes empty
    OverrunCapture buffer becomes full

    Common causes:

    • CPU overload
    • Very small buffer/period
    • Scheduling delays
    • Slow I/O or blocking calls
    • High interrupt latency

    Interview sentence:

    “XRUN occurs when the producer and consumer are out of sync.”

    One-line definition (Interview ready):
    XRUN recovery resets the PCM device and restarts streaming.

    Standard ALSA recovery steps:

    snd_pcm_prepare(pcm_handle);
    

    Typical recovery flow:

    • Detect XRUN (-EPIPE error)
    • Call snd_pcm_prepare()
    • Refill buffer
    • Resume playback/capture

    Prevention (important in interviews):

    • Increase buffer size
    • Use real-time scheduling
    • Avoid blocking calls
    • Optimize CPU usage

    Interview tip:

    “XRUN recovery is easy, but prevention is critical in real-time systems.”

    Period Size vs Buffer Size (Quick Table)

    AspectPeriod SizeBuffer Size
    UnitFrames per interruptTotal frames
    AffectsLatencyStability
    Too SmallCPU stressXRUN
    Too LargeHigh latencyDelay

    Tricky Follow-Up Interview Questions (with Answers)

    Q1. Can buffer size be smaller than period size?
    No. Buffer must be ≥ period size.

    Q2. Which impacts latency more?
    Period size.

    Q3. Does increasing buffer size fix XRUN?
    Yes, but increases latency.

    Q4. Is XRUN a hardware failure?
    No, it’s a timing issue.

    Q5. Does dmix increase XRUN chances?
    Yes, due to extra software mixing overhead.

    Final Interview Summary (Golden Lines)

    “Period size controls latency, buffer size controls stability, and XRUN happens when timing breaks between them.”

    Blocking Mode (Default)

    One-line (Interview ready):

    In blocking mode, ALSA API calls wait until the PCM device is ready to read or write audio data.

    How it works:

    • snd_pcm_writei() blocks
    • App sleeps until:
      • Enough buffer space is available (playback)
      • Enough data is available (capture)

    Example:

    snd_pcm_open(&handle, "hw:0,0", SND_PCM_STREAM_PLAYBACK, 0);
    

    Pros:

    Simple to use
    CPU-efficient
    Good for basic apps

    Cons:

    Can cause delays if scheduling is poor
    Risk of XRUN if app wakes up late

    Interview line:

    “Blocking mode is easier but less deterministic.”

    Non-Blocking Mode

    One-line (Interview ready):

    In non-blocking mode, ALSA calls return immediately if the device is not ready.

    How it works:

    • Open PCM with SND_PCM_NONBLOCK
    • Calls return -EAGAIN if not ready

    Example:

    snd_pcm_open(&handle, "hw:0,0",
                 SND_PCM_STREAM_PLAYBACK,
                 SND_PCM_NONBLOCK);
    

    Handling non-blocking I/O:

    • Poll using poll() or select()
    • Retry when device becomes ready

    Pros:

    • Low latency
    • Better real-time control
    • No thread blocking

    Cons:

    • More complex logic
    • Requires event handling

    Interview line:

    “Non-blocking mode is preferred for real-time audio pipelines.”

    Blocking vs Non-Blocking

    FeatureBlockingNon-Blocking
    DefaultYesNo
    API behaviorWaitsReturns immediately
    CPU usageLowerHigher
    Latency controlLimitedBetter
    ComplexitySimpleComplex
    Real-time apps

    Tricky Interview Question

    Q: Can blocking mode still be low latency?
    A: Yes, if period size is small and scheduling is real-time.

    Use Smaller Period Size

    Reduces wake-up interval

    Period size ↓ → Latency ↓
    

    Too small → XRUN risk

    Reduce Buffer Size

    Smaller buffer = less queued audio

    Buffer size = Period × Periods
    

    Best practice:

    • 2–4 periods only

    Use hw Instead of plughw

    Avoid format conversion

    hw:0,0  → lowest latency
    plughw → adds conversion delay
    

    Interview tip:

    “plughw increases latency due to software processing.”

    Use Non-Blocking + poll()

    Avoid thread sleep delays

    snd_pcm_nonblock(handle, 1);
    

    Use Real-Time Scheduling

    Prevents audio thread starvation

    SCHED_FIFO / SCHED_RR
    

    Interview line:

    “Real-time scheduling is critical for low-latency audio.”

    Avoid dmix (If Possible)

    dmix adds buffering & mixing delay

    Prefer:

    hw device
    

    Avoid:

    dmix
    

    Enable mmap Mode

    Zero-copy audio access

    snd_pcm_mmap_writei()
    

    Interview line:

    “MMAP mode reduces latency by avoiding memory copies.”

    Tune sw_params

    Important settings:

    • avail_min
    • start_threshold
    Lower avail_min → faster wake-ups
    Lower start_threshold → quicker start

    Tricky Follow-Up Questions

    Q1. Which has lower latency: blocking or non-blocking?
    Non-blocking.

    Q2. Is dmix real-time safe?
    No.

    Q3. Does ALSA guarantee real-time?
    No, OS scheduling matters.

    Q4. Is mmap always faster?
    Usually yes, but hardware-dependent.

    Q5. What’s the biggest cause of latency in ALSA?
    Large buffers + software plugins.

    Final Interview Golden Lines

    “Low ALSA latency requires small buffers, real-time scheduling, direct hardware access, and non-blocking design.”

    FAQ : ALSA Audio Interview Questions & Answers

    1. What is ALSA and why is it important for embedded audio interviews?

    ALSA (Advanced Linux Sound Architecture) is the core Linux audio framework that directly interacts with sound hardware. Interviewers focus on ALSA because it reflects your understanding of low-level audio handling, latency control, and driver interaction.

    2. What is the difference between buffer size and period size in ALSA?

    Buffer size defines the total audio memory, while period size defines how often interrupts occur. Interviewers ask this to check whether you understand latency, XRUNs, and real-time audio behavior.

    3. What causes XRUN in ALSA and how do you handle it?

    XRUN occurs when audio data is not delivered on time due to CPU load, wrong buffer configuration, or scheduling delays. Recovery is done using snd_pcm_prepare() or proper buffer tuning.

    4. How does ALSA handle multiple audio streams?

    ALSA uses plugins like dmix, dsnoop, and asym to manage multiple streams. Interviewers expect you to explain software mixing vs hardware mixing clearly.

    5. What is dmix in ALSA and when is it used?

    dmix is an ALSA software mixer that allows multiple applications to play audio simultaneously when hardware supports only one stream.

    6. What is the difference between hw, plughw, and default ALSA devices?

    • hw → Direct hardware access (no conversion)
    • plughw → Automatic format conversion
    • default → Uses ALSA plugins
      This question tests practical ALSA usage knowledge.

    7. What are ALSA plugins and why are they important?

    ALSA plugins handle resampling, format conversion, mixing, and routing. They make ALSA flexible and are critical in real-world embedded systems.

    8. How does ALSA achieve low latency in embedded systems?

    By using small period sizes, real-time scheduling, proper IRQ handling, and minimal software layers, ALSA can achieve very low audio latency.

    9. What happens if ALSA crashes in a running system?

    If ALSA crashes, active audio streams stop, but the system usually remains stable. Recovery depends on application-level handling and sound server architecture (PulseAudio, PipeWire, etc.).

    10. Why do interviewers ask ALSA questions even when PulseAudio or PipeWire is used?

    Because PulseAudio and PipeWire sit on top of ALSA, and strong ALSA fundamentals show that you understand the real audio data path, not just high-level APIs.

    Read More: Embedded Audio Interview Questions & Answers | Set 1
    Read More : Embedded Audio Interview Questions & Answers | Set 2
    Read More : Top Embedded Audio Questions You Must Master Before Any Interview
    Read More : What is Audio and How Sound Works in Digital and Analog Systems
    Read More : Digital Audio Interface Hardware
    Read More : Advanced Linux Sound Architecture for Audio and MIDI on Linux
    Read More : What is QNX Audio
    Read more : Complete guide of ALSA
    Read More : 50 Proven ALSA Interview Questions
    Read More : ALSA Audio Interview Questions & Answers