Discover the key tools for building Android Automotive OS AAOS . Beginner-friendly guide to JDK, Repo, Git, AOSP source code, and Android tool
It’s midnight. You’re driving alone on a deserted highway. The rain lashes against your windshield, and visibility is low. You glance at your car’s dashboard — the navigation system lights up with a clear route, your favorite playlist automatically fades in, and a voice assistant calmly says, “Take the next right turn.”
In that tense moment, your car isn’t just a machine — it’s a co-pilot keeping you safe, connected, and in control. Behind that experience lies Android Automotive OS AAOS — a powerful version of Android designed to run directly inside vehicles.
Now here’s the twist: you don’t have to be a big car manufacturer to explore it. With the right tools, you can build Android Automotive OS from scratch on your own computer. This guide will walk you step by step through the process — from setting up your environment to running the OS on an emulator or device.
Android Automotive OS AAOS
What is Android Automotive OS AAOS?
Android Automotive OS AAOS is a full-featured version of Android that is customized to run natively inside cars. Unlike Android Auto, which simply projects your smartphone’s screen onto a car’s display, AAOS is the car’s primary operating system. This means it directly controls and integrates vehicle functions such as:
Infotainment – Music, video, and media apps like Spotify or YouTube Music.
Navigation – Turn-by-turn directions with Google Maps or other navigation apps.
Vehicle Functions – Climate control, seat adjustment, or even battery management in electric cars.
Voice Assistance – Hands-free commands for safer driving.
In simple terms, Android Automotive OS transforms a car from being just a vehicle into a smart, connected, Android-powered computer on wheels.
If you’re new to embedded development or Android system builds, this guide will walk you through every step — from preparing your environment to compiling and running Android Automotive OS on an emulator or real hardware.
Prerequisites for Building Android Automotive OS AAOS
Imagine this: you’re setting out to build your very own version of Android Automotive OS AAOS — the same technology that powers modern car infotainment systems. You’re excited to see your custom build running in a car dashboard or even in an emulator. But before you dive into the code, you need to ensure your workstation is ready.
Building an entire operating system isn’t like installing a mobile app. It requires serious preparation — from the operating system on your laptop to the amount of memory and disk space you can spare. Think of it like preparing for a cross-country road trip: you wouldn’t leave without fuel, maps, and supplies. Similarly, your computer needs the right resources before the AAOS journey begins.
Let’s break down the prerequisites in detail.
1. Operating System (Linux or macOS)
Best Choice: Ubuntu Linux 20.04 LTS or later
Alternative: macOS (useful if you’re already a Mac user)
Why Linux? The Android Open Source Project (AOSP), which forms the foundation of AAOS, is built and tested mainly on Linux. Most scripts, tools, and community documentation assume you’re using Ubuntu or a similar distribution. If you stick with Linux, you’ll save yourself from countless compatibility issues.
What about Windows? If you’re on Windows, you have two main options:
Dual-boot with Ubuntu: Reliable, stable, and best for long-term use.
WSL2 (Windows Subsystem for Linux): Works for smaller Android projects, but for full AAOS builds, native Linux is far more stable.
Beginner Tip: If you’re completely new to Linux, start with Ubuntu because it’s well-documented, beginner-friendly, and widely supported in the Android developer community.
2. System Resources (Hardware Requirements)
Minimum RAM: 16 GB
Recommended RAM: 32 GB or more for faster builds
Disk Space: At least 400 GB free (500 GB+ if you plan multiple builds)
CPU: Multi-core processor (8 cores or more recommended)
Why so heavy? When you build Android Automotive OS, you’re not just compiling one app — you’re compiling:
This process generates gigabytes of intermediate files and requires running many tasks simultaneously.
RAM: If your memory is too low, your system will freeze or fail mid-build.
Disk Space: The raw Android source can exceed 100 GB. With build outputs and cache, it balloons to over 400 GB.
CPU: More cores = faster builds. For example, an 8-core CPU might take 2–3 hours, whereas a 4-core machine could run overnight.
Beginner Tip: If your personal machine doesn’t meet these specs, consider renting a cloud VM (e.g., Google Cloud, AWS EC2, or Azure) with high RAM and storage. Many developers use this approach to save time.
3. Stable Internet Connection
Why critical?
The first source code sync (repo sync) can require 60–100 GB of downloads.
An unstable connection can lead to partial or corrupted downloads, forcing you to start over.
You’ll also need frequent updates and patches, which means additional bandwidth.
Beginner Tip:
Use a wired Ethernet connection when possible — it’s more stable than Wi-Fi.
If you’re stuck with Wi-Fi, avoid networks with frequent dropouts.
Ensure you have an unlimited or high-cap data plan to handle the massive downloads.
Quick Checklist Before You Begin
A Linux-based environment (Ubuntu preferred; macOS acceptable).
At least 16 GB RAM (32 GB recommended).
Minimum 400 GB free disk space.
Multi-core processor (8+ cores if possible).
A reliable, high-speed internet connection.
With these prerequisites sorted, your development environment will be powerful enough to take on the challenge of building Android Automotive OS. Think of this stage as laying a strong foundation — without it, the rest of the process becomes frustrating.
Tools and Software Needed to Build Android Automotive OS AAOS
Imagine you’re about to assemble a high-performance car engine. You’ve cleared the garage, prepared the space, and made sure you have fuel. But without the right set of tools, even the most experienced mechanic can’t tighten a bolt or fit the pistons correctly.
The same is true for building Android Automotive OS (AAOS). Once your system meets the prerequisites, you need the proper software tools to put everything together. These tools are like your digital toolbox — each has a specific purpose, and missing even one can stall your build process.
Let’s go through them one by one, in a way that makes sense even if you’re just starting out.
1. Java Development Kit (JDK)
Requirement: JDK 8 or higher (JDK 11 is widely supported).
Why is it needed? Android and AAOS are built on Java at their core. The JDK provides the compiler, runtime, and libraries required to translate Java code into bytecode that the system can understand. Without it, your build scripts simply won’t run.
Beginner Tip: Stick with OpenJDK 8 or 11 because they’re stable and officially supported. Avoid installing multiple JDK versions unless you know how to configure environment variables (JAVA_HOME).
2. Repo Tool
What it is: A command-line tool created by Google to manage multiple Git repositories at once.
Why is it needed? The Android source code (including AAOS) isn’t stored in a single Git repository. Instead, it’s split into hundreds of smaller repos. The Repo Tool works like a project manager — it keeps all these repositories in sync, making sure your source code is complete and up-to-date.
Beginner Tip: Many first-time developers forget to add Repo to their PATH. Always verify you can run repo --version before syncing AOSP.
3. Git
What it is: A version control system (VCS).
Why is it needed? Git is the backbone of all modern open-source projects, and AAOS is no exception. It lets you:
Download source code.
Track changes across different branches.
Contribute your own modifications if needed.
Beginner Tip: If you’re new to Git, start with basic commands like git clone, git checkout, and git status. Don’t worry about advanced features just yet — focus on using Git to manage your AOSP and AAOS sources.
4. AOSP (Android Open Source Project) Source Code
What it is: The base source code for Android, extended with AAOS-specific components.
Why is it needed? AAOS doesn’t exist on its own. It’s built on top of AOSP, with additional vehicle-specific services such as infotainment, navigation, and car connectivity. Without the AOSP base, there’s nothing to customize or compile.
Beginner Tip: Make sure your internet connection is strong before you run repo sync. The download can be 60–100 GB and may take hours on slower networks.
5. Android Studio
What it is: Google’s official IDE for Android development.
Why is it needed? While AAOS builds are usually run on real hardware or emulators, Android Studio is essential for testing. It lets you:
Use the Android Emulator to boot your custom AAOS build.
Debug system apps.
Write companion apps for in-car systems.
Beginner Tip: Always use the latest stable release of Android Studio. It ensures compatibility with your build tools and avoids crashes common in preview versions.
Your AAOS Toolbox
Before you can build Android Automotive OS (AAOS), ensure you have:
Java Development Kit (JDK 8/11): Powers compilation.
Repo Tool: Manages multiple AOSP repositories.
Git: Version control backbone.
AOSP Source Code: The foundation of Android and AAOS.
Android Studio: Testing and emulation environment.
With these tools installed and configured, you’re no longer just preparing — you’re officially ready to start building your own version of AAOS.
Note: You can choose a different branch depending on your project (e.g., master or a newer Android release).
Sync the source code:
repo sync
This will take time since it downloads the full AOSP including Automotive components.
Step 3: Configure the Build
Set up the build environment:
source build/envsetup.sh
Select a target using the lunch command:
lunch
Choose a target like:
aosp_car_x86_64-userdebug
This configuration is optimized for Android Automotive.
Step 4: Build Android Automotive OS
Start the build process:
make -j$(nproc)
This step can take several hours depending on your CPU and RAM.
Step 5: Flash and Run Android Automotive OS
Once the build is ready, you can either flash it to a device or run it on an emulator.
Run on Emulator
To directly launch an emulator:
emulator
Or create an AVD (Android Virtual Device) in Android Studio:
Open Android Studio → AVD Manager.
Create a new AVD with an Automotive system image.
Start the emulator.
Flash to a Physical Device
If you have an AAOS-compatible device:
adb reboot bootloader
fastboot flashall -w
Conclusion
Building Android Automotive OS may seem complex, but once you break it into steps, it’s beginner-friendly. By setting up your environment, downloading AOSP, configuring, and compiling, you’ll have a working build that can run on an emulator or a real car system.
Exploring AAOS allows developers to create apps and services tailored for the automotive industry. With practice, you’ll gain confidence in modifying source code, debugging, and contributing to the AOSP community.
Answer: Android Automotive OS (AAOS) is a version of Android designed to run directly on a car’s hardware. Unlike Android Auto, which mirrors your phone, AAOS is the car’s native operating system. It controls infotainment, navigation, media, and even vehicle-specific functions like climate control.
2. What do I need before building Android Automotive OS?
Answer: You’ll need a Linux-based system (Ubuntu recommended), at least 16 GB RAM (32 GB preferred), 400 GB of free disk space, and a stable internet connection. These resources are essential because the Android source code is large, and compiling it requires significant hardware power.
3. Can I build Android Automotive OS on Windows?
Answer: Directly building AAOS on Windows is not supported. However, you can use Windows Subsystem for Linux (WSL 2) or set up a dual-boot system with Ubuntu. Beginners are advised to use native Linux since it offers the most stable experience.
4. Which tools are required to build Android Automotive OS (AAOS)?
Answer: The main tools you’ll need include: Java Development Kit (JDK) (8 or higher) Git (for version control) Repo tool (to manage AOSP repositories) Android Open Source Project (AOSP) source code Android Studio (for emulator testing)
5. How long does it take to build AAOS?
Answer: The build time depends on your hardware. On a machine with 32 GB RAM and a multi-core CPU, it can take 1–2 hours. On lower-end systems, it may take several hours. Using all available CPU cores (make -j$(nproc)) speeds up the process.
6. Can I run Android Automotive OS on an emulator?
Answer: Yes. After building, you can launch AAOS on an emulator using Android Studio’s AVD Manager with an automotive system image. This is the easiest way for beginners to test AAOS without needing real automotive hardware.
7. Can Android Automotive OS be flashed onto any car system?
Answer: No. AAOS must be flashed onto compatible automotive hardware that supports it. Most developers test it using an emulator first, and then on specialized development boards or supported car infotainment systems.
8. Is building AAOS suitable for beginners in Android development?
Answer: Yes, if you follow a step-by-step guide and have the right hardware. Beginners can learn how the Android system is structured, how builds work, and how to test on emulators before moving on to advanced customizations.
9. What’s the difference between Android Auto and Android Automotive OS?
Answer: Android Auto: Runs on your phone and projects apps to the car’s screen. Android Automotive OS (AAOS): Runs natively inside the car as the vehicle’s own operating system.
10. Where can I find official documentation for Android Automotive OS?
Learn QNX Sound Architecture (QSA) step by step. Discover how apps, drivers, and sound cards work together to play and record audio in QNX.
QNX Audio : Imagine you’re sitting in your car on a road trip. You connect your phone, open the music app on the car’s infotainment system, and press Play. A few seconds later, your favorite song flows through the speakers, filling the cabin.
But here’s the real question: How did that sound actually travel from the app you touched on the screen to the physical speakers hidden inside your car doors?
It feels instant and magical, but behind the scenes, a lot is happening. The music file (which is just digital data) has to pass through several layers—software, drivers, and hardware—before it can become sound waves your ears can enjoy.
This invisible “journey of sound” is managed by something called the QNX Sound Architecture (QSA).
And the cool part? QSA is built not just to play music, but to handle all kinds of sounds at the same time—your music, the navigation voice, and even safety alerts—without them clashing with each other.
That’s where QNX Sound Architecture (QSA) comes into the picture. If you’re new to QNX Neutrino RTOS and want to understand how audio works inside it, this guide is for you.
QNX Audio | QSA
The Building Blocks of QNX Audio
For any system to produce sound, three key ingredients are always required:
Hardware (Sound Card or Chip) This is the physical device that generates audio signals. Think of it as the speaker’s “engine.”
Device Driver The driver is like a translator. It knows how to talk to the hardware and how to make it do things like play, pause, or record audio.
Application Programming Interface (API) The API is the bridge between your application and the driver. It gives developers a clean, standard way to request audio services (e.g., “play this sound file” or “record from the microphone”).
When these three work together, your app can produce clear, managed sound output.
What is QNX Sound Architecture (QSA)?
QNX Sound Architecture, or QSA, is the audio framework inside QNX Neutrino RTOS.
You can think of QSA as the “audio brain” of QNX.
It makes sure applications, drivers, and hardware work smoothly together.
It is inspired by ALSA (Advanced Linux Sound Architecture) but has evolved in its own direction, meaning QSA is not directly compatible with ALSA anymore.
Why QSA is Special
Unlike simple sound systems, QSA is designed for embedded and real-time environments like cars, medical devices, and industrial systems. Here’s what makes it powerful:
Audio Concurrency Management Multiple apps can play sound at the same time. QSA decides which sound has priority. For example, your navigation voice prompt can temporarily lower (duck) your music volume so you don’t miss directions.
Preemption A critical system sound (like a seatbelt warning) can interrupt background audio immediately.
Volume Ramping Instead of sound starting or stopping abruptly, QSA can smoothly fade the audio in and out, creating a better user experience.
The Role of APIs in QSA
To a developer, the API is where the magic happens. Instead of dealing with complex hardware registers, you use simple API calls.
For example:
An app can play a WAV file using the API.
Another app can record audio from a microphone using the same API framework.
QNX even provides reference code, like:
wave.c → Example of a WAV player
waverec.c → Example of a WAV recorder
These help beginners quickly learn how to use the API without reinventing the wheel.
Story Example: Music vs. Navigation in a Car
Imagine you’re driving with your music blasting. Suddenly, the GPS says: “Turn left in 200 meters.”
Without QSA, you might not hear it because the music is too loud. With QSA:
The system ducks the music, lowers its volume,
Plays the navigation voice clearly,
Then ramps the music back up once the instruction is done.
That’s audio concurrency in action—something QSA does automatically.
Why Should Developers Care?
If you’re a beginner developer working on QNX Neutrino 7.1, learning QSA is crucial because:
It ensures your app works with real hardware audio.
It helps you build apps that feel smooth and professional (no audio glitches).
It’s the foundation for any media player, voice assistant, telephony, or alert system in QNX.
QNX Sound Architecture might sound complex at first, but at its core, it’s just about managing how apps, drivers, and hardware talk to each other to produce reliable, real-time sound.
If you’re just starting out, try exploring the sample programs (wave.c and waverec.c) provided in the QNX Audio Developer Guide. Once you see how a WAV player or recorder works, the rest of the architecture will start making sense.
In short: QSA is the reason your QNX system can play music, alerts, and voice instructions seamlessly—even at the same time.
QNX Audio Cards and Devices
When you’re learning QNX Audio for the first time, it can feel like stepping into a music studio filled with wires, mixers, and strange labels. To make sense of it, let’s imagine QNX’s audio system like a sound studio inside your computer or embedded device.
The Heart of Sound: The “Card”
The basic hardware needed to produce or capture sound is an audio chip or sound card, which QNX simply calls a card.
Think of a card as the “stage” where all your sound activity happens.
Each card can host multiple sound devices like mixers, controllers, and PCM channels.
QSA (QNX Sound Architecture) can support more than one card at a time and can even add or remove cards while the system is running—a bit like plugging in or unplugging instruments during a live concert.
So, before you can talk to a device (like the microphone or speaker), you need to know which card it belongs to.
The Devices on a Card
Each card contains several devices that handle different parts of the audio process:
Control Device
Manages general settings of the card.
It’s like the “power switch and configuration panel” of your sound stage.
Mixer Device
Controls volumes, balance, and audio routing.
Just like a DJ mixer adjusts the bass, treble, and volume of different tracks.
PCM Device (Pulse Code Modulation)
The real hero of sound conversion.
Responsible for:
Playback (Digital → Analog): turning digital audio files into actual sound waves.
Capture (Analog → Digital): recording microphone input as digital data.
A PCM device can only work in one direction at a time.
Typically, they come in pairs: one for playback (p) and one for capture (c).
Example: pcmC0D0p = Card 0, Device 0, Playback.
How QNX Names Devices
QNX uses a clear naming system under /dev/snd to represent sound devices:
C → Card number (starts at 0)
D → Device number (inside the card)
p → Playback
c → Capture
Example Directory Listing
When you run:
ls -l /dev/snd
You might see something like this:
total 0
lrw-rw-rw- 1 root root 0 May 31 11:11 capture -> pcmC0D0c
-rw-rw-rw- 1 root root 0 May 31 11:11 controlC0
-rw-rw-rw- 1 root root 0 May 31 11:11 mixerC0D0
-rw-rw-rw- 1 root root 0 May 31 11:11 pcmC0D0c
-rw-rw-rw- 1 root root 0 May 31 11:11 pcmC0D0p
lrw-rw-rw- 1 root root 0 May 31 11:11 pcmPreferredc -> pcmC0D0c
lrw-rw-rw- 1 root root 0 May 31 11:11 pcmPreferredp -> pcmC0D0p
lrw-rw-rw- 1 root root 0 May 31 11:11 playback -> pcmC0D0p
Breaking It Down
controlC0 → Control device for Card 0
mixerC0D0 → Mixer for Card 0, Device 0
pcmC0D0p → PCM Playback for Card 0, Device 0
pcmC0D0c → PCM Capture for Card 0, Device 0
pcmPreferredp → A symbolic link to the preferred playback device
pcmPreferredc → A symbolic link to the preferred capture device
In plain words: If you see pcmC0D0p, it means “play audio on card 0, device 0.” If you see pcmC0D0c, it means “record audio from card 0, device 0.”
A Real-Life Analogy
Let’s imagine:
The Card = A Music Studio
Control Device = Studio Manager (keeps everything in order)
Mixer Device = Sound Engineer (adjusts volumes and effects)
PCM Device = Performers (singers and instruments either playing music out or recording sound in)
Without the studio (card), the performers (PCM devices) and engineers (mixers) wouldn’t have a place to work.
Why This Matters
As a beginner developer:
Understanding cards and devices helps you know where your sound is going or coming from.
It’s the foundation before writing code that plays music, records audio, or mixes multiple streams.
In short:
Card = The container (sound chip).
Control, Mixer, PCM = The tools inside the card.
Naming Convention = Makes it easy to identify exactly where your audio is headed.
Opens the QNX PCM device using the ALSA-compatible API (snd_pcm_*) exposed by QNX.
Configures the device for sample rate / channels / format from the WAV header.
Streams the audio data in chunks to the device with proper error handling.
C++ WAV player for QNX (single-file)
Save as qnx_wav_player.cpp.
// qnx_wav_player.cpp
// Simple WAV player for QNX using ALSA-style PCM API (libasound)
// Build: g++ qnx_wav_player.cpp -o qnx_wav_player -lasound
// Usage: ./qnx_wav_player audio.wav

#include <iostream>
#include <fstream>
#include <vector>
#include <cstring>
#include <alsa/asoundlib.h>

struct WAVHeader {
    // minimal WAV header fields for PCM
    char riff[4];          // "RIFF"
    uint32_t overall_size; // file size - 8
    char wave[4];          // "WAVE"
    char fmt_chunk_marker[4]; // "fmt "
    uint32_t length_of_fmt;   // 16 for PCM
    uint16_t format_type;     // 1 = PCM
    uint16_t channels;
    uint32_t sample_rate;
    uint32_t byterate;
    uint16_t block_align;
    uint16_t bits_per_sample;
    // we will seek to "data" chunk after reading possible extra fields
};

bool read_wav_header(std::ifstream &in, WAVHeader &h, uint32_t &data_offset, uint32_t &data_size) {
    in.read(reinterpret_cast<char*>(&h), sizeof(WAVHeader));
    if (!in) return false;
    if (std::strncmp(h.riff, "RIFF", 4) != 0 || std::strncmp(h.wave, "WAVE", 4) != 0) return false;

    // find 'data' chunk (there may be extra chunks)
    data_offset = sizeof(WAVHeader);
    // After the initial WAVHeader we've read, there may be extra bytes if length_of_fmt > 16 or there are other chunks.
    // We'll scan forward for "data" ASCII marker.
    in.seekg(12 + 8 + h.length_of_fmt, std::ios::beg); // 12 for RIFF/WAVE, then fmt chunk header (8) + fmt chunk size
    if (!in) return false;

    // Simple scanner for "data" chunk:
    char chunkId[5] = {0};
    uint32_t chunkSize = 0;
    while (in.read(chunkId, 4)) {
        in.read(reinterpret_cast<char*>(&chunkSize), 4);
        if (std::strncmp(chunkId, "data", 4) == 0) {
            data_offset = static_cast<uint32_t>(in.tellg());
            data_size = chunkSize;
            return true;
        }
        // skip this chunk
        in.seekg(chunkSize, std::ios::cur);
    }
    return false;
}

snd_pcm_format_t snd_format_from_bits(int bits) {
    switch (bits) {
        case 8:  return SND_PCM_FORMAT_U8;
        case 16: return SND_PCM_FORMAT_S16_LE;
        case 24: return SND_PCM_FORMAT_S24_3LE; // 24-bit packed
        case 32: return SND_PCM_FORMAT_S32_LE;
        default: return SND_PCM_FORMAT_UNKNOWN;
    }
}

int main(int argc, char* argv[]) {
    if (argc < 2) {
        std::cerr << "Usage: " << argv[0] << " file.wav\n";
        return 1;
    }

    const char *wavfile = argv[1];
    std::ifstream in(wavfile, std::ios::binary);
    if (!in) {
        std::cerr << "Unable to open WAV file: " << wavfile << "\n";
        return 2;
    }

    WAVHeader hdr;
    uint32_t data_offset = 0, data_size = 0;
    if (!read_wav_header(in, hdr, data_offset, data_size)) {
        std::cerr << "Invalid or unsupported WAV file.\n";
        return 3;
    }

    if (hdr.format_type != 1) { // only PCM
        std::cerr << "Only PCM WAV supported (format_type != 1)\n";
        return 4;
    }

    snd_pcm_t *pcm_handle = nullptr;
    const char *device = "default"; // use preferred device
    int err = snd_pcm_open(&pcm_handle, device, SND_PCM_STREAM_PLAYBACK, 0);
    if (err < 0) {
        std::cerr << "snd_pcm_open error: " << snd_strerror(err) << "\n";
        return 5;
    }

    snd_pcm_hw_params_t *hw;
    snd_pcm_hw_params_alloca(&hw);
    snd_pcm_hw_params_any(pcm_handle, hw);
    snd_pcm_hw_params_set_access(pcm_handle, hw, SND_PCM_ACCESS_RW_INTERLEAVED);

    snd_pcm_format_t format = snd_format_from_bits(hdr.bits_per_sample);
    if (format == SND_PCM_FORMAT_UNKNOWN) {
        std::cerr << "Unsupported sample size: " << hdr.bits_per_sample << " bits\n";
        snd_pcm_close(pcm_handle);
        return 6;
    }

    err = snd_pcm_hw_params_set_format(pcm_handle, hw, format);
    if (err < 0) {
        std::cerr << "Cannot set sample format: " << snd_strerror(err) << "\n";
        snd_pcm_close(pcm_handle);
        return 7;
    }

    err = snd_pcm_hw_params_set_channels(pcm_handle, hw, hdr.channels);
    if (err < 0) {
        std::cerr << "Cannot set channels: " << snd_strerror(err) << "\n";
        snd_pcm_close(pcm_handle);
        return 8;
    }

    unsigned int rate = hdr.sample_rate;
    err = snd_pcm_hw_params_set_rate_near(pcm_handle, hw, &rate, 0);
    if (err < 0) {
        std::cerr << "Cannot set sample rate: " << snd_strerror(err) << "\n";
        snd_pcm_close(pcm_handle);
        return 9;
    }

    // Apply HW params
    err = snd_pcm_hw_params(pcm_handle, hw);
    if (err < 0) {
        std::cerr << "snd_pcm_hw_params failed: " << snd_strerror(err) << "\n";
        snd_pcm_close(pcm_handle);
        return 10;
    }

    // compute frame size (bytes per frame = channels * bits/8)
    int frame_bytes = hdr.channels * (hdr.bits_per_sample / 8);
    const size_t BUFS = 4096; // bytes
    std::vector<char> buffer(BUFS);

    // Seek to data start
    in.clear();
    in.seekg(data_offset, std::ios::beg);

    // Stream loop
    while (in && !in.eof()) {
        in.read(buffer.data(), buffer.size());
        std::streamsize bytes_read = in.gcount();
        if (bytes_read <= 0) break;

        // number of frames = bytes_read / frame_bytes
        snd_pcm_sframes_t frames = bytes_read / frame_bytes;
        char *ptr = buffer.data();
        while (frames > 0) {
            snd_pcm_sframes_t written = snd_pcm_writei(pcm_handle, ptr, frames);
            if (written == -EPIPE) {
                // underrun
                std::cerr << "Buffer underrun occurred\n";
                snd_pcm_prepare(pcm_handle);
            } else if (written < 0) {
                std::cerr << "Error writing to PCM device: " << snd_strerror(written) << "\n";
                snd_pcm_close(pcm_handle);
                return 11;
            } else {
                ptr += written * frame_bytes;
                frames -= written;
            }
        }
    }

    snd_pcm_drain(pcm_handle);
    snd_pcm_close(pcm_handle);
    std::cout << "Playback finished.\n";
    return 0;
}
Build & run
Copy qnx_wav_player.cpp to your QNX development system.
Build (example using g++): g++ qnx_wav_player.cpp -o qnx_wav_player -lasound On some QNX setups you may use qcc or need to point to the correct include/lib paths. (If alsa/asoundlib.h isn’t found, install QNX audio dev headers or adjust include paths.) (qnx.com, mikecramer.com)
Run: ./qnx_wav_player myfile.wav Make sure io-audio (or equivalent audio manager) is running and the correct deva-* driver for your hardware is loaded. You can use io-audio -l or check ps/ls for audio daemons per your QNX version. (qnx.com, OpenQNX)
Notes, tips & troubleshooting
Supported formats: This example only supports uncompressed PCM WAV. Compressed formats (MP3/AAC) need decoding before feeding PCM to the device.
Bit-depth choices: Some hardware/drivers may not support all bit depths (e.g., 24-bit packing); choose formats your driver supports. QNX tends to expose ALSA-compatible formats but check your driver docs. (mikecramer.com)
Device name:"default" opens the preferred device. You can list available cards/devices using utilities or aplay -l equivalent on your QNX system (if present) or inspect io-audio driver info. (Stack Overflow, OpenQNX)
Permissions & priorities: If audio glitches occur, check process priorities and that nothing with higher priority starves audio threads (graphics at too-high priority have been known to disturb audio). io-audio doc mentions priority considerations. (qnx.com)
Frequently asked questions (FAQ): QNX Audio & QSA
Q1: What is QNX Audio (QSA)?
Ans : QNX Audio, often referred to as QSA (QNX Sound Architecture), is the audio subsystem of the QNX operating system. It provides a framework for audio playback and recording, allowing applications to interface seamlessly with sound hardware on embedded systems.
Q2: How does QSA work in QNX Audio?
Ans: QSA handles audio streams by managing audio drivers, codecs, and buffers. It ensures real-time audio processing and supports multiple audio clients, allowing simultaneous playback and recording without conflicts.
Q3: What are the main components of QNX Audio?
Ans: The key components of QNX Audio include: Audio drivers: Interface with the hardware. Audio server (QSA server): Manages audio streams. Client libraries: Allow applications to send or receive audio data.
Q4: Which hardware does QNX Audio support?
Ans: QSA supports a wide range of embedded audio hardware, including I2S, HDMI audio, USB audio devices, and onboard DACs/ADCs, depending on the QNX platform and board configuration.
Q5: How do I start programming with QNX Audio?
Ans:To begin with QSA, you need to include the QNX audio client library in your project. You can then initialize the audio server, configure your audio stream, and use QSA APIs to play or record audio in real-time.
Q6: Can QNX Audio handle multiple audio streams simultaneously?
Ans: Yes, QSA is designed for multitasking environments. It can handle multiple audio streams concurrently, ensuring synchronization and minimal latency, making it ideal for infotainment, industrial, and embedded applications.
Q7: Is QNX Audio suitable for beginners?
Ans: Absolutely. With proper understanding of QSA APIs and audio principles, even beginners can implement basic audio playback and recording. QNX documentation provides detailed examples and tutorials to help you get started.
Q8: Where can I find more resources for QNX Audio?
Ans: You can explore the official QNX documentation, developer forums, and beginner guides specifically on QNX Audio (QSA). Many tutorials include step-by-step examples for creating audio applications on embedded platforms.
You can also Visit other tutorials of Embedded Prep
Practice Inheritance MCQs in C with beginner-friendly questions on abstract classes, polymorphism, and code reusability for students
It was a rainy evening, and I was revising for my Programming in C . As I flipped through my notes, I realized that inheritance—a concept I had read about many times—felt abstract and hard to grasp. I asked myself, “How can I really understand it instead of just memorizing?”
The answer came when I started practicing MCQs on inheritance. Each question acted like a mini-challenge, helping me connect theory with real coding scenarios. I discovered how base classes pass properties to derived classes, how abstract classes define interfaces, and how polymorphism makes programs flexible.
Through this hands-on approach, I transformed a complex topic into something tangible. And now, I want to share this learning path with other students so you can master inheritance in C++ the way I did—step by step, MCQ by MCQ.
Inheritance MCQs in C
Introduction of Inheritance MCQs in C
Inheritance is a fundamental concept in C++ that allows a class (derived class) to acquire properties and behaviors of another class (base class). Understanding inheritance is crucial for code reusability, polymorphism, and creating efficient object-oriented programs.
If you are a student preparing for the Programming in C++ course, these MCQs on inheritance will help you revise key concepts effectively.
Key Concepts of Inheritance in C
Before diving into MCQs, let’s understand the essential topics:
Base Class & Derived Class: The class whose properties are inherited is the base class, and the class that inherits is the derived class.
Types of Inheritance:
Single Inheritance
Multiple Inheritance
Multilevel Inheritance
Hierarchical Inheritance
Hybrid Inheritance
Access Specifiers in C++:
public inheritance
protected inheritance
private inheritance
Abstract Classes & Pure Virtual Functions: Abstract classes cannot be instantiated and are used to define a common interface for derived classes.
Polymorphism: Enables objects to behave differently based on the class type, often achieved using virtual functions.
Beginner-Friendly MCQs on Inheritance
1. What is inheritance in C?
a) Reusing existing functions b) Reusing existing classes c) Creating a new object d) Overloading operators
Answer: b) Reusing existing classes
2. Which type of inheritance allows a derived class to inherit from multiple base classes?
a) Single Inheritance b) Multiple Inheritance c) Multilevel Inheritance d) Hierarchical Inheritance
Answer: b) Multiple Inheritance
3. Which access specifier allows a derived class to inherit all public and protected members of the base class?
a) Private b) Protected c) Public d) Friend
Answer: c) Public
4. Which of the following cannot be instantiated in C?
a) Base Class b) Derived Class c) Abstract Class d) Friend Class
Answer: c) Abstract Class
5. What is polymorphism in C?
a) Reusing code in multiple classes b) Ability of a function or object to take multiple forms c) Writing multiple functions with the same name d) Using multiple inheritance
Answer: b) Ability of a function or object to take multiple forms
6. What is the purpose of a pure virtual function?
a) To overload a function b) To define a function in the base class that must be implemented in derived classes c) To hide a function d) To define a private function
Answer: b) To define a function in the base class that must be implemented in derived classes
7. Which inheritance type can cause the “diamond problem”?
a) Single Inheritance b) Multiple Inheritance c) Multilevel Inheritance d) Hybrid Inheritance
Answer: b) Multiple Inheritance
8. What is code reusability in C?
a) Using code without understanding b) Writing the same code repeatedly c) Using existing class properties in a new class d) Creating new functions for each task
Answer: c) Using existing class properties in a new class
9. Which keyword is used to declare a virtual function?
a) virtual b) override c) abstract d) polymorphic
Answer: a) virtual
10. What is dynamic memory allocation in inheritance?
a) Memory assigned at compile-time b) Memory assigned at runtime c) Memory shared by all objects d) Memory allocated only for base class
Answer: b) Memory assigned at runtime
11. Which of the following statements about base class constructors is correct?
a) Base class constructors are not called when creating a derived class object b) Base class constructors are called automatically before derived class constructors c) Base class constructors can only be called manually d) Base class constructors are ignored in inheritance
Answer: b) Base class constructors are called automatically before derived class constructors
12. Which type of inheritance avoids duplication of base class members in multiple inheritance?
a) Single Inheritance b) Virtual Inheritance c) Multilevel Inheritance d) Hierarchical Inheritance
Answer: b) Virtual Inheritance
13. Which of the following is true about protected members in a base class?
a) They are not accessible in derived classes b) They are accessible only in the same class c) They are accessible in derived classes but not outside the class hierarchy d) They are always public
Answer: c) They are accessible in derived classes but not outside the class hierarchy
14. What is the output of the following code snippet if
Base has a function display() and Derived overrides it, and you call
Base* ptr = new Derived(); ptr->display();?
a) Base class display function b) Derived class display function c) Compilation error d) Runtime error
Answer: b) Derived class display function
15. Which keyword is used to prevent a class from being inherited?
a) virtual b) final c) sealed d) abstract
Answer: b) final
16. Which of the following is true about multiple inheritance in C?
a) It is not supported b) Derived class inherits from only one base class c) A derived class can inherit features from more than one base class d) Multiple inheritance cannot use polymorphism
Answer: c) A derived class can inherit features from more than one base class
17. In multilevel inheritance, which class constructor is executed first?
a) Most derived class constructor b) Base class constructor c) Middle class constructor d) Random constructor
Answer: b) Base class constructor
18. What is the main advantage of using inheritance?
a) It makes code longer b) It promotes code reusability and modularity c) It increases compilation time d) It prevents polymorphism
Answer: b) It promotes code reusability and modularity
19. Which of the following statements is true about virtual functions?
a) They are only used in base classes b) They allow derived class functions to override base class functions dynamically c) They cannot be overridden d) They are automatically inline
Answer: b) They allow derived class functions to override base class functions dynamically
20. Which of the following best describes hybrid inheritance ?
a) Single inheritance only b) Combination of two or more types of inheritance c) Multilevel inheritance only d) Inheritance without base classes
Answer: b) Combination of two or more types of inheritance
Conclusion
Mastering inheritance in C is essential for understanding object-oriented programming and building efficient applications. Practicing these MCQs will help GTU students strengthen concepts like abstract classes, code reusability, polymorphism, and multiple inheritance.
To boost your preparation further:
Review base class and derived class concepts.
Practice creating abstract classes and virtual functions.
Explore different types of inheritance in small programs.
You can also Visit other tutorials of Embedded Prep
Master Inheritance MCQs in C (2025) – Frequently Asked Questions
What is inheritance in C?
Inheritance is an object-oriented programming concept that allows a class to acquire properties and behaviors from another class. In C, we simulate inheritance using structures and function pointers.
How is polymorphism related to inheritance in C?
Polymorphism allows functions to behave differently based on the object type. In C, this can be achieved using function pointers and structures, often in combination with inheritance-like patterns.
What are abstract classes in C?
C doesn’t have built-in abstract classes like C++, but you can mimic them using structures with function pointers that act as “abstract methods” to enforce implementation in derived structures.
How do MCQs help in learning inheritance in C?
MCQs reinforce understanding of concepts like polymorphism, abstract classes, and code reusability by testing knowledge in a structured way, making learning more interactive and effective.
Can we reuse code in C using inheritance?
Yes, by designing structures and function pointers thoughtfully, you can reuse code across multiple modules, simulating inheritance patterns.
Are inheritance MCQs only for advanced programmers?
No. Beginner-friendly MCQs are designed to gradually introduce inheritance, making it easier for learners at all levels.
What are some common mistakes while learning inheritance in C?
Mistakes include confusing function pointers, improper structure usage, and misunderstanding the simulation of abstract classes or polymorphism.
How do I practice inheritance MCQs effectively?
Start with simple questions, implement concepts in code, review answers, and progressively move to advanced MCQs covering polymorphism and abstract structures.
Are these MCQs updated for 2025 standards?
Yes, the questions are aligned with current C programming practices and focus on beginner-friendly, practical understanding for 2025 learners.
Where can I find free MCQs for practicing inheritance in C?
You can find curated, beginner-friendly MCQs on educational platforms, coding blogs, and sites like Embedded Prep Master that focus on practical learning.
Posted on: September 6, 2025 Job Type: Full-time, Permanent (Hybrid: 2 days office, 3 days remote)
Embedded Software Developer Job in Canada
Explore an exciting Embedded Software Developer Job in Canada with GHGSat. Work on satellites, Linux systems, and cutting-edge tech while helping the planet.
Are you searching for an exciting embedded job in Canada where your skills can make a global impact? At GHGSat, we use satellites and aircraft sensors to monitor greenhouse gas emissions, helping industries and governments reduce their environmental footprint. By joining our team, you’ll play a vital role in tackling climate change with technology.
We are hiring an Intermediate/Senior Embedded Software Developer in Montreal or Calgary (hybrid: 2 days office, 3 days remote). This is a chance to work on cutting-edge projects that blend aerospace, software, and environmental innovation.
About the Role
As an Embedded Developer at GHGSat, you’ll design, build, and improve the Linux-based firmware running on our satellites and aircraft systems. You’ll work with cameras, sensors, and avionics while ensuring our technology remains reliable, scalable, and efficient.
This role gives you the freedom to work independently on complex features, while still being part of a collaborative cross-functional team. Plus, we support continuous learning — you’ll get the opportunity to explore Rust, OCaml, and new tools as part of your growth.
Key Responsibilities
Develop, integrate, and test Linux firmware for satellites and aircraft.
Write control applications for cameras, sensors, heaters, and LEDs.
Build unit, component, and integration tests to ensure reliability.
Troubleshoot complex issues using software tools (debuggers, profilers) and hardware tools (oscilloscopes, logic analyzers).
Document all stages of development (requirements → testing).
Continuously improve workflows and reduce technical debt.
Collaborate effectively with the team and stakeholders.
Requirements
Must-Have Skills
Bachelor’s or Master’s degree in Computer Science, Computer/Electrical Engineering, or related field.
3+ years of embedded Linux application development.
Strong in C/C++ programming.
Knowledge of communication protocols (Ethernet, USB, I2C, SPI, CAN).
Experience with Python, Bash, CMake/Make, and GitLab CI/CD.
Solid debugging and profiling skills.
Strong communication and problem-solving abilities.
Nice-to-Have Skills
Linux driver development, Yocto, or bare-metal development.
Experience with ARM, x86, or FPGA architectures.
Familiarity with Rust, OCaml, REST APIs, GStreamer, SQL databases, or distributed systems.
Passion for aerospace, remote sensing, or environmental tech.
Benefits of This Embedded Job in Canada
Competitive salary + stock options.
Health & dental insurance.
Paid time off + floating statutory holidays.
Flexible hybrid work model.
Professional development opportunities.
High-impact projects that directly fight climate change.
At GHGSat, you’ll be part of a diverse, inclusive workplace where innovation and collaboration thrive.
Location & Start Date
Location: Montreal or Calgary, Canada (Hybrid: 2 days office, 3 days remote).
Start Date: As soon as possible.
Travel: Occasional.
Ready to grow your career with one of the most meaningful embedded jobs in Canada? Apply today and help us build smarter satellites and a cleaner planet.
How to Apply
If you’re ready to grow your career with one of the most meaningful embedded jobs in Canada, apply here:
Beginner-friendly guide to RTOS in embedded system. Learn what RTOS is, its features, types like FreeRTOS, QNX, VxWorks, and real-life .
When Arjun, a young engineer, bought his first microcontroller board, he was excited. He wrote a simple program to blink an LED, and it worked! But soon, he wanted more – he wanted the board to read sensor data, control a motor, and send information to his laptop at the same time.
That’s when he realized a problem: his simple code couldn’t keep up. Some tasks were delayed, others were missed entirely. Arjun thought, “Is there a smarter way to manage all these things at once?”
This is where he discovered the world of RTOS in embedded system.
What is RTOS in Embedded System?
An RTOS (Real-Time Operating System) is like a skilled traffic controller for embedded devices. Unlike a normal program that runs tasks one after another, an RTOS makes sure multiple tasks run together, without delay, and within strict timing.
Imagine a small factory:
One worker checks the temperature sensor.
Another worker controls the motor speed.
A third worker sends data to the cloud.
If they all waited for each other, the factory would fail. An RTOS makes sure each worker gets their turn on time, keeping everything smooth.
A Real-Time Operating System (RTOS) is a special kind of operating system designed to handle time-critical tasks. Unlike general-purpose operating systems (Windows, Linux, Android), which focus on multitasking and user comfort, an RTOS ensures tasks are executed within strict deadlines.
In short: RTOS = predictability + reliability + speed.
Fun fact: The first RTOS was created in the 1960s at Cambridge University. Since then, RTOS has become the backbone of industries like aerospace, medical devices, defense, and robotics.
Types of Real-Time Operating Systems
Types of Real-Time Operating Systems
RTOS in Embedded Systems can be classified into three types depending on timing strictness:
If controlMotor() takes 3 seconds, the sensor has to wait!
This causes delays and missed real-time events.
2. RTOS Execution (Using FreeRTOS Example)
With an RTOS, tasks run independently and are scheduled by the kernel.
// RTOS Based Example (FreeRTOS)
#include "FreeRTOS.h"
#include "task.h"
#include "stdio.h"

void readSensorTask(void *pvParameters) {
    while(1) {
        printf("Reading Sensor...\n");
        vTaskDelay(2000 / portTICK_PERIOD_MS); // run every 2 sec
    }
}

void controlMotorTask(void *pvParameters) {
    while(1) {
        printf("Controlling Motor...\n");
        vTaskDelay(3000 / portTICK_PERIOD_MS); // run every 3 sec
    }
}

void sendDataTask(void *pvParameters) {
    while(1) {
        printf("Sending Data...\n");
        vTaskDelay(1000 / portTICK_PERIOD_MS); // run every 1 sec
    }
}

int main(void) {
    xTaskCreate(readSensorTask, "Sensor", 1000, NULL, 1, NULL);
    xTaskCreate(controlMotorTask, "Motor", 1000, NULL, 1, NULL);
    xTaskCreate(sendDataTask, "Data", 1000, NULL, 1, NULL);

    vTaskStartScheduler(); // start the RTOS scheduler

    for(;;); // should never reach here
    return 0;
}
What happens here?
Each task has its own independent schedule.
The RTOS decides when and how often each task runs.
No task blocks another → true multitasking.
Key Difference
Aspect
Normal Loop (No RTOS)
With RTOS (FreeRTOS)
Task Execution
Sequential
Parallel (scheduled)
Delays
One task delays others
Independent timing
Efficiency
Low
High
Scalability
Hard to manage
Easy to add tasks
Where Does RTOS Work Compared to Normal OS?
Arjun, our young embedded engineer, once wondered: “Why do some systems like my laptop handle so many apps at once, while my microcontroller struggles with even three tasks?”
His mentor smiled and said, “Let’s think of computers as layered cakes 🍰. Each cake has different layers, and how they are designed decides whether it’s for a birthday party (normal OS) or a rocket launch (RTOS).”
1. Normal Operating System – The Party Cake
Imagine you’re at a birthday party. Everyone wants cake – kids, parents, friends. The host ensures everyone gets a piece, even if they must wait a little. No one starves, but some might wait longer.
That’s how a normal OS works.
+---------------------------+  Applications (Games, Browsers, Editors)
|   User Space              |
+---------------------------+  System Libraries (APIs)
|   Kernel Space            |
|   - Process management    |
|   - Memory management     |
|   - Device drivers        |
|   - File system           |
|   - Scheduler (fair share)|
+---------------------------+  Hardware (CPU, memory, devices)
Scheduler acts like the party host – ensuring fairness.
Applications share time equally.
If your game loads 1 second late, it’s fine.
Focus = throughput and user comfort.
Example: Windows, Linux, Android.
2. RTOS – The Emergency Cake
Now imagine a hospital emergency room. Doctors don’t serve patients in the order they arrived. Instead, the critical patient (heart attack) gets treated immediately, even if others have been waiting.
RTOS scheduler is the emergency doctor – it decides instantly who is most critical.
Deadlines are strict.
If a motor must stop in 10 ms, it will.
Focus = determinism and safety.
Example: FreeRTOS, QNX, VxWorks, Zephyr.
Main Differences (Cake vs Emergency Room)
Feature/Layer
Normal OS (Windows/Linux)
RTOS (FreeRTOS, QNX, VxWorks)
Scheduler
Fairness (everyone gets time)
Priority-based (critical first)
Applications
Many apps (GUI, games, tools)
Real-time tasks (sensors, motors)
Kernel
Heavy (file system, GUI, drivers)
Lightweight (tasks, ISRs, timers)
Timing
Flexible, soft deadlines
Strict, hard deadlines
Hardware Access
Abstracted via drivers
Very close to hardware
Use Cases
PCs, servers, phones
Cars, robots, medical devices
Summary
A normal OS is like a city mayor – keeping things fair and balanced for all citizens.
An RTOS is like a traffic cop at a busy junction – making sure ambulances (high-priority tasks) always pass first.
Without this difference, your smartphone would be fine with a normal OS, but your airbag system in a car must run on RTOS – because a late response could cost lives.
Final Thoughts
Arjun’s journey shows us that RTOS is like the invisible brain behind embedded systems. Without it, complex devices would stumble. With it, they become reliable, safe, and smart.
If you’re just starting out, try FreeRTOS on an Arduino or ESP32. You’ll see how tasks work together, just like a well-coordinated team.
In the world of embedded systems, mastering RTOS is like learning to conduct an orchestra – every instrument (task) plays at the right time, creating a beautiful symphony of technology.
You can also Visit other tutorials of Embedded Prep
If you’re preparing for Embedded Linux or Yocto Project roles, you’ll face advanced Yocto interview questions that go beyond recipes, layers, and the basic build. Senior interviews focus on real-world debugging, build optimization, BSP bring-up, BitBake, and layer design. In this guide, we break down advanced topics with beginner-friendly explanations and step-by-step examples so you can build confidence for architect-level discussions.
In this article, we’ll explore advanced Yocto interview questions with beginner-friendly explanations to help you understand the concepts step by step.
It’s 10:30 PM in the office. The lights are dim, most of your team has left, but your monitor still glows with an ongoing Yocto build. You’re the senior engineer responsible for bringing up a brand-new ARM board for an automotive client.
The pressure is high:
Tomorrow morning, the client expects to see the first boot on the new hardware.
The management team wants answers on how long the migration from Dunfell to Kirkstone will take.
Your developers are asking for a proper SDK toolchain so they can start app development.
The architect keeps talking about OTA updates because the system must support remote upgrades.
Meanwhile, your project manager just pinged you on Slack: “Why does the build take so long? Can we make it faster?”
This is the life of a Yocto expert. These challenges aren’t theory — they are real problems that senior engineers and architects solve every single day. And these same scenarios are exactly what interviewers ask in Yocto Interview Questions for senior roles.
Advanced Yocto Interview Questions
Let’s explore them one by one with practical explanations.
1.Explain Yocto’s task execution model (do_fetch, do_compile, do_install).
Ans: Yocto’s Task Execution Model
In Yocto, when you build a package (like a driver, library, or application), the build system follows a series of tasks. These tasks are like stages in a factory assembly line.
The most important ones you’ll see are:
do_fetch → Getting the source code
do_compile → Building (compiling) the source
do_install → Putting the built files in the right place for packaging
1. do_fetch (Fetching source code)
Think of this as collecting raw materials.
Yocto needs the source code before it can build anything.
do_fetch downloads the source from the location defined in the recipe (SRC_URI).
Sources can come from git repositories, tarballs, local directories, or mirrors.
Example in real life: You want to bake a cake. First, you go shopping for ingredients (flour, sugar, eggs). That’s your do_fetch.
2. do_compile (Compiling source code)
This is like the cooking step.
Once the source is fetched and unpacked, Yocto compiles it using the right compiler for your target device (cross-compilation).
It converts human-readable code (C, C++, etc.) into machine code (binaries).
Uses the environment defined by Yocto (toolchain, flags, dependencies).
Example in real life: After shopping, you start baking the cake by mixing ingredients and putting them in the oven. That’s your do_compile.
3. do_install (Installing built files)
This is the packaging step.
After compiling, Yocto needs to place the output in a structured directory (${D}), where it can later be packaged into .ipk, .rpm, or .deb files.
Files go into correct locations like /usr/bin, /usr/lib, /etc, etc.
This ensures the final image has the program in the right place.
Example in real life: Once the cake is baked, you place it nicely on a plate and decorate it so it’s ready to be served. That’s your do_install.
Summary
do_fetch → Get the source (raw materials).
do_compile → Build it (cook/bake).
do_install → Put it in the right place (serve it).
Together, these tasks form the core execution pipeline of Yocto when building any package
Yocto Task Dependencies (Execution Order)
Yocto doesn’t just run tasks randomly. It follows a dependency chain — meaning one task must finish before another can start.
do_image → Deliver the final cake to the customer.
Each step depends on the previous — you can’t bake before preheating, and you can’t serve before baking.
So the execution model works because of task dependencies. Yocto recipes declare these relationships, and BitBake makes sure everything happens in the correct order.
2.What is the role of sstate-cache?
Ans: Think of sstate-cache (Shared State Cache) as a reusable storage box where Yocto keeps the results of tasks it has already built.
When you build something (like compiling a library or creating a package), Yocto stores the output of that step in the sstate-cache.
Next time, instead of re-building everything from scratch, Yocto checks if the result is already available in the cache.
If it finds the exact same build result in sstate-cache, it just reuses it. This saves time and CPU effort.
Why is this important for beginners?
Without sstate-cache, Yocto would recompile every tiny piece of software every single time you build—even if nothing has changed. That means hours of waiting. With cache, Yocto quickly picks up the already built results and moves forward.
Real-time Use Case
Imagine you’re an embedded software engineer working on a custom Linux image for an IoT device.
Day 1: You build the entire image. It takes 4–5 hours because everything is built fresh. All outputs are stored in sstate-cache.
Day 2: You only modify a small configuration file, like enabling Wi-Fi support. Instead of re-building everything, Yocto reuses the majority of the previous results from the cache. Now, the build takes 15–20 minutes instead of hours.
In real companies, this is even more useful: Teams often share sstate-cache over a network. This way, if one developer builds something, others don’t need to rebuild the same thing again. They just pull from the cache, which makes collaboration super fast.
In short: sstate-cache is like Yocto’s time-saving memory. It prevents repeated work, speeds up builds, and helps teams collaborate efficiently.
Deep dive — sstate-cache (shared-state) in Yocto — how it works, why it speeds builds, and practical tips
Nice — let’s go from the “what” into the nuts and bolts, with commands, config examples and real-world gotchas.
1) Quick summary (one-liner)
sstate-cache (shared state cache) stores already-built task outputs (the reusable artifacts BitBake can restore later) so BitBake can skip expensive tasks when nothing relevant changed. (docs.yoctoproject.org)
2) What exactly is stored (and by whom)
BitBake stores the result of a task (for example: the installed files from do_install, packaged binaries from do_package, or content needed to populate a sysroot) as a sstate object.
The object contains just enough to restore the outputs of that task on another build that has the same inputs. It is not a full rebuild snapshot — it’s the reproducible output needed to skip the task. (docs.yoctoproject.org)
3) How BitBake decides whether an sstate entry is valid — task signatures
Every BitBake task has a signature built from all inputs that matter for that task: recipe metadata, dependencies, source checksums, certain relevant variables (compiler flags, sysroot contents, MACHINE, DISTRO, toolchain versions, etc.). Those inputs are combined into siginfo/sigdata files (you can find them under tmp/stamps/).
If the computed signature matches an sstate entry, BitBake can reuse that sstate instead of running the task. If it differs, BitBake rebuilds the task and writes a new sstate entry. You can inspect and compare these signatures with bitbake-dumpsigs and bitbake-diffsigs to see what changed. (docs.yoctoproject.org, wiki.yoctoproject.org)
4) Where the cache lives and how lookups work
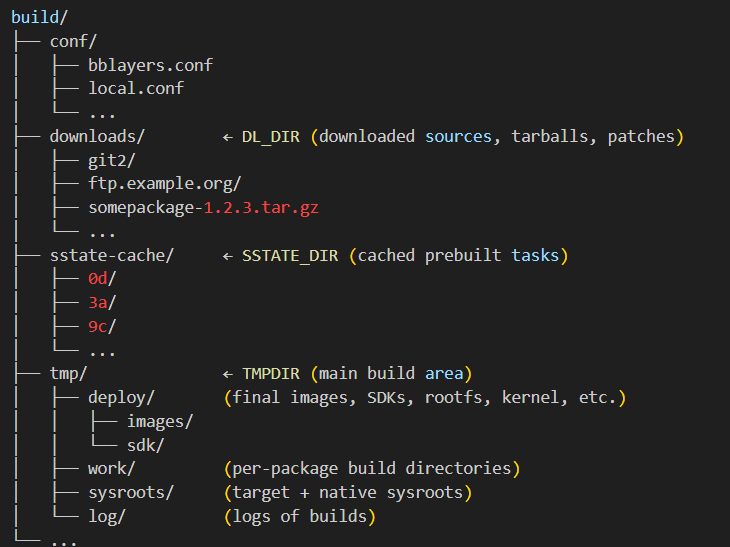
Default location for the local cache is ${TOPDIR}/sstate-cache (configurable via SSTATE_DIR). In local.conf you can override it, e.g.:
SSTATE_DIR ?= "/srv/yocto/sstate-cache"
Lookup order: BitBake first checks the localSSTATE_DIR. If not present, it can consult one or more sstate mirrors you configured via SSTATE_MIRRORS (HTTP, file, etc). If a mirror contains the exact matching sstate file, BitBake downloads it into the local SSTATE_DIR and then uses it. If no match is found anywhere, BitBake executes the task and stores the produced sstate locally for future use. (wiki.yoctoproject.org, Bootlin)
5) Common commands / tools you will use
See what changed in signatures:
bitbake-dumpsigs <sigdata-file-or-recipe> — show inputs that contribute to a task signature.
bitbake-diffsigs file1 file2 — compare two signature files to find the differing input(s). These are the first tools to use when a recipe rebuilds unexpectedly. (docs.yoctoproject.org)
Remove sstate for a recipe (force rebuild from scratch for that recipe):
bitbake -c cleansstate <recipe> (this runs do_cleansstate for the recipe). Note: clean ≠ cleansstate — clean removes workdir outputs but does not remove sstate. (docs.yoctoproject.org)
6) Sharing sstate across developers / CI — practical patterns & config
Two popular approaches:
Shared SSTATE_DIR: mount a common SSTATE_DIR (e.g., via NFS) so all builders read/write the same cache. Simple, but concurrency and permissions can cause trouble on busy systems.
SSTATE_MIRRORS: run a single builder that publishes an sstate mirror (rsync/HTTP/S3), and have other builders point to it with SSTATE_MIRRORS so artifacts are fetched into local caches when needed. This is usually safer and scales better for CI. Example local.conf snippet:
When a mirror is used, BitBake copies matching sstate entries into the builder’s local SSTATE_DIR so subsequent tasks are fast. (wiki.yoctoproject.org, Bootlin)
7) Pitfalls, gotchas and security notes
Signatures must match exactly. Changing MACHINE, DISTRO, toolchain, or any recipe variable that is part of the signature will invalidate sstate for affected tasks. That’s why sstate is very helpful only when build inputs and metadata are stable across builders. (docs.yoctoproject.org)
Shared sstate on busy NFS can be problematic (locking, partial writes) — prefer mirrors/HTTP or local caches plus mirror-syncing for CI. Plan permissions and concurrency carefully. (Bootlin)
Security: pulling prebuilt binary artifacts from an untrusted public sstate server can be an attack vector because you’re executing/packaging binaries built elsewhere. Only use trusted sstate mirrors. (Yocto community threads discuss the security implications of shared sstate).
Stale / divergent caches: if you get odd rebuilds or failures, compare signatures with bitbake-diffsigs and consider cleaning sstate for the recipe with -c cleansstate or purging old cache entries.
8) Real-world workflow example (concrete)
Developer A does a full build on a CI server; the server produces and uploads sstate-cache content to an HTTP endpoint (or S3).
Developer B clones the tree, sets SSTATE_MIRRORS to the CI server. When B builds, BitBake finds many exact-match sstate entries on the mirror and downloads them into local SSTATE_DIR, so B’s build reuses artifacts instead of compiling everything.
If B changes only a tiny config, BitBake rebuilds only the affected tasks — most other outputs come from sstate. Result: massive reduction in build time and CPU usage across the team. (Bootlin, wiki.yoctoproject.org)
Did you change MACHINE, DISTRO, or toolchain? → signatures invalidated.
Are there setscene tasks in the log? If you see Running setscene task … it means sstate entries were used. (wiki.yoctoproject.org)
Compare signatures: bitbake-dumpsigs or bitbake-diffsigs on the task’s sigdata files to see what input changed. (docs.yoctoproject.org)
Inspect local.conf: confirm SSTATE_DIR and SSTATE_MIRRORS are set correctly.
If needed, bitbake -c cleansstate <recipe> to force a rebuild of a particular recipe. (docs.yoctoproject.org)
10) Best-practice tips (short)
Keep a reliable sstate mirror (HTTP/rsync/S3) for CI and developer teams. (Bootlin)
Use local SSD-backed SSTATE_DIR on build nodes for performance; mirror into it rather than mounting a remote sstate for heavy write loads.
Use bitbake-diffsigs often when things rebuild; it quickly pinpoints what input changed. (docs.yoctoproject.org)
Periodically prune old sstate files to conserve disk space (Yocto has scripts/recipes for sstate maintenance). (docs.yoctoproject.org)
3.How Does Yocto Handle Cross-Compilation?
Ans: When you build software for embedded devices, the biggest challenge is that the target hardware (like ARM boards, BeagleBone, or Raspberry Pi) is very different from your development machine (usually x86 Linux or Windows). This is where cross-compilation comes in.
What is Cross-Compilation?
Cross-compilation means building software on one machine but running it on another.
Your laptop/PC = Host Machine (build environment).
Embedded board = Target Machine (where the software will run).
Since the target device usually doesn’t have enough power to compile big projects (like a Linux kernel or libraries), Yocto takes care of cross-compiling everything on the host machine.
How Yocto Handles Cross-Compilation
Yocto simplifies the process with a structured build system:
Toolchains
Yocto generates a cross-toolchain (compiler, linker, libraries) specific to the target architecture.
Example: If you’re building for ARM, Yocto creates an arm-poky-linux-gnueabi-gcc compiler.
Recipes and Metadata
Recipes (.bb files) describe how to fetch, configure, compile, and install software.
Each recipe automatically uses the correct cross-compiler and flags for the target architecture.
Sysroot
Yocto provides a sysroot (a mini root filesystem) with target-specific headers and libraries.
This ensures your application is compiled against the exact environment that will exist on the device.
BitBake Automation
The BitBake build tool ensures every package is compiled with the right toolchain, so you don’t have to manually set paths or flags.
Real-Life Example
Imagine you are developing a smart home controller on a Raspberry Pi (ARM).
You write your application on your laptop.
Instead of trying to compile directly on the Pi (which is slow), Yocto builds the app on your laptop using the ARM cross-toolchain.
Once compiled, the binaries run perfectly on the Pi because they were built for its architecture.
This makes Yocto extremely powerful for companies working on IoT devices, automotive systems, and consumer electronics.
In short: Yocto handles cross-compilation by automatically setting up the right toolchains, sysroot, and build environment. This allows you to build on your PC and deploy directly to your embedded target device without compatibility issues.
How to Generate and Use a Yocto SDK Toolchain for Cross-Compilation
Sometimes you don’t want to build everything with BitBake. You just want to write your own C/C++ app (like a Hello World or a sensor driver test) and cross-compile it outside Yocto. That’s where the Yocto SDK (toolchain) comes in.
Step 1: Generate the SDK Toolchain
In your Yocto build directory, run:
bitbake core-image-minimal -c populate_sdk
core-image-minimal is just an example image (you can replace it with your own image name).
This command creates an SDK installer script (something like poky-glibc-x86_64-core-image-minimal-cortexa9t2hf-neon-toolchain.sh).
Think of this SDK as a ready-made kit containing compilers, linkers, headers, and libraries for your target device.
Now your shell is ready to use the cross-compiler (like arm-poky-linux-gnueabi-gcc).
Step 3: Cross-Compile Your Application
Suppose you have a simple hello.c:
#include <stdio.h>
int main() {
    printf("Hello from Yocto cross-compilation!\n");
    return 0;
}
Compile it with:
$CC hello.c -o hello
Here $CC is automatically set by the SDK environment (e.g., arm-poky-linux-gnueabi-gcc).
The output binary hello is ready for your embedded target device.
Step 4: Deploy and Run
Copy it to your target device (like a Raspberry Pi or BeagleBone):
scp hello root@192.168.1.50:/home/root/
Then run it on the target:
./hello
And you’ll see:
Hello from Yocto cross-compilation!
Real-Life Use Case
Imagine you’re developing an IoT sensor application for an ARM-based board.
Instead of rebuilding the full Yocto image every time, you generate the SDK once.
Then you use it to quickly build and test small apps (like sensor readers, network clients, or debug tools).
This saves time and speeds up the development cycle.
Summary: Yocto’s SDK toolchain lets you cross-compile applications outside BitBake.
bitbake <image> -c populate_sdk → generate SDK.
Install and source the SDK → setup environment.
Compile apps with $CC → run on your embedded board.
4.How Do You Add a Custom Driver Module in Yocto?
Ans: When you’re working with embedded Linux, sometimes you need to add your own kernel driver — maybe for a new sensor, custom hardware, or a special board feature. Yocto makes this possible by letting you integrate your driver into the build system.
Suppose you’re building an IoT air quality monitor.
The board has a custom MQ-135 gas sensor circuit.
You write a driver module to interface with the sensor.
Adding this driver to Yocto ensures it’s automatically built and packaged with the image.
Every time the system boots, the driver is available without manually compiling on the target.
Summary: To add a custom driver in Yocto:
Write your driver (.c + Makefile).
Create a recipe (.bb) with inherit module.
Add recipe to your image.
Build with BitBake.
Load and test driver on target.
5.What Are Multiconfig Builds in Yocto?
Ans: Normally, a Yocto build creates one image for one target machine at a time. But in real-world projects, you might need to build multiple configurations (different targets or use-cases) in the same build environment.
That’s where multiconfig builds come in.
Beginner-Friendly Definition
Multiconfig builds in Yocto allow you to build multiple different targets (configs) in parallel, within the same build directory.
Each configuration can have its own:
Machine (hardware target)
Distro (Linux distribution)
Build settings
Image type
How It Works
You define multiple configs inside: build/conf/multiconfig/ For example:
multiconfig/machineA.conf
multiconfig/machineB.conf
Each config behaves like a separate Yocto build environment.
You then tell BitBake to build for both configs in one go: bitbake mc:machineA:core-image-minimal mc:machineB:core-image-sato
Real-Life Example
Imagine you’re working in automotive software:
You need to build an image for the Infotainment System (ARM).
At the same time, you also need a smaller image for a Telematics ECU (PowerPC).
With multiconfig builds:
You can build both images in a single Yocto project, sharing downloads, sstate-cache, and build artifacts.
This saves disk space and reduces build time because common dependencies are reused.
Why It’s Useful?
Build for multiple boards in one environment (e.g., Raspberry Pi + BeagleBone).
Build companion images (main system + recovery system).
Build SDK + image in a single step.
Saves time by reusing caches instead of maintaining separate build directories.
Summary: Multiconfig builds in Yocto let you generate multiple images (for different machines or purposes) in parallel, within the same build directory, while sharing downloads and caches. This is widely used in automotive, IoT, and consumer electronics, where multiple devices or partitions need separate images but must be managed together.
6.How Do You Debug Build Failures in Yocto?
Ans: Yocto builds are complex — they involve fetching sources, patching, configuring, compiling, installing, and packaging. If something goes wrong, the build can fail at any of these stages.
Debugging build failures is about finding where it broke and why.
Step 1: Look at the Error Message
When a build fails, BitBake will stop and show you an error summary. Example:
ERROR: Task (/meta-custom/recipes-apps/myapp/myapp_1.0.bb:do_compile) failed with exit code '1'
This means the error happened in the do_compile step of your recipe.
Step 2: Check the Log Files
Every task in Yocto logs output. You can find logs here:
This file usually contains the real compiler/linker errors.
Step 3: Use BitBake Debug Options
Run with debug messages: bitbake myapp -DDD (-D = debug, more Ds = more details).
Force a task to rerun and see logs: bitbake -c compile -f myapp
Drop into a shell at failure point: bitbake myapp -c compile -f -c devshell This opens a shell with the environment BitBake uses, so you can try compiling manually.
Step 4: Common Failure Causes
Missing Dependencies
Example: A library is required but not added in DEPENDS.
Fix: Add the missing dependency in your recipe.
Incorrect Paths
Example: Source files not found.
Fix: Check SRC_URI and S variables.
Patch Failures
Happens when the source code changes upstream.
Fix: Update or rebase your patches.
Toolchain Issues
Example: Wrong compiler flags.
Fix: Ensure you’re using Yocto’s cross-toolchain, not host gcc.
Step 5: Real-Life Example
Suppose you’re building an IoT temperature logger app.
The build fails in do_compile because it can’t find libm.so.
You check log.do_compile → it says: fatal error: math.h: No such file or directory
Root cause: You forgot to add the libm dependency.
Fix: Update recipe: DEPENDS += "virtual/libc"
Rebuild → now it works.
Summary: To debug Yocto build failures:
Check the error message (which task failed).
Open the task log (log.do_<task>).
Use BitBake debug flags (-DDD, -f, -c devshell).
Fix common issues like missing dependencies, bad paths, or patch errors.
1. Who should read Master Advanced Yocto Interview Questions (2025) | SET #3?
This guide is ideal for senior embedded engineers, system architects, and professionals preparing for interviews where advanced knowledge of Yocto is tested. If you already know the basics of layers, recipes, and builds, this set will help you dive deeper into real-world challenges.
2. What makes this Yocto interview guide different from others?
Unlike generic question lists, this guide provides beginner-friendly explanations of advanced topics, real-world use cases, and step-by-step reasoning. It helps you understand why things work in Yocto, not just what they are.
3. What topics are covered in this FAQ set?
This set focuses on advanced-level Yocto interview questions, including board bring-up and BSP creation, custom distributions and upgrades, multiconfig builds, cross-compilation techniques, debugging build failures, optimizing root filesystem size, and custom driver integration.
4. Do I need prior Yocto knowledge before reading this?
Yes. You should already understand the Yocto basics—recipes, layers, and tasks (do_fetch, do_compile, do_install)—before tackling these advanced interview questions. If you’re new, start with beginner Yocto tutorials first.
5. Are the answers suitable for real interview preparation?
Absolutely! The questions are commonly asked in senior and architect-level interviews, and the answers are framed so you can confidently explain them in a real interview setting.
6. Does this guide include real-world applications?
Yes. Each explanation is tied to practical embedded Linux scenarios, such as optimizing builds for automotive, IoT, or medical devices—making the content relevant for hands-on engineers and interview preparation.
7. Can I use these questions for quick revision?
Yes! The FAQs are structured so you can skim for quick prep or dive deeper for in-depth clarity before interviews.
8. Will this FAQ help me crack senior-level Yocto interviews?
While no guide can guarantee results, this FAQ gives you a solid edge by covering frequently asked advanced Yocto topics with clear, concise, and practical explanations.
You can also Visit other tutorials of Embedded Prep
Prepare for your embedded Linux career with our comprehensive guide on Yocto Interview Questions. This article covers common and advanced questions, practical tips, and step-by-step explanations to help you confidently crack Yocto-related interviews. Ideal for beginners and experienced developers aiming to strengthen their Yocto knowledge and ace technical rounds.
When Ravi, a young embedded developer, first joined an automotive company, he was super excited about working with Yocto. On his very first task, he was asked to customize the Linux kernel and add a new package to the image. But he froze—he only knew the basics of Yocto and BitBake. His senior smiled and said:
“Don’t worry, once you understand the intermediate concepts, Yocto will feel less scary and more powerful.”
That’s exactly what this article is about. If you’ve already covered the Yocto basics, these intermediate interview questions will help you prepare for real-world scenarios like Ravi’s.
Intermediate Yocto Interview Questions
1.Explain the Yocto build process step by step.
Meet Priya, an embedded engineer who needs a custom Linux image for a BeagleBone. She’s never built a full Yocto image before, so she treats the work like a recipe: gather ingredients, prepare the kitchen, follow the steps, and taste-test the result. Below is the recipe Priya followed — written so you can copy, paste, and run it yourself.
Short roadmap (what you’ll do)
Prepare your build host and install prerequisites.
Fetch Yocto (poky) and any BSP/meta layers.
Create a build directory and source the environment.
Configure local.conf and bblayers.conf.
Add custom layers or recipes (optional).
Run bitbake <image> to build.
Inspect outputs, SDKs, and caches.
Debug and iterate.
The step-by-step story (with commands & why)
1) Prepare the build host
Priya installs the packages the Yocto docs list (Python, git, required dev libs). Having the recommended host packages avoids weird failures later. The Yocto Quick Start lists the build-host prerequisites and the basic flow to get started. (Yocto Project Documentation)
Why: Yocto builds are heavy and sensitive to host tools. Install the distro packages the docs recommend before you start.
2) Get the source: clone poky and layers
Priya clones poky (the Yocto reference distribution) and any layers she needs (for example meta-openembedded, vendor BSP layers, or meta-myproject).
git clone git://git.yoctoproject.org/poky
cd poky
git clone git://git.openembedded.org/meta-openembedded ../meta-openembedded
# add other BSP/meta layers as needed
This is the usual starting point for a Yocto build. The Quick Build shows the typical checkout-and-build flow. (Yocto Project Documentation)
3) Create a build directory and source the environment
Priya runs the helper script to create and enter a build environment:
That script creates build/conf/ and sets up environment variables so bitbake works from the build directory. (Yocto Project Documentation)
4) Configure the build (local.conf & bblayers.conf)
Inside build/conf/ there are two files you edit:
local.conf — set MACHINE, BB_NUMBER_THREADS, PARALLEL_MAKE, and paths for DL_DIR and SSTATE_DIR.
bblayers.conf — list the layers (paths) the build should use.
Priya sets MACHINE to her board (e.g., beaglebone), points DL_DIR and SSTATE_DIR to a big fast disk, and tweaks thread counts so the build uses her CPU effectively. The Yocto build docs explain how these files control the build and where to set caches and machine targets. (Yocto Project Documentation)
Tip: Use a shared sstate-cache if you build multiple images or share between developers — it saves a lot of rebuild time.
5) Add or create a layer (optional; for your recipes)
If Priya needs to add a custom driver or recipe, she either adds an existing layer with:
bitbake-layers add-layer ../meta-my-layer
or creates one (yocto-layer helper or templates) and puts .bb recipes there. Layers let you keep custom code separate from upstream meta layers. The Yocto docs and common tasks sections show how layers and recipes organize metadata. (Yocto Project Documentation, The Yocto Project)
6) Build the image with BitBake
Now the main command:
bitbake core-image-minimal # or your custom-image
What happens under the hood? BitBake parses recipes, resolves dependencies, and runs recipe tasks in order (for each recipe: do_fetch → do_unpack → do_patch → do_configure → do_compile → do_install → do_package → do_populate_sysroot / image assembly). These tasks and their ordering are defined in the build system and are executed automatically. (Yocto Project Documentation)
Practical notes:
Build time depends on what needs to be compiled and whether artifacts exist in sstate/DL_DIR.
Use bitbake -k <image> to keep building other packages when failures occur, or bitbake -c cleansstate <recipe> to force rebuilding a recipe from scratch.
7) Where the results live (artifacts)
When the build succeeds, Priya finds images and packages under:
build/tmp/deploy/images/<MACHINE>/
There will be kernel zImage/uImage, rootfs tarballs, wic images, and package feeds. If she built an SDK, it appears from bitbake -c populate_sdk <image> (or bitbake <image>-sdk). The Yocto Quick Build and build docs describe where these outputs are placed. (Yocto Project Documentation)
8) Caching & downloads — why they matter
Two folders are critical:
DL_DIR — stores downloaded source tarballs.
SSTATE_DIR — shared state cache with prebuilt intermediate results.
Priya points these to persistent storage so subsequent builds (or other developers) reuse downloads and compiled pieces — massively speeding up rebuilds. The docs emphasize using DL_DIR and SSTATE_DIR to optimize builds. (Yocto Project Documentation)
9) Useful BitBake commands for iteration & debugging
bitbake -c listtasks <recipe> — show available tasks.
bitbake -c fetch <recipe> — fetch sources only.
bitbake -c cleansstate <recipe> — erase sstate for a recipe.
bitbake -e <recipe> — show environment variables.
bitbake <recipe> -c devshell — drop into a build shell for debugging (if supported).
Inspect logs: build/tmp/work/<arch>/<recipe>/<version>/temp/log.* for do_compile, do_configure, etc. See the tasks and common tasks docs for more debugging workflows. (Yocto Project Documentation)
If a dependency fails to fetch: check DL_DIR and proxy settings.
If compile fails: inspect the recipe’s log.do_compile and try bitbake -c cleansstate <recipe> and rebuild.
If build is slow: increase BB_NUMBER_THREADS and PARALLEL_MAKE in local.conf and ensure sstate is on fast storage.
If image missing a package: add it to IMAGE_INSTALL in local.conf or the image recipe.
Final — a one-paragraph recap
Priya’s Yocto build was a sequence of preparation (host packages), pulling the right metadata (poky and layers), configuring local.conf/bblayers.conf, and running bitbake which orchestrates many recipe tasks (fetch → configure → compile → package → assemble image). Artifacts end up in tmp/deploy/images/<MACHINE>, while DL_DIR and SSTATE_DIR speed up future builds. The Yocto docs (Quick Start, build/dev manual, and BitBake tasks reference) are excellent companions while you learn and iterate. (Yocto Project Documentation, The Yocto Project)
2.What is a .bbclass file and why is it used?
Imagine you are working in a kitchen that serves hundreds of recipes every day. Instead of writing the same steps like “wash vegetables, cut onions, add oil to the pan” in every recipe card, you create a shared guidebook. Every new recipe just says “follow the guidebook for chopping and frying” — simple, clean, and reusable.
That’s exactly what a .bbclass file does in Yocto.
A .bbclass file is a BitBake class file used in Yocto. It contains common functions, tasks, and variables that can be inherited by multiple recipes (.bb files).
Instead of duplicating code across recipes, developers put shared logic in a .bbclass file and then use:
inherit <classname>
inside their .bb recipe.
Why is it used? (Benefits)
Code Reuse → Write once, use everywhere. Example: packaging steps, fetching from Git, or autotools build flow.
Consistency → Ensures all recipes follow the same structure for similar tasks.
Simplifies Maintenance → Fix a bug or update logic in one .bbclass file, and all recipes that inherit it get the fix automatically.
Customization → Developers can create their own custom classes (like mycompany-update.bbclass) to enforce company-specific build rules.
Examples in Yocto
autotools.bbclass → Provides standard tasks for configure/compile/install when building with GNU Autotools.
cmake.bbclass → Defines how to build packages using CMake.
kernel.bbclass → Provides helper tasks for building Linux kernels.
In short: A .bbclass file in Yocto is like a shared recipe guide. It holds reusable build instructions that multiple recipes can inherit, making builds more efficient, cleaner, and easier to maintain.
Rreal-life mini example to show how .bbclass makes your Yocto recipes clean and reusable.
Step 1: Create a custom .bbclass file
Let’s say you often write recipes that install a simple script into /usr/bin. Instead of repeating the do_install task everywhere, you can create a .bbclass file:
my-common.bbclass
# my-common.bbclass
# A reusable class to install scripts into /usr/bin

do_install() {
    install -d ${D}${bindir}
    install -m 0755 ${WORKDIR}/${PN}.sh ${D}${bindir}/${PN}
}
What this does:
Creates /usr/bin in the rootfs (${bindir}).
Installs a script named after the recipe (${PN}.sh) into /usr/bin.
Step 2: Create two recipes that use this class
Now we’ll write two recipes that inherit this class.
hello-script.bb
SUMMARY = "A simple hello world script"
LICENSE = "MIT"
SRC_URI = "file://hello-script.sh"

S = "${WORKDIR}"

inherit my-common
goodbye-script.bb
SUMMARY = "A simple goodbye script"
LICENSE = "MIT"
SRC_URI = "file://goodbye-script.sh"

S = "${WORKDIR}"

inherit my-common
Step 3: Add the scripts
Inside each recipe’s files/ directory, add the scripts:
hello-script.sh
#!/bin/sh
echo "Hello, Yocto World!"
goodbye-script.sh
#!/bin/sh
echo "Goodbye, Yocto World!"
Step 4: Build and check
When you run:
bitbake hello-script
bitbake goodbye-script
👉 Both will install their scripts into /usr/bin/hello-script and /usr/bin/goodbye-script, but thanks to my-common.bbclass, you didn’t duplicate the do_install logic in each recipe.
Key Takeaway: The .bbclass file acts like a reusable library of tasks. Instead of repeating installation steps across multiple recipes, you write them once and just inherit it.
Typical Layer Structure
When you create a new layer (say meta-mycustom), the structure looks like this:
This tells Yocto where to look for recipes (.bb) and classes (.bbclass).
Step 3: Inherit the class in your recipes
Inside each recipe (hello-script.bb or goodbye-script.bb), add:
inherit my-common
That’s it — now both recipes reuse the logic from your .bbclass.
Step 4: Build and verify
From your build directory:
bitbake hello-script
bitbake goodbye-script
After build, check inside the rootfs (tmp/work/.../image/usr/bin/) and you should see:
/usr/bin/hello-script
/usr/bin/goodbye-script
In short:
.bbclass files live in classes/ inside your layer.
Point to them via layer.conf.
Inherit them in recipes to avoid duplicating code.
3.Difference Between .bb and .bbappend Files in Yocto
Imagine you’re a chef in a big kitchen.
A recipe card (.bb file) tells you exactly how to cook a dish — what ingredients to fetch, how to prepare them, and how to plate it.
But sometimes, you don’t want to rewrite the whole recipe. Instead, you just want to say: “Add extra spices” or “Serve with salad”. That’s where a .bbappend file comes in — it lets you extend or modify the original recipe without copying the entire thing.
What is a .bb file?
A BitBake recipe file (.bb) describes how to build a package.
It contains instructions like:
where to fetch source code (SRC_URI)
how to configure and compile (do_compile, do_install)
# Add an extra patch to hello recipe
SRC_URI += "file://hello-fix.patch"

do_install_append() {
    echo "Hello Yocto!" > ${D}${bindir}/extra.txt
}
This doesn’t replace the original recipe — it piggybacks on it and adds modifications.
Key Differences
Feature
.bb File
.bbappend File
Purpose
Defines a recipe from scratch
Extends or modifies an existing recipe
Content
Full build instructions (fetch, compile, install)
Only contains changes or additions
Naming
<recipe>_<version>.bb
<recipe>_<version>.bbappend
Use Case
When creating a new package/recipe
When tweaking an existing recipe (add patches, change variables, etc.)
In short:
.bb → full recipe (like the original cookbook entry).
.bbappend → patch/extension to an existing recipe (like adding your own notes on the cookbook page).
4.How do you use the bitbake-layers command?
Ans: Imagine you’ve just started working on a Yocto project. You open the project folder and see so many files and directories that it feels like walking into a big library with no map. Every book (or in Yocto’s case, every recipe) is kept in a section called a layer. But the question is: how do you quickly find out which sections exist, what books are inside, or where a new book should go?
That’s where the bitbake-layers command becomes your guide. Think of it as the librarian of Yocto layers.
What can this “librarian” do for you?
Show all the sections (layers) you already havebitbake-layers show-layers => Just like asking the librarian, “Which sections are in this library?”
List all the books (recipes) insidebitbake-layers show-recipes => You’ll see all the recipes Yocto knows about.
Find out who provides a specific bookbitbake-layers show-recipes <recipe-name> => If the same book exists in two sections, this command tells you which one is being used.
Add a new section to your librarybitbake-layers add-layer ../meta-myproject => Imagine bringing a brand-new section of books and placing it in the library.
Remove a section you no longer needbitbake-layers remove-layer ../meta-myproject => Just like taking out an old, unused section.
Check which books have special notes (appends)bitbake-layers show-appends => Shows you all .bbappend files—like sticky notes attached to certain books with extra instructions.
Why is this helpful for beginners?
When you’re new to Yocto, it’s easy to get lost. The bitbake-layers command gives you clarity and control:
You know which layers are active.
You can quickly spot which recipe is being used.
Adding or removing layers becomes simple.
In short: The bitbake-layers command is like a friendly librarian for your Yocto project—it shows you the layers, recipes, and lets you manage them without confusion.
5.What is the purpose of DL_DIR, SSTATE_DIR, and TMPDIR in Yocto?
Ans: Imagine you are building a huge Lego city with thousands of pieces. To make it faster and smoother, you don’t want to run to the shop every time you need a piece, right? You’ll keep some parts in storage, reuse old ones, and have a special workbench where you assemble everything.
In Yocto, these three directories act just like that:
1. DL_DIR → The Lego Shop Bag
Whenever you need new Lego parts, you first download them. In Yocto, source codes, patches, and tarballs are downloaded and saved inside DL_DIR.
Purpose:
Stores all downloaded source files.
Prevents downloading the same thing again in future builds.
Saves internet bandwidth and time.
Think of it as the bag you bring home from the Lego shop—you keep it safe so you don’t need to buy the same piece twice.
2. SSTATE_DIR → The Reusable Parts Box
As you build, sometimes you already assembled something earlier, like a Lego house wall. Instead of rebuilding it from scratch, you pull it out of your reusable box.
Purpose:
Stores precompiled and cached build outputs.
Allows Yocto to reuse previous builds.
Makes repeated builds much faster.
It’s like your personal storage of pre-built Lego walls, windows, and doors—ready to plug in without wasting time.
3. TMPDIR → The Workbench
This is where the real action happens. You open the bag, take out pieces, use some from your reusable box, and build on your workbench.Purpose:
Stores all temporary build files.
Contains the working space for compiling, assembling, and linking.
Usually the largest directory in size.
It’s like the big table where you build your Lego city before showing it to the world.
Why are these three important together?
DL_DIR ensures you don’t keep downloading sources.
SSTATE_DIR ensures you don’t rebuild the same thing again.
TMPDIR is where Yocto actually builds your final image.
By using these three smartly, Yocto saves time, resources, and makes the build process efficient.
In short:
DL_DIR = Download bag (sources).
SSTATE_DIR = Reusable parts box (cached builds).
TMPDIR = Workbench (active build area).
Where do DL_DIR, SSTATE_DIR, and TMPDIR exist?
When you set up a Yocto build environment (by sourcing oe-init-build-env), a new folder called build/ (or whatever you named it) gets created. Inside this, there is a configuration folder called conf/local.conf.
This is the place where DL_DIR, SSTATE_DIR, and TMPDIR are defined.
Default locations:
DL_DIR
Default: build/downloads/
You can change it in local.conf: DL_DIR ?= "${TOPDIR}/downloads"
This folder will contain all the tarballs, source code archives, and patches.
SSTATE_DIR
Default: build/sstate-cache/
You can change it in local.conf: SSTATE_DIR ?= "${TOPDIR}/sstate-cache"
This is where Yocto saves prebuilt shared state objects (cache).
TMPDIR
Default: build/tmp/
You can change it in local.conf: TMPDIR ?= "${TOPDIR}/tmp"
This folder is the biggest one—it contains all intermediate build files, sysroots, and the final images.
So, do they always exist?
Yes, by default they get created automatically when you run your first bitbake build.
Their locations are controlled from local.conf (inside build/conf/).
You can move them outside the build folder if you want to share downloads or sstate across multiple projects.
In short:
These three directories exist inside your Yocto build directory by default.
You’ll see them as:
build/downloads → (DL_DIR)
build/sstate-cache → (SSTATE_DIR)
build/tmp → (TMPDIR)
6.How do you add a new package to a Yocto image?
Ans: Imagine you are preparing a lunchbox for a school trip. By default, the lunchbox already has some food items—like rice, vegetables, and water. But suddenly your friend says: “Hey, can you also add some chocolates?”
In Yocto, your image is just like that lunchbox. It already contains some software packages, but you can add extra packages (like chocolates) to it before it is built.
Step-by-Step (with Story)
Find the package you want
First, make sure the package exists in one of your Yocto layers.Example: Let’s say you want to add nano (a text editor).
It’s like checking if chocolates are available in your kitchen before packing. bitbake-layers show-recipes | grep nano
Edit the Image Recipe 🥡
Open your custom image recipe or local.conf.Add the package under IMAGE_INSTALL_append.
Example (inside local.conf): IMAGE_INSTALL_append = " nano" Just like putting chocolates inside the lunchbox.
Rebuild the Image
Now build the image again using:
bitbake core-image-minimal (or whichever image recipe you are using). This is like closing the lunchbox and preparing it for the trip.
Flash and Check
Once the image is built, flash it to your board and boot.Run:
nano --version If you see the version, it means your “chocolate” (package) is inside the lunchbox.
Why is this important?
Adding packages to a Yocto image is how you customize your embedded Linux system. Instead of shipping a plain box, you create a tailored image that has exactly the tools and applications you need.
In short: To add a new package to a Yocto image, you:
Check if the package recipe exists.
Add it to your image (IMAGE_INSTALL_append).
Rebuild the image.
Boot and verify.
It’s just like packing extra food in your lunchbox before a trip—simple, flexible, and under your control.
Adding Packages in Yocto: local.conf vs. Custom Image Recipe
Continuing with our lunchbox story
Imagine you are preparing lunch for a short picnic today. You quickly add a chocolate bar 🍫 inside your own lunchbox. But when you open a canteen business (serving hundreds of students every day), you wouldn’t go and edit each lunchbox one by one—you’d create a standard menu 🍱 that always includes chocolates.
That’s exactly the difference between using local.conf and a custom image recipe in Yocto.
Method 1: Add Packages in local.conf
This is the quick and easy way, like packing your own lunchbox just for today.
Open build/conf/local.conf.
Add your package: IMAGE_INSTALL_append = " nano htop"
Build the image.
Best for testing and experimenting with packages. Not good for long-term projects, because your changes stay only in your local setup.
Method 2: Create a Custom Image Recipe
This is the professional way, like writing a canteen’s fixed lunch menu 🍱. Every lunchbox that comes out will automatically follow this recipe.
Steps:
Create a new recipe inside your own layer, e.g.: meta-myimage/recipes-core/images/my-image.bb
Inside the .bb file, define your image: SUMMARY = "My Custom Image" LICENSE = "MIT" IMAGE_INSTALL += " \ nano \ htop \ vim \ " inherit core-image
Build with: bitbake my-image
Best for real projects and teams where you want reproducibility and a clean history of changes.
Comparison Table
Method
When to Use
Example Use Case
local.conf
Quick testing, one-time changes
Adding nano just to try
Custom Image Recipe
Permanent project setup
Your product image always needs nano + htop + vim
7.What Steps Are Involved in Customizing the Linux Kernel in Yocto?
Ans : Let’s imagine a real-life story:
You bought a smart coffee machine that runs on an embedded Linux system. The company shipped it with basic features—make coffee, adjust temperature, etc. But as an engineer, you want to customize it. Maybe you want to add support for a new touchscreen display, or optimize the system to boot faster in the morning when you’re half-asleep.
This is exactly like customizing the Linux kernel in Yocto. The kernel is the heart of your embedded device, and Yocto lets you tune it for your hardware.
Here are the steps you’d follow in Yocto:
1. Identify Your Kernel Recipe
In Yocto, everything is managed with recipes. The Linux kernel recipe is usually found inside:
meta/recipes-kernel/linux/
For example: linux-yocto.bb or a vendor-specific kernel recipe.
In our coffee machine story: This is like finding the original recipe for your coffee—what beans, water temperature, and milk ratio are used.
2. Create Your Own Layer for Customization
Never edit Yocto’s default files directly. Instead, create a new layer (example: meta-coffee-kernel). This keeps your changes clean and separate.
Just like in real life: Instead of spoiling the company’s recipe book, you make your own recipe notes in a new diary.
3. Use a .bbappend File
To modify the kernel, create a .bbappend file that matches the original kernel recipe’s name. Example:
linux-yocto_%.bbappend
Here you can add patches, extra configurations, or point to a different kernel source.
Think of it like adding your own twist to the coffee recipe—extra chocolate powder or almond milk—without rewriting the whole recipe.
4. Add Kernel Configuration Changes
Yocto allows kernel configs using fragments. You can create a file like myconfig.cfg:
CONFIG_SPI=y
CONFIG_I2C=y
CONFIG_USB_SERIAL=m
Then reference it in your .bbappend.
In the coffee machine: This is like saying, “Always enable the steam nozzle, but make milk frother optional.”
5. Apply Kernel Patches (if needed)
If you want deeper customization (e.g., new driver, bug fix), you add a patch file (.patch) and tell Yocto to apply it.
Like fixing your coffee machine’s button that sometimes doesn’t work—you solder a fix and update the design.
6. Rebuild the Kernel
Run:
bitbake linux-yocto
Yocto will fetch, patch, configure, and build the kernel.
This is like brewing the coffee with your new recipe. You test if it tastes better.
7. Deploy and Test
Flash the newly built kernel to your board or device. Boot it and check logs:
dmesg
Make sure your new features are working.
Like sipping the coffee ☕—if it’s too strong, adjust again. If perfect, enjoy .
[
Step 1 ] ➝ Find Kernel Recipe
   📂 Location: meta/recipes-kernel/linux/
   Example: linux-yocto.bb

        |
        v

[ Step 2 ] ➝ Create Custom Layer
   📂 Example: meta-coffee-kernel
   (Keep changes clean, separate from Yocto core)

        |
        v

[ Step 3 ] ➝ Add .bbappend File
   📝 File: linux-yocto_%.bbappend
   (Extend original recipe without modifying it)

        |
        v

[ Step 4 ] ➝ Add Kernel Configurations
   🛠️ Example: myconfig.cfg
   CONFIG_SPI=y
   CONFIG_I2C=y
   CONFIG_USB_SERIAL=m

        |
        v

[ Step 5 ] ➝ Apply Kernel Patches (if needed)
   🧩 Add .patch files for drivers, bug fixes, or features

        |
        v

[ Step 6 ] ➝ Rebuild Kernel
   💻 Command: bitbake linux-yocto

        |
        v

[ Step 7 ] ➝ Deploy & Test
   📱 Flash new kernel → Boot device
   🔍 Check logs with: dmesg
8.How Do You Enable or Disable systemd in a Yocto Build?
Ans : Imagine you’re setting up a smart home system .
If you want everything automated (lights turn on, coffee machine starts, doors lock), you choose a modern manager to handle all tasks → this is like systemd.
If you want an old-school approach where you manually start things one by one, you stick with SysVinit.
In Yocto, you can decide which init system (startup manager) your embedded device should use.
Steps to Enable or Disable systemd in Yocto
1. Add systemd to DISTRO_FEATURES
Edit your distro configuration file (e.g., local.conf or your custom distro .conf file):
SysVinit = Old manual filter coffee maker 🫖 (still works, but step by step). In Yocto, you decide which one your “kitchen” (embedded device) should use.
9.What is the purpose of MACHINE, DISTRO, and TCLIBC variables?
1. MACHINE
What it means: It tells Yocto for which hardware (board/SoC/CPU architecture) you are building the image.
Why it matters: Each board has different bootloaders, kernel configs, and device trees. The MACHINE variable ensures Yocto picks the right BSP (Board Support Package).
Example:MACHINE = "beaglebone-yocto" MACHINE = "qemuarm64" 👉 If you set MACHINE="beaglebone-yocto", the image will include BeagleBone-specific kernel, bootloader, and drivers.
2. DISTRO
What it means: It defines the distribution policy — i.e., the set of rules about how the image is built, what features are included, and how packages are managed.
Why it matters: Different distros can enable/disable systemd, package managers, debug tools, or optimizations.
Example:DISTRO = "poky" DISTRO = "nodistro" 👉 If you use DISTRO="poky", you get the standard Poky distribution (Yocto’s reference distro). If you use nodistro, you get a very minimal build without distro-specific policies.
3. TCLIBC
What it means: It specifies which C library implementation will be used as the standard C library for the build.
Why it matters: The C library affects performance, footprint, and compatibility.
Options:
glibc → Default, full-featured, widely used
musl → Lightweight, fast, good for embedded
uclibc → Older, small footprint, but less common now
Example:TCLIBC = "glibc" TCLIBC = "musl" 👉 For a resource-constrained IoT device, you might choose musl. For a general Linux system, glibc is standard.
In short:
MACHINE → Which hardware/board am I targeting?
DISTRO → What distribution rules/policies should I follow?
TCLIBC → Which C library will power my programs?
Real-life analogy: Imagine you are cooking 👩🍳:
MACHINE = Which kitchen are you cooking in? (big restaurant kitchen vs. small home kitchen)
DISTRO = Which recipe book are you following? (Indian, Italian, or minimal diet plan)
TCLIBC = Which cooking oil are you using? (butter = full flavor, olive oil = light, coconut oil = minimal)
Let’s go step by step so you see where and how Yocto actually sets these variables.
Where MACHINE, DISTRO, and TCLIBC are set
MACHINE
Where it is set:
Usually in your conf/local.conf file (in the build/conf/ directory).
Machine-specific details (bootloader, kernel, device tree) live inside meta-<board>/conf/machine/<machine>.conf.
Example (local.conf):MACHINE ?= "beaglebone-yocto"
Machine config file (beaglebone-yocto.conf):require conf/machine/include/tune-arm926ejs.inc UBOOT_MACHINE = "am335x_boneblack_config" KERNEL_DEVICETREE = "am335x-boneblack.dtb" -> This tells Yocto to use BeagleBone’s bootloader and kernel device tree.
DISTRO
Where it is set:
In conf/local.conf (to pick which distribution you want).
The actual distro configuration file is inside meta-poky/conf/distro/poky.conf (if you’re using Poky).
Example (local.conf):DISTRO ?= "poky"
Distro config file (poky.conf):DISTRO_NAME = "Poky (Yocto Project Reference Distro)" DISTRO_VERSION = "4.0" INIT_MANAGER = "systemd" PACKAGE_CLASSES ?= "package_rpm" -> Here Yocto decides: use systemd as init, RPM as package format, etc.
TCLIBC
In short:
MACHINE → Set in local.conf, details in machine/*.conf.
DISTRO → Set in local.conf, rules defined in distro/*.conf.
TCLIBC → Set in local.conf, C library recipes chosen accordingly.
Real-life story: Imagine you’re running a food delivery kitchen:
MACHINE = Which branch kitchen you are cooking from (Delhi branch vs. Bangalore branch).
DISTRO = Which menu card you follow (North Indian thali, Italian pasta, or a custom diet menu).
TCLIBC = Which cooking base you use (butter, olive oil, or ghee).
All three work together so the customer (your embedded device) gets the right dish (final Linux image).
10.How to Minimize the Size of a Yocto Root Filesystem
Ans: When we build an operating system image with Yocto, the root filesystem (rootfs) contains all the programs, libraries, and files that your device will use. But in embedded devices (like routers, IoT boards, or automotive systems), storage is very limited. So, we must make the rootfs as small as possible.
Simple Ways to Minimize Yocto Rootfs
Use a Smaller Base Distribution
Instead of using the full poky (which is like a big buffet meal), you can use poky-tiny, which only gives you the essentials. This way, your system only gets what it really needs to run, nothing extra.
Remove Extra Tools and Debug Packages
By default, Yocto may add tools for debugging, profiling, or package management.
If your device doesn’t need them, remove them. It’s like packing your travel bag — if you’re going on a weekend trip, you don’t need to carry an iron, a heavy coat, or five pairs of shoes. Just take what’s necessary.
Use BusyBox Instead of Full Utilities
BusyBox is like a Swiss Army knife: it combines many small tools (like ls, cp, rm) into one lightweight binary.
This drastically cuts down size. Imagine instead of carrying 10 different kitchen tools (spoon, knife, peeler, corkscrew, opener…), you just carry a single Swiss knife that does all the jobs.
Choose a Lightweight C Library (musl)
Most Linux systems use glibc, but it’s heavy.
For small embedded devices, musl is a better option. It’s like choosing a lightweight sports bike instead of a heavy truck when you only need to move around the city.
Strip Debug Information
Programs often include debugging details, which are helpful for developers but unnecessary on the final device.
Removing this information saves space. It’s like buying new clothes — you don’t keep the price tags and extra packaging, you throw them away before wearing them.
Disable Package Manager (if you don’t need updates)
Package managers like RPM or opkg allow you to install new software later, but they also take up space.
If your device has a fixed purpose (like showing weather data on a screen), you don’t need a package manager. It’s like a set-top box — you don’t install apps on it every day, so why keep that extra overhead?
Compress the Filesystem
Use compressed filesystems like squashfs to shrink the final image size. This is like vacuum-packing clothes before a trip — same items, but taking up half the space.
Real-Life Application
Imagine you’re designing a smart home temperature monitor with an ESP32 or BeagleBone:
You only need:
A Linux kernel
Drivers for Wi-Fi and sensors
A small web server
A few basic commands
You don’t need:
Big GUI libraries
Multimedia tools
Heavy debugging utilities
By following the above tricks:
Your rootfs might shrink from 200 MB → 20 MB.
That means it fits easily into the device’s flash memory, and your product becomes faster and cheaper to produce.
In short:
Pick the smallest base (like poky-tiny).
Use BusyBox + musl.
Remove extras and strip binaries.
Compress the filesystem.
Your embedded device then becomes like a minimal backpack for a short trip — small, light, and only carrying what you need.
Minimal local.conf Example for Small Root Filesystem
# ================================
# Yocto Minimal RootFS Configuration
# ================================

# 1. Select target machine (board/SoC)
MACHINE ?= "beaglebone-yocto"

# 2. Use a small distribution
DISTRO ?= "poky-tiny"

# 3. Use lightweight C library
TCLIBC ?= "musl"

# 4. Keep only minimal image features
IMAGE_FEATURES = "splash"
EXTRA_IMAGE_FEATURES = ""

# 5. Remove unnecessary tools (debug, profiling, package management)
IMAGE_FEATURES_remove = "tools-debug tools-profile package-management"

# 6. Prefer BusyBox over full GNU utilities
PREFERRED_PROVIDER_virtual/ps = "busybox"
PREFERRED_PROVIDER_virtual/init = "busybox"

# 7. Strip debug symbols to reduce binary size
INHERIT += "rm_work"
IMAGE_GEN_DEBUGFS = "0"

# 8. Choose smaller package format (ipk is usually lighter than rpm/deb)
PACKAGE_CLASSES ?= "package_ipk"

# 9. Add compressed root filesystem type
IMAGE_FSTYPES += "squashfs"

# 10. Set default image to a minimal base image
CORE_IMAGE_EXTRA_INSTALL = ""
What This Does in Real Life
Imagine you are making a smart home gateway (like a Wi-Fi hub for IoT devices).
✅ poky-tiny + musl = minimal Linux base → fits into 16 MB flash.
✅ busybox = one tool instead of many → reduces space.
DHT11 Sensor Driver into Yocto : When I first got my BeagleBone board, I was super excited. I wanted to connect real-world sensors and see live data flowing into my board. One of the simplest yet powerful sensors I picked was the DHT11, a low-cost digital temperature and humidity sensor.
At first glance, I thought: “It should be as easy as connecting a wire and running a Python script, right?” But then came the challenge — I wanted to integrate it properly at the kernel driver level and make it part of my Yocto-built image, so that every time I flashed my SD card, my BeagleBone would already have the driver and I could directly fetch temperature readings.
If you’ve ever felt this curiosity, this guide is for you. Let’s go step by step.
Manual Way: Adding DHT11 Sensor Driver into Yocto for BeagleBone
Why DHT11 Sensor Driver into Yocto ?
Consistency: Every image build includes your driver — no need to manually insert modules each time.
Customization: You can control how the driver behaves and integrate it with other services.
Scalability: If tomorrow you move to another sensor or a production board, your Yocto setup scales with you.
Step 1: Set Up Yocto Project Environment
Download Poky and layersgit clone git://git.yoctoproject.org/poky.git cd poky git checkout <yocto-version> # e.g., dunfell, honister
Add necessary layers for BeagleBonegit clone git://git.yoctoproject.org/meta-ti.git git clone git://git.yoctoproject.org/meta-openembedded.git
Create a build directorysource oe-init-build-env build
Set your machine in conf/local.confMACHINE ?= "beaglebone"
Step 2: Understand Your DHT11 Sensor
DHT11 uses 1-wire digital communication.
Pins:
VCC: 3.3V or 5V
GND: Ground
DATA: Connected to a GPIO pin on BeagleBone
The driver needs to read the digital pulses and convert them to temperature and humidity.
Step 3: Create a Custom Layer
Create a new layer for your driver: bitbake-layers create-layer meta-dht11
Add this layer to your build: bitbake-layers add-layer ../meta-dht11
Step 4: Write the Kernel Driver
4.1: Create Driver Skeleton
Go to your layer: meta-dht11/recipes-kernel/dht11/
Master the most important Yocto interview questions for 2025. Prepare effectively for embedded software engineer roles with beginner to advanced level questions. The Yocto Project has become a standard in the embedded Linux world. Companies across automotive, industrial, IoT, and consumer electronics rely on Yocto to build custom Linux distributions. If you are preparing for an interview as an Embedded Software Engineer, having a strong grasp of Yocto is crucial.
This article covers carefully structured Yocto interview questions ranging from basic concepts to real-world problem-solving. Whether you are a fresher, intermediate developer, or senior engineer, this guide will help you prepare confidently.
I still remember the first time I heard the word Yocto. It was during a late-night debugging session on an automotive project. Our team had been struggling to bring up a custom Linux distribution on new hardware. Someone casually mentioned, “Why don’t we just use Yocto for this?” At that moment, Yocto felt like a mysterious black box—powerful, but intimidating.
Weeks later, after diving into documentation, recipes, and layers, I realized that Yocto wasn’t just another build system. It was the toolchain that empowered companies across automotive, IoT, industrial, and consumer electronics to build Linux their way. And the more I learned, the more I noticed a pattern—every serious embedded Linux interview I attended started testing my Yocto knowledge.
One interviewer leaned forward and asked me: “If you had to add a new package into your image, what steps would you follow in Yocto?”
Another one challenged me with: “How would you debug a build failure in BitBake, especially when dependencies aren’t obvious?”
At first, these questions felt overwhelming. But over time, I saw the logic: Yocto interviews are not about memorizing commands—they are about proving you can handle the real challenges teams face every day.
That’s why I decided to put together this collection of Yocto interview questions for 2025. It’s not just theory—it’s structured from the ground up, the same way you grow in your career:
Basics for freshers to break the ice
Intermediate for developers who’ve shipped at least one Linux product
Advanced, real-world problem-solving for senior engineers who need to think beyond commands
By the end of this guide, you won’t just know the answers—you’ll understand the why behind them. And that’s exactly what interviewers are looking for.
Yocto Interview Questions
Basic Yocto Interview Questions
1.What is the Yocto Project, and why is it used in embedded systems?
Ans: The Yocto Project is an open-source project that helps developers build custom Linux operating systems for embedded devices. Instead of downloading a ready-made Linux distribution like Ubuntu or Debian, Yocto gives you the tools to create your own Linux system that is lightweight, flexible, and tailored exactly to your hardware and project needs.
In simple words, think of Yocto as a kitchen for Linux:
You don’t get a pre-cooked meal (like Ubuntu).
Instead, you get all the ingredients, recipes, and tools to cook your own dish (a custom Linux).
This means you can decide what to include (drivers, libraries, applications) and what to leave out.
It is widely used in embedded systems (like automotive systems, IoT devices, routers, and medical equipment) because:
Customization – Embedded devices often have limited memory, storage, and processing power. Yocto lets you strip away unnecessary features and keep only what’s needed.
Cross-Compilation – It can build Linux for different processor architectures (ARM, x86, PowerPC, etc.), which is common in embedded systems.
Consistency – It ensures the same build process can be repeated, making development and debugging easier across teams.
Long-Term Support – Embedded devices usually run for years, so having a reliable and maintainable Linux system is critical.
Imagine you are building a smart thermostat for your home. This thermostat needs to:
Read the room temperature from a sensor
Show the temperature on a small display
Connect to Wi-Fi and send data to a mobile app
Now, you don’t need a full Linux desktop with web browsers, office apps, or games—most of that would just waste space and memory.
Here’s where Yocto comes in:
You use Yocto to build a Linux system specifically for your thermostat.
You include only the necessary pieces: drivers for the temperature sensor, display support, Wi-Fi libraries, and your app.
You leave out everything else, making the system lightweight and fast.
Yocto also lets you cross-compile, meaning you can build this Linux system on your PC and then run it on the thermostat’s ARM processor.
Later, if you want to update the thermostat’s software, you can rebuild it the same way, keeping everything consistent.
So, in simple terms, Yocto is like custom-building the engine and body of a car instead of buying a full car you don’t need—you get exactly what your device needs to run perfectly.
2.How Yocto Differs from Buildroot and Other Build Systems
Ans: When it comes to building Linux for embedded systems, there are several tools you can use, like Yocto and Buildroot. Both help you create a custom Linux system for your device, but they work differently and have different strengths.
Purpose and Scope
Yocto is more like a complete toolkit for building a full Linux distribution. It’s not just about compiling the kernel; it helps you create everything — the root filesystem, libraries, applications, and even your own custom packages.
Buildroot is simpler. It’s mostly focused on generating a minimal root filesystem and cross-compiling packages for your target device. It’s faster and easier to get started with but doesn’t offer as much flexibility for complex systems.
Flexibility
Yocto is extremely flexible. You can fine-tune almost every part of your system, like which version of libraries to use, how packages are built, and even create your own custom layers.
Buildroot is more limited in flexibility. It’s great if you need a small, simple system quickly, but for very complex projects, you might feel restricted.
Complexity and Learning Curve
Yocto has a steeper learning curve. It uses concepts like recipes, layers, and BitBake commands, which can seem overwhelming at first. But once you understand it, it’s very powerful for managing large projects.
Buildroot is beginner-friendly and easier to understand. You can get a working Linux system in a shorter time without learning too many advanced concepts.
Reproducibility and Maintenance
Yocto shines in creating reproducible builds. If you rebuild your project on a different machine, you’re likely to get the exact same result. It’s designed for long-term maintenance and large projects.
Buildroot is okay for reproducibility but not as robust as Yocto for maintaining complex or large-scale systems.
Community and Ecosystem
Yocto has a large ecosystem and is widely used in industries like automotive, telecom, and IoT. It supports a wide range of hardware and has extensive documentation.
Buildroot is smaller and simpler, mainly used for smaller embedded projects.
In short:
Use Yocto if you need a fully customized, maintainable Linux system for a complex embedded device. Use Buildroot if you want something quick, small, and easy.
3.What is BitBake, and what role does it play?
Ans: When working with the Yocto Project, you’ll often hear about something called BitBake. Think of BitBake as the “engine” that powers Yocto.
BitBake is the chef who reads all those recipes, makes sure the ingredients are ready, cooks everything in the right order, and finally serves the complete meal (your Linux image).
What is BitBake? BitBake is a build tool (like make in traditional Linux builds). It reads instructions (called recipes) that tell it how to download, configure, compile, and package software for your embedded system.
A recipe in Yocto is just a text file with steps that describe how to build a piece of software (like BusyBox, Python, or even your custom app).
BitBake then follows these recipes to create the final system image for your board.
What role does it play?
Task manager: BitBake breaks big jobs (like building an entire Linux system) into smaller tasks and runs them in the right order.
Automation: Instead of you manually downloading, compiling, and installing everything, BitBake automates the process.
Cross-compilation: Since embedded devices often use processors different from your PC, BitBake takes care of compiling software for the target hardware (not just your host machine).
Reproducibility: BitBake makes sure if you build the system today or months later, you’ll get the same results.
Simple Analogy Imagine you’re cooking a big meal. The recipes are like cooking instructions for each dish.
In short: BitBake is the build engine of the Yocto Project. It reads recipes, manages dependencies, and automates the entire process of building a Linux system for embedded devices.
4.Define a recipe (.bb file) in Yocto.
Ans: In the Yocto Project, a recipe is a text file with a .bb extension that tells BitBake how to build a piece of software for your embedded system.
Think of it as a set of instructions for BitBake — it explains:
Where to get the source code
The recipe tells BitBake where to download the software, whether from a URL, Git repository, or local files.
How to build it
It defines the compilation steps, configuration options, and dependencies needed to build the software.
How to install it
The recipe specifies where to place the compiled files in the target filesystem.
Other metadata
It can include version numbers, license information, or checksums to verify the source.
Example Analogy
If BitBake is the chef, the .bb recipe is like the detailed cooking instruction for a dish:
“Get these ingredients (source code),
Chop and cook them this way (compile),
Put them on the plate here (install into the root filesystem).”
do_install(): How to install into the target filesystem.
In short: A recipe (.bb file) is the core instruction file in Yocto that tells BitBake what to build, how to build it, and where to put it in the final embedded Linux image.
5.What is a layer in Yocto? Provide an example.
Ans: In the Yocto Project, a layer is a collection of recipes, configuration files, and other resources that are grouped together to add specific functionality to your embedded Linux build.
Think of a layer as a building block. You can stack multiple layers to customize your Linux system. Each layer can contain:
Recipes (.bb files) to build software
Configuration files (.conf) for build settings
Patches or modifications for existing software
Why Layers Are Useful
Organization: Keeps recipes and configurations organized by functionality (e.g., one layer for GUI, one for networking).
Reusability: You can reuse layers across different projects. For example, a “Wi-Fi driver layer” can be used in multiple device builds.
Customization: Makes it easier to maintain your own modifications without touching the core Yocto files.
Example of Layers in Yocto
Core layer (poky/meta)
Comes with Yocto by default. Contains essential recipes like the Linux kernel, core libraries, and utilities.
Board Support Package (BSP) layer (meta-beaglebone)
Contains recipes and configurations specific to BeagleBone hardware, like kernel patches and device tree files.
Custom application layer (meta-myapp)
You can create your own layer for building your applications or scripts.
Simple Analogy
Imagine building a house:
The core layer is the foundation and walls.
The BSP layer is the wiring and plumbing customized for your house.
Your custom layer is the furniture, decorations, and personal touches.
✅ In short: A layer in Yocto is a modular collection of recipes and configurations that you can add to your build to customize or extend your embedded Linux system.
6.Difference between local.conf and bblayers.conf in Yocto
Ans: When working with the Yocto Project, you’ll often hear about two important configuration files: local.conf and bblayers.conf. Both are essential, but they serve different purposes. Let’s break it down simply:
local.conf
Think of local.conf as your personal workspace settings.
It defines how you want to build your image. For example:
Which machine you are building for (MACHINE = "beaglebone")
How many cores to use for compilation (PARALLEL_MAKE or BB_NUMBER_THREADS)
What type of image to generate (CORE_IMAGE_MINIMAL vs CORE_IMAGE_FULL_CFP)
You can also override default build options here.
Basically, it’s your local tweaks and preferences for a Yocto build.
bblayers.conf
bblayers.conf is more like a map of all the layers Yocto should use.
Layers are collections of recipes, configurations, and metadata. For example:
meta (core Yocto layer)
meta-openembedded (extra recipes like Python or networking tools)
meta-ti (Texas Instruments support for BeagleBone or other boards)
Without layers listed here, BitBake won’t know where to find recipes to build your image.
It’s essentially a list of sources that make your build possible.
In short:
local.conf → “How I want to build” (my settings, preferences, and tweaks).
bblayers.conf → “Where to get the ingredients” (the layers and recipes used for building).
7.What is Poky in the Yocto Project?
Ans: In the Yocto Project, Poky is like the starter kit or reference system. It’s not a board or a physical product—it’s a collection of essential tools, configurations, and metadata that helps you build custom Linux distributions for embedded devices.
You can think of Poky as a foundation layer that includes:
BitBake – The build engine that processes recipes and builds your images.
Reference layers – Basic recipes and configurations for building a minimal Linux system.
Example settings – Such as machine configurations and image types, so you can get started quickly.
In simple terms:
Poky = Yocto Project’s ready-made starting point
It gives you all the tools you need to create a custom Linux image for your hardware without starting from scratch.
Even if you add extra layers (like meta-openembedded or meta-ti), Poky remains the core reference that makes everything work together smoothly.
8.How do you set the target machine in Yocto?
Ans: In Yocto, the target machine is the hardware or board you want to build your Linux image for, like BeagleBone, Raspberry Pi, or QEMU. Setting the target machine tells Yocto which configuration, kernel, and drivers to use.
There are two main ways to set it:
Using local.conf
Open the conf/local.conf file inside your build directory.
Look for the line that starts with MACHINE ?=.
Set your board name. For example, for BeagleBone: MACHINE ?= "beaglebone"
Save the file and run bitbake <image-name>—Yocto will build the image for that specific machine.
Using environment variable
Before building, you can export the machine name in the terminal: export MACHINE=beaglebone bitbake core-image-minimal
This method is temporary and works only for the current terminal session.
Key point:
The machine name must match a machine configuration in the Yocto layers you are using. Otherwise, BitBake will throw an error.
What are the differences between core-image-minimal and core-image-full-cmdline?
Here’s a beginner-friendly, realistic, and plagiarism-free explanation:
9.Differences between core-image-minimal and core-image-full-cmdline in Yocto
Ans: In Yocto, images are ready-to-use Linux system builds for your target hardware. Two common reference images are core-image-minimal and core-image-full-cmdline. They differ in size, features, and intended use:
Feature
core-image-minimal
core-image-full-cmdline
Purpose
Bare minimum Linux image
Full-featured command-line Linux image
Size
Very small (~10–20 MB)
Larger (~50–100 MB)
Included software
Only essential system files (kernel, init system, shell)
Includes essential system files plus many utilities, libraries, networking tools, and command-line programs
Use case
Ideal for testing, learning, or creating a custom minimal image
Good for development and debugging, when you need more tools and a complete command-line environment
Boot behavior
Boots to a basic shell
Boots to a standard command-line login prompt with more utilities available
Key point:
Use core-image-minimal when you want a tiny, lightweight system.
Use core-image-full-cmdline when you need a more complete Linux environment for development or testing.
10.Where are Yocto build outputs (images, SDK, logs) stored ?
When you build a Yocto project, all the output files such as images, SDKs, and logs are stored inside the build directory of your Yocto project. By default, this directory is created when you set up your build environment using source oe-init-build-env.
Inside the build directory, you’ll find some important subfolders:
tmp/deploy/images/ – This is where all the built images for your target machine are stored. For example, if you build core-image-minimal for BeagleBone, the .wic, .tar.bz2, or .rootfs files will be here.
tmp/work/ – This folder contains all the work directories for each recipe being built. It’s like Yocto’s workspace where it compiles each package.
tmp/sysroots/ – Contains sysroot files used for cross-compilation.
tmp/deploy/sdk/ – If you build an SDK using bitbake -c populate_sdk <image>, the generated SDK installer will appear here.
tmp/log/ – All the build logs are stored here. If a build fails, you can check these logs to debug the issue.
So essentially, build/tmp/deploy is your main folder for final outputs like images and SDKs, while logs and intermediate files are inside other tmp subfolders.
You can also Visit other tutorials of Embedded Prep
Beginner-friendly guide to Circular Linked List. Learn types, structure, advantages, disadvantages, applications, and C code examples. When learning data structures, most beginners start with arrays and linked lists. Among different types of linked lists, the Circular Linked List is an important concept that offers flexibility in memory management and traversal. In this article, we will explain what a circular linked list is, its types, advantages, and real-world applications in a beginner-friendly way.
A Circular Linked List is a special type of linked list in which the last node is connected back to the first node, forming a closed loop. Unlike arrays, circular linked lists are dynamic in nature, meaning they can grow or shrink during program execution.
What is a Circular Linked List?
A Circular Linked List is a type of linked list where the last node points back to the first node instead of pointing to NULL. This creates a circular connection, allowing continuous traversal of the list in a loop.
Unlike a Singly Linked List, which ends at NULL, or a Doubly Linked List, which has two pointers, the circular linked list makes navigation seamless without an endpoint.
Types of Circular Linked List
Singly Circular Linked List
A singly circular linked list is just like a normal singly linked list, but with one small twist. In this structure, every node has two parts: the data it stores and a pointer to the next node. The difference is that the last node doesn’t point to NULL; instead, it connects back to the very first node. This creates a circular chain where you can keep moving forward from one node to the next without ever reaching an end. Imagine it like kids standing in a circle holding hands—if you keep walking around, you’ll return to the starting point. This kind of list is useful when you need to repeatedly go through data, such as in round-robin scheduling or playlist management in music players.
Singly Circular Linked List
Doubly Circular Linked List
A doubly circular linked list is an advanced version of the circular linked list. In this structure, every node contains three parts: the data, a pointer to the next node, and another pointer to the previous node. Unlike a simple doubly linked list, the last node doesn’t end with NULL. Instead, its next pointer connects back to the first node, and the first node’s previous pointer links to the last node. This creates a complete circular chain where you can move forward or backward through the list without ever reaching an endpoint. You can think of it like a train running on a circular track—you can travel clockwise or counterclockwise and always come back to where you started. This makes doubly circular linked lists very handy in situations like navigation menus, music or video playlists, and simulations where movement in both directions is needed.
Doubly Circular Linked List
Basic Structure of a Circular Linked List
Here’s a simple structure in C language:
struct Node {
    int data;
    struct Node* next;
};
For a Doubly Circular Linked List, we add a previous pointer:
#include <iostream>
using namespace std;
class Node {
public:
    int data;
    Node* next;

    Node(int value) {
        data = value;
        next = nullptr;
    }
};
void insertEnd(Node*& last, int value) {
Node* newNode = new Node(value);
if (last == nullptr) {
last = newNode;
last->next = last; // Self loop
} else {
newNode->next = last->next;
last->next = newNode;
last = newNode;
}
}
void display(Node* last) {
if (last == nullptr) return;
Node* temp = last->next;
do {
cout << temp->data << " -> ";
temp = temp->next;
} while (temp != last->next);
cout << " (back to start)\n";
}
int main() {
Node* last = nullptr;
insertEnd(last, 10);
insertEnd(last, 20);
insertEnd(last, 30);
display(last);
return 0;
}
Why Learn Circular Linked List?
It helps in CPU scheduling algorithms (Round Robin).
Useful in repeated task execution like music playlists, traffic signal management, and multiplayer games.
Provides constant time insertion at both ends.
Difference Between Circular Linked List and Regular Linked List
Feature
Regular Linked List
Circular Linked List
Last Node
Points to NULL
Points to first node
Traversal
Stops at NULL
Never ends, continues in a loop
Memory Usage
Has a terminating pointer
Utilizes memory efficiently
Applications
Basic data storage
Scheduling, queues, buffers
When to Use Circular Linked List Instead of Array?
Use Case
Array
Circular Linked List
Fixed size
✅
❌
Dynamic growth
❌
✅
Random access
✅ O(1)
❌ O(n)
Continuous looping
❌
✅
Insertion at beginning
❌ O(n)
✅ O(1)
Circular Linked List Interview Questions
Preparing for coding interviews? Here’s a categorized list of Circular Linked List interview questions suitable for beginners, intermediate learners, and experienced professionals.
Beginner-Level Questions
What is a Circular Linked List?
How does a Circular Linked List differ from a regular Linked List?
What are the types of Circular Linked Lists?
Write the structure of a node in a Circular Singly Linked List.
Write the structure of a node in a Circular Doubly Linked List.
What are the advantages of Circular Linked Lists over arrays?
List some real-world applications of Circular Linked Lists.
What is the time complexity of insertion at the beginning of a Circular Linked List?
What is the time complexity of deletion at the end of a Circular Linked List?
Explain how traversal works in a Circular Linked List.
Intermediate-Level Questions
Why do we often maintain a pointer to the last node instead of the first node in Circular Linked Lists?
Explain insertion at the beginning, end, and a specific position in a Circular Linked List.
Explain deletion at the beginning, end, and a specific position in a Circular Linked List.
How do you implement a Circular Queue using a Circular Linked List?
How would you check if a linked list is circular?
What is the difference between a Circular Singly Linked List and a Circular Doubly Linked List?
Write pseudocode for traversing a Circular Linked List.
How can you implement Round Robin Scheduling using a Circular Linked List?
Compare time complexities of insertion and deletion in Circular Linked Lists vs Arrays.
What challenges arise while debugging a Circular Linked List?
Experienced-Level Questions
How do you detect an infinite loop in a Circular Linked List?
How would you reverse a Circular Linked List?
How can a Circular Linked List be used to implement a deque (double-ended queue)?
In which scenarios is a Circular Linked List better than a Doubly Linked List?
How would you merge two Circular Linked Lists into one?
Design an algorithm to split a Circular Linked List into two halves.
How do you handle memory management issues in large Circular Linked Lists?
What are the potential pitfalls in pointer manipulation when inserting nodes into a Circular Linked List?
How does a Circular Linked List improve CPU scheduling performance?
Design a Circular Linked List to handle a real-time system scenario (e.g., traffic light control).
Conclusion
A Circular Linked List is a powerful data structure for situations requiring continuous traversal and dynamic memory allocation. Though slightly more complex than singly linked lists, its applications in operating systems, games, and memory management make it worth learning.
If you are a beginner, start by understanding the structure, then practice insertion, deletion, and traversal operations in circular linked lists. With time, you’ll find this data structure highly useful in real-world applications.
If you are a beginner, start with circular singly linked lists and then move on to doubly circular linked lists. With practice, you’ll understand how this structure outperforms arrays and regular linked lists in certain scenarios.
FAQs on Circular Linked List
1.What is the main difference between singly and circular singly linked list?
Ans: In singly linked list, traversal ends at NULL. In circular singly linked list, traversal loops back to the first node.
2.Why is circular linked list used in OS scheduling?
Ans: Because tasks can be executed in a continuous loop (Round Robin algorithm).
3.Can we implement queues using circular linked list?
Ans: Arrays are faster for random access, but circular linked lists are better for dynamic memory and looping tasks. Yes, circular linked lists are best suited for circular queues.
4.Which is faster — array or circular linked list?
Ans: Arrays are faster for random access, but circular linked lists are better for dynamic memory and looping tasks.
5.Why is it better to keep a pointer to the last node instead of the first node in a Circular Linked List?
Ans: Because insertion at the beginning and the end can be done in O(1) time without traversing the entire list.
6.How do you detect an infinite loop in a Circular Linked List?
Ans: By using the Floyd’s Cycle Detection Algorithm (Tortoise and Hare algorithm).
7.What is the time complexity for insertion and deletion in Circular Linked List?
Ans: Insertion at beginning/end → O(1) Insertion at specific position → O(n) Deletion at beginning/end → O(1) Deletion at specific position → O(n)
8.What are the challenges in debugging a Circular Linked Lis
Ans: Risk of infinite loops if termination conditions are not handled. Requires extra care in insertion/deletion to maintain circular structure.
9.Compare Circular Linked List with Doubly Linked List in terms of memory usage and traversal.
Ans: Circular Linked List saves memory by avoiding NULL pointers. Doubly Circular Linked List requires more memory but supports two-way traversal.
10.How does a Circular Linked List improve CPU scheduling in an Operating System?
Ans: In Round Robin Scheduling, processes are arranged in a circular linked list so the CPU can allocate time slices fairly to each process in a loop.
You can also Visit other tutorials of Embedded Prep