“Security enabled” is not one switch. On ESP32-C6, Secure Boot and flash encryption address different parts of the device lifecycle, and combining them does not remove the need to plan updates, recovery and key management.
Espressif’s Secure Boot v2 guide describes signature verification for the second-stage bootloader and application images. The flash-encryption guide covers encryption of off-chip flash contents. One feature helps ensure the device boots authorized software; the other helps protect stored firmware and data against physical flash readout.
Separate the security goals
Secure Boot is about authenticity and execution: the boot process verifies signed code before it runs. Espressif’s guide describes RSA-PSS or ECDSA verification and notes that public keys are stored on-device while their corresponding private keys should remain protected outside the device.
Flash encryption protects data at rest in external flash. Espressif warns that enabling it affects the options available for future updates and says production use should follow its release-mode guidance. That is a strong reason to validate the production workflow on test devices before committing a manufacturing process.
Plan for the day a key or update must change
A secure product needs a documented signing-key custody process, a recovery and update strategy, and a clear understanding of irreversible provisioning settings. Decide how a key rotation or compromise would be handled before deployment, and test the normal update path and recovery behavior on hardware representative of production.
Keep signing keys out of developer workstations and routine build jobs.
Document who can approve a release and how artifacts are signed.
Test the intended update and recovery path before manufacturing.
Review the ESP-IDF guide’s eFuse and production implications with the hardware team.
Record the security configuration for each shipped hardware revision.
This is an architecture overview, not a step-by-step provisioning guide. Consult Espressif’s version-matched documentation before configuring a device. Secure Boot and flash encryption are powerful controls, but incorrect lifecycle planning can make legitimate maintenance difficult.
The ESP32-C6’s radio combination looks tailor-made for connected products: 2.4 GHz Wi-Fi 6, Bluetooth 5 LE and IEEE 802.15.4. The chip can be used in Matter Wi-Fi endpoint devices or Matter Thread endpoint devices, according to Espressif’s platform documentation.
But having the radios on one chip does not make a device automatically interoperable. A Matter product still needs the right protocol stack, data model, commissioning flow, product behavior and testing. Choosing Wi-Fi or Thread affects the device’s connectivity assumptions and the surrounding network architecture.
Wi-Fi and Thread are different product choices
Espressif lists Wi-Fi 6 support alongside Bluetooth LE and 802.15.4 connectivity. The latter can enable Thread and Zigbee use cases. For Matter, Espressif describes Wi-Fi-capable SoCs as a path for Matter Wi-Fi devices and 802.15.4 SoCs such as ESP32-C6 as a path for Matter Thread devices.
That distinction matters during product planning. A Wi-Fi endpoint depends on the home’s Wi-Fi setup. A Thread endpoint needs a compatible Thread network, typically with a border router connecting that network to the IP infrastructure. Bluetooth LE may participate in onboarding, but it is not the same thing as the device’s normal Matter transport.
What should the firmware team prove?
Decide whether the product is a Matter-over-Wi-Fi or Matter-over-Thread device before selecting examples and architecture.
Confirm that the specific ESP-IDF and ESP-Matter versions support the board and features you plan to use.
Test commissioning, reconnect behavior and recovery after credentials or network availability change.
Validate the device’s Matter data model and user-visible behavior with the target ecosystem.
Measure memory, radio coexistence and power on the actual hardware—not only in a sample build.
Espressif also documents gateway and border-router designs that combine devices, so do not assume every architecture fits on a single C6. Start from the project’s supported reference design and verify the whole system end to end.
The useful headline is not “one chip does every smart-home protocol.” It is that the C6 gives developers several connectivity options, while the product still needs a deliberate network and interoperability design.
Complete ESP32-C3 board guide for beginners. Compare the best ESP32-C3 boards, pinout, layout, price, schematics, and tutorials for your next IoT project.
If you’ve been exploring Wi-Fi and Bluetooth projects, you’ve probably come across the esp32-c3 board. It’s tiny, affordable, powerful, and beginner-friendly, which makes it one of the best choices for hobby electronics, IoT devices, and even small-scale production projects.
Think of this guide as a conversation with a smart friend over coffee—clear, direct, and free from corporate jargon. By the end of this article, you’ll understand the board inside out, know which version to buy, and be ready to build your own ESP32-C3-based projects.
What Is the ESP32-C3 Board?
The esp32-c3 board is a compact development board powered by Espressif’s ESP32-C3 chip, which is based on the RISC-V architecture. You get built-in Wi-Fi, Bluetooth 5, GPIO pins, low power modes, and a strong open-source ecosystem.
If you’ve used ESP8266 or the original ESP32 before, the ESP32-C3 will feel familiar—but lighter, more efficient, and cheaper.
What makes it more appealing is that it is easy to flash, easy to program, and incredibly stable.
Why the ESP32-C3 Board Is So Popular
Let’s break it down like you’d explain to a friend:
It’s cheap. Seriously cheap.
It supports modern Wi-Fi and Bluetooth 5 Low Energy.
It’s based on RISC-V, which is open-source and gaining popularity.
It works perfectly with Arduino, PlatformIO, and ESPHome.
It’s power-efficient and ideal for battery-based IoT devices.
It comes in many versions, including the xiao esp32 c3 board, one of the smallest ESP boards ever built.
Whether you’re a hobbyist or someone making a production-ready IoT device, the esp32-c3 board is a fantastic choice.
Different Versions of the ESP32-C3 Board
The beauty of the ESP32-C3 ecosystem is that you can choose from several variants. Here’s a quick walkthrough.
1. Xiao ESP32 C3 Board
The xiao esp32 c3 board by Seeed Studio is extremely tiny. It’s almost the size of a postage stamp. If you want the smallest esp32 c3 board, this is the one. It has:
USB-C port
Low power consumption
11 GPIO pins
Compact layout for wearable or mini IoT devices
Great for ultra-small projects.
2. ESP32-C3 Dev Board
The esp32 c3 dev board is the classic development board format similar to NodeMCU boards. It’s beginner-friendly, breadboard-friendly, and ideal for learning.
This version is the most common choice for students and makers.
3. ESP32 C3 Mini Breakout Board
The esp32 c3 mini breakout board is even smaller than regular development boards but slightly bigger than the Xiao board. It offers:
Sufficient GPIO
On-board antenna
Low cost
Perfect when you want something small but still easy to solder.
Understanding the ESP32-C3 Board Layout
If you’re new to microcontrollers, the layout might look scary, but the esp32-c3 board layout is actually clean and simple. Most boards follow this structure:
USB connector
Boot and reset buttons
On-board Wi-Fi antenna
Power regulation components
ESP32-C3 chip module
User LEDs
Row of GPIO pins
Since every manufacturer follows a slightly different layout, be sure to check your board’s documentation.
ESP32-C3 Board Pinout
Understanding the esp32 c3 board pinout helps you connect sensors, displays, relays, and everything else. While pinouts vary, most ESP32-C3 boards include:
GPIO pins (0–10 or more depending on board)
UART pins for serial communication
I2C pins (SDA, SCL)
SPI pins (MOSI, MISO, SCK, CS)
ADC channels
PWM pins
5V and 3.3V power pins
Ground pin
Tip for beginners: If you’re unsure about a pin, search the exact board’s pinout diagram. It prevents mistakes and keeps your board safe.
ESP32-C3 Board Manager on Arduino IDE
If you’re using Arduino IDE, you need to install the esp32 c3 board manager.
Here’s the simple beginner-friendly way:
Open Arduino IDE
Go to File → Preferences
Add ESP boards URL
Open Tools → Board → Boards Manager
Search “ESP32”
Install the package
Select the esp32-c3 board
That’s it. Your board is ready to program using Arduino.
Using the ESP32-C3 Board with PlatformIO
platformio esp32 c3 board support is excellent. In fact, many developers prefer PlatformIO over Arduino because it:
Lets you manage libraries easily
Offers faster compilation
Supports VS Code
To start, create a new project and choose ESP32-C3 Dev Module under PlatformIO’s board list.
If you’re building bigger projects or multiple firmware variants, PlatformIO is the best choice.
Using the ESP32-C3 Board with ESPHome
Many people use the esphome esp32 c3 board option to build smart home devices. ESPHome allows you to control your device from Home Assistant without writing full C++ code.
You write YAML, flash the board, and ESPHome handles the rest.
Some popular ESPHome uses:
Smart switches
Energy meters
Air quality monitors
Door sensors
Temperature & humidity automation
ESPHome + ESP32-C3 is a powerful combination for DIY smart home users.
ESP32-C3 Datasheet (What Beginners Should Know)
The esp32-c3 datasheet is full of electrical details, but here’s the beginner-friendly summary:
RISC-V single core @ 160 MHz
Wi-Fi 2.4 GHz
Bluetooth 5 (BLE)
400 KB SRAM + 384 KB ROM
Low power modes
22 programmable GPIO (depends on package)
Integrated flash (in most modules)
If you want to explore deeper, the datasheet explains everything about power, timing, registers, and memory layout.
ESP32-C3 Schematic Explained in Simple Words
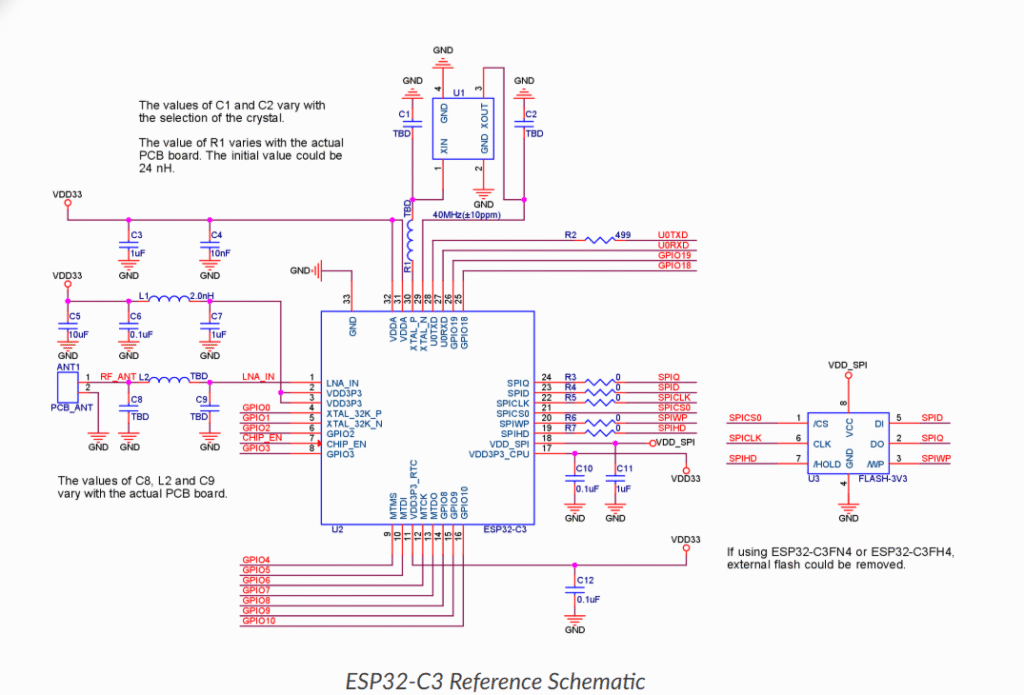
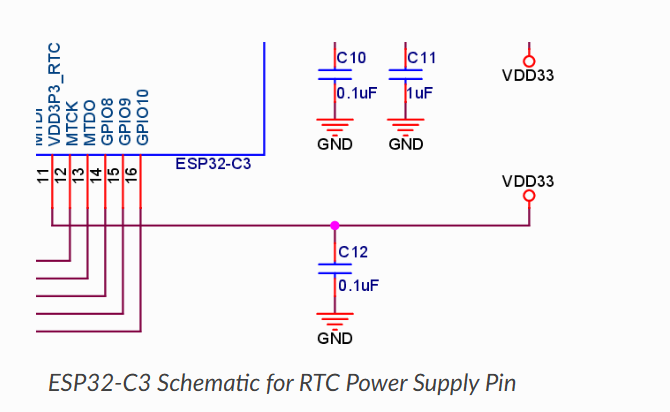
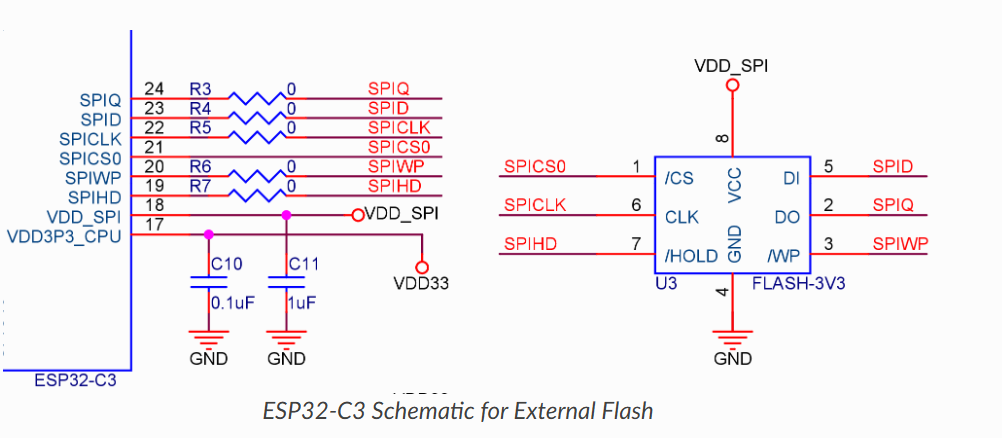
Many makers get overwhelmed seeing a schematic, but a simple breakdown of the esp32-c3 schematic or esp32-c3 board schematic makes it less scary.
A typical schematic includes:
Power supply section (5V → 3.3V regulator)
USB-to-serial converter chip
ESP32-C3 module
Reset + boot buttons
Antenna circuit
Crystal oscillator
Reading the schematic helps when troubleshooting or designing your own ESP32-C3-based custom PCB.
ESP32-C3 Price: How Much Should You Pay
One of the best things about the board is affordability. The esp32-c3 price usually ranges between:
₹200–₹350 in India
$3–$6 internationally
The Xiao ESP32-C3 Board is slightly more expensive, but still budget friendly.
If you’re building a product prototype, you can buy several boards without worry.
Best ESP32-C3 Board for Beginners
People often ask: What is the best esp32 c3 board?
Here’s a simple answer:
Best overall:
ESP32-C3 Dev Board Easy to use, breadboard friendly, ideal for learning.
Best for small projects:
Xiao ESP32 C3 Board The smallest esp32 c3 board, perfect for compact builds.
Best for soldering enthusiasts:
ESP32 C3 Mini Breakout Board
Choose based on your project needs, not just popularity.
Real-World Uses of the ESP32-C3 Board
Here are projects people commonly create:
1. Weather Stations
Using sensors like DHT11/DHT22 with Wi-Fi updates.
2. Smart Home Automation
Lights, relays, motion sensors via ESPHome.
3. IoT Monitoring Devices
Air quality, ESP32-C3 + MQ sensors.
4. Battery-powered trackers
Thanks to low power modes.
5. Wearable Tech
Using the Xiao ESP32 C3.
6. Wireless Controllers
Using BLE with RISC-V optimized code.
The board is flexible enough for hobby work and real products.
Programming the ESP32-C3 Board for the First Time
Let’s go over a simple beginner program: blinking an LED.
Upload this using Arduino IDE or PlatformIO. On most esp32-c3 boards, GPIO2 is the built-in LED.
Troubleshooting ESP32-C3 Boards
Here are quick fixes for common problems.
Board not detected?
Try another USB cable. Some cables don’t support data.
Port not available?
On Windows, reinstall USB-to-Serial drivers.
Flash failed error?
Press and hold BOOT button while uploading.
Wi-Fi unstable?
Keep antennas clear from metallic objects.
Pin not working?
Check the esp32 c3 board pinout; some pins have specific roles.
Making Your Own PCB With ESP32-C3
If you plan to create a product or custom board, the esp32-c3 schematic and esp32-c3 board layout documents will help.
Key tips:
Use a good 3.3V regulator
Leave clearance around the antenna
Follow Espressif’s reference design
Keep USB traces short and neat
Many developers start with a dev board, test the idea, then design a smaller custom PCB.
Frequently Asked Questions About ESP32-C3 Board
1. Is ESP32-C3 better than ESP8266?
Yes, it has Bluetooth, more memory, better Wi-Fi, and RISC-V architecture.
2. Can I use it with Arduino IDE?
Yes, just install the esp32 c3 board manager.
3. Is the ESP32-C3 powerful enough for IoT?
Absolutely. It handles sensors, displays, and network tasks easily.
4. Does every board have USB-C?
Many do, especially modern ones like Xiao ESP32 C3.
5. Which one is the smallest ESP32-C3 board?
The Xiao ESP32 C3 Board.
6. Can I run ESPHome on it?
Yes, ESPHome esp32 c3 board support is excellent.
7. Is the ESP32-C3 good for beginners?
Yes. It’s simple, stable, and well-documented.
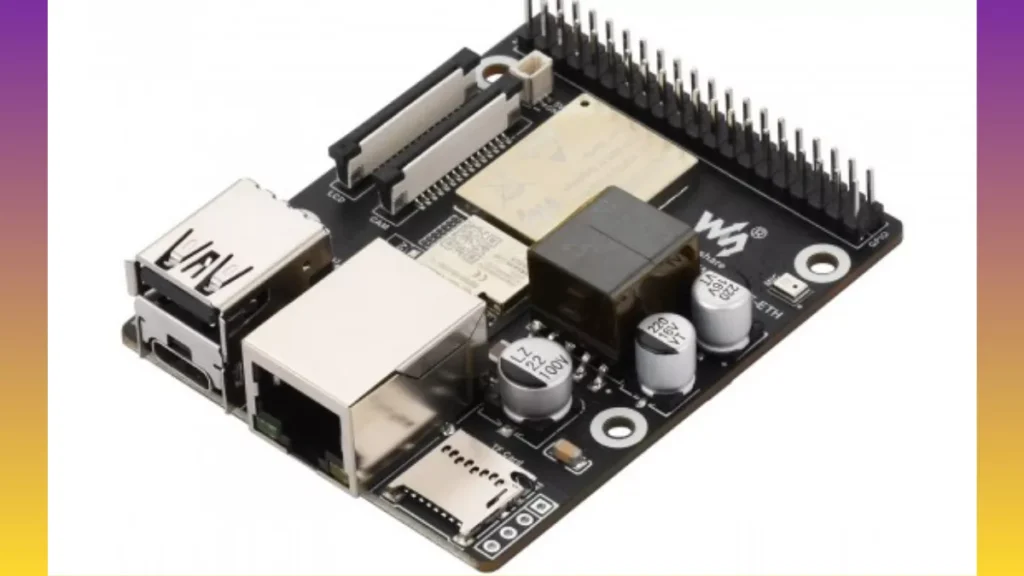
If you’re exploring other advanced ESP boards, you might also like the ESP32-C6 PoE Development Board, which offers Power-over-Ethernet for professional IoT builds. You can read the full guide here: ESP32‑C6 PoE Development Board
Final Thoughts
The esp32-c3 board is one of the best microcontroller boards for beginners and hobbyists in 2025. It’s cheap, powerful, and packed with the right features for modern Wi-Fi and Bluetooth projects.
Whether you choose the Xiao ESP32 C3 board, the ESP32-C3 dev board, or the esp32 c3 mini breakout board, you’ll enjoy building with it. With great support from Arduino, PlatformIO, and ESPHome, this board makes IoT development easier than ever.
If you’re just starting out or looking for the best esp32 c3 board for your next project, the ESP32-C3 is absolutely worth it.
Explore the ESP32-C6 PoE development board designed for HMI and IoT applications, featuring Wi-Fi 6, Ethernet PoE, Zigbee, and versatile connectivity for smart panels and IoT projects.
Hey, friend have you heard about the ESP32‑C6 PoE development board? It’s getting a lot of attention, especially for HMI (human‑machine interface) and IoT applications. Think of it like the kind of microcontroller board that brings together modern wireless connectivity, wired ethernet, and power‑over‑ethernet (PoE) all in one neat package.
If you’re working on smart panels, local edge devices, or even just want a reliable board with both Wi‑Fi 6 and wired network, this board is something you should seriously consider.
What Is the ESP32‑C6? (A Quick Refresher)
Explore the ESP32-C6 PoE development board designed for HMI and IoT applications, featuring Wi-Fi 6, Ethernet PoE, Zigbee, and versatile connectivity for smart panels and IoT projects.
First, a little background on the ESP32‑C6 itself: it’s one of Espressif’s newer system-on-chips (SoCs) that supports 2.4 GHz Wi‑Fi 6, Bluetooth 5 (LE), and IEEE 802.15.4 (which means Zigbee or Thread).
Its brain is a 32-bit RISC‑V processor, running at up to 160 MHz, paired with a low-power core at 20 MHz. (Espressif Systems) On top of that, it has a solid memory footprint: 320 KB ROM, 512 KB SRAM, and support for external flash.
All these features make the ESP32‑C6 particularly attractive for IoT: you get both wireless flexibility and low power, plus native support for Zigbee-like protocols.
If you want to dig into the nitty-gritty, Espressif’s ESP32‑C6 datasheet is super useful — it covers electrical specs, pin assignments, RF behavior, and more.
Enter the PoE Factor: Why PoE Matters
PoE (Power over Ethernet) is a game changer when you’re designing devices that need a stable power supply over wired networks — especially for remote or fixed installations. Instead of plugging in a separate power adaptor, you can run data and power through the same Ethernet cable. That’s huge for simplification and reliability.
When you combine PoE with the ESP32‑C6, you’re not just getting wireless — you’re also getting the robustness of ethernet, making it a very reliable foundation for HMI panels, IoT gateways, or industrial dashboards.
The New Development Board: Waveshare + ESP32‑C6 PoE
Recently, Waveshare introduced a development board that brings all these advantages together: the Waveshare ESP32‑P4 + ESP32‑C6 PoE development board. (IPv6.net)
Here’s what makes it cool:
It supports 100 Mbps Ethernet with PoE, so you don’t have to worry about separate power lines. (IPv6.net)
It includes Wi‑Fi 6 (thanks to ESP32‑C6), Bluetooth LE, and even OTG via USB 2.0. (IPv6.net)
Peripherals are generous: there’s MIPI‑CSI and MIPI‑DSI for camera / display, audio codec + amp + mic, MicroSD slot, and a 40‑pin GPIO header. (IPv6.net)
Useful interfaces like I2S, I2C, SPI, UART, PWM/MCPWM, RMT, ADC, and TWAI (CAN). (IPv6.net)
For security, it supports secure boot, flash encryption, crypto accelerators, TRNG, and privilege separation. (IPv6.net)
Altogether, this board is tailor-made for HMI terminals, smart panels, multimedia control, and local edge‑AI or IoT gateways. It really bridges wired reliability with wireless flexibility.
How It Helps in HMI and IoT Applications
Let me put this into a scenario: imagine you’re building a smart panel for a factory or a home-automation dashboard.
You want reliable connectivity: PoE gives you a steady power and an ethernet link.
You want wireless flexibility: with Wi‑Fi 6 and Bluetooth LE, the panel can talk to other devices, sensors, or even mobile apps.
You might want to embed a display: the MIPI‑DSI interface helps you hook up a screen cleanly.
For touch input or external sensors, the 40 GPIOs let you connect keypads, buttons, or sensors easily.
For audio-based interactions (voice, notifications), the audio codec + mic support is really handy.
In short, it’s not just another microcontroller board — it’s a full-fledged HMI / IoT development platform.
For a smooth setup of Wi-Fi connections on boards like this, using tools such as ESP32 WiFiManager tutorials can simplify network management, letting your device automatically connect to available networks without hardcoding credentials.
How It Compares to Other ESP32‑PoE Boards
There are several PoE boards in the ESP32 space, and each has its niche. Here’s how the ESP32‑C6 PoE solution compares:
Traditional ESP32-PoE or boards like esp32-poe-ea, esp32-poe-iso, esp32-poe-iso-ea: these often use older ESP32 variants (like the original Xtensa-based cores), not RISC‑V or Wi‑Fi 6.
ESP32-poe board: good for general Ethernet + PoE, but lacks the modern radio stack (Thread / Zigbee) that C6 supports.
ESP32 poe ethernet hats or esp32 poe hat: add-ons or “hats” for PoE, but may not integrate as tightly or offer the advanced connectivity features that ESP32‑C6 brings.
ESP32-C3 PoE: the C3 is also RISC‑V, but typically doesn’t have Wi-Fi 6 and 802.15.4 radio like the C6.
So, if your priority is multi-protocol connectivity + Ethernet + PoE, the ESP32‑C6 board is especially compelling.
Advanced Connectivity: Zigbee, Thread, and More
One standout feature of the ESP32‑C6 (and thus any development board built on it) is its support for 802.15.4 — which means Zigbee and Thread protocols. (Espressif Systems)
Why does that matter? In IoT:
You might want to build a Zigbee Matter bridge: C6 can act as a Matter endpoint and talk to other Zigbee Matter devices.
For Thread networks, C6 supports Thread and can be used in Thread-based home automation.
Because it also has Wi-Fi and BLE, you get incredible protocol flexibility in a single chip.
If your product roadmap involves smart home devices, mesh networks, or interoperable devices, this becomes a very powerful building block.
Alternative “PoE + C6” Style Boards: Bug Board & Shield
Speaking of alternative boards, there is the Esp32‑C6‑Bug board: a development board built around the C6 SoC with Wi-Fi 6, BLE, and 802.15.4. (Crowd Supply)
However, the Bug board itself doesn’t have built-in Ethernet or PoE — that’s handled by a companion Esp32-Bug-Eth shield, which adds a W5500 Ethernet chip plus a DP1435-5V PoE module. (Crowd Supply)
This modular approach is interesting if you want to prototype first and then decide whether to integrate PoE. The shield also supports Stemma-QT connectors, making it easy to interface with sensors. (Crowd Supply)
You can even pick up just the Esp32-Bug‑PoE shield separately. (e-shop.prokyber.com)
Real‑World Use & Community Feedback
From the community:
Some users say that when using the Bug board + Ethernet shield, they can offload wireless traffic (like Thread or Zigbee) to Ethernet, giving more stable multi-protocol setups. (Reddit)
Others have tried using the C6 with PlatformIO, but noted that Arduino support is limited — PlatformIO often insists on ESP‑IDF framework instead. (Reddit)
There are also some notes about USB limitations: for instance, on some C6 boards, the USB port is only for serial communication and doesn’t act like a general USB device. (Reddit)
All this shows it’s still a fairly cutting-edge ecosystem — but growing fast.
Other ESP32 Variants to Consider (and Why C6 Is Unique)
It’s useful to compare with other variants:
ESP32‑C3 PoE: A more budget-friendly RISC‑V chip, but doesn’t bring Wi-Fi 6 or 802.15.4.
ESP32 Cam PoE: If your project demands a camera + PoE, this is an option — but it’s usually based on older ESP32 cores, and may not give the same radio flexibility.
ESP32‑POE and esp32-poe-iso boards: solid for Ethernet + PoE, but not as future-ready when you think mesh networks or Matter.
Waveshare ESP32‑P4 + boards (like the one mentioned): note that the Waveshare ESP32‑P4 + ESP32-C6 PoE board is a hybrid: P4 core (AI instructions) + C6 for connectivity. (IPv6.net)
Real Hardware Examples You Can Buy
Here are a few relevant boards that are currently available:
Espressif ESP32‑C6‑DevKitC‑1: The official development board from Espressif, with Wi-Fi 6, C6 core, and exposed GPIO.
ESP32‑C6 DevKitM‑1: A more compact version, ideal for breadboarding or smaller prototypes.
Waveshare ESP32‑C6 1.47″ Display Board: This board even comes with a 1.47″ color screen, which is great for basic HMI – though note, this version doesn’t necessarily support PoE out of the box.
I couldn’t find a commercial, off‑the‑shelf ESP32‑C6 PoE board other than the Waveshare‑style hybrid or the Bug + shield combo — but those are robust starting points.
Pricing & Cost Considerations (ESP32‑C6 Price)
When it comes to ESP32-C6 price, it’s still somewhat niche — newer boards or development kits will likely cost more compared to older ESP32 variants. The Bug board + shield combo (for PoE) is reasonably priced for prototyping. (Crowd Supply)
But when you add features like PoE, a display, or audio, the cost goes up — so when planning a project, budget accordingly.
Getting Started: How to Use the Board for HMI / IoT
If you’ve just got one in your hands, here’s a friendly roadmap to get started:
Read the Datasheet: Start with the ESP32‑C6 datasheet. (Espressif Systems)
Set Up Your Development Environment: Use ESP-IDF, which fully supports C6. (Espressif Systems)
Power It Right: For PoE, make sure your switch or injector is compatible. (Using a PoE switch or PoE injector helps you test the ethernet + power features.)
Prototype Peripherals: Connect a display via MIPI‑DSI if you’re building an HMI, or hook up microSD, microphone, or other I/O.
Use Network Features: Try both Wi-Fi 6 and Ethernet. Test Zigbee or Thread if you want mesh networking.
Secure Your Device: Turn on secure boot, enable flash encryption, and take advantage of crypto accelerators.
Deploy & Test: Build a simple UI, deploy your panel, and monitor power consumption, latency, and connectivity.
Limitations & Things to Watch Out For
Just to keep things real — as promising as the ESP32‑C6 PoE development board is, it has some trade‑offs:
Radio co‑existence: Some users note that using Wi-Fi and 802.15.4 (Zigbee / Thread) at the same time is limited due to RF path sharing. (Reddit)
USB limitations: On certain C6 boards, USB is only for serial, not general USB device functionality. (Reddit)
Support maturity: While ESP-IDF supports C6, some frameworks (like Arduino or PlatformIO) may not have as mature or stable support. (Reddit)
PoE height and size: Adding PoE modules or shields can increase board size or complexity, especially on a compact dev board.
Cost trade‑offs: If you don’t need PoE or Zigbee / Thread, older ESP32 boards might be cheaper and more than good enough.
Why This Board Could Rank #1 for Your Next Project
If you ask me (over coffee), here’s why the ESP32‑C6 PoE development board (especially a Waveshare-style hybrid) might be the best choice for your next IoT or HMI build:
Versatility: Wired + wireless connectivity — you’re covered for robustness or flexibility.
Long-term scalability: Support for Zigbee, Thread, and Matter means your design is future-ready.
Security: Secure boot, encryption, cryptographic accelerators — things that matter if you’re building a real product.
Simplicity of deployment: PoE means fewer cables, fewer power hassles, especially for remote panels.
If you’re building a smart device with a real display or need a stable network connection, this board punches way above its weight.
Final Thoughts
To wrap up, the ESP32‑C6 PoE development board targeting HMI and IoT applications is a pretty compelling piece of hardware. It’s not just about having “another ESP32” — it’s about combining up-to-date wireless tech (Wi-Fi 6 + BLE + Zigbee) with wired ethernet + PoE, making it a strong candidate for smart panels, gateways, and edge devices.
Yes, there are alternatives (like the Bug board + shield, or older PoE boards), but for future-ready multi-protocol designs, C6 is a sweet spot. Just be aware of tradeoffs, set up your development environment with ESP-IDF, and you’ll be well on your way.