Learn Modules Programming Basics in Linux with clear examples, step-by-step guidance, and beginner-friendly explanations for efficient kernel module development.
If you are starting your journey into Linux kernel development, modules programming basics is one topic you simply cannot skip. Kernel modules are the safest, cleanest, and most practical way to learn how the Linux kernel really works without constantly rebuilding the entire kernel.
Think of kernel modules like plugins for the Linux kernel. You load them when needed, unload them when you are done, and keep your system flexible and clean. Whether you want to write a device driver, add debugging support, or experiment with kernel internals, understanding module programming basics is step one.
What Are Kernel Modules and Why Do They Matter?
A kernel module is a piece of code that runs inside the Linux kernel space and can be inserted or removed at runtime. Unlike user-space programs, kernel modules have direct access to hardware and core kernel services.
Why does this matter?
Because without kernel modules:
Every driver change would require a full kernel rebuild
Development would be slow and risky
Debugging would be painful
With kernel modules:
You can load features dynamically
You can test drivers safely
You can keep the kernel small and modular
This is why modules programming basics is considered the foundation of Linux kernel programming.
Kernel code must always clean up. If you forget this, you crash systems in real products.
Step 7: Module Metadata
module_init(my_init);
module_exit(my_exit);

MODULE_LICENSE("GPL");
MODULE_AUTHOR("Kernel Developer");
MODULE_DESCRIPTION("Simple Character Driver");
Without this, your module is incomplete.
Building and Testing the Character Driver
Build the Module
Use the same kernel module Makefile you already learned.
Load the Module
sudo insmod mychardev.ko
Check Kernel Log
dmesg
You will see the assigned major number.
Create Device Node
sudo mknod /dev/mychardev c <major> 0
Now your driver is accessible from user space.
Test from User Space
cat /dev/mychardev
You should see kernel logs confirming read access.
Congratulations. You just walked through a real character driver module.
How lsmod Really Works Internally
Most people use lsmod without knowing what it does.
Let’s fix that.
What lsmod Shows
lsmod
Output columns:
Module name
Size
Used by (dependency count)
This data does not come from nowhere.
lsmod Reads From /proc/modules
Internally, lsmod reads:
/proc/modules
This file is generated by the kernel dynamically.
It contains:
Loaded module list
Memory usage
Reference counts
Dependency information
So when you load your character driver, it instantly appears here.
Understanding /proc Internals Like a Kernel Developer
The /proc filesystem is a virtual filesystem. Files here do not exist on disk.
They are views into kernel data structures.
Important /proc Files for Module Developers
/proc/modules
Tracks loaded kernel modules
Used by lsmod
/proc/kallsyms
Kernel symbol table
Lists exported functions and variables
/proc/devices
Lists registered character and block devices
Shows major numbers
Example:
cat /proc/devices
You will see your character driver listed under character devices.
How /proc Connects to Modules Programming Basics
When you:
Register a device
Export a symbol
Load a module
The kernel updates internal structures that /proc exposes.
That means:
/proc is not magic
It is a debug window into kernel state
Understanding this gives you confidence during debugging.
How Module Dependencies Appear in /proc
When a module depends on another:
Kernel tracks symbol usage
Reference counts increase
/proc/modules reflects this relationship
This is how modprobe safely loads and unloads modules.
Why Interviewers Love These Topics
Interviewers ask about:
Character driver flow
lsmod output
/proc internals
Not because they want commands, but because these topics prove:
You understand kernel architecture
You can debug real systems
You know how kernel modules live and die
Mastering this puts you ahead of most candidates.
Common Beginner Confusions Cleared
/proc files are not real files
lsmod is just a viewer, not a controller
Character drivers are not optional in kernel learning
Cleanup is as important as initialization
Final Thoughts
If modules programming basics is the foundation, then:
Character drivers are the walls
lsmod and /proc internals are the wiring behind them
Once you understand these:
Writing drivers becomes logical
Debugging becomes faster
Kernel code stops feeling dangerous
You are no longer guessing. You are observing the kernel from the inside.
FAQ : Modules Programming Basics
1. What is a Linux kernel module (LKM)? A Linux kernel module is a piece of code that can be loaded into or removed from the Linux kernel at runtime. It extends the kernel functionality without the need to reboot the system.
2. Why should I learn Linux kernel modules? Learning LKMs allows you to write device drivers, implement new system features, or optimize kernel behavior. It’s essential for embedded systems, OS development, and low-level programming.
3. How do I create a Linux kernel module? You write a C file containing init and exit functions, compile it with the kernel build system, and use insmod to load it and rmmod to remove it.
4. What are the key functions in a kernel module? Every kernel module has at least:
init_module() or module_init() – runs when the module is loaded
cleanup_module() or module_exit() – runs when the module is removed
5. How do I check if a kernel module is loaded? Use the command:
lsmod
It lists all currently loaded kernel modules.
6. What is modprobe and how is it different from insmod?
insmod loads a module manually
modprobe automatically handles module dependencies before loading
7. Can I pass parameters to a kernel module? Yes, you can pass parameters using module_param() macros. For example, you can set buffer sizes, device IDs, or debugging flags at load time.
8. How do kernel modules help with device drivers? Modules allow drivers to be loaded only when hardware is present, reducing memory usage and keeping the kernel modular and efficient.
9. What are kernel module dependencies? Some modules require other modules to work. modprobe automatically loads dependencies, while insmod requires manual handling.
10. How do I debug Linux kernel modules? You can use:
dmesg for kernel messages
printk() to print debug info from your module
Kernel debuggers like kgdb for advanced debugging
11. Can I update a module without rebooting Linux? Yes, one of the main advantages of LKMs is hot-swapping – you can remove and reload updated modules without restarting the system.
12. What are the best practices for writing kernel modules?
Keep modules small and focused
Check return values and handle errors
Avoid blocking operations in the kernel
Use proper synchronization for shared resources
13. Which tools do I need to work with Linux kernel modules?
GCC compiler for C
Makefile for kernel build system
insmod, rmmod, modprobe, lsmod, and dmesg commands
14. Are Linux kernel modules secure? Modules run in kernel space, so a buggy or malicious module can crash or compromise the system. Always validate code and test in a safe environment.
Explore the Linux Memory Sub-System in a simple, beginner-friendly way. Learn virtual memory, paging, caching, MMU, and memory management concepts used in real systems.
Ever wondered why your computer seems fast one moment and slow the next? The secret often lies in the memory sub-system. If the CPU is the brain, then memory is its workspace. A well-managed memory sub-system ensures smooth multitasking, stability, and speed.
Today, we’ll explore the Linux kernel memory sub-system, dive into memory representation data structures, memory allocators, boot memory allocation, and page tables and address translation all in a clear, beginner-friendly way.
What is a Memory Sub-System?
Think of your computer’s memory sub-system as a highly organized library:
Bookshelves: Physical RAM and other memory hardware.
Catalog: OS memory management structures.
Librarians: Memory allocators ensuring the right “book” (data) is at the right place.
The memory sub-system isn’t just RAM; it’s a combination of hardware, software, and data structures that work together to store, retrieve, and move data efficiently.
Why Memory Sub-System Matters
Understanding the memory sub-system is critical for:
This snippet demonstrates kernel memory allocation and freeing, showing the practical use of memory allocators.
Summary
The memory sub-system is the silent powerhouse behind your computer’s speed, stability, and multitasking. From boot memory allocation to page tables and address translation, and from memory representation data structures to memory allocators, it’s a fascinating, intricate system.
Mastering it helps you:
Write more efficient code
Debug memory issues
Optimize system performance
For Linux developers, understanding the kernel memory sub-system is essential, whether you’re building drivers, optimizing applications, or debugging system crashes.
Memory Sub-System Interview Questions and Answers
ROUND 1: Basic & Screening Interview Questions
These questions test fundamental understanding and clarity of concepts.
1. What is a Memory Sub-System?
Answer: The memory sub-system is the part of a computer system responsible for storing, organizing, allocating, and accessing memory. It includes physical memory like RAM, virtual memory, page tables, caches, and memory management logic inside the operating system. Its main goal is to provide fast, safe, and efficient memory access to applications and the kernel.
2. Why is the memory sub-system important?
Answer: Because CPU speed alone doesn’t define performance. If memory access is slow or poorly managed, the CPU will stay idle. A good memory sub-system improves performance, stability, multitasking, and system reliability.
3. What are the main components of a memory sub-system?
Answer: Key components include:
Physical memory (RAM)
Virtual memory
Page tables
Memory allocators
Caches
Memory management unit (MMU)
4. What is virtual memory?
Answer: Virtual memory is an abstraction that allows each process to think it has its own large, continuous memory space. The operating system maps virtual addresses to physical memory using page tables.
5. Difference between virtual memory and physical memory?
Answer:
Virtual Memory
Physical Memory
Seen by programs
Actual RAM
Continuous address space
Fragmented
Managed by OS
Managed by hardware
Uses page tables
Uses memory chips
6. What is Linux kernel memory?
Answer: Linux kernel memory refers to memory used internally by the kernel for:
Kernel code and data
Device drivers
Kernel objects
Buffers and caches
This memory is protected from user-space access.
7. What is a memory allocator?
Answer: A memory allocator is responsible for assigning and freeing memory blocks. In Linux, different allocators exist for different needs like buddy allocator, slab allocator, and SLUB allocator.
8. Why do we need multiple memory allocators?
Answer: Because:
Large allocations need different handling than small ones
Kernel objects are frequently created and destroyed
Performance and fragmentation must be optimized
9. What is memory fragmentation?
Answer: Fragmentation happens when free memory is broken into small, scattered pieces that can’t be used efficiently even if total free memory exists.
10. What are page tables?
Answer: Page tables are data structures that map virtual addresses to physical addresses. They enable virtual memory, memory protection, and isolation between processes.
11. What is address translation?
Answer: Address translation is the process of converting a virtual address generated by a program into a physical address using page tables and the MMU.
12. What is MMU?
Answer: MMU (Memory Management Unit) is hardware that performs:
Virtual to physical address translation
Access permission checks
Cache control
13. What is cache memory?
Answer: Cache is fast memory placed close to the CPU to reduce access time for frequently used data.
14. What is boot memory allocation?
Answer: Boot memory allocation is memory allocation done during early system startup before the full memory management system is ready.
15. Why is early boot memory special?
Answer: Because:
Normal allocators are not initialized
Kernel still needs memory for setup
Special boot-time allocators are required
ROUND 2: Advanced & Technical Interview Questions
These test real kernel-level understanding.
16. Explain Linux memory sub-system architecture.
Answer: Linux memory sub-system consists of:
Physical memory management
Virtual memory management
Page cache and slab cache
Memory zones
Swap and reclaim mechanisms
All work together to provide efficient memory usage.
17. What are memory zones in Linux?
Answer: Memory zones divide RAM based on hardware limitations:
ZONE_DMA – For DMA-capable devices
ZONE_NORMAL – Regular kernel and user memory
ZONE_HIGHMEM – High memory not directly mapped
18. What is the buddy allocator?
Answer: The buddy allocator manages memory in power-of-two blocks. It splits large blocks into smaller ones and merges free blocks to reduce fragmentation.
19. What problem does the slab allocator solve?
Answer: Slab allocator optimizes allocation of small, frequently used kernel objects by caching them instead of allocating from scratch every time.
20. Difference between SLAB and SLUB allocator?
Answer:
SLAB
SLUB
Complex design
Simpler
More memory overhead
Less overhead
Older
Default in modern Linux
21. What is kmalloc and vmalloc?
Answer:
kmalloc
vmalloc
Physically contiguous
Virtually contiguous
Faster
Slower
Limited size
Larger allocations
22. When would you use vmalloc?
Answer: When large contiguous virtual memory is needed but physical contiguity is not required.
23. Explain page fault.
Answer: A page fault occurs when a process accesses a page not currently mapped in physical memory. The kernel handles it by loading the page or allocating memory.
24. What is demand paging?
Answer: Demand paging loads memory pages only when they are actually accessed, saving memory.
25. What is swap memory?
Answer: Swap is disk space used as an extension of RAM when physical memory is insufficient.
Answer: High memory is RAM that cannot be permanently mapped into kernel address space on 32-bit systems.
41. Explain memory leak in kernel space.
Answer: Kernel memory leak occurs when allocated memory is not freed, leading to gradual system instability.
42. Tools to debug Linux memory issues?
Answer:
/proc/meminfo
slabtop
vmstat
perf
kmemleak
43. How does memory sub-system affect performance?
Answer: Efficient memory allocation reduces latency, avoids fragmentation, improves cache usage, and keeps CPU busy.
44. Explain Linux boot memory flow.
Answer:
Early boot allocator initializes
Kernel sets up page tables
Memory zones are created
Buddy and slab allocators start
45. Real-world example where memory knowledge helped debugging?
Answer (Sample): High memory usage issue caused by slab cache growth due to missing kfree, fixed by identifying leak using slabtop.
Bonus: One-Line Rapid-Fire Questions
Page size? → Usually 4KB
Kernel space vs user space? → Separate memory regions
TLB miss? → Slower address translation
Physical contiguous memory needed? → DMA
Frequently Asked Questions (FAQ) on Memory Sub-System
1. What is a memory sub-system in simple words?
A memory sub-system is the part of a computer that stores data and makes sure the CPU can access it quickly and safely. It manages RAM, virtual memory, page tables, and memory allocation so programs run smoothly without interfering with each other.
2. Why is the memory sub-system important for system performance?
Because even the fastest CPU becomes slow if memory access is inefficient. A well-designed memory sub-system reduces delays, improves multitasking, and keeps applications responsive.
3. How does the Linux kernel manage memory?
The Linux kernel manages memory using physical and virtual memory layers, memory allocators, page tables, and caching mechanisms. Together, these components ensure efficient allocation, protection, and fast access to memory.
4. What is the role of virtual memory in the memory sub-system?
Virtual memory allows each process to use its own private address space. It helps in memory isolation, security, and efficient use of RAM by loading only required data when needed.
5. What are page tables and why are they needed?
Page tables map virtual addresses to physical memory locations. They are essential for address translation, memory protection, and enabling multiple programs to run at the same time without conflicts.
6. What are memory allocators in Linux?
Memory allocators are kernel mechanisms that assign and free memory. Linux uses different allocators like the buddy allocator for large memory blocks and slab or SLUB allocators for small, frequent allocations.
7. What is boot memory allocation?
Boot memory allocation is the process of reserving and assigning memory during early system startup, before the full memory management system is initialized. It ensures the kernel can load and configure itself properly.
8. What are memory representation data structures?
Memory representation data structures are internal kernel structures that track memory usage, allocation state, and mappings. Examples include page structures, virtual memory areas, and page tables.
9. How does address translation work in Linux?
When a program accesses memory, the CPU generates a virtual address. The memory sub-system uses page tables and the MMU to translate this virtual address into a physical address in RAM.
10. What is the difference between kernel memory and user memory?
Kernel memory is used by the operating system and device drivers, while user memory is used by applications. Kernel memory is protected and cannot be accessed directly by user programs.
11. What problems can occur if memory is poorly managed?
Poor memory management can lead to slow performance, crashes, memory leaks, fragmentation, and even system freezes. That’s why a strong memory sub-system is critical for stability.
12. Why should developers understand the memory sub-system?
Understanding the memory sub-system helps developers write efficient code, debug memory issues, improve performance, and succeed in Linux and embedded system interviews.
Time measurement and delays are the backbone of how Linux and embedded systems actually work. This guide explains time measurement in a simple, practical way, covering kernel ticks, jiffies, Linux timers, and delay APIs with real-world meaning.
You will learn why systems need accurate time tracking, how delays are introduced without wasting CPU, and which delay methods are safe to use in user space and kernel space. Everything is explained in clear language, with examples that reflect real engineering work, not theory. Whether you are preparing for Linux kernel interviews or trying to write stable embedded code, this article helps you understand time and delays the way the operating system does.
Introduction: Why Time Measurement & Delays Matter More Than You Think
Time is invisible, but in computing systems, especially embedded and operating systems, time controls everything.
When you blink an LED, schedule a process, debounce a button, send an audio frame, or wait for hardware to stabilize, you are dealing with time measurement & delays. If time handling is wrong, systems become unstable, slow, power-hungry, or simply broken.
Most beginners treat delays as “just add sleep” and time as “just read a timer.” That works for demos, but real systems need precision, predictability, and efficiency .
By the end, you will think about time the same way the kernel does.
The Need for Time Measurement in Computing Systems
Let’s start with the most basic question.
Why do systems even need time measurement?
Imagine a system with no sense of time:
Tasks would never expire
Schedulers could not decide who runs next
Network timeouts would never trigger
Animations, audio, and video would break
This is why the need for time measurement exists at every level of software.
Core reasons time measurement is required
1. Task Scheduling
Operating systems decide which task runs and for how long. Without time measurement, fair scheduling is impossible.
2. Timeout Handling
Waiting forever for hardware or network responses is dangerous. Time measurement allows safe timeouts.
3. Performance Measurement
You cannot optimize what you cannot measure. Execution time, latency, and response time all depend on accurate clocks.
4. Synchronization
Protocols, distributed systems, and real-time tasks rely on timestamps to stay in sync.
5. Power Management
Sleep states, wakeup timers, and low-power modes all rely on time measurement.
In short, time measurement is not a feature. It is infrastructure.
Understanding Time from a System’s Point of View
Humans think in seconds and minutes. Computers don’t.
A system sees time as:
Clock cycles
Timer interrupts
Counters
Ticks
This abstraction is what allows software to reason about time.
Hardware clocks vs software time
Hardware clocks
CPU clock
System timer
RTC (Real Time Clock)
These provide raw timing signals.
Software time
Jiffies
Ticks
High resolution timers
Software layers convert hardware signals into usable time units.
This is where Time measurement & Delays becomes an OS responsibility.
Kernel Tick: The Heartbeat of the Operating System
One of the most important concepts in time measurement is the kernel tick.
What is a kernel tick?
A kernel tick is a periodic interrupt generated by a hardware timer. Every tick tells the kernel: “Another small unit of time has passed.”
Think of it like a heartbeat.
If the kernel tick is 1 ms, the kernel gets 1000 ticks per second.
Why the kernel tick exists
The kernel tick helps the OS:
Update system time
Preempt tasks
Handle timers
Trigger scheduling decisions
Without the kernel tick, the OS would be blind to time progression.
How Kernel Tick Works Internally
Let’s simplify this.
Hardware timer fires an interrupt
CPU switches to kernel mode
Timer interrupt handler runs
Kernel updates internal time counters
Scheduler may run
CPU resumes execution
This entire process happens thousands of times per second.
That is why kernel tick handling must be fast.
Kernel Tick Frequency and Its Impact
Kernel tick frequency is often represented as HZ.
Examples:
HZ = 100 → tick every 10 ms
HZ = 250 → tick every 4 ms
HZ = 1000 → tick every 1 ms
Higher tick rate pros
Better timing precision
Smoother scheduling
More responsive systems
Higher tick rate cons
More interrupts
Higher CPU overhead
Increased power consumption
Choosing the right kernel tick rate is a balance, especially in embedded systems.
Tickless Kernel: A Modern Improvement
Older systems relied heavily on kernel ticks. Modern systems often use a tickless design.
What does tickless mean?
Instead of waking up at fixed intervals, the kernel sleeps until the next event.
This reduces:
Unnecessary wakeups
Power usage
Interrupt overhead
Tickless kernels still support Time measurement & Delays, but more efficiently.
The Need for Delays in Real Systems
Now let’s talk about delays.
Why do we need delays at all?
At first glance, delays seem wasteful. But the need for delays is very real.
Common reasons include:
Hardware stabilization
Communication timing
User experience
Synchronization
Let’s break this down.
Hardware Stabilization Delays
Hardware does not react instantly.
Examples:
Sensors need warm-up time
PLLs need lock time
Displays need initialization delays
Skipping these delays leads to undefined behavior.
This is one of the most common beginner mistakes.
Communication Timing Delays
Protocols often require timing gaps.
Examples:
SPI chip select timing
I2C setup and hold times
UART baud rate stabilization
Here, delays are not optional. They are part of the protocol.
User Experience Delays
Sometimes delays are intentional.
Examples:
Button debounce
UI animations
Status indication timing
These delays make systems feel natural instead of jittery.
Synchronization and Coordination
In concurrent systems, delays help coordinate events.
Examples:
Waiting for a resource
Polling with timeout
Retrying after failure
This is where delay design becomes critical.
Introducing Delays: The Right Way vs the Wrong Way
Now comes the practical part.
Introducing delays incorrectly
The most common wrong approach is busy waiting.
for (int i = 0; i < 1000000; i++);
Problems:
CPU is wasted
Timing is unreliable
Power usage spikes
Busy waits should be avoided unless absolutely necessary.
Introducing Delays Using Sleep Mechanisms
Operating systems provide sleep APIs for a reason.
User space delays
sleep()
usleep()
nanosleep()
These allow the CPU to do useful work elsewhere.
Kernel space delays
msleep()
usleep_range()
schedule_timeout()
These are safer and scheduler-friendly.
This is the correct way of introducing delays in most cases.
Delay Accuracy vs Delay Efficiency
Not all delays are equal.
Accurate delays
Needed for hardware timing
Short duration
Often implemented using timers
Efficient delays
Needed for waiting
Longer duration
CPU should sleep
Choosing the wrong type leads to bugs or inefficiency.
Delays in Embedded Systems
Embedded systems add another layer of complexity.
Bare-metal delays
Timer based delays
Cycle counting
SysTick usage
RTOS delays
vTaskDelay()
Tick based scheduling
Time slicing
Here, Time measurement & Delays are tightly coupled with system design.
Real Time Systems and Delay Guarantees
In real-time systems, delays are not just delays. They are deadlines.
Missing a delay window can cause:
Data corruption
Safety hazards
System failure
That is why real-time kernels treat time as a first-class citizen.
Measuring Time Accurately
Delays are only as good as your time measurement.
Common time sources
System clock
Monotonic clock
Hardware timers
What to avoid
Wall clock for measuring durations
Unstable clocks
Low resolution timers
Always use monotonic time for measuring elapsed durations.
Time Drift and Its Effects
Time is never perfect.
Clocks drift due to:
Temperature
Voltage
Hardware quality
Systems compensate using:
Clock synchronization
Periodic calibration
RTC correction
Ignoring drift causes long-term issues.
Common Mistakes Beginners Make
Let’s call these out directly.
Using busy loops for delays
Assuming sleep is exact
Ignoring scheduler behavior
Mixing time units
Using wall clock for performance measurement
Fixing these improves system reliability instantly.
Best Practices for Time Measurement & Delays
Here are rules that actually work.
Measure time, don’t guess
Sleep whenever possible
Use kernel-provided timers
Keep delays minimal
Understand your scheduler
Test under load
These apply across Linux, RTOS, and embedded platforms.
Time Measurement & Delays in Linux Kernel Context
In the Linux kernel:
Kernel tick drives scheduling
Timers manage delayed execution
High resolution timers improve accuracy
Understanding these concepts helps you debug latency, audio glitches, and real-time issues.
Linux Timer Internals, Delay APIs, and Interview Q&A
Part 1: Linux Timer Internals Explained Like a Human
Why Linux Needs Timers at All
Linux is not sitting idle waiting for things to happen. It needs timers to:
Wake up sleeping processes
Enforce scheduling time slices
Handle timeouts
Measure time correctly
This entire system is built around time measurement & delays.
Core Building Blocks of Linux Timer Internals
1. Hardware Timers (The Foundation)
Linux does not create time from nothing. It relies on hardware timers such as:
Programmable Interval Timer
High Precision Event Timer (HPET)
ARM generic timer
TSC (Time Stamp Counter)
These timers generate interrupts or counters that Linux uses to track time.
2. Kernel Tick (Traditional Model)
Earlier Linux kernels used a fixed periodic interrupt called the kernel tick.
Timer interrupt fires every X milliseconds
Kernel updates internal time
Scheduler decides task switching
Timers are checked
This is where HZ comes into play.
Example:
HZ = 1000 → 1 tick every 1 ms
3. Tickless Kernel (Modern Linux)
Modern Linux uses a tickless kernel when possible.
Instead of waking up every millisecond:
Kernel programs the timer for the next actual event
CPU sleeps longer
Power consumption drops
Tickless kernel still supports accurate time measurement & delays, just smarter.
4. Jiffies (Kernel’s Internal Time Unit)
Jiffies is a global counter incremented every tick.
Type: unsigned long
Unit: ticks
Used heavily inside kernel
Example:
timeout = jiffies + msecs_to_jiffies(100);
Jiffies is fast, not precise. That’s intentional.
5. Timer Wheel (Efficient Timer Management)
Linux manages timers using a timer wheel concept.
Why?
Thousands of timers may exist
Checking all timers every tick is expensive
Timer wheel groups timers by expiration time, making timer handling efficient.
6. High Resolution Timers (hrtimers)
For accurate timing (audio, real-time tasks), Linux uses high resolution timers.
Features:
Nanosecond precision
Not limited by kernel tick
Uses hardware timer directly
This is critical for modern multimedia and real-time systems.
7. Softirqs and Timers
Timer callbacks often run in softirq context.
This means:
Cannot sleep
Must be fast
No blocking calls
Many kernel bugs happen because developers forget this.
Part 3: Linux Timer Interview Questions and Answers
ROUND 1: Basic to Intermediate Questions
Q1. Why does Linux need timers?
Answer: Linux needs timers to track time, schedule processes, handle timeouts, manage delays, and support real-time behavior. Without timers, multitasking would not work.
Q2. What is a kernel tick?
Answer: A kernel tick is a periodic timer interrupt that tells the kernel that a small unit of time has passed. It is used for scheduling, time accounting, and timer management.
Q3. What is HZ in Linux?
Answer: HZ defines how many timer interrupts occur per second. For example, HZ = 1000 means one tick every millisecond.
Q4. What are jiffies?
Answer: Jiffies is a kernel variable that counts the number of ticks since system boot. It is used internally for timing calculations.
Q5. Difference between busy wait and sleep?
Answer: Busy wait wastes CPU cycles while sleep allows the scheduler to run other tasks. Busy wait is accurate but inefficient.
Q6. Why is mdelay dangerous?
Answer: Because it blocks the CPU and prevents other tasks from running, which can cause latency and power issues.
Q7. What is tickless kernel?
Answer: A tickless kernel avoids periodic timer interrupts when the system is idle and wakes up only when needed, improving power efficiency.
ROUND 2: Advanced & Kernel-Level Questions
Q1. Why does Linux prefer usleep_range over udelay?
Answer: usleep_range allows the scheduler flexibility and reduces power usage, while udelay is a busy wait and blocks the CPU.
Q2. Can you sleep in interrupt context?
Answer: No. Sleeping in interrupt context is not allowed because interrupts must execute quickly and cannot block.
Q3. What context do timer callbacks run in?
Answer: Most timer callbacks run in softirq context, which means they cannot sleep and must be fast.
Q4. How does Linux achieve high resolution timers?
Answer: Linux uses hardware timers directly through hrtimers instead of relying on kernel ticks, allowing nanosecond precision.
Q5. What happens if HZ is too high?
Answer: Higher HZ increases timer interrupts, CPU overhead, and power consumption.
Q6. Why should wall clock not be used for measuring execution time?
Answer: Wall clock can change due to NTP or user adjustment. Monotonic clock always moves forward and is reliable.
Q7. How does schedule_timeout work internally?
Answer: It sets the task state and puts the process to sleep until the specified number of jiffies expires or a signal wakes it.
Q8. When should hrtimers be used?
Answer: When precise timing is required, such as audio playback, real-time scheduling, or hardware synchronization.
Q9. What are common timer-related bugs?
Answer:
Sleeping in atomic context
Using udelay for long delays
Timer callback doing heavy work
Incorrect time unit conversion
Q10. How does time measurement affect audio or real-time systems?
Answer: Incorrect timing causes jitter, buffer underruns, missed deadlines, and unstable system behavior.
Frequently Asked Questions (FAQ) on Time Measurement & Delays
1. What is time measurement in Linux systems?
Time measurement in Linux is the way the operating system tracks the passage of time to schedule tasks, manage delays, handle timeouts, and measure performance. It is done using hardware timers, kernel ticks, and software counters.
2. Why is time measurement important in operating systems?
Time measurement is important because without it the system cannot schedule processes, enforce timeouts, or coordinate hardware and software correctly. Almost every OS feature depends on accurate timing.
3. What is a kernel tick in Linux?
A kernel tick is a periodic timer interrupt that informs the Linux kernel that a fixed amount of time has passed. It helps the kernel update time, run the scheduler, and manage timers.
4. What does HZ mean in the Linux kernel?
HZ defines how many kernel ticks occur per second. For example, HZ = 1000 means the kernel receives one tick every millisecond, which improves timing accuracy but increases CPU overhead.
5. What are jiffies and why are they used?
Jiffies are a kernel variable that counts the number of ticks since system boot. They are fast and efficient, making them ideal for internal kernel time calculations.
6. Why does Linux use a tickless kernel?
Linux uses a tickless kernel to reduce unnecessary timer interrupts when the system is idle. This improves power efficiency and reduces CPU usage while still maintaining accurate time measurement.
7. What is the need for delays in Linux and embedded systems?
Delays are needed to allow hardware to stabilize, manage communication timing, debounce inputs, and synchronize tasks. Without proper delays, systems can behave unpredictably.
8. What is the difference between busy wait and sleep delays?
Busy wait delays keep the CPU active and waste processing power, while sleep delays allow the scheduler to run other tasks. Sleep-based delays are preferred in most cases.
9. Which delay API should be used inside the Linux kernel?
For short delays, usleep_range() is preferred. For longer delays, msleep() is commonly used. Busy wait functions like udelay() should only be used for very short hardware-specific delays.
10. Can a kernel timer callback sleep?
No, kernel timer callbacks usually run in softirq context, where sleeping is not allowed. Timer callbacks must execute quickly and avoid blocking operations.
11. Why is monotonic time preferred over wall clock time?
Monotonic time always moves forward and is not affected by system time changes. Wall clock time can change due to NTP or manual updates, making it unreliable for measuring durations.
12. How do time measurement and delays affect system performance?
Incorrect handling of time and delays can cause high CPU usage, poor responsiveness, audio glitches, missed deadlines, and increased power consumption. Proper time management leads to stable and efficient systems.
Learn how to modify kernel sources step-by-step, with real driver examples and beginner-friendly guidance for Linux and embedded systems.
If you’ve ever wondered what really happens inside Linux when hardware talks to software, you’re already thinking in the right direction. Modifying kernel sources is where Linux stops being just an operating system and starts becoming a tool you can shape.
This guide is written for curious beginners. You don’t need to be a kernel wizard. You don’t need to memorize internal APIs. You just need patience, basic Linux knowledge, and the willingness to learn by doing.
By the end of this article, you’ll clearly understand how to modifying kernel sources, why people do it, and how to do it safely without breaking your system.
What Does Modifying Kernel Sources Really Mean?
At a simple level, modifying kernel sources means changing the Linux kernel’s source code to adjust how the system behaves.
This could mean:
Adding support for new hardware
Tweaking existing drivers
Adding logs for debugging
Changing scheduling or memory behavior
Learning kernel internals for career growth
You’re not rewriting Linux from scratch. Most changes are small and focused. A few lines added. A condition adjusted. A feature enabled or disabled.
That’s how everyone starts.
Why Would Anyone Modify Kernel Sources?
This is the first question beginners ask. And it’s a fair one.
Here are the real reasons people modify kernel sources:
1. Hardware Support
Maybe your device isn’t fully supported by the stock kernel. Embedded boards, sensors, custom peripherals often need kernel tweaks.
2. Learning Kernel Internals
There’s no better way to understand the Linux kernel than reading and modifying its code. Tutorials help, but hands-on experience sticks.
3. Debugging System Issues
Sometimes logs aren’t enough. Adding custom debug prints inside kernel code helps trace tricky bugs.
4. Performance Optimization
In embedded and real-time systems, small kernel changes can make a big difference.
5. Career Growth
If you’re aiming for roles in embedded Linux, BSP development, or kernel engineering, knowing how to modifying kernel sources is a serious advantage.
Before You Touch Kernel Code: Important Basics
Let’s slow down for a moment.
Modifying kernel sources is powerful, but careless changes can:
Prevent your system from booting
Break drivers
Cause silent bugs
So before editing anything, make sure you understand these basics.
You Should Be Comfortable With:
Basic Linux commands
Using a terminal
Editing files with vim or nano
Understanding C code at a basic level
You don’t need to be a C expert. You just need to read code without panicking.
Getting the Linux Kernel Source Code
You can’t modify what you don’t have.
Option 1: Download From kernel.org
This is the clean, official source.
wget https://cdn.kernel.org/pub/linux/kernel/v6.x/linux-6.6.tar.xz
tar -xf linux-6.6.tar.xz
cd linux-6.6
Option 2: Use Git (Recommended)
Git makes experimentation safer.
git clone https://git.kernel.org/pub/scm/linux/kernel/git/stable/linux.git
cd linux
Using Git allows you to:
Track changes
Revert mistakes
Understand diffs clearly
If you’re serious about modifying kernel sources, Git is your friend.
Understanding the Kernel Source Tree (Without Getting Lost)
At first glance, the kernel directory looks scary. Relax. You don’t need to understand everything.
That’s it. You’ve modified kernel source code safely.
Step 4: Build and Deploy
Rebuild:
make -j$(nproc)
make modules
make dtbs
Flash kernel and dtb to the board.
Step 5: Verify Using dmesg
After boot:
dmesg | grep GPIO
Expected output:
XYZ GPIO: probe started
XYZ GPIO: probe completed successfully
If you see this, congratulations You just validated:
Driver probe executed
Kernel modification worked
Deployment pipeline is correct
This is exactly how real kernel debugging starts.
Step 6: Real Logic Modification Example (Small but Meaningful)
Now let’s do a real change, not just logs.
Suppose the GPIO direction is wrongly set by default.
Original code:
gpiochip_add_data(&chip, data);
You want to force a GPIO as output during init.
Modify:
ret = gpiochip_add_data(&chip, data);
if (ret)
    return ret;

gpio_direction_output(LED_GPIO, 1);
pr_info("XYZ GPIO: LED GPIO set as output\n");
This is a real driver modification:
Small
Targeted
Hardware-aware
This is how kernel work is actually done in companies.
Step 7: Why This Example Matters
From an interviewer’s perspective, this proves you understand:
Where drivers live
What probe does
How to debug kernel code
Safe kernel modification workflow
Interview-Focused Kernel Modification Q&A (Real Questions, Real Answers)
Now let’s switch hats.
Imagine you’re in an embedded Linux interview. These are actual questions interviewers ask.
Q1: What do you mean by modifying kernel sources?
Answer:
Modifying kernel sources means changing the Linux kernel’s C source code to alter or extend kernel behavior, such as fixing drivers, adding debug logs, supporting new hardware, or optimizing system behavior. These changes are rebuilt and deployed as a new kernel image.
Q2: When would you modify kernel code instead of user space?
Answer:
When the issue or feature is related to:
Hardware initialization
Device drivers
Interrupt handling
Power management
Performance-critical paths
User space cannot fix problems that originate in kernel space.
Q3: What is the safest way to start kernel modification?
Answer:
Start by:
Reading the existing code
Adding debug logs using pr_info or printk
Making small, isolated changes
Testing one change at a time
This minimizes risk and helps understand execution flow.
Q4: What is the role of the probe function in a driver?
Answer:
The probe function is called when the kernel matches a driver with a device. It is responsible for:
Allocating resources
Mapping registers
Initializing hardware
Registering the driver with kernel subsystems
Most driver debugging starts in the probe function.
Q5: How do you debug kernel modifications?
Answer:
Common methods include:
Using dmesg to read kernel logs
Adding printk or pr_info statements
Observing boot logs via serial console
Checking for kernel warnings or panics
Kernel debugging relies heavily on logging.
Q6: What is the difference between device tree changes and driver changes?
Answer:
Device tree changes describe hardware configuration like pins, interrupts, and addresses.
Driver changes modify software logic like initialization sequence or feature handling.
Most embedded issues should first be checked in the device tree.
Q7: Can a wrong kernel modification brick a board?
Answer:
A wrong kernel can prevent boot, but boards are rarely permanently bricked. Keeping:
A backup kernel
Recovery method (UART, SD card, fastboot)
makes kernel experimentation safe.
Q8: Why is Git important in kernel development?
Answer:
Git helps:
Track changes
Revert mistakes
Create patches
Review differences
Kernel development without version control is risky and unprofessional.
Q9: What precautions do you take before modifying kernel code?
Answer:
Understand hardware and requirements
Read related code paths
Enable required kernel config options
Keep a working kernel backup
Modify one thing at a time
Q10: How do you explain kernel modification experience in interviews?
Answer (Strong Answer):
“I worked on embedded Linux boards where I modified kernel drivers to debug hardware issues, added logs in probe functions, adjusted initialization logic, and rebuilt and tested kernels using cross-compilation. I followed safe workflows with backups and incremental testing.”
Real I2C Driver Modification
We’ll use a very realistic scenario that happens in embedded projects.
The Scenario (Straight From Real Projects)
You have:
An embedded Linux board
An I2C sensor or EEPROM
The driver exists in the kernel
But the device:
Sometimes doesn’t probe
Or works unreliably at boot
Your task:
Modify the I2C driver to debug and fix the issue.
Step 1: Understand the I2C Stack (Simple Mental Model)
If you work with Linux at anything below the application layer, sooner or later you run into one unavoidable topic: kernel configuration and compilation. It sounds heavy. It sounds scary. And honestly, most tutorials make it worse by throwing options, commands, and theory at you without context.
Let’s fix that.
In this guide, we’ll walk through kernel configuration and compilation step by step, in plain language. You’ll understand why we configure the kernel, how compilation actually works, and what matters in real embedded and Linux development. No fluff. No marketing talk. Just real understanding.
What Is Kernel Configuration and Compilation?
At a high level, kernel configuration and compilation is the process of:
Selecting which features the Linux kernel should include
Turning that configuration into a binary kernel image
Installing that kernel so the system can boot with it
The Linux kernel is not a single fixed binary. It’s more like a massive toolkit. You decide what tools you want, and then you build a kernel that fits your system.
This is especially important for:
Embedded boards
Custom hardware
Performance-sensitive systems
Learning kernel internals properly
Why Kernel Configuration Matters More Than You Think
A common beginner mistake is assuming kernel configuration is optional or something only distro maintainers do. That’s not true.
Here’s why kernel configuration matters:
Hardware support The kernel must know which drivers to include for your CPU, storage, display, network, and peripherals.
Boot time and size Including everything makes the kernel huge and slow. Embedded systems suffer badly from this.
Stability Wrong options can cause random crashes, boot failures, or subtle bugs.
Now your bootloader can load zImage and am335x-boneblack.dtb.
Step 7: Boot and Verify
Flash the bootloader and root filesystem if not already done.
Boot the board.
Check kernel version:
uname -r
Verify modules:
lsmod
Check hardware detection:
dmesg | grep i2c
dmesg | grep spi
If everything works, congratulations! You’ve just done kernel configuration and compilation for an ARM board.
Step 8: Common Pitfalls for Beginners
Wrong cross-compiler → Kernel builds but won’t boot
Missing essential drivers → Kernel panics on boot
Wrong device tree → Board boots but peripherals fail
Forgetting modules_install → Modules not available at runtime
Step 9: Tips for Real Embedded Development
Keep a versioned .config file in Git
Test changes incrementally
Document why you changed any option
Use a CI system if working on multiple boards or kernels
Optional: Quick SPI/I2C Driver Test
If you enabled I2C or SPI in the kernel:
# List I2C devices
i2cdetect -y 1

# List SPI devices
ls /dev/spidev*
This ensures kernel configuration matches your hardware setup.
FAQ on Kernel Configuration and Compilation
1. What is kernel configuration and compilation in Linux?
Answer: Kernel configuration and compilation is the process of customizing the Linux kernel for your system by selecting which features, drivers, and modules to include, and then building a binary kernel image that your machine can run. Proper configuration ensures hardware compatibility, better performance, and system stability.
2. Why is kernel configuration important for ARM boards?
Answer: ARM boards have diverse hardware components like CPUs, I2C, SPI, and USB peripherals. Kernel configuration allows you to include only the necessary drivers and modules, reducing kernel size, improving boot time, and ensuring that all hardware works reliably.
3. How do I start kernel configuration for an embedded board?
Answer: The easiest way is to start with a defconfig provided by your board vendor. For example, for BeagleBone Black, you can use: make ARCH=arm CROSS_COMPILE=arm-linux-gnueabihf- am335x_boneblack_defconfig This gives you a solid starting point, which you can further refine using menuconfig or nconfig.
4. What is the difference between built-in and module drivers in kernel configuration?
Answer:
Built-in (y): Compiled directly into the kernel; necessary for boot-critical hardware.
Module (m): Compiled as a loadable kernel module; can be loaded or unloaded at runtime. Choosing the right type ensures efficient memory usage and system reliability.
5. How do I compile the Linux kernel after configuration?
Answer: After configuration, use the following command:
make ARCH=arm CROSS_COMPILE=arm-linux-gnueabihf- zImage modules dtbs -j$(nproc)
This builds the kernel image, modules, and device tree blobs for your ARM board.
6. How do I install compiled kernel modules?
Answer: Use modules_install with an installation path pointing to your root filesystem:
make ARCH=arm CROSS_COMPILE=arm-linux-gnueabihf- INSTALL_MOD_PATH=~/rootfs modules_install
This ensures all required modules are available when the kernel boots.
7. What are the common mistakes to avoid during kernel configuration?
Answer:
Enabling unnecessary features, which bloats the kernel
Disabling essential drivers or CPU support
Using the wrong architecture or cross-compiler
Forgetting to install modules Avoiding these mistakes saves hours of troubleshooting.
8. How can I verify my compiled kernel is working correctly?
Answer: After booting your board with the new kernel, check:
Kernel version: uname -r
Loaded modules: lsmod
Hardware detection: dmesg | grep i2c or dmesg | grep spi Proper verification ensures the configuration matches your hardware.
9. Can kernel configuration improve system performance?
Answer: Yes. A well-configured kernel reduces boot time, memory usage, and CPU overhead. By including only necessary features and drivers, you create a lean, fast, and secure kernel optimized for your embedded board.
10. Is kernel configuration and compilation necessary for beginners?
Answer: Absolutely. Even beginners benefit from learning kernel configuration and compilation. It builds a strong foundation in Linux system programming, helps debug hardware issues, and prepares you for advanced embedded development on ARM or other architectures.
Learn the Essentials of Linux Kernel Architecture with our comprehensive guide. Master core concepts, understand kernel components, and prepare for all Linux kernel interview questions. Perfect for beginners and professionals aiming to excel in Linux system programming.
If you have ever used Linux, whether on a server, embedded device, Android phone, or development board, you have already relied on the Linux kernel. It works quietly in the background, managing hardware, memory, processes, and communication between software and devices. Yet for many beginners, the kernel feels mysterious and complex.
This article breaks down the Essentials of Linux kernel architecture in a clear, human, and beginner-friendly way. Just real explanations that help you understand how the Linux kernel is designed, how its major components work together, and why this architecture has made Linux so powerful and popular.
By the end of this guide, you will have a solid mental model of how the Linux kernel works internally and why its architecture matters in real-world systems.
What Is the Linux Kernel?
At its core, the Linux kernel is the heart of the operating system. It sits between user applications and the hardware.
When you open a file, start a program, connect to the internet, or plug in a USB device, your application does not talk directly to the hardware. Instead, it makes a request to the kernel. The kernel decides what is allowed, manages resources, and communicates with the hardware safely.
In simple terms:
Applications ask for services
Kernel manages and controls everything
Hardware does the actual physical work
This layered design is the foundation of Linux kernel architecture.
Why Linux Kernel Architecture Matter
Understanding the Essentials of Linux kernel architecture is important for several reasons:
It helps you debug system-level problems
It improves performance tuning skills
It is essential for kernel development, device drivers, and embedded systems
It is a common interview topic for Linux and embedded roles
Linux is used everywhere because its kernel architecture is modular, efficient, and scalable. The same kernel design runs on tiny microcontrollers and massive cloud servers.
Monolithic Kernel Design in Linux
Linux uses a monolithic kernel architecture, but with a modern twist.
In a traditional monolithic kernel:
All core services run in kernel space
Memory management, process scheduling, file systems, and device drivers are part of the kernel
Linux follows this approach, but it also supports loadable kernel modules, which makes it flexible.
Why Linux Chose a Monolithic Kernel
A monolithic kernel offers:
Faster performance due to fewer context switches
Direct communication between kernel components
Lower overhead compared to microkernels
The downside is complexity, but Linux solves this with modular design.
Kernel Space vs User Space
One of the most important concepts in Linux kernel architecture is the separation between kernel space and user space.
User Space
User space is where applications run. Examples include:
Web browsers
Shells like bash
Media players
Your own C or Python programs
Applications in user space have limited privileges. They cannot directly access hardware or critical memory.
Kernel Space
Kernel space is where the Linux kernel runs. Code here has:
Full access to hardware
Control over memory and CPU
Responsibility for system stability
This separation improves security and stability. If an application crashes, it usually does not crash the whole system.
System Calls: The Bridge Between User and Kernel
Applications interact with the kernel using system calls.
A system call is a controlled entry point into the kernel. Common examples include:
open() for files
read() and write() for I/O
fork() and exec() for process creation
From a Linux kernel architecture point of view, system calls are critical because they define how user space safely requests kernel services.
Process Management in Linux Kernel
Process management is a core part of the Essentials of Linux kernel architecture.
What Is a Process?
A process is a running instance of a program. The kernel keeps track of each process using a structure called task_struct.
This structure stores:
Process ID (PID)
State (running, sleeping, stopped)
Priority
Memory information
Open files
Process Scheduling
The Linux kernel uses a scheduler to decide which process runs on the CPU.
Key features include:
Preemptive multitasking
Fair scheduling for interactive tasks
Support for real-time scheduling
The Completely Fair Scheduler (CFS) is commonly used and aims to give each process a fair share of CPU time.
Memory Management in Linux Kernel
Memory management is another essential building block of Linux kernel architecture.
Virtual Memory
Linux uses virtual memory to give each process the illusion that it has its own private memory.
Benefits include:
Process isolation
Efficient memory usage
Support for swapping
Paging and Address Translation
The kernel uses paging to map virtual addresses to physical memory. Hardware support from the MMU (Memory Management Unit) helps with fast translation.
Kernel Memory vs User Memory
The kernel carefully separates:
User process memory
Kernel memory
This prevents applications from corrupting kernel data.
File System Architecture
Linux treats almost everything as a file. This philosophy is deeply embedded in Linux kernel architecture.
Virtual File System (VFS)
The Virtual File System is an abstraction layer that allows Linux to support multiple file systems.
Examples include:
ext4
XFS
Btrfs
FAT
VFS provides a common interface so applications do not need to know which file system is in use.
Device Drivers and Hardware Interaction
Device drivers are the glue between hardware and the kernel.
In Linux kernel architecture:
Drivers run in kernel space
They expose standard interfaces to user space
They are often loadable as kernel modules
This modular approach allows:
Dynamic loading and unloading of drivers
Smaller kernel images
Easier development and debugging
Loadable Kernel Modules
One of the most powerful features in the Essentials of Linux kernel architecture is support for Loadable Kernel Modules (LKMs).
Modules allow you to:
Add functionality without rebooting
Develop drivers independently
Reduce kernel size
Common examples include:
USB drivers
Network drivers
File system modules
Interrupt Handling in Linux Kernel
Hardware devices need a way to notify the CPU. This is done using interrupts.
The Linux kernel:
Registers interrupt handlers
Responds quickly to hardware events
Uses deferred work mechanisms like softirqs and tasklets
Efficient interrupt handling is critical for performance and responsiveness.
Inter-Process Communication (IPC)
Processes often need to communicate. Linux kernel architecture supports multiple IPC mechanisms:
Pipes
Signals
Message queues
Shared memory
Sockets
Each method serves a different use case, from simple parent-child communication to high-performance data sharing.
Networking Stack in the Linux Kernel
The Linux kernel includes a full networking stack.
Key layers include:
Network device drivers
IP layer
Transport protocols like TCP and UDP
Socket interface for applications
This integrated design allows Linux to power everything from routers to cloud servers.
Security Model in Linux Kernel Architecture
Security is built into the kernel design.
Important elements include:
User and group permissions
Capability-based security
Mandatory Access Control frameworks like SELinux and AppArmor
The kernel enforces these rules consistently across the system.
Kernel Preemption and Real-Time Support
Linux supports different levels of kernel preemption.
This is especially important for:
Embedded systems
Audio processing
Automotive and industrial applications
Real-time patches further enhance deterministic behavior.
Boot Process and Kernel Initialization
Understanding kernel architecture also means understanding how Linux boots.
High-level steps include:
Bootloader loads the kernel
Kernel initializes hardware
Kernel mounts the root file system
First user process (init or systemd) starts
Each step relies on tightly coordinated kernel components.
Why Linux Kernel Architecture Scales So Well
One reason Linux dominates servers, cloud, and embedded systems is its scalable architecture.
It supports:
Multiple CPU architectures
SMP and NUMA systems
Tiny embedded boards and massive servers
This flexibility comes from clean internal abstractions and modular design.
Common Misconceptions About Linux Kernel Architecture
Let’s clear a few myths:
Linux is not a microkernel
Drivers do not always crash the system if written properly
Kernel development is hard but not impossible
With the right understanding, the kernel becomes approachable.
How Beginners Should Learn Linux Kernel Architecture
If you are new, focus on:
Understanding kernel vs user space
Learning system calls
Exploring process and memory management
Writing simple kernel modules
Reading code becomes much easier once the architecture makes sense.
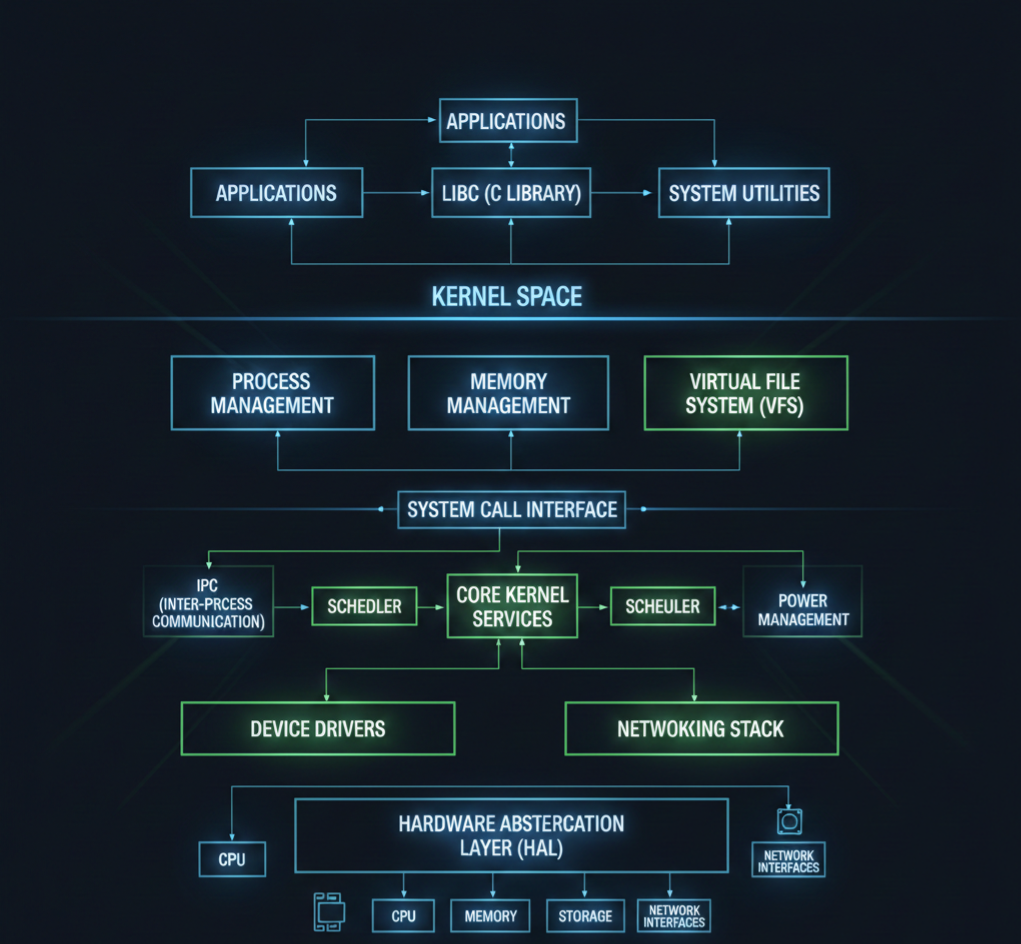
Linux Kernel Architecture Diagram
Think of Linux kernel architecture like a well-organized city. Applications live on the surface, hardware lives underground, and the kernel is the intelligent system running everything in between.
Let’s start with a simple logical diagram.
Linux Kernel Architecture Diagram (Conceptual View)
+--------------------------------------------------+
|                  User Space                      |
|                                                  |
|  Applications (Browser, Editor, Media Player)    |
|  Shell (bash, zsh)                               |
|  System Utilities                                |
|                                                  |
+--------------------|-----------------------------+
                     | System Calls
+--------------------v-----------------------------+
|                  Kernel Space                    |
|                                                  |
|  +--------------------------------------------+  |
|  |           System Call Interface             |  |
|  +--------------------------------------------+  |
|                                                  |
|  Process Management   Memory Management          |
|  (Scheduler, Tasks)   (Paging, Virtual Memory)   |
|                                                  |
|  File System (VFS)    Inter-Process Communication|
|  (ext4, XFS)         (Pipes, Signals, Sockets)  |
|                                                  |
|  Networking Stack     Device Drivers             |
|  (TCP/IP)             (USB, Audio, Display)     |
|                                                  |
|  Interrupt Handling   Power Management           |
|                                                  |
+--------------------|-----------------------------+
                     |
+--------------------v-----------------------------+
|                    Hardware                      |
|  CPU | RAM | Disk | Network | USB | Display     |
+--------------------------------------------------+
Now let’s break this down layer by layer.
1. User Space (Where Applications Live)
This is the top layer of the Linux kernel architecture.
What runs here?
Browsers
Media players
Text editors
Shells like bash
Your own C, C++, Python programs
Important point:
User space cannot directly access hardware. Everything must go through the kernel.
This separation keeps the system safe and stable. If an app crashes, the kernel stays alive.
2. System Call Interface (The Gateway)
The system call interface is the bridge between user space and kernel space.
When an application wants to:
Read a file
Allocate memory
Create a process
Send data over the network
It makes a system call.
Common system calls:
open()
read()
write()
fork()
exec()
Think of system calls as a formal request form that applications submit to the kernel.
3. Kernel Space (The Brain of the System)
This is where the real work happens. The kernel runs with full privileges and controls all system resources.
Let’s go component by component.
4. Process Management
Process management is a core pillar of Linux kernel architecture.
What it handles:
Creating processes
Killing processes
Scheduling CPU time
Context switching
The kernel uses internal structures to track each process and a scheduler to decide who runs and when.
This is why Linux can run hundreds of processes smoothly.
5. Memory Management
Memory management ensures every process gets memory safely and efficiently.
Key responsibilities:
Virtual memory
Paging
Memory protection
Kernel vs user memory separation
Each process thinks it owns all the memory, but the kernel quietly manages the illusion.
This design prevents one process from corrupting another.
6. File System Layer (VFS)
Linux supports many file systems, but applications don’t care which one you use.
That’s because of the Virtual File System (VFS).
What VFS does:
Provides a common interface for file operations
Allows ext4, XFS, FAT, and others to work together
Keeps applications portable
This is a classic example of smart kernel architecture design.
7. Device Drivers
Device drivers are how the kernel talks to hardware.
Examples:
Keyboard drivers
USB drivers
Audio drivers
Network card drivers
Drivers run in kernel space and expose standard interfaces to user space.
Linux supports loadable kernel modules, so drivers can be added or removed without rebooting.
8. Networking Stack
The Linux kernel includes a full networking implementation.
Includes:
Network device drivers
IP layer
TCP and UDP
Socket interface
This allows Linux to function as:
A desktop OS
A server OS
A router
A cloud platform
All using the same kernel architecture.
9. Inter-Process Communication (IPC)
Processes often need to talk to each other.
Linux kernel architecture supports multiple IPC mechanisms:
Pipes
Signals
Message queues
Shared memory
Sockets
Each one exists because different problems need different communication styles.
10. Interrupt Handling
Hardware devices need attention from the CPU.
They use interrupts to signal the kernel.
The kernel:
Handles interrupts quickly
Defers heavy work
Keeps the system responsive
Efficient interrupt handling is critical for performance.
11. Hardware Layer
This is the physical world:
CPU
RAM
Disk
Network card
Sensors
Displays
The kernel is the only layer allowed to touch hardware directly.
This design keeps hardware access controlled and secure.
How All Layers Work Together
Here’s a simple flow example:
You click “Save” in a text editor
The app makes a system call
The kernel checks permissions
VFS routes the request
File system writes data
Device driver talks to disk
Hardware stores the data
All of this happens in milliseconds.
Why This Architecture Is So Powerful
The Linux kernel architecture is:
Modular
Secure
High-performance
Scalable
That’s why the same kernel runs on:
Android phones
Embedded boards
Servers
Supercomputers
Linux Kernel Programming Interview Questions :
Basic Linux Kernel Programming Questions
What is the Linux kernel and its primary responsibilities?
What are the differences between user space and kernel space?
Explain the process context vs interrupt context in Linux kernel.
What are system calls? Give examples.
How does the Linux kernel manage memory?
What are kernel modules? How do you load and unload a module?
Explain the proc filesystem and its usage.
What are character devices and block devices?
What is a major number and a minor number in Linux device drivers?
What is init_module and cleanup_module in kernel modules?
Explain the difference between static and dynamic kernel modules.
What are kernel threads, and how do you create them?
What is spinlock, and how is it different from a mutex?
Explain preemption in Linux kernel.
What is a wait queue? How is it used in kernel programming?
Intermediate Linux Kernel Programming Questions
What is the difference between copy_to_user() and copy_from_user()?
Explain the kernel memory allocation methods (kmalloc, vmalloc, etc.).
What is a task_struct, and why is it important?
Explain the Linux process scheduling mechanism.
What is the difference between hardirq and softirq?
What are bottom halves, and what is their role?
Explain workqueues and tasklets.
What is interrupt handling in Linux kernel?
What is a device driver, and what are the types of device drivers?
How do you register a character device driver in Linux?
What is the difference between blocking and non-blocking I/O in kernel space?
Explain the Linux kernel logging mechanism (printk, KERN_INFO, etc.).
What is a module parameter, and how do you pass parameters to a kernel module?
What are kernel namespaces, and how are they used?
Explain Virtual File System (VFS) and its role.
How does the Linux kernel handle file operations?
Explain the kernel networking stack.
What is a kobject, and how does it relate to sysfs?
Explain reference counting in the Linux kernel.
How does dynamic kernel tracing work (ftrace, perf)?
What is a PCI device driver, and how do you write one?
How do you implement I2C or SPI device drivers in Linux?
Explain interrupt-driven vs polling mechanisms in kernel device drivers.
How do you implement DMA in Linux kernel drivers?
What is a kernel timer, and how do you implement it?
Explain Linux kernel modules dependencies and symbol exports.
How does user-space memory mapping (mmap) work in kernel drivers?
How do you debug kernel modules using kgdb or printk?
Explain the Linux kernel boot process.
How does the scheduler handle real-time processes?
What is NUMA, and how does the kernel handle memory in NUMA systems?
How do you handle deadlocks in the kernel?
Practical / Scenario-Based Questions
How would you modify an existing Linux kernel driver?
How do you implement read and write operations in a character driver?
How would you trace a kernel panic?
How do you profile a kernel module for performance?
How do you implement interrupt handling for a GPIO device?
How do you use procfs or sysfs to expose driver data to user space?
How do you implement ioctl commands for a custom device?
How would you handle concurrency in a multi-threaded kernel module?
How do you simulate and test a driver in QEMU before using real hardware?
How do you write a kernel module compatible with multiple kernel versions?
Expert / Advanced Scenario Questions
How would you implement zero-copy communication between kernel and user space?
How do you optimize memory usage in kernel modules?
How do you write a kernel driver for DMA buffer sharing between devices?
Explain how kernel hot-plugging works.
How do you handle interrupt storms in Linux?
How do you implement suspend/resume operations for a device driver?
How do you use kernel timers to schedule periodic tasks?
How do you implement custom kernel syscalls?
How do you handle kernel module security and permissions?
How do you debug race conditions in kernel driver code?
Final Thoughts
The Essentials of Linux kernel architecture are not about memorizing code or data structures. They are about understanding how Linux thinks, how it manages resources, and how its components work together as one system.
Once you grasp the architecture, Linux stops feeling like magic and starts feeling logical.
Whether you are preparing for interviews, working on embedded systems, or simply curious about how operating systems work, learning Linux kernel architecture is one of the best investments you can make in your technical journey.
FAQ : Linux Kernel Architecture
1. What is Linux Kernel Architecture? Linux Kernel Architecture is the internal structure of the Linux operating system. It manages hardware, processes, memory, and system calls, acting as a bridge between software and hardware.
2. Why is Linux Kernel important for developers? Understanding the Linux Kernel helps developers write efficient code, manage hardware resources, and develop device drivers or system-level applications.
3. What are the main components of the Linux Kernel? The Linux Kernel consists of process management, memory management, file system, device drivers, network stack, and system calls.
4. What is the difference between monolithic and microkernel in Linux? Linux uses a monolithic kernel, where all core services run in kernel space for performance. Microkernels run minimal services in kernel space and others in user space for modularity.
5. How does process management work in the Linux Kernel? The kernel handles process creation, scheduling, and termination. It uses scheduling algorithms to manage CPU time efficiently among processes.
6. What is a Linux Kernel module? A kernel module is a piece of code that can be loaded or unloaded into the kernel at runtime, like device drivers or system extensions.
7. How is memory managed in Linux Kernel? Linux uses virtual memory, paging, and caching to efficiently allocate memory for processes and the system while isolating processes from each other.
8. How can I prepare for Linux Kernel interview questions? Focus on kernel architecture, process and memory management, device drivers, file systems, and hands-on practice with kernel modules.
9. Can I modify the Linux Kernel safely? Yes, by using a separate test environment or virtual machine. Kernel modifications require caution and understanding of dependencies.
10. Where can I learn Linux Kernel Architecture from scratch? You can start with official Linux Kernel documentation, beginner-friendly tutorials, YouTube guides, and practical exercises like writing simple kernel modules.
Linux System Programming Part 2 covers advanced concepts like IPC, signals, threads, synchronization, and real-world system programming examples for developers.
Dive deeper into Linux system programming with Part 2 of our comprehensive guide, designed for developers aiming to master advanced Linux programming concepts. This part focuses on process synchronization, inter-process communication (IPC), file I/O operations, signals, threads, and advanced system calls. Learn how to write efficient, reliable, and secure Linux applications by exploring practical examples, real-world use cases, and performance optimization techniques. Whether you’re preparing for technical interviews or developing high-performance software, this guide equips you with the essential skills to handle complex Linux programming challenges.
Key Topics Covered:
Advanced process management and lifecycle handling
Inter-process communication (IPC): Pipes, message queues, semaphores, shared memory
Thread programming: POSIX threads (pthreads), synchronization, and concurrency control
Signal handling and asynchronous programming
File I/O and advanced file system operations
System call optimization and debugging techniques
Perfect for software engineers, embedded developers, and Linux enthusiasts, this guide provides step-by-step explanations and examples to help you write robust, high-performance Linux applications.
Linux System Programming
Linux I/O Architecture
Introduction to Components of I/O Architecture
Q1. What is I/O architecture in Linux?
Answer: I/O architecture in Linux defines how data flows between user applications, kernel, and hardware devices. It provides a structured way to access devices like disks, keyboards, network cards, and displays using standard system calls such as read(), write(), and ioctl().
Q2. What are the main components of Linux I/O architecture?
Answer: The major components are:
User Space
System Call Interface
Virtual File System (VFS)
File System Layer
I/O Cache (Page Cache & Buffer Cache)
Block and Character Device Layer
Device Drivers
Hardware
Q3. Why does Linux use a layered I/O architecture?
Answer: Layered architecture provides:
Hardware independence
Code reusability
Easier maintenance
Support for multiple file systems
Secure access to devices
Q4. What is the role of user space in I/O?
Answer: User space contains applications that:
Request I/O using APIs (printf, fopen)
Cannot access hardware directly
Use system calls to interact with kernel
Q5. What is the role of the kernel in I/O?
Answer: The kernel:
Validates user requests
Manages file systems
Handles caching
Communicates with device drivers
Ensures protection and synchronization
Objectives of Linux I/O Model
Q6. What are the main objectives of the Linux I/O model?
Answer:
Uniform access to all devices
High performance
Hardware abstraction
Security and protection
Scalability
Portability
Q7. How does Linux provide uniform I/O access?
Answer: Linux treats everything as a file, allowing the same system calls (open, read, write, close) to be used for:
Files
Devices
Pipes
Sockets
Q8. How does Linux I/O model improve performance?
Answer: Through:
Page cache
Read-ahead
Write buffering
Asynchronous I/O
DMA support
Q9. How does Linux ensure secure I/O?
Answer: Using:
File permissions
User/kernel mode separation
Capability checks
Access control lists (ACLs)
Q10. What is portability in Linux I/O?
Answer: Applications do not depend on hardware specifics. Device drivers handle hardware differences, making apps portable across platforms.
Virtual File System (VFS)
Q11. What is VFS in Linux?
Answer: Virtual File System (VFS) is a kernel abstraction layer that provides a common interface to different file systems such as EXT4, FAT, NTFS, NFS, etc.
Q12. Why is VFS needed?
Answer: Because Linux supports multiple file systems and VFS:
Hides file system details
Allows switching file systems without changing applications
Q13. What are the main data structures used by VFS?
Answer:
super_block
inode
dentry
file
Q14. What is a superblock?
Answer: A superblock stores metadata about a file system, such as:
File system type
Block size
Mount status
Maximum file size
Q15. What is a dentry?
Answer: Dentry (Directory Entry) maps file names to inode numbers and helps speed up pathname lookup.
Q16. How does VFS handle system calls?
Answer: System calls go through VFS, which:
Identifies the file system
Invokes the appropriate file system operations
File System Services
Q17. What services does a file system provide?
Answer:
File creation and deletion
Read/write operations
Directory management
Permission handling
Metadata management
Q18. What is file metadata?
Answer: Metadata includes:
File size
Ownership
Permissions
Timestamps
Block location
Q19. How does Linux handle different file systems?
Answer: Using:
File system drivers
VFS abstraction
Mount mechanism
Q20. What is mounting?
Answer: Mounting attaches a file system to a directory tree, making it accessible.
Q21. What happens internally during file read?
Answer:
User calls read()
Kernel checks file descriptor
VFS locates inode
Cache is checked
Disk access if cache miss
Data copied to user space
I/O Cache
Q22. What is I/O cache?
Answer: I/O cache is memory used by the kernel to store frequently accessed disk data to reduce disk I/O.
Q23. What is page cache?
Answer: Page cache stores file data pages read from disk in RAM.
Q24. What is buffer cache?
Answer: Buffer cache stores block-based data, mainly metadata and raw blocks.
Q25. Why is caching important?
Answer: Caching:
Improves performance
Reduces disk access
Saves power
Enables faster reads
Q26. What is write-back caching?
Answer: Data is written to cache first and later flushed to disk asynchronously.
Q27. What is write-through caching?
Answer: Data is written to both cache and disk immediately.
Q28. What is cache coherence?
Answer: Ensures cached data matches data on disk.
Understanding File Descriptors
Q29. What is a file descriptor?
Answer: A file descriptor is an integer handle used by a process to access an open file or I/O resource.
Q30. Who assigns file descriptors?
Answer: The kernel assigns them when open() is called.
Q31. Standard file descriptors?
Answer:
FD
Meaning
0
stdin
1
stdout
2
stderr
Q32. Where are file descriptors stored?
Answer: In the process file descriptor table.
Q33. What does a file descriptor point to?
Answer: It points to a struct file in kernel memory.
Q34. Can multiple file descriptors point to the same file?
Answer: Yes, via dup() or fork().
Q35. What happens when a file is closed?
Answer: Kernel:
Decrements reference count
Frees resources if count reaches zero
Inode Structures
Q36. What is an inode?
Answer: An inode is a kernel data structure that stores metadata of a file, excluding its name.
Q37. What information does inode contain?
Answer:
File type
Permissions
Owner and group
Size
Timestamps
Data block pointers
Q38. What does inode NOT store?
Answer: File name Directory hierarchy
Q39. How is file name linked to inode?
Answer: Through directory entries (dentries).
Q40. What is inode number?
Answer: A unique identifier for a file within a file system.
Q41. Can multiple filenames map to the same inode?
Answer: Yes, through hard links.
Q42. Difference between inode and file descriptor?
Answer:
Inode
File Descriptor
File metadata
Process-specific handle
Persistent
Temporary
File-system level
Process level
Q43. What happens to inode when file is deleted?
Answer: Inode is freed only when link count and open count become zero.
Q44. What is inode cache?
Answer: Kernel cache that stores recently used inodes to speed up file access.
Q45. How does inode improve performance?
Answer: Avoids repeated disk reads for metadata.
Final Interview Tips
If interviewer asks “Explain Linux I/O flow in one answer”, say:
Linux I/O starts from user space via system calls, passes through VFS which abstracts file systems, uses inode and dentry for metadata, leverages page cache for performance, and finally communicates with device drivers to access hardware.
Linux I/O Architecture Interview Question
Introduction to Components of I/O Architecture
Beginner Level
What is I/O in an operating system?
Why is I/O required in Linux?
What are the basic components of Linux I/O architecture?
What is the role of hardware devices in I/O?
What is a device driver?
What is the role of the kernel in I/O operations?
What is user space and kernel space?
What is a system call?
Why can’t user applications access hardware directly?
What is buffering in I/O?
Intermediate Level
Explain the complete I/O data flow in Linux.
What are I/O controllers?
What is DMA (Direct Memory Access)?
What is interrupt-driven I/O?
What is polling-based I/O?
Difference between blocking and non-blocking I/O?
What is synchronous I/O?
What is asynchronous I/O?
What is memory-mapped I/O?
Difference between character devices and block devices?
Advanced / Expert Level
Explain Linux I/O architecture with layers.
How does Linux abstract hardware differences?
What happens internally when read() is called?
How does Linux handle concurrent I/O requests?
What is zero-copy I/O?
How does Linux optimize I/O performance?
What role does the block layer play?
How does Linux support multiple devices uniformly?
How does virtualization affect Linux I/O?
How does Linux ensure I/O reliability?
Objectives of Linux I/O Model
Beginner Level
What is the Linux I/O model?
Why does Linux need an I/O model?
What problems does the Linux I/O model solve?
What is device independence?
What does “everything is a file” mean in Linux?
Intermediate Level
How does Linux provide a uniform I/O interface?
How does Linux achieve portability using its I/O model?
What is abstraction in Linux I/O?
How does Linux support scalability in I/O?
Why is buffering and caching important?
Advanced / Expert Level
How does Linux I/O model improve performance?
How does Linux handle parallel I/O?
How does the I/O model ensure security?
Compare Linux I/O model with other OS models.
How does Linux balance performance vs data safety?
Virtual File System (VFS)
Beginner Level
What is Virtual File System (VFS)?
Why is VFS needed?
Is VFS a real file system?
What problem does VFS solve?
Name file systems supported by Linux via VFS.
Intermediate Level
How does VFS provide file system abstraction?
What are the main VFS objects?
What is a superblock?
What is an inode?
What is a dentry?
What is a file object?
How does VFS handle mount operations?
How does VFS process open() system call?
How does VFS support network file systems?
What is pathname resolution?
Advanced / Expert Level
Explain VFS internal data structures.
How does VFS cache dentries and inodes?
How does VFS ensure file system independence?
How are file operations registered in VFS?
How does VFS handle permissions?
What is lazy inode allocation?
How does VFS interact with the block layer?
How does a custom file system integrate with VFS?
How does VFS work in containers?
What are VFS performance bottlenecks?
File System Services
Beginner Level
What are file system services?
What basic services does a file system provide?
What is file creation and deletion?
What is file metadata?
What is directory management?
Intermediate Level
How does a file system manage disk space?
What is journaling?
What is file locking?
What is mounting and unmounting?
Difference between hard link and soft link?
What is file access control?
What is quota management?
What is sparse file?
What is delayed allocation?
What is extent-based storage?
Advanced / Expert Level
How does journaling improve crash recovery?
How does file system recovery work after crash?
What is copy-on-write?
How does Linux support encryption at file system level?
What is snapshotting?
How does Linux handle large directories?
What are scalability issues in file systems?
How does Linux handle metadata consistency?
What is file system fragmentation?
Compare ext4, xfs, and btrfs internals.
I/O Cache
Beginner Level
What is I/O cache?
Why is caching needed?
What is page cache?
Difference between buffer cache and page cache?
What data is cached in Linux?
Intermediate Level
How does Linux page cache work?
What is read-ahead?
What is write-back cache?
What are dirty pages?
What is cache eviction?
What is LRU algorithm?
Difference between write-through and write-back?
What is sync()?
What is fsync()?
How does cache improve I/O performance?
Advanced / Expert Level
How does Linux manage cache pressure?
How are dirty pages flushed to disk?
What is O_DIRECT?
How does mmap() use page cache?
How does NUMA affect caching?
How does Linux prevent data loss due to caching?
What is readahead tuning?
What happens under heavy I/O load?
How does cache coherency work?
Explain page cache vs direct I/O.
Understanding File Descriptors
Beginner Level
What is a file descriptor?
Why are file descriptors integers?
What are standard file descriptors?
What are STDIN, STDOUT, STDERR?
How does open() create a file descriptor?
Intermediate Level
How does the kernel track file descriptors?
What is per-process file descriptor table?
Difference between file descriptor and file pointer?
What happens when a file descriptor is closed?
What is dup() and dup2()?
What is file descriptor inheritance?
How does fork() affect file descriptors?
How does exec() affect file descriptors?
What is close-on-exec flag?
What is file descriptor leak?
Advanced / Expert Level
Explain kernel structures related to file descriptors.
How does Linux prevent FD leaks?
What is select(), poll(), epoll()?
Difference between select and epoll?
What is edge-triggered vs level-triggered I/O?
How does epoll scale better?
What is asynchronous I/O (AIO)?
What is ulimit -n?
How does kernel synchronize FD access?
How is FD passing done between processes?
Inode Structures
Beginner Level
What is an inode?
What information does an inode store?
What is an inode number?
Are filenames stored in inode?
What is the relationship between file and inode?
Intermediate Level
Difference between inode and file descriptor?
What is inode table?
What is link count?
How do hard links work with inodes?
How are permissions stored in inode?
What is inode caching?
How does Linux locate inode on disk?
What happens to inode when file is deleted?
What is an orphan inode?
How does inode handle file size?
Advanced / Expert Level
Explain inode life cycle.
How does Linux allocate inodes?
What is lazy inode destruction?
How does inode locking work?
What are inode operations?
How does VFS use inode operations?
How does journaling affect inode updates?
What is inode exhaustion?
How does Linux handle millions of inodes?
How does inode scalability impact performance?
File I/O Operations in Linux
File Input/Output (I/O) operations form the backbone of any operating system’s interaction with storage devices. In Linux, understanding file I/O is essential not only for system programming but also for building robust applications that manage data efficiently. This article explores the concepts, APIs, and operations related to file handling in Linux, in clear, human-readable language.
1. Introduction to File I/O Operations
At its core, file I/O is the process of reading data from and writing data to files on a storage medium. Linux treats everything as a file, including regular files, directories, devices, and even network sockets. This abstraction allows developers to use a unified interface to interact with different types of resources.
Key points to know about file I/O:
File Descriptors (FDs): Each file opened in Linux is assigned an integer called a file descriptor. The OS uses this FD to keep track of open files and their state.
0 – Standard input (stdin)
1 – Standard output (stdout)
2 – Standard error (stderr)
File Modes: Files can be opened in various modes like read (r), write (w), append (a), or combinations (r+, w+).
File I/O can be broadly divided into two types:
Standard I/O (Buffered I/O using stdio.h)
System-level I/O (Unbuffered I/O using system calls like open(), read(), write(), close())
2. Introduction to Common File APIs
Linux provides several APIs (Application Programming Interfaces) for interacting with files:
2.1 System-Level File APIs
These APIs work directly with file descriptors:
Function
Description
open()
Opens a file and returns a file descriptor. Supports flags like O_RDONLY, O_WRONLY, O_RDWR, O_CREAT.
read()
Reads data from an open file into a buffer. Requires FD, buffer, and size.
write()
Writes data from a buffer to an open file.
close()
Closes the file descriptor and frees associated resources.
lseek()
Moves the file pointer to a specific location (random access).
fsync()
Ensures that all buffered data is written to disk.
Example: Opening and reading a file:
#include <fcntl.h>
#include <unistd.h>
#include <stdio.h>

int main() {
    int fd = open("example.txt", O_RDONLY);
    if (fd < 0) {
        perror("Failed to open file");
        return 1;
    }

    char buffer[100];
    int bytesRead = read(fd, buffer, sizeof(buffer) - 1);
    if (bytesRead > 0) {
        buffer[bytesRead] = '\0';
        printf("File content:\n%s\n", buffer);
    }

    close(fd);
    return 0;
}
2.2 Standard I/O APIs (Buffered I/O)
These are provided by the C library (stdio.h) and are higher-level, buffered I/O operations:
Function
Description
fopen()
Opens a file and returns a FILE* pointer. Modes: "r", "w", "a", "r+" etc.
fread()
Reads binary data from a file stream.
fwrite()
Writes binary data to a file stream.
fprintf()
Writes formatted text to a file.
fscanf()
Reads formatted text from a file.
fclose()
Closes the file stream.
fseek()
Moves the file position indicator.
fflush()
Flushes the buffer to disk immediately.
Example: Reading a file using standard I/O:
#include <stdio.h>

int main() {
    FILE *fp = fopen("example.txt", "r");
    if (fp == NULL) {
        perror("Failed to open file");
        return 1;
    }

    char line[256];
    while (fgets(line, sizeof(line), fp)) {
        printf("%s", line);
    }

    fclose(fp);
    return 0;
}
Key difference: Standard I/O is buffered, meaning it reads/writes larger blocks at once for efficiency, while system-level I/O works directly with the kernel.
3. Accessing File Attributes
Linux provides system calls to query file metadata stored in the filesystem. File attributes include size, permissions, ownership, timestamps, and type.
stat(): Returns metadata about a file.
fstat(): Returns metadata for an open file descriptor.
Locks ensure data integrity in multi-process environments.
5.3 File Descriptor Duplication
dup() or dup2() allows redirecting file descriptors:
int new_fd = dup2(fd, 1); // Redirect stdout to file
This is commonly used in shell programming or logging.
6. Best Practices for File I/O
Always check the return values of file operations (open, read, write, fopen, etc.) to handle errors.
Close all file descriptors or streams to prevent resource leaks.
Use buffering wisely for performance (fread/fwrite vs read/write).
Use file locks when multiple processes may access the same file.
Avoid using hardcoded file paths; use relative paths or configurable paths.
For large files, prefer memory-mapped I/O (mmap) for efficiency.
Linux File I/O Interview Questions and Answers
1. Basics of File I/O
Q1. What is File I/O in Linux? A: File I/O (Input/Output) in Linux refers to reading data from and writing data to files stored on a storage device. Linux treats almost everything as a file (regular files, directories, devices, sockets).
Q2. What is a File Descriptor (FD)? A: A file descriptor is an integer that uniquely identifies an open file within a process.
0 → Standard input (stdin)
1 → Standard output (stdout)
2 → Standard error (stderr)
Q3. Difference between system-level I/O and standard I/O?
Feature
System-level I/O
Standard I/O
API
open(), read(), write()
fopen(), fread(), fwrite()
Buffering
Unbuffered
Buffered (faster for large data)
Header
<fcntl.h>, <unistd.h>
<stdio.h>
Return
Number of bytes read/written
Number of elements read/written
Q4. What are the different file opening modes?
O_RDONLY → Read-only
O_WRONLY → Write-only
O_RDWR → Read and write
O_CREAT → Create file if it doesn’t exist
O_TRUNC → Truncate file to 0 length
O_APPEND → Append writes to end of file
Q5. How do you read from a file?
System I/O: read(fd, buffer, size)
Standard I/O: fread(buffer, size, count, FILE*)
Q6. How do you write to a file?
System I/O: write(fd, buffer, size)
Standard I/O: fwrite(buffer, size, count, FILE*)
2. File Attributes
Q7. How can you access file attributes in Linux?
Using stat(), fstat(), or lstat().
Returns metadata like file size, permissions, owner, timestamps.
Example:
struct stat fileStat;
stat("file.txt", &fileStat);
printf("Size: %ld\n", fileStat.st_size);
Q8. Difference between stat(), fstat(), and lstat()?
int new_fd = dup2(fd, 1); // Redirect stdout to file
5. Advanced File I/O
Q17. Difference between buffered and unbuffered I/O?
Type
Buffered
Unbuffered
API
fread/fwrite
read/write
Speed
Faster for large data
Slower (system call overhead)
Control
Buffer flushed automatically
Manual flush via fsync()
Q18. What is fsync()?
Ensures all buffered data is physically written to disk.
Important for critical data to avoid loss in case of crash.
Q19. What is memory-mapped I/O (mmap)?
Maps a file into process memory space.
Allows file data to be accessed like memory.
Efficient for large files or frequent random access.
Q20. How do you check end-of-file (EOF) in standard I/O?
Use feof(FILE *fp) which returns non-zero if end of file is reached.
Q21. Difference between text and binary file I/O?
Text I/O converts line endings (\n) to system format.
Binary I/O reads/writes raw bytes without modification.
Q22. How do you handle errors in file I/O?
Check return values of all operations (open, read, write, fopen).
Use perror() or strerror(errno) for descriptive error messages.
Q23. What happens if you forget to close a file?
File descriptor leak occurs.
OS may eventually close it on process exit, but can exhaust resources if too many files are open.
Q24. Can you read/write files concurrently in Linux?
Yes, with proper file locks or atomic operations.
Use fcntl() or flock() to prevent race conditions.
Q25. What are symbolic links vs hard links?
Hard link → Another name for the same inode. Both share same data.
Symbolic link → Pointer to the file path. Can cross filesystems.
Q26. How does lseek() differ from fseek()?
lseek() → works on file descriptors (unbuffered).
fseek() → works on FILE* streams (buffered).
fseek() may not reflect actual disk position until fflush().
Q27. How do you open a file for both reading and writing?
System I/O: open("file.txt", O_RDWR)
Standard I/O: fopen("file.txt", "r+")
Q28. Difference between O_TRUNC and O_APPEND?
O_TRUNC → Truncates file to 0 bytes when opened.
O_APPEND → Writes always added to the end of the file.
Q29. What is pread() and pwrite()?
pread() → Read from a file descriptor at a specific offset without changing file pointer.
pwrite() → Write to a file descriptor at a specific offset.
Useful in multithreaded applications.
Q30. How does Linux handle I/O caching?
Linux caches file data in memory (page cache) to speed up access.
fsync() or sync() ensures cached data is written to disk.
Linux Signal Management: Types, Handling, and Process Communication
Signals in Linux are a fundamental mechanism that allow processes to receive asynchronous notifications about events or exceptions. Proper understanding of signal management is crucial for building robust and responsive applications. This guide will cover everything from basic concepts to advanced usage, with examples, data structures, and process communication.
Introduction to Signals
A signal is a software interrupt delivered to a process to notify it that a specific event occurred. Signals can be generated by the kernel, other processes, or by the process itself.
Key points:
Signals are asynchronous, meaning they can occur at any time.
They are used for error handling, process control, and inter-process communication.
Every signal has a unique integer number and a default action associated with it (e.g., terminate, ignore, stop, continue).
Example default actions:
SIGKILL → terminates the process (cannot be caught or ignored)
SIGTERM → requests termination (can be caught)
SIGSTOP → pauses the process
SIGCONT → resumes a paused process
Linux Signal Types & Categories
Linux provides over 30 predefined signals. These can be broadly categorized into:
a) Termination Signals
Intended to terminate the process.
Examples: SIGKILL, SIGTERM.
b) Stop Signals
Pause the process execution.
Examples: SIGSTOP, SIGTSTP.
c) Continue Signals
Resume a stopped process.
Example: SIGCONT.
d) Ignore Signals
Signals that the process can choose to ignore.
Example: SIGCHLD (child process status change).
e) Core Dump Signals
Cause the process to terminate and generate a core dump for debugging.
Linux Signal Management Interview Questions & Answers
Beginner-Level Questions
1. What is a signal in Linux?
Answer: A signal is a software interrupt delivered to a process to notify it of an event. Signals are asynchronous and can be generated by the kernel, other processes, or the process itself. Each signal has a unique number and a default action (terminate, stop, ignore, etc.).
2. What are the common signals in Linux?
Answer: Common signals include:
SIGKILL → Force terminate (cannot be caught or ignored)
SIGTERM → Graceful terminate
SIGINT → Interrupt from keyboard (Ctrl+C)
SIGSTOP → Pause process
SIGCONT → Continue a paused process
SIGCHLD → Notify parent about child status
SIGUSR1 and SIGUSR2 → User-defined signals
3. How can a process generate a signal?
Answer: Signals can be generated by:
Kernel events: e.g., SIGSEGV on segmentation fault.
Other processes: Using kill(pid, signal).
Self-generated: Using raise(signal) in C.
4. What is the default action of a signal?
Answer: Every signal has a default action, such as:
Terminate process (SIGKILL)
Stop process (SIGSTOP)
Ignore signal (SIGCHLD)
Core dump (SIGSEGV)
5. How to catch signals in a process?
Answer: You can catch signals using:
signal() function – Simple way
signal(SIGINT, handler);
sigaction() – Advanced way, supports flags, masks, and extended info
sa_sigaction → handler with extra info (siginfo_t)
sa_mask → signals blocked during handler
sa_flags → options (e.g., SA_RESTART)
3. What is SA_RESTART?
Answer: A flag in sigaction that automatically restarts interrupted system calls when a signal is delivered. Example: reading a file won’t fail with EINTR if SA_RESTART is set.
4. What are reentrant functions in signal handlers?
Answer:
Functions safe to call in signal handlers
Do not modify global state unexpectedly
Examples: write(), signal-safe functions
Unsafe:printf(), malloc()
5. How do you use signals to pause/resume processes?
Answer:
Use SIGSTOP to pause and SIGCONT to resume:
kill -STOP <pid>
kill -CONT <pid>
Useful for debugging or process control.
6. How to send signals using kill, raise, and pthread_kill?
Answer:
kill(pid, signal) → send signal to another process
raise(signal) → send signal to self
pthread_kill(thread_id, signal) → send signal to a specific thread
7. Explain asynchronous-safe signal handling
Answer:
Only use async-signal-safe functions in handlers
Set flags instead of performing I/O or memory allocation
Example:
volatile sig_atomic_t flag = 0;
void handler(int sig) { flag = 1; }
8. How does the kernel manage signals internally?
Answer:
Each process has a task_struct containing a signal_struct
Tracks pending signals, blocked signals, and signal masks
Delivery occurs at safe points, typically during context switches
9. What is sigsuspend()?
Answer:
Temporarily replaces signal mask and waits for signals
10. Difference between real-time and standard signals
Answer:
Feature
Standard Signals
Real-Time Signals
Numbers
1–31
32–64
Queuing
No
Yes (queued)
Order Delivery
Not guaranteed
FIFO guaranteed
Examples
SIGINT, SIGTERM
SIGRTMIN + n
11. How to handle multiple signals at the same time?
Answer:
Use sigaction with sa_mask to block other signals during handler
Real-time signals can queue multiple occurrences
Helps prevent race conditions in multi-threaded programs
12. How are signals used in multithreaded applications?
Answer:
Signals can be delivered to specific threads using pthread_kill()
Signal masks are thread-specific
Useful for thread-level notifications
13. How to debug signal-related issues?
Answer:
Use strace to monitor signals:
strace -e signal -p <pid>
Check pending signals with /proc/<pid>/status
Validate signal masks using sigprocmask
14. How to handle signals safely in a critical section?
Answer:
Block the signals during critical section using sigprocmask()
Unblock after completing the section
15. Real-world use cases of signals
Answer:
Daemon processes using SIGUSR1 to reload config
Parent process tracking child processes via SIGCHLD
Graceful termination of services using SIGTERM
Debugging with SIGSTOP and SIGCONT
Concurrent Application Designs
Concurrency is a fundamental concept in modern software development. With the rise of multi-core processors, networked applications, and real-time systems, understanding how to design concurrent applications has become essential for developers who want to build efficient, responsive, and scalable software.
Introduction to Concurrent Applications
A concurrent application is a software system designed to perform multiple tasks simultaneously. Unlike sequential programs, which execute one instruction at a time, concurrent applications overlap execution to improve performance and responsiveness.
For example, consider a web server handling multiple client requests. If it processes requests sequentially, each client must wait for the previous request to complete. In a concurrent design, multiple requests are processed simultaneously, reducing wait times and improving user experience.
Concurrency is not just about speed—it’s also about responsiveness and resource utilization. By enabling multiple operations to progress at the same time, concurrent applications can make optimal use of CPU cores, handle asynchronous events like network requests, and manage shared resources efficiently.
Understanding the Need for Concurrent Applications
There are several reasons why developers design applications to be concurrent:
Performance Improvement Concurrency allows programs to use multiple processors or cores efficiently. Tasks that can run in parallel, like processing large datasets or handling multiple client requests, complete faster when executed concurrently.
Responsiveness In applications such as user interfaces or real-time systems, concurrency ensures that the system remains responsive. For example, a video player can continue decoding frames while the user interacts with the interface, preventing the app from freezing.
Resource Utilization Many systems involve I/O operations, such as reading from a disk or network. These operations are slow compared to CPU processing. Concurrent designs allow the CPU to perform other tasks while waiting for I/O, improving overall resource usage.
Scalability In distributed systems or cloud-based applications, concurrency enables scaling. More tasks can run simultaneously, allowing the system to handle increased workload without significant performance degradation.
Simplified Problem Modeling Some real-world problems are naturally concurrent. For example, modeling traffic signals, robotics, or simulations often involves multiple independent processes operating simultaneously. Designing a concurrent system can simplify mapping real-world behavior into software.
Standard Concurrency Models
Concurrency can be achieved using various design models. Each model has its own advantages, challenges, and typical use cases. The choice of model depends on the problem being solved, hardware architecture, and programming language.
1. Thread-Based Concurrency
Concept: Threads are lightweight processes that share the same memory space within a process. Each thread executes a sequence of instructions independently but can access shared variables.
Advantages:
Efficient memory usage because threads share the same process memory.
Fine-grained parallelism for CPU-bound tasks.
Challenges:
Requires careful synchronization to avoid race conditions.
Deadlocks and starvation can occur if resources are not managed properly.
Use Cases: GUI applications, web servers, high-performance computing.
2. Process-Based Concurrency
Concept: A process is an independent program with its own memory space. Processes communicate via inter-process communication (IPC) mechanisms like pipes, sockets, or shared memory.
Advantages:
Strong isolation; errors in one process do not affect others.
Suitable for distributed or multi-node systems.
Challenges:
Higher memory overhead compared to threads.
IPC can be slower than shared-memory communication.
Use Cases: Database servers, containerized microservices, operating system services.
3. Event-Driven Concurrency
Concept: Event-driven programs respond to external events (e.g., user input, network messages) using a central event loop. Tasks are typically non-blocking, and execution is scheduled as events occur.
Advantages:
Efficient for I/O-bound applications.
Avoids the complexity of thread management.
Challenges:
Callback-based design can lead to “callback hell” if not managed properly.
Not suitable for CPU-bound tasks without additional threads.
Use Cases: Node.js servers, GUI frameworks, real-time web applications.
4. Actor Model
Concept: In the actor model, the system consists of independent actors that communicate by sending messages. Each actor processes messages sequentially and can create new actors.
Advantages:
Avoids shared memory, reducing the risk of race conditions.
Highly scalable for distributed systems.
Challenges:
Requires careful design of message-passing protocols.
Debugging asynchronous message flows can be tricky.
Use Cases: Distributed systems, Erlang-based telecom systems, cloud microservices.
5. Data-Parallel Model
Concept: This model focuses on performing the same operation simultaneously on multiple data elements. It is widely used in high-performance computing and GPU programming.
Advantages:
Highly efficient for numerical computations.
Ideal for tasks with repetitive operations on large datasets.
Challenges:
Limited to problems where data can be processed independently.
Synchronization overhead may occur if reductions or shared results are needed.
Use Cases: Scientific simulations, image processing, machine learning.
6. Pipeline (Stream) Concurrency
Concept: Tasks are divided into stages, each running concurrently and passing results to the next stage, forming a processing pipeline.
Advantages:
Ideal for streaming data and continuous processing.
Improves throughput without requiring all stages to be completed sequentially.
Challenges:
Requires buffering between stages to handle variable processing speeds.
Error handling and backpressure management can be complex.
Use Cases: Video processing, data ingestion pipelines, compiler design.
Best Practices in Designing Concurrent Applications
Minimize Shared State Shared memory is a common source of bugs. Reducing shared state or using immutable data structures can prevent race conditions.
Use Synchronization Primitives Wisely Locks, semaphores, and mutexes are necessary but should be used sparingly to avoid deadlocks and performance bottlenecks.
Prefer Higher-Level Abstractions Languages like Java, C++, and Python provide thread pools, futures, and async frameworks that simplify concurrency management.
Handle Exceptions Gracefully In concurrent systems, unhandled exceptions in one thread or task should not crash the entire application.
Test for Concurrency Issues Use stress testing, race condition detection tools, and code reviews to catch subtle concurrency bugs early.
1. What is a concurrent application? Answer: A concurrent application is designed to execute multiple tasks at the same time, either in parallel or overlapping in execution. This allows better performance, responsiveness, and resource utilization compared to sequential programs. Example: a web server handling multiple client requests simultaneously.
2. Why do we need concurrency in applications? Answer: Concurrency is needed for:
Responsiveness – keeping applications responsive while performing long tasks.
Better resource utilization – CPU can process other tasks while waiting for I/O.
Scalability – handling more tasks without performance degradation.
Natural modeling of real-world problems – like traffic lights, robotics, simulations.
3. What is the difference between concurrency and parallelism? Answer:
Concurrency: Multiple tasks make progress independently, but not necessarily simultaneously (can be on a single core).
Parallelism: Tasks literally run at the same time on multiple processors or cores. Concurrency is about structure; parallelism is about execution.
4. What are threads and processes? Answer:
Thread: Lightweight unit of execution within a process that shares the process memory.
Process: Independent program with its own memory space. Threads are faster to create and use less memory, but require synchronization. Processes provide isolation but are heavier and use IPC for communication.
5. What are race conditions? Answer: A race condition occurs when two or more tasks access shared data at the same time, and the final outcome depends on the order of execution. Example: two threads incrementing a shared counter simultaneously.
6. How do you prevent race conditions? Answer:
Use synchronization primitives like mutexes, semaphores, or locks.
Reduce shared state where possible.
Use atomic operations or thread-safe data structures.
Intermediate Level Questions
7. What are the standard concurrency models? Answer:
Thread-based concurrency – multiple threads share memory within a process.
Process-based concurrency – independent processes communicate via IPC.
Event-driven concurrency – tasks are triggered by events using a main event loop.
Actor model – actors communicate through messages; no shared state.
Data-parallel model – same operation applied simultaneously on multiple data elements.
Pipeline concurrency – tasks divided into stages, each running concurrently in a pipeline.
8. What is an event-driven model, and when is it used? Answer: An event-driven model executes tasks in response to events, often using a central event loop. It’s ideal for I/O-bound applications like web servers or GUIs because tasks don’t block the system while waiting for input/output.
9. Explain the Actor model. Answer: In the Actor model, each actor is an independent unit of computation that processes messages sequentially and can send messages to other actors. This avoids shared state, reducing race conditions, and is suitable for highly scalable distributed systems.
10. What are synchronization primitives in concurrency? Answer: Synchronization primitives are tools to control access to shared resources:
Mutex – allows only one thread to access a resource at a time.
Semaphore – controls access based on a counter; allows multiple threads up to a limit.
Condition variable – allows threads to wait for certain conditions before proceeding.
Atomic operations – perform operations on shared data without interruption.
11. What is deadlock, and how can it be prevented? Answer: A deadlock occurs when two or more tasks are waiting for each other to release resources, and none can proceed. Prevention techniques:
Avoid circular wait by acquiring resources in a fixed order.
Use timeout mechanisms when acquiring locks.
Minimize resource locking duration.
12. What is a thread pool? Why is it used? Answer: A thread pool is a collection of pre-created threads ready to execute tasks. Advantages:
Reduces overhead of creating/destroying threads repeatedly.
Limits the number of concurrent threads to prevent resource exhaustion.
Improves application performance in high-load scenarios like servers.
Advanced Level Questions
13. What is the difference between blocking and non-blocking concurrency? Answer:
Blocking concurrency: Tasks wait until a resource or I/O operation completes (thread is idle).
Non-blocking concurrency: Tasks can continue executing other operations while waiting (event-driven or async tasks). Non-blocking designs improve CPU utilization and responsiveness.
14. Explain pipeline (stream) concurrency with an example. Answer: Pipeline concurrency divides tasks into stages where each stage processes input and passes results to the next. Example: Video processing –
Stage 1: Decode frames
Stage 2: Apply filters
Stage 3: Display frames Each stage runs concurrently, improving throughput.
15. How do you test a concurrent application? Answer:
Stress testing – simulate high load to check performance.
Race detection tools – detect race conditions in code.
Code reviews – check for proper locking and shared resource management.
Unit testing with multiple threads – verify thread-safe behavior.
16. What is the difference between parallel and concurrent programming models in practice? Answer:
Concurrent programming focuses on task structuring, e.g., threads, events, or actors, allowing multiple tasks to make progress.
Parallel programming focuses on executing tasks simultaneously on multiple cores, often using data-parallelism or SIMD/GPU programming. Many modern systems combine both approaches.
17. Explain data-parallel concurrency and its use cases. Answer: Data-parallel concurrency involves performing the same operation on multiple independent data elements simultaneously. Use cases:
18. What are some best practices for designing concurrent applications? Answer:
Minimize shared state and side effects.
Use higher-level concurrency abstractions when available.
Carefully manage locks to avoid deadlocks.
Handle exceptions in all threads or tasks.
Test for concurrency-related bugs using tools and stress tests.
19. Can concurrency improve single-threaded CPU-bound applications? Answer: Not always. For CPU-bound tasks on a single core, concurrency may not improve performance and may add overhead. True performance gains occur when tasks can be parallelized across multiple cores or involve I/O waiting.
20. How does the choice of concurrency model affect scalability? Answer:
Thread-based: Good for moderate-scale multi-core tasks but may hit limits with thousands of threads.
Process-based: Better isolation; suitable for distributed systems but more resource-intensive.
Event-driven / async: Excellent for high I/O load, scales well with thousands of connections.
Actor model: Highly scalable in distributed environments due to message-based design.
Concurrency Models
Concurrency Model
Advantages
Disadvantages / Challenges
Common Use Cases
Thread-Based
– Lightweight; shares process memory- Efficient for CPU-bound tasks
– Race conditions if shared state not managed- Risk of deadlocks, starvation
GUI apps, web servers, high-performance computing
Process-Based
– Strong isolation- Faults in one process don’t affect others
– High memory overhead- IPC can be slower
Database servers, OS services, microservices
Event-Driven / Async
– Efficient for I/O-bound apps- Avoids thread management complexity
– Callback hell / complex async flow- Not ideal for CPU-bound tasks
Node.js servers, GUIs, real-time web apps
Actor Model
– No shared memory; avoids race conditions- Highly scalable for distributed systems
– Debugging async messages can be tricky- Designing message protocols is essential
– High throughput- Continuous data processing- Each stage runs concurrently
– Buffering between stages needed- Backpressure and error handling can be complex
Video streaming, compiler design, data processing pipelines
Linux Process Creation and Management
Linux is a multitasking operating system where processes are the fundamental units of execution. Understanding process creation and management is critical for developers, system programmers, and those preparing for technical interviews. This guide covers everything from basic system calls to advanced kernel routines, memory optimization, and thread creation.
1. Process Creation Calls in Linux
In Linux, processes are created using system calls like fork(), vfork(), and execve(). Each serves a specific purpose.
1.1 fork()
The fork() system call is the standard way to create a new process. It creates a child process that is an almost exact copy of the parent process, including code, data, and stack.
Returns 0 in the child, the child PID in the parent, and -1 on failure.
Child inherits parent’s memory, file descriptors, and environment.
Uses Copy-on-Write (COW) to optimize memory (explained later).
Use Cases: General-purpose process creation where the parent needs to continue execution alongside the child.
1.2 vfork()
vfork() is similar to fork() but optimized for situations where the child immediately calls execve() to run a new program. Unlike fork(), vfork()does not copy the parent’s address space; the child shares it temporarily, so the parent is suspended until the child exits or executes a new program.
Syntax:
#include <unistd.h>
#include <stdio.h>
#include <stdlib.h>

int main() {
    pid_t pid = vfork();

    if (pid < 0) {
        perror("vfork failed");
        exit(1);
    } else if (pid == 0) {
        // Child process
        execlp("ls", "ls", "-l", NULL);
        _exit(0); // Always use _exit() after exec
    } else {
        // Parent resumes after child exec or exit
        printf("Parent process resumes, PID: %d\n", getpid());
    }

    return 0;
}
Key Points:
More efficient than fork() when child immediately executes another program.
Parent is suspended until the child exits or calls exec.
Must avoid modifying variables shared with the parent to prevent undefined behavior.
1.3 execve()
execve() replaces the current process image with a new program. It does not create a new process, so it is usually called by the child after fork() or vfork().
Syntax:
#include <unistd.h>
#include <stdio.h>

int main() {
    char *args[] = {"/bin/ls", "-l", NULL};
    execve("/bin/ls", args, NULL);
    perror("execve failed"); // Runs only if execve fails
    return 1;
}
Key Points:
Loads a new executable into the process memory.
File descriptors can be preserved if not closed before exec.
Frequently combined with fork() to spawn new programs.
1.4 Differences Between fork(), vfork(), and execve()
System Call
Creates New Process
Copies Address Space
Parent Suspended
Use Case
fork()
Yes
Yes (COW)
No
General child process creation
vfork()
Yes
No (shares memory)
Yes
Child immediately execs another program
execve()
No
N/A
N/A
Replace process image with new program
2. Monitoring Child Processes
Once a process spawns children, it often needs to monitor and manage them.
2.1 wait() and waitpid()
wait() suspends the parent until any child terminates. waitpid() allows more precise control over which child to wait for.
Example:
#include <sys/wait.h>
#include <unistd.h>
#include <stdio.h>

int main() {
    pid_t pid = fork();

    if (pid == 0) {
        // Child
        printf("Child running\n");
        _exit(42);
    } else {
        // Parent
        int status;
        pid_t wpid = waitpid(pid, &status, 0);
        if (WIFEXITED(status)) {
            printf("Child exited with status %d\n", WEXITSTATUS(status));
        }
    }

    return 0;
}
Key Points:
WIFEXITED(status) checks if the child exited normally.
Mastering these concepts is critical for system programming, embedded development, and interview success.
Linux Process Creation & Management Interview Questions
Section 1: Basic Process Creation
Q1. What is a process in Linux? A: A process is a running instance of a program. It has a unique PID (Process ID), memory space, file descriptors, and execution context. Processes are the basic units of execution in Linux.
Q2. What is the difference between fork() and execve()? A:
Feature
fork()
execve()
Creates a new process?
Yes
No (replaces current process)
Copies memory?
Yes (COW)
N/A
Typical Use
Create child to run code
Run a new program in current process
Return Value
0 in child, PID in parent
On failure returns -1, otherwise does not return
Q3. Write a simple fork() example and explain the output.
Linux System Programming is the practice of writing programs that directly interact with the Linux operating system using system calls and low-level APIs. It allows developers to control processes, memory, files, signals, and inter-process communication for building efficient and high-performance applications.
2. Why is Linux System Programming important for embedded and system developers?
Linux System Programming gives developers full control over hardware and OS resources. It is essential for embedded systems, device drivers, servers, and performance-critical applications where efficiency, reliability, and low latency are required.
3. What is the difference between system programming and application programming in Linux?
System programming works close to the Linux kernel using system calls like fork(), exec(), read(), and write(), while application programming relies on high-level libraries and frameworks. System programming focuses on performance, resource management, and OS behavior.
4. What are system calls in Linux, and why are they used?
System calls are special functions that allow user programs to request services from the Linux kernel, such as file access, process creation, or memory allocation. They provide a safe and controlled way to interact with kernel space.
5. Which programming language is best for Linux System Programming?
C is the most commonly used language for Linux System Programming because it provides direct access to system calls and memory. C++ is also used when object-oriented design is required, while still maintaining low-level control.
6. How does process management work in Linux System Programming?
Linux uses system calls like fork(), exec(), wait(), and exit() to create, manage, and terminate processes. Understanding process states, parent-child relationships, and scheduling is crucial for writing robust system-level programs.
7. What is Inter-Process Communication (IPC) in Linux?
IPC allows multiple processes to communicate and synchronize with each other. Linux supports IPC mechanisms such as pipes, message queues, shared memory, semaphores, and sockets, each designed for specific use cases.
8. How is memory managed in Linux System Programming?
Linux memory management involves concepts like virtual memory, paging, stack, heap, and memory mapping using malloc(), free(), and mmap(). Proper memory handling prevents leaks, fragmentation, and performance issues.
9. What role do signals play in Linux System Programming?
Signals are software interrupts used to notify processes about events like termination, illegal memory access, or timer expiration. Handling signals correctly is important for process control, debugging, and graceful shutdowns.
10. How can beginners start learning Linux System Programming effectively?
Beginners should start by learning C programming, Linux command-line basics, and core concepts like processes, files, and memory. Practicing small programs using system calls and reading manual pages (man) helps build strong fundamentals.
Learn POSIX Threads (pthreads) in Linux: thread creation, synchronization, mutexes, condition variables, and advanced concepts with practical examples & interview tips.
Multithreading is a fundamental concept in modern software development, especially in high-performance, real-time, and concurrent applications. POSIX Threads, commonly called pthreads, is the standard threading library in Unix/Linux systems. This article will give you a complete understanding of pthreads from basics to advanced concepts, with examples, diagrams, and interview tips.
1. Introduction to POSIX Threads
What are Threads?
A thread is the smallest unit of execution within a process.
Multiple threads can exist within the same process, sharing code, data, and resources like file descriptors and heap memory.
Each thread has its own stack, program counter (PC), and registers.
Example: A web server can use one thread per client request, sharing the same memory space for efficient communication.
Difference Between Processes and Threads
Feature
Process
Thread
Memory
Separate memory space
Shares memory with other threads
Overhead
Higher (context switching)
Lower
Communication
Inter-process communication (IPC)
Direct memory access
Creation
fork()
pthread_create()
Use-case
Isolation, heavy tasks
Lightweight, concurrent tasks
Interview Tip: Be ready to explain why threads are faster than processes for certain tasks, citing shared memory and low creation overhead.
Advantages and Use-Cases of Multithreading
Advantages:
Responsiveness: GUI apps remain responsive while performing background tasks.
Resource sharing: Threads share process memory, enabling easy communication.
Better CPU utilization: Threads can run concurrently on multiple cores.
Simplified program structure: Tasks like I/O and computation can run in parallel.
Use-Cases:
Web servers and database servers
Real-time embedded systems
Parallel computation tasks (matrix multiplication, video processing)
Producer-consumer pipelines
2. POSIX Threads Library Overview
What is pthreads?
POSIX Threads is a standard API for multithreading on Unix-like systems.
Implemented in <pthread.h>.
Supports thread creation, synchronization, attributes, cancellation, and real-time scheduling.
What is a thread? How does it differ from a process?
What are the advantages of using threads over processes?
Explain multithreading with an example.
What is POSIX Threads (pthreads)? Why is it used?
How do you include pthread library in a C/C++ program?
How do you compile a pthread program in Linux? (-lpthread)
What is the difference between user-level threads and kernel-level threads?
Can threads share memory? Which resources are shared, and which are private?
Intermediate Questions 9. Explain the thread lifecycle (New, Runnable, Running, Waiting, Terminated). 10. What is a thread ID (pthread_t)? How is it used? 11. What is a joinable thread vs a detached thread?
Advanced Questions 12. Explain the differences between POSIX threads and Windows threads. 13. What are some common pitfalls when using threads in Linux?
2. Thread Creation and Termination
Beginner Questions
How do you create a thread in pthreads? Explain pthread_create() arguments.
What is the prototype of a thread function?
How do threads terminate? Difference between pthread_exit() and returning from thread function.
How do you wait for a thread to finish? Explain pthread_join().
Intermediate Questions 5. Can a thread return a value? How? 6. What happens if pthread_join() is not called for a joinable thread? 7. What is the effect of calling exit() inside a thread?
Advanced Questions 8. How can you handle multiple threads returning different data types? 9. Explain thread stack allocation and stack size management.
3. Thread Attributes (pthread_attr_t)
Beginner Questions
What are thread attributes? Why are they used?
How do you initialize and destroy thread attributes? (pthread_attr_init, pthread_attr_destroy)
Intermediate Questions 3. How do you set a thread as detached using attributes? 4. How do you set a custom stack size? 5. How do you set scheduling policy using attributes? (SCHED_FIFO, SCHED_RR, SCHED_OTHER)
Advanced Questions 6. What are real-time thread attributes and their significance? 7. How do thread attributes affect performance and memory usage?
4. Thread Detachment
Beginner Questions
What is the difference between detached and joinable threads?
How do you detach a thread after creation? (pthread_detach)
Intermediate Questions 3. What happens if a detached thread calls pthread_exit()? 4. Can you join a detached thread? Why or why not?
Advanced Questions 5. When should you use detached threads in real-world applications?
5. Thread Synchronization
Mutexes
Beginner Questions
What is a mutex? Why is it needed?
How do you initialize, lock, unlock, and destroy a mutex?
What happens if a thread tries to unlock a mutex it does not own?
Intermediate Questions 4. What is a recursive mutex? When is it used? 5. Explain deadlocks with an example in multithreaded programs. 6. How can deadlocks be avoided in pthread programs?
Advanced Questions 7. Explain priority inversion and how to handle it in pthreads.
Condition Variables
Beginner Questions
What is a condition variable?
How do pthread_cond_wait(), pthread_cond_signal(), and pthread_cond_broadcast() work?
Intermediate Questions 3. Why do you need a mutex with condition variables? 4. What is spurious wakeup, and how do you handle it?
Advanced Questions 5. Explain producer-consumer problem using mutex and condition variables.
Reader-Writer Locks
Beginner Questions
What is a reader-writer lock (pthread_rwlock_t)?
How is it different from a mutex?
Intermediate Questions 3. How do you acquire read and write locks? (pthread_rwlock_rdlock, pthread_rwlock_wrlock) 4. What happens if multiple writers try to acquire the lock simultaneously?
6. Thread-Specific Data (TSD)
Beginner Questions
What is thread-specific data?
How do you create a pthread_key_t?
Intermediate Questions 3. How do you set and get thread-specific data? (pthread_setspecific, pthread_getspecific) 4. How is thread-specific data useful in real applications?
Advanced Questions 5. How do you cleanup thread-specific data automatically?
7. Thread Cancellation and Cleanup
Beginner Questions
How do you cancel a thread? (pthread_cancel)
What is the difference between asynchronous and deferred cancellation?
Intermediate Questions 3. How do you set a thread as cancellable or non-cancellable? 4. What are cleanup handlers? (pthread_cleanup_push, pthread_cleanup_pop)
Advanced Questions 5. How do you ensure resources are freed when a thread is cancelled?
8. Advanced Thread Topics
Scheduling and Real-time
Beginner Questions
What are the POSIX thread scheduling policies? (SCHED_FIFO, SCHED_RR, SCHED_OTHER)
How do you set thread priority?
Intermediate Questions 3. How is real-time scheduling different from normal scheduling? 4. What are the limitations of real-time threads in Linux?
Signal Handling in Threads
How are signals delivered in multithreaded programs?
How do you block/unblock signals for a thread? (pthread_sigmask)
Deadlocks
What is a deadlock?
How can you detect and prevent deadlocks?
Explain lock hierarchy and timeout-based strategies.
9. Best Practices Questions
What are common pitfalls in pthread programming?
How do you avoid race conditions?
How should multithreaded programs be structured for safety and efficiency?
How do you optimize performance in multithreaded programs?
How do you debug pthread programs? (gdb, helgrind, valgrind)
10. Practical and Coding Questions (Interview-Focused)
Write a simple program that creates multiple threads and prints messages.
Implement a producer-consumer problem using mutexes and condition variables.
Implement a thread-safe counter using mutex or atomic operations.
Demonstrate using thread-specific data.
Write a program where threads are detached and cannot be joined.
Simulate deadlock and show how to fix it.
Demonstrate cancelling a thread and cleaning up resources.
Implement a reader-writer scenario using pthread_rwlock_t.
Conclusion
POSIX threads allow efficient, lightweight multithreading in Linux.
Practice coding small multithreaded programs, and always reason about synchronization and data sharing.
Advanced topics: Real-time scheduling, signal handling, and performance optimization are often asked in senior-level interviews.
Recommended Resources:
“Programming with POSIX Threads” by David R. Butenhof
Linux man pages: man pthread_create, man pthread_mutex_lock
Online tutorials and example repositories on GitHub
FAQ : POSIX Threads (pthreads)
1. What are POSIX Threads (pthreads) in Linux?
Answer: POSIX Threads, or pthreads, are a standardized way to create and manage multithreaded programs in Linux. Threads allow a program to execute multiple tasks concurrently within the same process, sharing memory and resources while maintaining separate execution contexts.
2. How do I create a thread using pthreads in C/C++?
Answer: You create a thread using pthread_create(). It requires a thread ID, optional thread attributes, the thread function, and an argument. Example:
This starts a new thread executing thread_function.
3. What is the difference between processes and threads?
Answer:
Processes have separate memory spaces, heavier to create, and use IPC to communicate.
Threads share the same memory space, are lightweight, and communicate directly through shared variables. Threads are ideal for concurrent execution, while processes are better for isolation and fault tolerance.
4. How can I wait for a thread to finish in pthreads?
Answer: Use pthread_join() to wait for a joinable thread to complete and optionally retrieve its return value:
void* retval;
pthread_join(tid, &retval);
Detached threads cannot be joined, and their resources are automatically freed after completion.
5. What are pthread mutexes and why are they important?
Answer: A mutex (mutual exclusion) is a synchronization primitive used to prevent race conditions when multiple threads access shared data. Operations include lock, unlock, and destroy:
6. What is the purpose of condition variables in pthreads?
Answer: Condition variables allow threads to wait for certain conditions before proceeding, typically used with mutexes. They support signaling one or all threads when a condition changes:
7. What is thread-specific data (TSD) in pthreads?
Answer: Thread-specific data allows each thread to store its own private data using a key (pthread_key_t), even if multiple threads run the same function:
pthread_key_t key;
pthread_setspecific(key, data);
void* val = pthread_getspecific(key);
This is useful for per-thread storage in libraries or reusable modules.
8. How do you cancel a thread safely in pthreads?
Answer: Use pthread_cancel() to request thread termination. Threads can be asynchronous or deferred cancellable, and you can use cleanup handlers to release resources:
9. What are detached threads and how are they different from joinable threads?
Answer:
Joinable threads require pthread_join() to free resources.
Detached threads free resources automatically when they finish. Use pthread_detach(tid) to detach a thread. Detached threads are ideal for background tasks where you don’t need the return value.
10. What are common pitfalls in pthread programming?
Answer:
Race conditions due to unsynchronized shared memory.
Deadlocks caused by nested or circular locking.
Forgetting to destroy mutexes/condition variables.
Improper use of detached threads leading to memory/resource leaks.
Ignoring thread cancellation and cleanup.
Best Practice: Always use mutexes, condition variables, and cleanup handlers for safe multithreaded programs.
Learn IPC in Linux from beginner to expert ! Explore pipes, message queues, shared memory, semaphores, and signals with examples, diagrams, and interview-focused tips. Master process communication, synchronization, and race condition prevention in Linux system programming.
Inter-Process Communication (IPC) in Linux is a fundamental concept that allows processes to exchange data and synchronize their actions efficiently. Whether you are a beginner trying to understand how processes interact or an expert looking to deepen your knowledge of advanced IPC mechanisms, this guide covers everything. From pipes, message queues, and shared memory to semaphores and signals, we break down each IPC method with practical examples, diagrams, and real-world use cases. Learn how to prevent race conditions, manage concurrent processes, and optimize performance in Linux-based systems. This comprehensive tutorial is designed for developers, embedded engineers, and system programmers preparing for interviews or building robust, high-performance applications. Master IPC in Linux and elevate your system programming skills from beginner to expert.
Imagine you’re sitting with a friend over coffee, discussing Linux programming. You bring up a scenario: you have multiple programs running on your Linux system, and sometimes these programs need to talk to each other. How do they share data or coordinate actions safely and efficiently? That’s where IPC in Linux comes in.
Inter-Process Communication (IPC) is a set of mechanisms that allows processes to communicate and synchronize their actions. Whether you’re writing a small utility or a complex system, understanding IPC is crucial for Linux programming and system design. In this article, we’ll cover everything from beginner-friendly basics to advanced concepts, with practical examples and interview-focused tips. We’ll dive into Message Queues, Semaphores, and Shared Memory in detail, so you’ll have a complete picture of IPC in Linux.What is IPC in Linux?
At its core, IPC in Linux refers to techniques that allow one process to send data to another or coordinate tasks. Processes in Linux are isolated—they have their own memory spaces—so direct access to another process’s memory isn’t possible. IPC mechanisms solve this problem.
Think of processes as separate offices. Without IPC, each office works in isolation. IPC is like the internal mail system, shared bulletin boards, or signaling devices that allow offices to communicate safely.
Key objectives of IPC include:
Data Sharing: Allow processes to exchange information safely.
Synchronization: Coordinate processes so they execute in a specific order.
Resource Management: Prevent conflicts when multiple processes access shared resources.
In Linux, IPC is implemented through several mechanisms. The most commonly used are:
Message Queues
Semaphores
Shared Memory
Sockets and Pipes (less common in kernel-level IPC discussion)
In this guide, we’ll focus on the first three since they are widely used and often asked about in interviews.
Why IPC is Important in Linux
You might wonder why processes can’t just access each other’s memory. The reason is process isolation. Isolation ensures that a bug in one process doesn’t crash others, enhancing security and stability. But isolation also means that processes need structured ways to communicate—enter IPC.
Here’s why IPC matters:
Multi-tasking systems: Modern Linux systems run multiple programs at the same time. IPC ensures smooth interaction.
Performance optimization: Using IPC efficiently avoids unnecessary delays and resource conflicts.
Kernel-level programming: Many Linux services use IPC internally. Understanding it is key to systems programming.
Interview relevance: Most Linux or embedded systems interviews ask about IPC mechanisms, differences, and implementations.
Types of IPC in Linux
Linux provides both System V IPC and POSIX IPC. The concepts are similar, but POSIX IPC is more modern and portable.
IPC Type
System V
POSIX
Description
Message Queue
✅
✅
Allows sending messages between processes asynchronously.
Semaphore
✅
✅
Used to control access to shared resources and synchronize processes.
Shared Memory
✅
✅
Fastest IPC method; allows processes to share a memory segment.
Pipes & FIFO
✅
✅
Simplest form; for parent-child or unrelated process communication.
Sockets
✅
✅
Network-aware IPC, useful for inter-machine communication.
For interviews and practical systems programming, the three main pillars are Message Queues, Semaphores, and Shared Memory, which we will explore in detail.
1. Message Queue in Linux
What is a Message Queue?
A message queue is a kernel-managed queue that allows processes to exchange messages. Unlike shared memory, processes do not directly access the same memory area. Instead, the kernel mediates the transfer, ensuring data integrity and synchronization.
Think of it as a post office: processes can “send letters” (messages), and the kernel ensures they reach the correct recipient.
Features of Message Queues
Asynchronous communication
Kernel-managed storage
Messages can be prioritized
Safe for multiple readers and writers
System Calls for Message Queues
In Linux, the key system calls for System V message queues are:
msgget() – create or access a message queue
msgsnd() – send a message
msgrcv() – receive a message
msgctl() – control operations (delete, query, set permissions)
Interview Tip: Be ready to explain how semaphores prevent race conditions, and difference between mutex vs semaphore.
3. Shared Memory in Linux
What is Shared Memory?
Shared memory allows multiple processes to access the same memory segment. It is the fastest IPC mechanism because processes read/write directly, without kernel-mediated copies like message queues.
Think of shared memory as a shared whiteboard: everyone can write and read from it, but you need rules (synchronization) to avoid conflicts.
Key Features
Fastest IPC method
Direct memory access
Requires synchronization (usually via semaphores)
Suitable for large data exchange
System Calls for Shared Memory
shmget() – create/get shared memory segment
shmat() – attach shared memory to process address space
shmdt() – detach shared memory
shmctl() – control operations (delete, query)
Example: Shared Memory Usage
#include <stdio.h>
#include <sys/ipc.h>
#include <sys/shm.h>
#include <string.h>

int main() {
    key_t key = ftok("shmfile", 65);
    int shmid = shmget(key, 1024, 0666 | IPC_CREAT);

    char *str = (char*) shmat(shmid, (void*)0, 0);
    strcpy(str, "Hello from shared memory");

    printf("Data written to shared memory: %s\n", str);
    shmdt(str);
    shmctl(shmid, IPC_RMID, NULL);
    return 0;
}
Interview Tip: Know why semaphores are often paired with shared memory, and the performance trade-offs between shared memory and message queues.
IPC in Linux: System V vs POSIX
It’s important to know that Linux supports System V IPC (older, traditional) and POSIX IPC (modern, portable). Differences include:
Feature
System V
POSIX
Identifier
int key
string name
Creation & deletion
msgget/shmget/semget
mq_open/shm_open/sem_open
Message handling
msgsnd/msgrcv
mq_send/mq_receive
Standardization
Legacy, Unix
Portable, standardized
Interview Tip: Many interviewers ask which IPC mechanism is preferred today and why. POSIX is usually favored for portability and standardization.
Semaphores: Controlling access to printer, shared files, or database
Shared Memory: High-performance systems like video processing, trading platforms
Interview Questions on IPC in Linux
Here’s a list of common interview questions from beginner to expert level:
What is IPC in Linux and why is it used?
Explain the difference between threads and processes.
What is the difference between message queues, semaphores, and shared memory?
How do you prevent race conditions in shared memory?
Write a simple C program to demonstrate a semaphore.
How does msgsnd() differ from write() to a pipe?
Compare System V IPC and POSIX IPC.
How do you synchronize access to shared memory between processes?
What are the advantages and disadvantages of each IPC mechanism?
Explain an interview scenario where message queues are better than shared memory.
1. What is IPC in Linux and why is it used?
IPC (Inter-Process Communication) in Linux is a set of techniques that allows multiple processes to communicate and share data with each other.
Why we need it: Each process in Linux has its own private memory space. If one process wants to share data with another or coordinate actions, it cannot directly access the other process’s memory. IPC solves this by providing safe, structured ways to exchange information and synchronize tasks.
Common uses of IPC:
Sharing data between processes (like configuration or computation results)
Synchronizing tasks to avoid conflicts
Coordinating resource usage, e.g., multiple processes accessing a printer or database
Key takeaway: Without IPC, processes would be isolated and unable to cooperate effectively, limiting system functionality and efficiency.
2. Explain the difference between threads and processes
Feature
Process
Thread
Memory Space
Each process has its own address space
Threads share the same memory space
Creation Overhead
Higher (more resource-intensive)
Lower (lighter weight)
Communication
Needs IPC (message queue, shared memory)
Direct memory access (shared data)
Isolation
Strong isolation
Less isolation; a crash can affect all threads in the process
Scheduling
OS schedules each process separately
OS schedules threads of a process individually
In short: Processes are like separate offices, while threads are like employees in the same office sharing resources.
3. What is the difference between message queues, semaphores, and shared memory?
IPC Mechanism
Description
Key Points
Message Queue
Kernel-managed queue where processes can send/receive messages asynchronously
Safe, handles small messages, supports prioritization
Semaphore
Synchronization tool to control access to resources
Prevents race conditions, can be binary (mutex) or counting
Shared Memory
Memory segment accessible by multiple processes
Fastest method, requires synchronization (usually via semaphores)
Analogy:
Message Queue → Post office
Semaphore → Traffic light
Shared Memory → Whiteboard shared by multiple people
4. How do you prevent race conditions in shared memory?
Race condition: Occurs when two or more processes access shared data simultaneously and at least one is writing. Resulting behavior becomes unpredictable.
Ways to prevent it:
Use semaphores: Wrap read/write operations in wait() and signal() to ensure only one process modifies shared memory at a time.
Mutexes (in POSIX threads): If threads share memory within the same process, use pthread_mutex_lock() and pthread_mutex_unlock().
Careful design: Minimize shared memory access and design processes to avoid simultaneous writes.
Example:
// Pseudocode for using semaphore with shared memory
wait(sem);       // lock
shared_data++;   // critical section
signal(sem);     // unlock
5. Write a simple C program to demonstrate a semaphore
Here’s a beginner-friendly C example using System V semaphore:
Tip: Never access shared memory without synchronization to avoid race conditions.
9. What are the advantages and disadvantages of each IPC mechanism?
IPC Mechanism
Advantages
Disadvantages
Message Queue
Asynchronous, safe, supports priorities
Slower than shared memory, kernel overhead
Semaphore
Prevents race conditions, simple control
Does not store data, only for synchronization
Shared Memory
Fastest IPC, ideal for large data
Requires synchronization, more complex, can cause race conditions
10. Explain an interview scenario where message queues are better than shared memory
Scenario: Imagine a logging system where multiple processes generate logs and a single process writes them to a file.
Using shared memory would require semaphores to avoid race conditions.
Using a message queue, each process can send messages asynchronously, and the logging process can read messages in order without worrying about locks.
Why message queue is better here:
Maintains order automatically
No explicit locking required
Safer and easier to manage when multiple producers exist
Best Practices for IPC in Linux
Always handle errors in IPC system calls.
Clean up resources after use (delete message queues, semaphores, shared memory).
Pair shared memory with semaphores to avoid race conditions.
Use POSIX IPC for portability across Unix systems.
Limit message size in queues to avoid memory issues.
Document the communication protocol between processes clearly.
Conclusion
Mastering IPC in Linux is crucial for any programmer working with processes, system programming, or Linux internals. Understanding message queues, semaphores, and shared memory equips you to design robust and efficient applications. For interviews, make sure you can write small programs, explain trade-offs, and reason about synchronization.
Think of IPC as the language processes use to coordinate—a skill that separates beginner programmers from advanced Linux developers. Start with message queues, experiment with semaphores, and then tackle shared memory. Once you understand these, you’ll be ready to handle almost any Linux IPC challenge.
Frequently Asked Questions (FAQ) – IPC in Linux
Q1: What is IPC in Linux? A: IPC (Inter-Process Communication) in Linux is a set of mechanisms that allow processes to communicate, share data, and synchronize their execution. Common IPC methods include pipes, message queues, shared memory, semaphores, and signals.
Q2: Why is IPC important in Linux? A: IPC is crucial for building efficient, high-performance applications where multiple processes need to coordinate tasks or exchange data. Without IPC, processes would run independently and could not share information safely.
Q3: What are the types of IPC in Linux? A: Linux supports several IPC mechanisms:
Pipes and Named Pipes (FIFO) – for simple communication between processes.
Message Queues – to send and receive structured messages.
Shared Memory – for high-speed data exchange.
Semaphores – for process synchronization.
Signals – to notify processes of events or interrupts.
Q4: What is the difference between pipes and message queues? A: Pipes allow sequential data transfer between related processes, while message queues let processes send/receive discrete messages in a queue, supporting asynchronous communication and priority-based handling.
Q5: How does shared memory work in Linux IPC? A: Shared memory allows multiple processes to access the same memory segment, enabling fast data exchange. Synchronization tools like semaphores are used to prevent race conditions when multiple processes read/write simultaneously.
Q6: What is a semaphore and why is it used? A: A semaphore is a synchronization tool used to control access to shared resources. It prevents race conditions by ensuring that only a limited number of processes can access a critical section at a time.
Q7: How do signals help in IPC? A: Signals are notifications sent to a process to indicate events like termination, interrupts, or timers. They provide a lightweight way for processes to respond to events asynchronously.
Q8: How to choose the right IPC method in Linux? A: The choice depends on the use case:
Use pipes for simple, linear data transfer.
Use message queues for structured, asynchronous messaging.
Use shared memory for high-speed, large data exchange.
Use semaphores for synchronization of shared resources.
Use signals for event notifications and process control.
Q9: Can IPC cause performance issues? A: Yes, improper use of IPC can lead to bottlenecks, deadlocks, or race conditions. Choosing the right mechanism and proper synchronization is key to optimal performance.
Q10: Is IPC used in embedded Linux systems? A: Absolutely. IPC is widely used in embedded Linux for real-time communication, process synchronization, and efficient resource sharing between processes and threads.
Linux System Programming explained clearly for beginners, covering core concepts, real system behavior, and practical foundations to build strong low-level Linux skills.
Linux System Programming Part 1 is a beginner-friendly guide designed to help developers understand how software directly interacts with the Linux operating system. This part focuses on the core foundations of system programming, explaining essential concepts such as processes, system calls, file handling, memory layout, and user space vs kernel space in a simple and practical way.
If you are preparing for embedded systems roles, Linux interviews, or low-level programming jobs, this series will help you build strong fundamentals step by step. Real-world examples, clear explanations, and practical insights make complex topics easy to grasp, even for beginners.
By the end of Part 1, you will have a solid understanding of how Linux programs execute, how resources are managed, and how applications communicate with the kernel. This knowledge forms the base for advanced topics like device drivers, multithreading, and performance optimization covered in later parts.
Perfect for students, working professionals, and anyone serious about mastering Linux system programming.
What is GNU Compiler (GCC) ?
Q1: What is GCC and what are its main components? A1: GCC (GNU Compiler Collection) is a compiler system that supports multiple programming languages such as C, C++, and Fortran. Its main components include:
Preprocessor (cpp): Handles macros, header inclusion, and conditional compilation.
Compiler (cc1): Converts preprocessed source code into assembly code.
Assembler (as): Converts assembly code into machine code object files.
Linker (ld): Combines object files and libraries into a final executable.
Q2: What are the basic stages of compilation in GCC? A2: The stages are:
Preprocessing: Handles #include, #define, and conditional compilation.
Compilation: Converts preprocessed code into assembly code.
Assembly: Converts assembly into object code (.o files).
Linking: Combines object files and libraries into an executable binary.
Explain Compile & Build Process
Q3: What is the difference between compiling and building? A3:
Compiling: Transforming source code into object files (machine code) without producing a complete executable.
Building: The complete process including compilation, assembly, and linking to generate the final executable.
Q4: What are some common flags used in GCC to control compilation? A4:
-c: Compile only, do not link.
-o <file>: Specify output file name.
-Wall: Enable all warnings.
-g: Include debugging information.
-O / -O2 / -O3: Optimization levels.
What is Toolchain ?
Q5: What is a cross-compilation toolchain? A5: A cross-compilation toolchain allows compiling code on one platform (host) to run on a different platform (target). It typically includes:
Cross-compiler (e.g., arm-none-eabi-gcc)
Assembler
Linker
Libraries and headers for the target architecture.
Q6: What is the role of binutils in a toolchain? A6:binutils is a collection of binary tools like as (assembler), ld (linker), objdump, nm, and ar, which help in generating, inspecting, and managing object files and executables.
Explain Object File Analysis ?
Q7: How can you analyze an object file generated by GCC? A7: Object files (.o) can be analyzed using:
nm <file> → Lists symbols (functions and variables).
objdump -d <file> → Disassembles code into assembly.
readelf -h <file> → Shows ELF header information.
size <file> → Shows memory size used by code, data, and bss.
Q8: What is the difference between .text, .data, and .bss sections in an object file? A8:
.bss → Contains uninitialized global/static variables (zero-initialized at runtime).
What is Executable Images ?
Q9: What is an ELF executable? A9: ELF (Executable and Linkable Format) is a standard binary format used in Linux for executables, object files, and shared libraries. It contains sections for code, data, symbol tables, dynamic linking info, and headers.
Q10: How does the linker resolve symbols while creating an executable? A10: The linker combines object files and libraries, resolves undefined symbols by matching references with definitions, and adjusts addresses to produce a single executable. It also handles relocation and dynamic linking information if needed.
Q11: How can you check the dependencies of an executable in Linux? A11: Using ldd <executable> to list shared libraries required by the executable.
What is toolchain ?
A toolchain is essentially a set of programming tools used to develop software for a particular platform or processor. It’s called a “chain” because each tool in the chain passes its output to the next tool, ultimately producing a final executable program.
Key Points about a Toolchain:
Purpose: To take source code and turn it into a binary executable that can run on a target system.
Components of a Typical Toolchain: For C/C++ development (especially with GCC), a toolchain usually includes:
Compiler (e.g., gcc, g++) → Converts source code into assembly or object files.
Linker (ld) → Combines multiple object files and libraries into a single executable.
Libraries → Precompiled code you can use (like libc, math libraries).
Debugger (gdb) → Helps analyze and debug the program.
Other Utilities (binutils) → Tools like objdump, nm, readelf, ar for managing object files and binaries.
Cross-Compilation Toolchain: When the development machine (host) is different from the target machine, you need a cross-compiler toolchain. For example:
arm-none-eabi-gcc → Compiles code on x86 Linux for ARM microcontrollers.
Ensures the program runs correctly on the target platform.
Allows debugging, optimization, and analysis of code.
Supports embedded development where the target hardware is not the same as the host.
Example: On a Linux system, a simple toolchain flow for C could be:
gcc main.c -o main
Here, gcc acts as a compiler + linker, internally invoking the assembler and linker to generate the executable main.
Introduction to Libraries
What is a Library?
A library is a collection of precompiled code, functions, classes, or routines that you can use in your programs without rewriting them. Libraries help you reuse code, modularize applications, and reduce compilation time.
Example: printf() in C comes from the standard C library (libc).
Types of Libraries
Static Libraries (.a in Linux, .lib in Windows)
Code is copied into the executable at compile-time.
Advantages: Faster execution, no dependency at runtime.
Disadvantages: Larger executable, need to recompile to update.
Shared / Dynamic Libraries (.so in Linux, .dll in Windows)
Code is linked at runtime.
Advantages: Smaller executables, easy to update library without recompiling programs.
Disadvantages: Requires library to be present at runtime.
Creating Libraries
2.1 Creating a Static Library
Write your functions in a .c file. Example: mylib.c
Library provides fallback behavior if symbol is not defined.
Weak Symbols in Shared Libraries
Weak symbols are resolved at runtime
Strong symbols in application override shared library weak symbols
Example:
App strong foo → overrides libfoo.so weak foo
How to Check Weak vs Strong Symbols
nm libfoo.so
Output:
W foo     # Weak symbol
T bar     # Strong symbol (text)
One-Line Interview Answer
A strong symbol must have exactly one definition, while a weak symbol provides a default definition that can be overridden by a strong one during linking.
Common Pitfalls
Weak symbols hide missing implementations
Debugging override issues can be tricky
Overuse leads to unclear ownership
18. How to handle dependencies between shared libraries?
Use LD_LIBRARY_PATH, rpath, or system-wide paths
Example: -Wl,-rpath,/path/to/libs during compilation
Ensure dependent libraries are available at runtime
Shared libraries often depend on other shared libraries. These dependencies must be correctly resolved at build time and runtime.
We define dependencies in common.mk only if they are shared across multiple targets; target-specific libraries should be defined in their respective Makefiles.
19. How does the linker search for libraries?
Compile-time:-L/path
Runtime:
LD_LIBRARY_PATH
/etc/ld.so.conf + ldconfig
Default system paths like /lib, /usr/lib
20. How can static and shared libraries coexist in a project?
Use static libraries for critical code that must be embedded
Use shared libraries for common code that may be updated or reused across programs
Compile and link appropriately:
gcc main.c -L. -lmylib -static-libgcc -o main
What is Process Management?
Process Management is a fundamental function of an operating system (OS).
It is responsible for:
Creating, scheduling, and terminating processes
Managing process execution and resources
Ensuring efficient CPU utilization and system stability
Simply put, process management is how the OS keeps track of all running programs and decides who runs, when, and for how long.
Objectives of Process Management
Efficient CPU Utilization:
Maximize CPU usage by scheduling multiple processes efficiently.
Process Isolation and Protection:
Ensure processes don’t interfere with each other’s memory or resources.
Synchronization and Communication:
Manage inter-process communication (IPC) and prevent race conditions.
Deadlock Prevention:
Detect and handle situations where processes wait indefinitely for resources.
Resource Allocation:
Allocate CPU, memory, I/O devices fairly to all processes.
Components of Process Management
A. Process Creation
Processes can be created by:
User requests (running a program)
Parent process creating child (fork in Linux)
Example in Linux:
pid_t pid = fork();  // Creates a child process
if(pid == 0) {
    // Child process
} else {
    // Parent process
}
B. Process Termination
When a process finishes execution:
Releases memory, CPU, and other resources
Parent may collect exit status (using wait() in Linux)
Types of termination:
Normal termination: Process completes normally
Abnormal termination: Due to error or signal
C. Process Scheduling
Determines which process runs next on the CPU.
Two main types:
Long-term scheduling: Decides which job enters the ready queue.
Short-term scheduling: Decides which ready process gets CPU next.
Schedulers in Linux:
CFS (Completely Fair Scheduler) for normal tasks
RT (Real-Time) Scheduler for high-priority real-time tasks
D. Process States
New: Process created but not yet admitted to ready queue
Ready: Waiting to get CPU
Running: Currently executing
Waiting/Blocked: Waiting for I/O or event
Terminated: Finished execution
E. Process Control Block (PCB)
OS keeps a PCB for every process, containing:
Process ID (PID)
Process state
Program counter (PC)
CPU registers
Memory pointers
Open files
Scheduling info
PCB acts as a process identity card in the OS.
F. Inter-Process Communication (IPC)
Process management also ensures processes can communicate safely:
Shared memory
Message queues
Pipes
Signals
G. Context Switching
When CPU switches from one process to another:
Save current process’s context (registers, PC)
Load next process’s context
Overhead exists, but it allows multitasking
4. Importance in Linux
Linux is a multi-tasking, multi-user OS.
Process management ensures:
Fair CPU distribution
Isolation between user processes
Efficient handling of thousands of processes simultaneously
Summary Table
Feature
Description
Process Creation
Forking, exec, user requests
Process Termination
Normal/Abnormal, releasing resources
Scheduling
Long-term, short-term, CFS, RT
Process States
New, Ready, Running, Waiting, Terminated
PCB
Stores process info for OS
IPC
Communication between processes
Context Switching
Save/restore CPU state for multitasking
Introduction to Program Loading
Program loading is the process of taking a program from disk storage and making it ready to run in memory (RAM).
Active program; PID, stack, heap, data, text; process states
Process Address Space
Virtual memory: Text, Data, BSS, Heap, Stack; isolated per process
Kernel Process Descriptor
task_struct in Linux; holds all process info
Linux Process Scheduler
Decides CPU allocation; CFS (fair), RT (real-time), uses queues, priority
Introduction to Stack
Definition: A stack is a LIFO (Last In First Out) data structure used in memory to store temporary data such as function calls, local variables, and return addresses.
LIFO: Last item pushed is the first item popped.
Primary Use: Function calls, recursion, local variables, CPU context during interrupts, and expression evaluation.
Memory layout:
Stack usually grows downwards in most architectures (from high memory to low memory).
It is a part of process memory layout, along with code/text, heap, and data segments.
Interview Q:Why is stack used in function calls? Answer: Stack stores function parameters, return addresses, and local variables, allowing nested or recursive function calls to execute correctly.
How Stack Grows and Shrinks
Stack Growth:
Push operation: Adds data to the stack → stack grows downward (in most systems) toward lower memory addresses.
Pop operation: Removes data from the stack → stack shrinks upward toward higher memory addresses.
Example (x86 32-bit):
High Memory
|           |
|           |
|           |
|           |
|-----------| <- Stack starts here (top)
| Local var | <- Push
| Return Addr|
| Parameters|
Low Memory
Registers Involved:
ESP / RSP → Stack Pointer (points to the top of the stack)
EBP / RBP → Base Pointer (used to reference function frame)
Interview Q:Does stack grow upward or downward? Answer: Usually downward in most architectures like x86, but it depends on CPU architecture.
How Function Parameters Are Passed
Function parameters can be passed:
Via Stack (common in x86, C default calling conventions)
Push parameters right-to-left.Function reads them relative to the base pointer.
void foo(int a, int b);
foo(10, 20);
Stack layout before foo executes:
[b = 20]   <- top of stack
[a = 10]
[Return Address]
[Old EBP]
Via Registers (common in ARM, x64)
Parameters passed through registers (r0-r3 in ARM, RCX, RDX, R8, R9 in x64 Windows).
Interview Q:Why sometimes parameters are passed in registers instead of stack? Answer: Registers are faster than memory access, so small number of parameters are passed in registers for efficiency.
4. Stack Frame (Activation Record)
Definition: A stack frame is a block of memory created on the stack for a function call. It stores:
Function parameters
Local variables
Return address
Saved base pointer (old EBP / RBP)
Structure of a stack frame (x86):
Higher Memory
-----------------
Function Params  <- passed by caller
Return Address
Old Base Pointer <- EBP of previous function
Local Variables
-----------------
Lower Memory
sum() stack frame:
[Return Address to main]
[Old EBP of main]
[a = 10]
[b = 20]
[c = 30]
sum() executes → returns 30 → stack frame destroyed → back to main.
6. How Stack Is Managed by CPU
Stack Pointer (SP / ESP / RSP): Points to top of stack
Base Pointer (BP / EBP / RBP): Points to base of current stack frame
Push/Pop Instructions: Automatically update SP.
CALL Instruction: Pushes return address, jumps to function.
RET Instruction: Pops return address, resumes execution.
Interview Q:What registers are used in stack management? Answer: Stack Pointer (SP) for top of stack, Base Pointer (BP) to access local variables/parameters, Instruction Pointer (IP) for return addresses.
7. Common Interview Questions (with Answers)
Q1: Difference between stack and heap? A:
Feature
Stack
Heap
Allocation
Automatic
Manual (malloc/free)
Size
Limited
Larger
Access
Fast
Slower
Lifetime
Function lifetime
Until freed
Growth
Downward
Upward
Q2: What happens if stack overflows? A:Stack overflow occurs when recursion or deep function calls exceed stack memory → usually crashes program or triggers segmentation fault.
Q3: Can local variables be accessed after function returns? A: No, they exist only in the stack frame. After return, memory is reclaimed.
Q4: How recursion uses stack? A: Each recursive call creates a new stack frame storing its parameters and local variables. Base case stops recursion to avoid overflow.
Q5: What is difference between stack and static memory?
Stack: Dynamic, automatic, LIFO, local variables
Static: Fixed, global/static variables, exist throughout program lifetime
Q6: How is stack different from queue?
Stack: LIFO (last in, first out)
Queue: FIFO (first in, first out)
Q7: What are saved registers in stack frame?
Usually callee-saved registers (like EBX, ESI in x86) are saved to maintain state across function calls.
Application Programming Interfaces (API)
1. What is an API? (Definition)
API (Application Programming Interface) is a set of functions, rules, and protocols that allows one software component to communicate with another without knowing its internal implementation.
In simple words: API = Contract between software components
Example:
int open(const char *pathname, int flags);
You don’t know how open() works internally in the kernel — you just use it.
2. Why Do We Need an API? (Understanding the Need)
Problem without APIs
Applications would directly access hardware or kernel internals
Very unsafe
Hardware dependent
No portability
Difficult to maintain
APIs solve these problems
Problem
How API helps
Hardware complexity
Hides hardware details
Security
Prevents direct kernel access
Portability
Same API works across platforms
Maintainability
Internal changes don’t affect apps
Reusability
Same API used by multiple apps
Interview Line
APIs provide abstraction, safety, portability, and standardization for application development.
3. Types of APIs (Interview Important)
User-Space APIs
Used by applications in user mode
Examples:
POSIX APIs (printf(), malloc(), open())
C standard library (libc)
Qt, Android APIs
Kernel APIs (Internal)
Used inside the kernel, not by applications
Examples:
kmalloc()
schedule()
copy_to_user()
User applications cannot directly call kernel APIs
APIs may internally use system calls, but APIs are NOT system calls themselves.
5. What is a System Call? (Quick Recap)
A system call is a controlled entry point that allows a user-space program to request services from the kernel.
Examples:
read()
write()
fork()
exec()
System calls require mode switching.
6. User Mode vs Kernel Mode (Core OS Concept)
User Mode
Limited privileges
Cannot access hardware
Runs applications
Kernel Mode
Full privileges
Direct hardware access
Runs OS kernel & drivers
Feature
User Mode
Kernel Mode
Hardware access
❌
✅
Crash impact
Only app
Entire OS
Security
Safe
Critical
7. User Mode → Kernel Mode Transition (Step-by-Step)
How does it happen?
Application calls an API
API invokes a system call
CPU executes a software interrupt / syscall instruction
CPU switches to kernel mode
Kernel performs requested operation
Control returns to user mode
Architecture Example (x86)
Instruction: syscall / int 0x80
Interview Diagram (Explain verbally)
Application (User Mode)
        ↓
     API Call
        ↓
   System Call
        ↓
Kernel Mode Execution
        ↓
     Return Result
8. Why Applications Cannot Call System Calls Directly?
Reason
Explanation
Security
Prevent unauthorized access
Stability
Avoid OS crashes
Hardware protection
Prevent misuse
Standardization
APIs abstract OS differences
9. APIs and Application Portability (VERY IMPORTANT)
What is Portability?
Ability of software to run on multiple platforms with minimal changes
How APIs Enable Portability
Same API interface across OSes
Internals change, API stays same
Example:
printf("Hello");
Runs on:
Linux
QNX
Android
Embedded Linux
Because:
printf() API is standardized (POSIX / C standard)
Without APIs
Direct system calls
Hardware-specific code
Rewrite application for every OS
Interview Line
APIs act as a platform-independent layer, enabling application portability.
10. API Example in Embedded / QNX Context
Since you work on QNX & embedded systems, this is gold for interviews
Example:
read(fd, buffer, size);
Application doesn’t know:
Whether data comes from UART
SPI
Audio device
QNX kernel handles it via drivers
This allows same application to run on different SoCs.
11. Real-World Analogy (Interview Friendly)
API = Restaurant Menu
Menu = API
Kitchen = Kernel
Customer = Application
Customer doesn’t enter kitchen Customer orders via menu (API)
12. Common Interview Questions & Answers
Q1: Are APIs platform dependent?
APIs are platform-independent System calls are platform-dependent
Q2: Can API exist without system calls?
Yes (pure user-space APIs like math libraries)
Q3: Does every API call result in a system call?
No Example:
strlen()
Works entirely in user space
Q4: Why not expose system calls directly to applications?
Security risks
Portability issues
Kernel instability
Complete Interview Questions & Answers
What is an API?
Answer: An API (Application Programming Interface) is a set of predefined functions, rules, and protocols that allows an application to communicate with another software component or the operating system without knowing internal implementation details.
Why do we need APIs?
Answer: APIs are needed to:
Hide hardware and kernel complexity
Provide security and controlled access
Improve code reusability
Enable portability across platforms
Simplify application development
What problems would occur without APIs?
Answer: Without APIs:
Applications would directly access hardware
Security would be compromised
System crashes would increase
Code would be hardware-dependent
Applications would not be portable
What are the main advantages of APIs?
Answer:
Abstraction
Security
Portability
Maintainability
Scalability
Reusability
What are the different types of APIs?
Answer:
User-space APIs – Used by applications
Kernel APIs – Used internally by the OS kernel
Library APIs – Provided by libraries like libc, Qt
Web APIs – REST, HTTP APIs
What is a User-Space API?
Answer: User-space APIs are functions that run in user mode and are called directly by applications.
Examples: printf(), malloc(), open()
What is a Kernel API?
Answer: Kernel APIs are internal functions used inside the kernel to manage memory, processes, and hardware.
Example: kmalloc(), schedule()
Can user applications access kernel APIs directly?
Answer: No User applications cannot directly access kernel APIs due to security and stability reasons.
What is a System Call?
Answer: A system call is a mechanism that allows a user-space program to request services from the kernel by switching from user mode to kernel mode.
Examples of System Calls?
Answer:
read()
write()
fork()
exec()
exit()
API vs System Call
Feature
API
System Call
Level
High-level
Low-level
Mode
User mode
Kernel mode
Portability
High
Low
Hardware access
No
Yes
Safety
Safer
Risky
Are API and system call the same?
Answer: No APIs may internally use system calls, but APIs themselves are not system calls.
Does every API call invoke a system call?
Answer: No Example:
strlen()
This works completely in user space.
Why not allow applications to use system calls directly?
Answer:
Security risks
OS instability
No abstraction
Poor portability
What is User Mode?
Answer: User mode is a restricted CPU mode where applications run with limited privileges and no direct hardware access.
What is Kernel Mode?
Answer: Kernel mode is a privileged CPU mode where the OS has full control over hardware, memory, and processes.
Difference between User Mode and Kernel Mode?
Feature
User Mode
Kernel Mode
Privileges
Limited
Full
Hardware access
No
Yes
Crash impact
App only
Whole OS
Why do we need two modes?
Answer: To:
Protect the system
Prevent faulty applications from crashing the OS
Enforce security boundaries
How does user mode to kernel mode transition happen?
Answer (Step-by-step):
Application calls API
API triggers system call
CPU executes syscall instruction
CPU switches to kernel mode
Kernel performs operation
Control returns to user mode
Which CPU instruction is used for mode switching?
Answer:
syscall
sysenter
int 0x80 (older x86)
What is an API Wrapper?
Answer: An API wrapper is a library function that wraps a system call and provides a user-friendly interface.
Example:
printf() → write() → syscall
What is libc?
Answer: libc is the C standard library that provides APIs for:
File handling
Memory management
Process control
How does API improve portability?
Answer: APIs provide a standard interface, allowing the same application code to run on different platforms without modification.
Why are system calls not portable?
Answer: Because system calls are:
OS-specific
Architecture-dependent
Kernel-implementation dependent
What is POSIX API?
Answer: POSIX is a standardized API specification that ensures portability across UNIX-like operating systems.
Example of portability using APIs?
Answer:
read(fd, buf, size);
Works on:
Linux
QNX
Android
Embedded Linux
API vs Driver
Answer:
API → Application-facing interface
Driver → Hardware-facing interface
Can an API exist without kernel involvement?
Answer: Yes Example:
Math APIs
String APIs
What happens if an API fails?
Answer: API returns:
Error codes
NULL pointers
errno values
What is errno?
Answer: errno is a global variable set by APIs to indicate the cause of failure.
Role of APIs in Embedded Systems?
Answer:
Hardware abstraction
RTOS portability
Driver isolation
Faster development
API usage in QNX (Interview Bonus)
Answer: QNX uses POSIX-compliant APIs allowing applications to remain portable across different SoCs and BSPs.
What is the biggest benefit of APIs?
Answer: Abstraction + Portability
One-line API definition for interviews?
Answer:
An API is a standardized interface that allows applications to interact with the operating system safely and portably.
Virtual Address Space & Process Memory Management
1. Introduction to Virtual Address Space
Q1. What is a Virtual Address?
A virtual address is an address generated by a program during execution. It does not directly point to physical RAM.
Simplifies programming – same address layout for all processes
Q4. Difference between Virtual Address and Physical Address
Virtual Address
Physical Address
Used by program
Used by hardware
Process-specific
System-wide
Translated by MMU
Actual RAM location
Not directly accessible
Accessed by CPU
2. Managing Process Address Space
Q5. What is a Process Address Space?
It is the entire memory layout assigned to a process.
Typical layout (Linux):
High Address
-----------------
Stack
-----------------
Memory Mapped Region
-----------------
Heap
-----------------
BSS
-----------------
Data
-----------------
Text (Code)
-----------------
Low Address
Q6. Who manages the process address space?
Kernel manages it
Uses:
Page tables
MMU
Virtual memory subsystem
Each process has its own page table.
Q7. What is Page Table?
A page table maps:
Virtual Page Number → Physical Frame Number
Used by MMU during address translation.
Q8. What happens during context switch related to memory?
Kernel switches:
Page table base register
TLB entries may be flushed
New process sees its own virtual memory
3. Stack Allocations
Q9. What is Stack Memory?
Stack is a memory region used for:
Function calls
Local variables
Function parameters
Return addresses
Q10. How does Stack grow?
On most architectures (x86, ARM):
Grows downward (high → low address)
Q11. What is Stack Frame?
A stack frame is created for each function call and contains:
Function parameters
Local variables
Saved registers
Return address
Q12. Who allocates and deallocates stack memory?
Automatically managed
Allocated when function is called
Deallocated when function returns
Q13. Stack vs Heap (Interview Favorite)
Stack
Heap
Fast
Slower
Auto-managed
Programmer-managed
Limited size
Larger
Function scope
Global scope
Risk: Stack overflow
Risk: Memory leak
Q14. What is Stack Overflow?
Occurs when:
Deep recursion
Large local variables
Leads to segmentation fault.
4. Heap & Data Segment Management
Q15. What is Heap Memory?
Heap is used for:
Dynamic memory allocation at runtime
Allocated using:
malloc(), calloc(), realloc()
Q16. How does Heap grow?
Grows upward (low → high address)
Q17. What is Data Segment?
Stores global and static variables.
Q18. Types of Data Segment
Initialized Data Segment
int a = 10;
static int b = 5;
Uninitialized Data Segment (BSS)
int x;
static int y;
Q19. Why is BSS important?
Occupies no space in executable
Initialized to zero at runtime
Saves disk space
5. Memory Maps
Q20. What is a Memory Map?
A memory map shows how a process’s virtual address space is laid out.
External fragmentation – free memory split into small pieces
Q30. How does OS allocate heap memory internally?
Uses:
brk() / sbrk() → heap extension
mmap() → large allocations
7. Memory Locking
Q31. What is Memory Locking?
Prevents memory pages from being:
Swapped out to disk
Q32. Why is Memory Locking required?
Used in:
Real-time systems
Audio/video processing
Embedded & QNX/Linux RTOS
Ensures deterministic performance.
Q33. Functions used for Memory Locking
mlock()
munlock()
mlockall()
munlockall()
Q34. What does mlockall() do?
Locks:
All current and future memory pages of process
mlockall(MCL_CURRENT | MCL_FUTURE);
Q35. What happens if memory is not locked in RT systems?
Page faults
Unpredictable latency
Missed deadlines
Q36. Any limitations of Memory Locking?
Requires privileges
Limited by system settings
Excessive locking affects overall system
8. Interview Rapid-Fire Questions
Q37. Can two processes have same virtual address?
Yes But mapped to different physical memory
Q38. Who translates virtual to physical address?
MMU with page tables
Q39. What causes Segmentation Fault?
Invalid memory access
Stack overflow
Dereferencing NULL pointer
Q40. What is Copy-on-Write (CoW)?
Memory shared until modification
Used during fork()
Q41. Heap vs mmap allocation – when used?
Small allocations → Heap
Large allocations → mmap
9. One-Line Interview Summary
Virtual memory provides each process an isolated address space where stack, heap, data, and mapped regions are managed by the kernel using paging, ensuring security, efficiency, and deterministic behavior when required.
Conclusion
Linux System Programming builds a strong foundation for understanding how software truly works on a Linux system. By learning Linux System Programming, developers gain clarity on process behavior, memory usage, system calls, and kernel interaction, which are essential for writing efficient and reliable programs. These fundamentals not only improve coding confidence but also help in debugging real-world issues and performing better in technical interviews. Whether you are a beginner or an experienced developer, mastering Linux System Programming opens the door to advanced topics like embedded Linux, device drivers, and high-performance system software, making it a valuable skill for long-term career growth.
Frequently Asked Questions (FAQ) : Linux System Programming
1. What is Linux System Programming?
Linux System Programming involves writing programs that interact directly with the Linux operating system using system calls and low-level interfaces.
2. Why is Linux System Programming important?
Linux System Programming helps developers understand how applications communicate with the Linux kernel, improving performance, reliability, and debugging skills.
3. Who should learn Linux System Programming?
Linux System Programming is ideal for embedded engineers, Linux developers, backend programmers, and students preparing for system-level interviews.
4. What are the core topics in Linux System Programming?
Linux System Programming covers processes, system calls, file handling, memory management, signals, and user space vs kernel space concepts.
5. Is Linux System Programming beginner-friendly?
Linux System Programming can be learned by beginners with basic C knowledge when explained step by step with practical examples.
6. Which language is used for Linux System Programming?
Linux System Programming is primarily done using the C programming language because of its close interaction with the Linux kernel.
7. Is Linux System Programming required for embedded systems?
Yes, Linux System Programming is essential for embedded Linux development and understanding low-level system behavior.
8. How does Linux System Programming differ from application programming?
Linux System Programming focuses on low-level OS interaction, while application programming focuses on high-level user functionality.
9. Does Linux System Programming help in debugging?
Linux System Programming improves debugging skills by giving insight into process execution, memory usage, and system resources.
10. Can Linux System Programming improve career opportunities?
Yes, Linux System Programming skills are highly valued in embedded systems, Linux development, and system software roles.
Learn how to build a real Audio Custom Player using Yocto, with ALSA support, custom layers, and flashing steps for embedded Linux boards.
This step-by-step guide shows how to build a real Audio Custom Player using the Yocto build system, explained in clear and practical language. You’ll learn how to create an ALSA-based audio player similar to aplay, set up the correct Yocto folder structure, write a custom layer and recipe, enable embedded Linux audio support, build the Yocto image, and flash it onto a BeagleBone or other embedded boards. The article is written for beginners who want hands-on understanding and for experienced engineers looking for a clean, production-ready audio player workflow. Everything is explained from real embedded development experience, without theory overload or copy-paste tutorials.
Why Build an Audio Custom Player Instead of Using aplay?
If you have worked with Linux audio even a little, you already know aplay. It works, but it is not designed for production systems.
Here is why real embedded products avoid plain aplay:
No UI or control layer
No fade-in or fade-out
No volume ramping
No error recovery
No device hot-plug handling
No service-style startup
No customization
A custom Audio Custom Player gives you:
Full control over audio playback
Feature parity or better than aplay
Clean integration with Yocto
Predictable behavior on embedded hardware
Production-ready audio flow
This is exactly why automotive, industrial, and consumer devices never ship aplay as-is.
What We Are Building (Big Picture)
By the end of this guide, you will understand how to:
Build a custom audio player similar to aplay
Integrate it into a Yocto build
Enable ALSA audio support
Cross-compile the player
Package it as a Yocto recipe
Flash the image on BeagleBone or similar board
Boot and play audio automatically
This applies to any embedded Linux board, not just BeagleBone.
Audio Architecture in Embedded Linux (Simple View)
Before coding anything, let’s understand the audio flow.