Author: admin

  • Master QNX Boot Process Interview Question Explained (2026)

    Learn the complete QNX Boot Process: IPL, Startup Code, IFS, SLM & Boot Manager explained step-by-step for embedded system interviews.

    Understanding the QNX boot process is a must if you’re preparing for embedded or automotive interviews. In this video, we break down the complete QNX boot flow step by step from power-on to application launch in a way that’s easy to understand and practical for real interviews.

    You’ll learn how IPL, startup code, IFS, the Neutrino microkernel, SLM, and the Boot Manager work together during system boot. Each concept is explained with clear logic, real-world examples, and common interview questions that are frequently asked in companies working with QNX RTOS.

    This content is designed for beginners, experienced engineers, and senior embedded developers who want clarity instead of textbook definitions. If you’re targeting roles in automotive, IVI, ADAS, or real-time systems, this guide will help you answer confidently and explain concepts like a professional.

    Perfect for:

    • QNX RTOS interview preparation
    • Embedded software engineers
    • Automotive and safety-critical system roles

    Explain QNX booting process

    0️⃣ Power-On / Reset

    • CPU resets and starts execution from a fixed reset vector
    • Control goes to platform firmware
      • ROM code / SoC boot ROM
      • BIOS / UEFI (x86)
      • Trusted firmware (ARM)

    1️⃣ Firmware / Platform Initialization

    Responsibilities:

    • Basic silicon initialization
    • Select boot media (eMMC, SD, NOR, NAND, network)
    • Load the Initial Program Loader (IPL)

    Still not QNX OS yet.

    2️⃣ Initial Program Loader (IPL)

    First QNX-specific software

    Responsibilities:

    • Initialize minimum hardware:
      • DRAM controller
      • CPU caches
      • Basic clocking
    • Locate and load the QNX IFS (Image File System) into RAM
    • Transfer execution to the startup program inside the IFS

    IPL is board-specific and extremely small.

    3️⃣ Image File System (IFS)

    The IFS is a single binary image containing:

    • Startup program (startup-*)
    • procnto (kernel + process manager)
    • Boot scripts
    • Drivers & servers
    • Boot manager / SLM (if used)
    • Optional user applications

    IPL only loads the IFS; it does not start services.

    4️⃣ Startup Program (Critical Stage)

    Executed directly from the IFS

    Responsibilities:

    • Identify CPU and SoC
    • Initialize interrupt controller
    • Initialize timers
    • Configure caches
    • Initialize MMU
    • Discover RAM & reserved regions
    • Build the System Page (syspage)
    • Register kernel callouts
    • Prepare execution environment for the kernel

    The kernel cannot run without startup completing

    5️⃣ Transfer Control to procnto

    • Startup jumps to procnto entry point

    6️⃣ procnto (Kernel + Process Manager)

    procnto contains:

    • Neutrino microkernel
    • Process manager

    Kernel responsibilities:

    • Thread scheduling
    • Interrupt handling
    • Message passing (IPC)
    • Timers
    • Signals

    Process manager responsibilities:

    • Process creation (spawn, fork)
    • Memory management
    • POSIX services
    • File descriptor handling

    At this point, the OS is alive, but no drivers or filesystems exist yet.

    7️⃣ Boot Script Execution (Buildfile Script)

    • procnto executes the startup script embedded in the IFS
    • Script is defined in the IFS buildfile

    Script launches:

    • Device drivers (resource managers)
    • Filesystems
    • Networking stack
    • Logging services

    Example:

    devc-seromap
    io-blk.so
    devb-mmcsd
    mount -t qnx6 /dev/mmc0 /
    

    Script order defines system bring-up order.

    8️⃣ Boot Manager (Optional, Policy-Based)

    Runs as a user-space process

    Responsibilities:

    • Decide boot mode:
      • Normal
      • Recovery
      • Factory
      • OTA update
    • Read:
      • GPIO
      • NVRAM
      • Reset reason
    • Select:
      • Which script
      • Which partition
      • Which system profile

    Boot Manager does not boot the OS, it selects how the OS continues.

    9️⃣ SLM – System Launch Manager (Optional but Common)

    Runs after boot decision

    Responsibilities:

    • Launch services based on policy
    • Handle:
      • Dependencies
      • Ordering
      • Restart policies
      • Monitoring

    Example:

    • Start audio only after codec driver
    • Restart camera service on crash
    • Delay UI until graphics stack is ready

    Replaces traditional init systems.

    🔟 Filesystem Mounting

    • Root filesystem mounted
    • Persistent storage mounted
    • /proc, /dev, /etc become available

    1️⃣1️⃣ System Services Running

    Examples:

    • io-pkt (networking)
    • slog2info (logging)
    • devb-* (storage)
    • Audio, camera, display services

    All run in user space.

    1️⃣2️⃣ User Applications Start

    • System enters RUNNING state
    • Real-time applications start with:
      • Assigned priority
      • Scheduling policy
    • System is fully operational

    COMPLETE FLOW DIAGRAM

    Power On / Reset
          ↓
    Firmware / ROM / UEFI
          ↓
    Initial Program Loader (IPL)
          ↓
    Load IFS into RAM
          ↓
    Startup Program
          ↓
    procnto (Kernel + Process Manager)
          ↓
    Boot Script (IFS)
          ↓
    Boot Manager (optional)
          ↓
    SLM (optional)
          ↓
    Drivers / Services
          ↓
    Applications
    

    IPL (Initial Program Loader) is the first QNX-specific software component that runs after power-on/reset.
    Its primary role is to prepare minimal hardware and load the QNX OS image (IFS) into RAM.

    Simple Definition

    IPL is a small, board-specific program that runs after firmware, initializes minimal hardware, loads the QNX Image File System (IFS) into memory, and transfers control to the startup program.

    Where IPL Fits in the QNX Boot Sequence

    Power ON / Reset
       ↓
    Firmware / Boot ROM / UEFI
       ↓
    IPL   ← (first QNX component)
       ↓
    Startup program (inside IFS)
       ↓
    procnto (kernel + process manager)
    

    Key Responsibilities of IPL

    1️⃣ Minimal Hardware Initialization

    • Initialize DRAM / RAM controller
    • Set basic CPU clocks
    • Enable caches (if required)
    • Setup minimal UART for debug logs

    Only what’s needed to load the OS — nothing more.

    2️⃣ Locate Boot Media

    • Determines where the OS image is stored:
      • NOR / NAND Flash
      • eMMC / SD card
      • Network (TFTP)
      • SPI Flash

    3️⃣ Load the IFS (Image File System)

    • Copies the QNX IFS image from boot media into RAM
    • Verifies image integrity (optional checksum/signature)

    4️⃣ Transfer Control to Startup Program

    • Jumps to the startup program entry point
    • From this point, IPL is no longer involved

    What IPL Does NOT Do

    • Does not initialize MMU
    • Does not start the kernel
    • Does not start drivers or services
    • Does not run in user space

    Characteristics of IPL

    • Board-specific
    • Very small footprint
    • Runs in physical addressing mode
    • Written in C + assembly
    • Often stored in ROM or Flash

    IPL vs Startup Program (Very Common Interview Question)

    FeatureIPLStartup Program
    Runs first✅❌
    Hardware initMinimalExtensive
    Loads IFS✅❌
    Builds syspage❌✅
    Initializes MMU❌✅
    Starts kernel❌✅ (via procnto)

    One-Line Ultra-Short Answer

    IPL is a minimal bootloader in QNX that initializes basic hardware and loads the OS image (IFS) into RAM before handing control to the startup program.

    High-Level Difference (One-Line)

    IPL is a minimal, board-specific QNX loader whose only job is to load the IFS, while U-Boot is a full-featured, OS-agnostic bootloader that can load many operating systems and provide user interaction.

    Position in Boot Flow

    QNX with IPL

    ROM / Firmware
       ↓
    IPL
       ↓
    Startup program
       ↓
    procnto (kernel)
    

    QNX with U-Boot

    ROM / Firmware
       ↓
    U-Boot
       ↓
    Load IFS into RAM
       ↓
    Startup program
       ↓
    procnto (kernel)
    

    U-Boot can replace IPL, but the startup program is still mandatory in QNX.

    Core Purpose

    AspectIPLU-Boot
    Primary goalLoad QNX IFSGeneral-purpose bootloader
    OS specificYes (QNX)No (Linux, QNX, RTOS)
    Feature setMinimalVery rich
    User interactionNoneCLI, scripting
    Typical sizeVery small (KBs)Large (100s of KBs–MBs)

    Hardware Initialization

    AreaIPLU-Boot
    DDR initMinimalFull
    ClocksMinimalFull
    GPIONoYes
    NetworkingNoYes
    USBNoYes
    DisplayNoYes

    IPL initializes only what’s needed to load IFS.

    Storage & Boot Sources

    FeatureIPLU-Boot
    NOR/NANDYesYes
    eMMC/SDYesYes
    Network bootRareCommon
    Filesystem supportNoYes (FAT, EXT, etc.)

    OS Image Handling

    FeatureIPLU-Boot
    Loads IFSYesYes
    Loads Linux kernelNoYes
    Multiple imagesNoYes
    Image selectionFixedDynamic

    Security Features

    FeatureIPLU-Boot
    Secure bootLimitedStrong
    Image authenticationBasicAdvanced
    TPM supportNoYes

    Scripting & Debugging

    FeatureIPLU-Boot
    Command lineNoYes
    Boot scriptsNoYes
    Environment variablesNoYes
    Recovery shellNoYes

    Typical Use Cases

    IPL is used when:

    • You want fast, deterministic boot
    • System is fixed-function
    • Safety-critical systems (automotive)
    • Minimal attack surface

    U-Boot is used when:

    • Multiple OS support needed
    • Development & debugging required
    • OTA updates, recovery modes
    • Rich storage & network boot options

    Common Interview Trick Question

    Q: Can QNX boot without IPL?

    ✔️ Yes, if U-Boot loads the IFS directly
    ❌ No, QNX can’t boot without the startup program

    IPL vs U-Boot vs Startup

    ComponentRole
    IPLLoads IFS
    U-BootLoads IFS or kernel
    StartupPrepares system for kernel

    Startup is mandatory. IPL is optional if U-Boot is used.

    Real Automotive Example

    • Boot ROM → U-Boot
    • U-Boot verifies image & selects slot
    • U-Boot loads QNX IFS into RAM
    • Jumps to startup program
    • QNX kernel starts

    IFS (Image File System) is a single, self-contained binary image that contains everything QNX needs to boot and start running — including the kernel, startup code, drivers, and applications.

    Simple Definition

    IFS is a bootable, in-memory filesystem image that bundles the QNX kernel, startup program, system processes, drivers, scripts, and applications into one binary loaded by the bootloader.

    Where IFS Fits in the Boot Sequence

    IPL / U-Boot
       ↓
    Load IFS into RAM
       ↓
    Startup program
       ↓
    procnto (kernel)
       ↓
    Boot scripts & services
    

    What an IFS Contains

    Mandatory Components

    • Startup program (startup-*)
    • procnto
      • Neutrino microkernel
      • Process manager

    Optional Components

    • Boot scripts
    • Device drivers (resource managers)
    • Filesystem drivers
    • Networking stack
    • Boot Manager
    • SLM (System Launch Manager)
    • System services
    • User applications
    • Shared libraries

    Everything inside the IFS is available immediately at boot.

    Why QNX Uses IFS

    1️⃣ Single Binary = Fast & Reliable Boot

    • No dependency on external filesystems
    • Ideal for real-time & safety systems

    2️⃣ Read-Only & In-Memory

    • Stored in ROM/Flash
    • Loaded into RAM
    • Immutable at runtime → improves reliability

    3️⃣ Deterministic Startup

    • Exact execution order defined in buildfile
    • No surprises during boot

    How IFS is Created

    Tool Used

    • mkifs

    Input

    • Buildfile
      • Lists binaries
      • Defines scripts
      • Sets permissions & paths

    Output

    • Single IFS binary
      • Example: ifs-qnx.bin

    Simple Buildfile Example

    [virtual=armle]
    startup-qcom
    procnto
    script=/etc/system/boot {
        devc-seromap
        io-blk.so
    }
    

    Runtime Characteristics

    FeatureIFS
    LocationRAM
    Writable (read-only)
    SizeFixed at build time
    ExecutionDirect from memory
    Mount point/ (initial root)

    IFS vs Root Filesystem

    AspectIFSRoot FS
    PurposeBoot & early systemPersistent storage
    ModifiableNoYes
    Used at bootAlwaysOptional
    ReliabilityVery highDepends on storage

    After boot, QNX may switch root to a persistent filesystem.

    Common Interview Questions

    Q. Can QNX boot without IFS?

    ❌ No
    IFS is mandatory.

    Q. Can there be multiple IFS images?

    ✔️ Yes

    • Different boot modes
    • Recovery images
    • OTA A/B partitions

    Q. Is IFS the same as Linux initramfs?

    Conceptually similar, but:

    • IFS is more deterministic
    • Built specifically for QNX
    • Integrated tightly with the kernel startup

    One-Line Ultra-Short Answer

    IFS is a single, bootable in-memory filesystem image that contains the QNX startup program, kernel, drivers, scripts, and applications.

    Startup code in QNX is the very first software that runs after the boot loader (IPL) and before the QNX Neutrino microkernel starts.

    Its main job is to initialize the hardware, prepare memory, and load the QNX kernel and system processes into RAM.

    Why is Startup Code needed in QNX?

    When the system powers on:

    • Hardware is in an unknown state
    • RAM is not initialized
    • MMU, caches, clocks are not configured

    The startup code prepares the system so the QNX kernel can run safely and deterministically.

    Position in QNX Boot Flow (Interview Point)

    Power ON
       ↓
    ROM / Boot ROM
       ↓
    IPL (Initial Program Loader)
       ↓
    Startup Code   ← (This)
       ↓
    QNX Neutrino Microkernel (procnto)
       ↓
    System Services & Applications
    

    Key Responsibilities of QNX Startup Code

    1. Basic Hardware Initialization

    • Initialize CPU
    • Configure clocks and PLL
    • Enable RAM controllers
    • Set up UART (for early debug output)

    2. Memory Setup

    • Detect available RAM
    • Build the system memory map
    • Reserve memory for:
      • Kernel
      • System processes
      • Drivers

    3. MMU and Cache Setup

    • Initialize MMU
    • Set up page tables
    • Enable instruction and data caches

    (Important for performance and protection)

    4. Load the IFS (Image File System)

    • Locate the IFS image
    • Copy it into RAM
    • Validate the image

    IFS contains:

    • Neutrino kernel (procnto)
    • Process Manager
    • Shared libraries
    • Startup services

    5. Start the QNX Microkernel

    • Transfer control to:
    procnto
    
    • After this point, QNX kernel scheduling and message passing begin

    Is Startup Code Hardware Dependent?

    Yes

    • Startup code is board-specific
    • Written per SoC / CPU architecture
    • Different for:
      • ARM
      • x86
      • PowerPC

    Where is Startup Code Located?

    • Stored inside the IFS
    • Built using:
    startup-<boardname>
    

    Example:

    startup-am335x
    startup-imx8
    

    Difference Between IPL and Startup Code (Very Common Interview Question)

    IPLStartup Code
    Runs from ROM/FlashRuns from RAM
    Very minimalMore complex
    Loads startupLoads kernel + IFS
    Hardware-agnosticHardware-specific

    One-Line Interview Answer

    Startup code in QNX is a board-specific program that runs after the IPL to initialize hardware, configure memory and MMU, load the IFS, and finally start the QNX Neutrino microkernel.

    Real-World Example (Bonus)

    On an ARM board:

    • IPL sets up SDRAM
    • Startup code:
      • Configures MMU
      • Sets UART for logs
      • Loads procnto
      • Hands control to the kernel

    Where they sit in the QNX boot flow

    Power ON
      ↓
    Boot ROM
      ↓
    IPL (Initial Program Loader)
      ↓
    Startup Code
      ↓
    QNX Neutrino Microkernel (procnto)
      ↓
    SLM (System Launch Manager)
      ↓
    Boot Manager
      ↓
    System Services & Applications
    

    1️⃣ Startup Code (Before Kernel)

    What is Startup Code?

    Startup code is a board-specific program that runs after IPL and before the QNX kernel.

    Runs in:

    • No OS context
    • No scheduling, no IPC, no processes

    Main Responsibilities

    • Initialize CPU, clocks, PLL
    • Initialize RAM
    • Set up MMU and caches
    • Build system memory map
    • Load IFS into RAM
    • Start Neutrino microkernel (procnto)

    Key Interview Line

    Startup code prepares the hardware and memory so that the QNX kernel can safely start.

    2️⃣ SLM (System Launch Manager)

    What is SLM?

    SLM is the first user-space process launched by the QNX kernel.

    It is responsible for starting all core system services.

    Runs in:

    • User space
    • Fully scheduled by the kernel
    • Uses message passing

    What SLM Does

    • Reads system launch configuration
    • Starts:
      • Process Manager
      • Path Manager
      • Device drivers
      • Filesystems
      • Networking stack
    • Handles service dependencies
    • Ensures correct startup order

    Why SLM is important

    • Provides deterministic system bring-up
    • Allows controlled, restartable services

    Key Interview Line

    SLM is responsible for launching and supervising essential system services after the kernel starts.

    3️⃣ Boot Manager

    What is Boot Manager?

    Boot Manager is a user-space component that controls which system configuration or boot image to start.

    It is commonly used in automotive and safety-critical systems.

    Runs in:

    • User space
    • After SLM starts basic services

    What Boot Manager Does

    • Selects:
      • Normal boot
      • Recovery boot
      • OTA update boot
    • Validates images (CRC / signature)
    • Handles:
      • A/B partitions
      • Rollback on failure
    • Supports safe and secure boot flow

    Why Boot Manager is needed

    • Enables fail-safe boot
    • Supports software updates
    • Required for ASIL / functional safety systems

    Key Interview Line

    Boot Manager controls system boot modes and ensures safe startup, recovery, and update handling.

    Direct Comparison Table (Very Important)

    FeatureStartup CodeSLMBoot Manager
    Boot StageBefore kernelAfter kernelAfter SLM
    Runs InNo OSUser spaceUser space
    Hardware InitYesNoNo
    Kernel LaunchYesNoNo
    Service LaunchNoYesPartial
    Boot Mode SelectionNoNoYes
    Safety / OTANoNoYes
    Board SpecificYesMostly genericGeneric

    One-Line Differentiation

    • Startup code initializes hardware and starts the kernel
    • SLM launches and manages system services
    • Boot Manager decides how the system boots (normal, recovery, update)

    Common Interview Trap

    ❌ “Boot Manager starts the kernel”
    ✅ Wrong — kernel is already running before Boot Manager starts.

    Real Automotive Example

    • Startup initializes SoC and DDR
    • Kernel starts
    • SLM launches:
      • Audio
      • Camera
      • CAN
    • Boot Manager:
      • Verifies OTA image
      • Chooses A/B partition
      • Rolls back on failure

    5-Second Interview Answer

    In QNX, startup code initializes hardware and starts the kernel, SLM launches and supervises system services, and Boot Manager controls boot modes, recovery, and updates for safe system startup.

    io-pkt is the QNX networking stack process that provides TCP/IP networking services.

    Detailed Explanation

    • io-pkt is a user-space network protocol stack
    • It implements:
      • TCP
      • UDP
      • IP
      • ARP
      • ICMP
    • Uses QNX’s message-passing microkernel architecture
    • Hardware-independent networking core

    Key Responsibilities

    • Packet routing
    • Protocol handling
    • Socket API support
    • Interface with NIC drivers

    How hardware fits in

    • NIC drivers are shared libraries loaded by io-pkt
    • Example:
    io-pkt-v6-hc -d e1000
    

    Why QNX uses io-pkt (Interview Point)

    • Fault isolation (user space)
    • Restartable networking stack
    • Deterministic behavior

    Runs in:

    • User space

    devb-* is the QNX block device driver used for storage devices.

    Detailed Explanation

    • devb stands for device block
    • Provides block-level access to storage:
      • eMMC
      • SD card
      • USB storage
      • SATA
      • NVMe

    What devb-* Does

    • Manages:
      • Read/write blocks
      • Disk partitions
      • Media detection
    • Exposes devices like:
    /dev/hd0
    /dev/hd0t77
    

    Common devb-* Examples

    DriverDevice
    devb-sdmmcSD / eMMC
    devb-umassUSB mass storage
    devb-sataSATA disk
    devb-nvmeNVMe

    Used with File Systems

    • Works with:
      • fs-qnx6
      • fs-ext4
      • fs-fat

    Runs in:

    • User space

    devc-* is the QNX character device driver for serial communication interfaces.

    Detailed Explanation

    • devc stands for device character
    • Provides serial I/O support:
      • UART
      • RS-232
      • RS-485
    • Uses termios interface

    What devc-* Does

    • Handles:
      • Baud rate
      • Parity
      • Flow control
      • Interrupts
    • Creates devices like:
    /dev/ser1
    /dev/ttyS0
    

    Common devc-* Examples

    DriverInterface
    devc-ser8250Standard UART
    devc-mx1i.MX UART
    devc-omapTI OMAP UART

    Runs in:

    • User space

    Comparison Table

    Featureio-pktdevb-*devc-*
    TypeNetwork stackBlock driverCharacter driver
    Used ForTCP/IP networkingStorage devicesSerial communication
    Device TypeNetworkBlockCharacter
    Runs InUser spaceUser spaceUser space
    RestartableYesYesYes
    Hardware SpecificPartiallyYesYes

    One-Line Difference

    • io-pkt → networking stack
    • devb-* → storage devices
    • devc-* → serial communication

    Common Interview Trap

    ❌ “These drivers run in kernel space”
    ✓ Wrong — QNX runs drivers in user space for fault tolerance.

    Real Automotive Example

    • io-pkt → Ethernet / CAN-over-IP
    • devb-sdmmc → eMMC storage
    • devc-ser8250 → Debug UART

    5-Second Interview Answer (Perfect)

    In QNX, io-pkt provides networking services, devb-* handles block storage devices, and devc-* manages serial character devices, all running safely in user space

    A startup script in QNX is a shell script that runs after the QNX kernel boots to start system services, drivers, and applications in a defined order.

    Slightly Detailed

    • Executed in user space
    • Runs after procnto (microkernel) is up
    • Typically launched by SLM (System Launch Manager)
    • Used to:
      • Start drivers
      • Mount filesystems
      • Configure networking
      • Launch applications

    What Does a Startup Script Do?

    Common tasks include:

    • Start drivers:
    devc-ser8250 &
    io-pkt-v6-hc -d e1000 &
    devb-sdmmc &
    
    • Mount filesystems:
    mount -t qnx6 /dev/hd0t177 /data
    
    • Configure networking:
    ifconfig en0 192.168.1.10
    
    • Set environment variables
    • Start applications and services

    Where Are Startup Scripts Located?

    Interview Answer

    Startup scripts are stored inside the IFS (Image File System) and are executed during system boot.

    Common Locations

    LocationPurpose
    /etc/system/Primary system startup scripts
    /etc/system/enum/Hardware enumeration scripts
    /etc/rc.d/Optional rc-style scripts
    /proc/boot/Read-only IFS contents

    Most Important File (Very Common Question)

    /proc/boot/script

    • Main startup script
    • Executed automatically during boot
    • Lives inside the IFS
    • Read-only at runtime

    How Startup Scripts Are Executed (Boot Flow)

    Kernel (procnto)
       ↓
    SLM starts
       ↓
    SLM executes /proc/boot/script
       ↓
    Drivers and services start
    

    Why Startup Scripts Are Important?

    Interview Points

    • Control boot order
    • Enable deterministic startup
    • Allow easy system customization
    • No kernel recompilation required

    Startup Script vs Startup Code

    Startup CodeStartup Script
    Runs before kernelRuns after kernel
    Written in CWritten in shell
    Hardware initializationService & driver launch
    Board-specificMostly generic

    Real-World Example (Automotive)

    • Startup script:
      • Starts audio service
      • Launches camera driver
      • Brings up Ethernet
    • Allows OTA updates without touching kernel

    One-Line Interview Answer

    A startup script in QNX is a user-space shell script stored in the IFS that runs after the kernel boots to launch system services, drivers, and applications.

    Conclusion

    The QNX boot process may look complex at first, but once you understand the role of each stage, it becomes very logical and easy to explain in interviews. From IPL and startup code preparing the hardware, to the Neutrino microkernel taking control, and finally SLM and the Boot Manager launching and managing system services, every step is designed for determinism, safety, and reliability.

    Knowing how these components work together not only helps you answer interview questions with confidence but also gives you a real-world understanding of why QNX is widely used in automotive and safety-critical systems. If you can clearly explain the boot flow and the responsibility of each layer, you already stand out as a strong embedded engineer.

    Keep revising the flow, relate it to practical use cases, and you’ll be well prepared for any QNX or embedded systems interview.

    FAQ : QNX Boot Process

    1. What is the QNX boot process?

    The QNX boot process is the sequence of steps the system follows from power-on to running applications. It involves IPL, startup code, IFS, the Neutrino microkernel, SLM, and Boot Manager.

    2. What is IPL in QNX?

    IPL (Initial Program Loader) is the first code that runs after powering on the system. It initializes basic hardware and loads the startup code into RAM.

    3. What is startup code in QNX?

    Startup code is a board-specific program that runs after IPL. It sets up memory, MMU, caches, and loads the IFS, then starts the Neutrino microkernel.

    4. What is IFS (Image File System)?

    IFS contains the QNX kernel, drivers, libraries, and startup scripts. Startup code loads IFS into RAM so the system can run all services.

    5. What is SLM in QNX?

    SLM (System Launch Manager) is the first user-space process launched by the kernel. It starts drivers, system services, and applications, handling dependencies and startup order.

    6. What is Boot Manager in QNX?

    Boot Manager controls which boot mode or image the system uses. It ensures safe boot, recovery options, and OTA updates, especially in automotive or safety-critical systems.

    7. What is io-pkt in QNX?

    io-pkt is the networking stack process in QNX. It handles TCP/IP, UDP, ICMP, and communicates with NIC drivers to provide network functionality in user space.

    8. What are devb-* drivers in QNX?

    devb-* drivers are block device drivers for storage devices like SD cards, eMMC, USB drives, and SATA/NVMe disks. They provide read/write block-level access.

    9. What are devc-* drivers in QNX?

    devc-* drivers are character device drivers used for serial communication interfaces such as UART, RS-232, and RS-485.

    10. What is a startup script in QNX?

    A startup script is a user-space shell script executed after the kernel boots. It launches drivers, services, and applications, defining the system’s startup behavior.

    11. Where are startup scripts located in QNX?

    Startup scripts are stored in the IFS, usually under /etc/system/ or /proc/boot/script. They are executed automatically during system boot.

    12. What is the difference between startup code, SLM, and Boot Manager?

    ComponentRole
    Startup CodeHardware initialization and kernel launch
    SLMLaunches system services and drivers in user space
    Boot ManagerManages boot modes, safe boot, recovery, and updates

    In short, startup code starts the kernel, SLM starts services, and Boot Manager controls boot modes.
    Read More about Process : What is is Process
    Read More about System Call in Linux : What is System call
    Read More about IPC : What is IPC
  • Master QNX OS Interview Questions and Answer 2026

    QNX OS interview questions and answers for 2026, explained in simple language. Covers microkernel architecture, IPC, scheduling, resource managers, and real-time concepts for embedded and automotive engineers.

    This collection of QNX OS interview questions and answers is designed for engineers who want to truly understand QNX, not just memorize definitions. The questions are written in a practical way, similar to what is actually asked in real technical interviews, especially for automotive, embedded, and RTOS roles.

    The content starts from basic concepts, such as what QNX is, why it is called a microkernel OS, and how it differs from Linux. As the questions progress, they move into core internal topics like kernel space vs user space, message passing, processes and threads, scheduling, IPC, and resource managers. Advanced sections cover fault tolerance, adaptive partitioning, real-time behavior, priority scheduling, and system reliability, which are commonly discussed in senior-level interviews.

    Each answer is written in simple language, focusing on clarity and understanding, not textbook definitions. Wherever possible, explanations reflect real-world behavior, how QNX works internally, and how engineers actually use it in production systems like automotive ECUs, medical devices, and industrial controllers.

    This material is especially useful for:

    • Embedded Software Engineers
    • Automotive/QNX Developers
    • RTOS and System Programming Interviews
    • Engineers working with QNX Neutrino

    The goal is not to impress with complex wording, but to help you explain QNX confidently and naturally during interviews just like an experienced engineer would.

    QNX is a POSIX-compliant, microkernel-based real-time operating system used in embedded and safety-critical systems. It provides deterministic real-time performance, high reliability, and fault isolation, making it ideal for automotive, medical, industrial, and aerospace applications.

    Key Points to Mention in Interviews

    • RTOS (Real-Time OS) → Guarantees predictable response times
    • Microkernel architecture → Only essential services (scheduler, IPC, interrupts) run in kernel
    • Fault tolerant → A crashing driver doesn’t crash the whole system
    • POSIX compliant → Familiar Linux/UNIX APIs
    • High reliability & safety → Used in ADAS, infotainment, medical devices
    • Message-passing IPC → Core communication mechanism
    • Certified OS → ISO 26262, IEC 61508, etc.

    Where QNX is Used

    • Automotive (Infotainment, ADAS, Digital Cockpits)
    • Medical Devices
    • Industrial Automation
    • Aerospace & Defense
    • Robotics

    QNX is a real-time operating system (RTOS).

    Interview-Ready Answer

    QNX is a hard real-time operating system that provides deterministic and predictable response times, which makes it suitable for safety-critical embedded systems.

    Why QNX is Real-Time

    • Deterministic scheduling → Guaranteed response within deadlines
    • Microkernel architecture → Minimal kernel, faster interrupt handling
    • Priority-based preemptive scheduling
    • Message-passing IPC → Core real-time communication mechanism
    • Low interrupt latency & jitter

    Hard vs Soft Real-Time

    • QNX = Hard real-time OS
      Missing a deadline is considered a system failure (important for automotive, medical systems).

    Interview One-Liner (Strong)

    QNX is a POSIX-compliant, microkernel-based hard real-time operating system designed for deterministic and safety-critical applications.

    In QNX, a microkernel means that only the most essential operating system services run in the kernel, such as the scheduler, interrupt handling, and inter-process communication (IPC). All other services like device drivers, file systems, networking, and protocol stacks run as user-space processes.

    Key Points to Mention

    1. Minimal Kernel → Only critical functions run in kernel space.
    2. User-space Services → Most OS services run as separate processes, improving stability and fault isolation.
    3. Fault Isolation → If a driver or service crashes, it won’t crash the whole system.
    4. Message-Passing IPC → Kernel facilitates communication between processes efficiently.
    5. Real-Time Friendly → Microkernel keeps latency low, making it suitable for hard real-time applications.

    Example Explanation

    • Suppose the audio driver crashes in QNX → Only that driver stops; the OS and other applications continue running.
    • Contrast this with monolithic kernels (like Linux), where a driver crash can crash the whole system.

    One-Liner for Interviews

    QNX’s microkernel architecture runs only essential services in the kernel, while other services run in user space, providing fault tolerance and real-time performance.

    QNX is a microkernel-based real-time operating system designed for deterministic, safety-critical embedded systems, while Linux is a monolithic, general-purpose OS that is not inherently real-time (unless using PREEMPT_RT patches).

    Key Differences to Mention

    FeatureQNXLinux
    Kernel TypeMicrokernelMonolithic
    Real-Time SupportHard real-time (deterministic)General-purpose; soft real-time with PREEMPT_RT
    Fault IsolationHigh – services run in user space; crashes don’t crash OSLow – kernel modules can crash entire system
    Inter-Process Communication (IPC)Message-passing via microkernelShared memory, signals, pipes (less deterministic)
    Typical Use CaseAutomotive, medical, industrial, aerospaceDesktop, servers, embedded systems (non-critical)
    Memory FootprintSmall, lightweightLarger, heavier
    Boot TimeFast, optimized for embedded systemsSlower, general-purpose boot
    CertificationISO 26262, IEC 61508, DO-178Not generally certified for safety-critical applications

    Example for Interview

    • Automotive Infotainment: QNX → Digital dashboard (hard real-time, fault-tolerant).
    • Desktop Application: Linux → Ubuntu OS on a laptop.

    One-Liner for Interviews

    QNX is a real-time, microkernel OS optimized for safety-critical embedded systems, whereas Linux is a general-purpose monolithic OS with limited real-time support.

    QNX is widely used in embedded and safety-critical systems where reliability, fault tolerance, and real-time performance are essential.

    Key Areas / Industries

    1. Automotive
      • Infotainment systems (digital dashboards, touchscreens)
      • Advanced Driver Assistance Systems (ADAS)
      • Digital cockpits and instrument clusters
    2. Medical Devices
      • Life-support equipment, patient monitors
      • Imaging systems
    3. Industrial Automation
      • Robotics, PLCs, factory automation controllers
      • Process control systems
    4. Aerospace & Defense
      • Avionics and flight control systems
      • Mission-critical embedded electronics
    5. Telecommunications
      • Network switches, base stations
    6. IoT and Embedded Devices
      • Smart appliances, robotics, edge devices

    Example for Interview

    “For example, in automotive, QNX is used in digital dashboards where a crash in the media player or Bluetooth module won’t take down the whole system, thanks to its microkernel architecture.”

    One-Liner

    QNX is commonly used in automotive, medical, industrial, aerospace, and telecommunications systems where reliability and real-time performance are critical.

    QNX is a microkernel-based real-time operating system with features designed for embedded and safety-critical systems, providing high reliability, determinism, and fault tolerance.

    Key Features

    1. Microkernel Architecture
      • Only essential services run in the kernel (scheduler, IPC, interrupts)
      • Other services (drivers, file systems, networking) run in user space
      • Ensures fault isolation and system stability
    2. Real-Time Performance
      • Hard real-time deterministic scheduling
      • Low interrupt latency and predictable response times
      • Priority-based preemptive multitasking
    3. POSIX Compliance
      • Supports standard UNIX/Linux APIs
      • Eases application porting from other systems
    4. Inter-Process Communication (IPC)
      • Efficient message-passing mechanism
      • Supports synchronous and asynchronous communication between processes
    5. Fault Tolerance & High Reliability
      • Crashing of a driver or service does not crash the OS
      • Critical for safety-certified applications
    6. Scalability
      • Runs on small microcontrollers to complex multi-core systems
      • Suitable for both resource-constrained devices and high-end embedded platforms
    7. File System Support
      • Journaling and networked file systems for reliability
      • Can integrate custom embedded file systems
    8. Networking & Communication
      • Supports TCP/IP, CAN, USB, and other industrial protocols
      • Suitable for connected embedded systems
    9. Security & Safety Certification
      • ISO 26262 (Automotive), IEC 61508 (Industrial), DO-178B/C (Aerospace)
      • Enables use in safety-critical applications
    10. Modularity
      • Easy to add/remove components without affecting the kernel
      • Lightweight and customizable for specific embedded use cases

    Example for Interview

    “For instance, in an automotive digital dashboard, QNX ensures that even if the media or Bluetooth service crashes, the display of speed, fuel, and engine status continues to work reliably, thanks to its microkernel architecture and fault isolation.”

    One-Liner for Interviews

    QNX features a microkernel architecture, hard real-time performance, fault tolerance, POSIX compliance, scalable modular design, and is certified for safety-critical systems.

    POSIX compliance in QNX means that the operating system supports standard UNIX/Linux APIs and interfaces, allowing developers to write portable applications that can run on QNX with minimal changes.

    Key Points to Mention

    1. Standardized API
      • QNX provides POSIX-compliant system calls for file I/O, process management, threading, signals, and IPC.
      • Makes it familiar to developers coming from Linux or UNIX environments.
    2. Portability
      • Applications written using POSIX APIs can be easily ported between QNX and other POSIX-compliant systems.
    3. Real-Time Extensions
      • QNX extends POSIX with real-time features, such as real-time scheduling (SCHED_FIFO, SCHED_RR) and priority inheritance mutexes.
    4. Example APIs in QNX
      • File operations: open(), read(), write(), close()
      • Threads: pthread_create(), pthread_join()
      • IPC: mq_open(), mq_send(), mq_receive() (message queues)
    5. Why It Matters
      • Reduces development time and learning curve
      • Enables cross-platform development for embedded systems
      • Ensures consistency and standard compliance in embedded applications

    Example for Interview

    “If you have an application written for Linux using standard POSIX threads and message queues, you can port it to QNX almost directly because QNX supports the same POSIX APIs, while also providing real-time guarantees.”

    One-Liner for Interviews

    POSIX compliance in QNX ensures standard UNIX/Linux API support, enabling application portability and consistent development while adding real-time capabilities.

    QNX is a proprietary operating system developed by BlackBerry. It is not open source, and its source code is licensed under commercial terms.

    Key Points to Mention

    1. Proprietary License
      • QNX requires a commercial license for development and deployment.
      • Source code is not freely available to the public.
    2. Commercial Support
      • BlackBerry provides official support, updates, and safety certifications.
      • Essential for automotive, medical, and industrial applications.
    3. Contrast with Open Source OS
      • Linux, FreeRTOS → Open source, source code freely available.
      • QNX → Closed-source, with guaranteed reliability and certification.
    4. Why Proprietary Matters
      • Ensures controlled development, rigorous testing, and compliance with safety standards like ISO 26262 or IEC 61508.

    One-Liner for Interviews

    QNX is a proprietary, commercially licensed real-time operating system with source code controlled by BlackBerry.

    Neutrino is the microkernel-based real-time operating system (RTOS) at the core of QNX. It provides the fundamental services like scheduling, inter-process communication (IPC), and interrupt handling, enabling QNX to deliver deterministic, reliable, and fault-tolerant performance in embedded systems.

    Key Points to Mention

    1. Core of QNX
      • Neutrino is the actual OS kernel.
      • All QNX services (file system, networking, drivers) run on top of Neutrino.
    2. Microkernel Architecture
      • Only essential functions (scheduler, IPC, interrupt handling) are in the Neutrino kernel.
      • Other services run in user space → better fault isolation.
    3. Real-Time Capabilities
      • Supports hard real-time scheduling.
      • Ensures predictable response times for critical applications.
    4. POSIX Compliance
      • Neutrino implements POSIX APIs, allowing applications to be portable from UNIX/Linux.
    5. Fault-Tolerant
      • If a driver or service crashes, Neutrino keeps the system running.

    Example for Interview

    “In an automotive dashboard, Neutrino ensures that the speedometer and fuel gauge continue updating even if a non-critical service like media playback crashes, thanks to its microkernel design.”

    One-Liner for Interviews

    Neutrino is the microkernel RTOS at the heart of QNX, providing deterministic real-time performance, POSIX compliance, and fault tolerance for embedded systems.

    Deterministic behavior in an RTOS means that the system responds to events or interrupts within a guaranteed, predictable amount of time, regardless of system load. This is essential for real-time applications where timing is critical.

    Key Points to Mention

    1. Predictable Response
      • A deterministic RTOS ensures that tasks meet their deadlines consistently.
      • Example: If a sensor triggers an interrupt, the OS handles it within a fixed maximum latency.
    2. Critical for Real-Time Systems
      • Timing guarantees are required in automotive, medical, aerospace, and industrial systems.
      • Missing deadlines can lead to system failures or safety hazards.
    3. Determinism vs Speed
      • Determinism focuses on predictability, not just fast execution.
      • Even if execution is slightly slower, as long as timing is predictable, it’s considered deterministic.
    4. Example
      • In a car’s ABS system, the RTOS must read wheel speed sensors and control brakes within exact deadlines. QNX ensures this deterministic behavior.

    One-Liner for Interviews

    Deterministic behavior in an RTOS means predictable, guaranteed response times to events or interrupts, ensuring real-time deadlines are always met.

    The latest major version of QNX is QNX Software Development Platform (SDP) 8.0. It includes:

    • QNX OS 8.0 – The core microkernel-based real-time operating system.
    • QNX OS for Safety 8.0 – Safety-certified edition for critical systems (ISO 26262, IEC 61508).
    • QNX Hypervisor 8.0 – Embedded virtualization platform.
    • QNX Momentics IDE 8.0.x – Development environment supporting SDP 8.0.

    Key Points:

    • Designed for embedded and safety-critical systems.
    • Provides deterministic real-time performance.
    • Supports fault isolation and microkernel architecture.

    One-Liner for Interviews:

    “QNX SDP 8.0 is the latest version, with QNX OS 8.0 at its core, optimized for embedded and safety-critical applications.”

    QNX Architecture

    QNX Architecture Overview

    QNX is a microkernel-based real-time operating system (RTOS). Its architecture is designed for high reliability, modularity, and real-time performance.

    The main layers are:

    1. Microkernel

    • Core of QNX.
    • Very small and minimal: only contains the most essential OS functions.
    • Responsibilities:
      • Task scheduling (prioritized, real-time scheduling)
      • Interprocess communication (IPC)
      • Interrupt handling
      • Timers
      • Low-level memory management
    • All other OS services run as user-space processes, not inside the kernel.

    Key point: This design improves stability because a crash in a service doesn’t crash the entire system.

    2. Process Managers (User-space Services)

    These are system services that run outside the kernel, providing higher-level OS functionalities:

    ServiceFunction
    File SystemManages files, directories, and storage devices.
    Network StackHandles TCP/IP, UDP, and network protocols.
    Device DriversHardware control (keyboard, serial, audio, display) as user-space tasks.
    Resource ManagersUnified interface for devices & files, exposing them as files (/dev).
    Timers / ClocksUser-space timers and scheduling assistance.
    • These services communicate with each other and with the microkernel via IPC.
    • Because they are separate from the kernel, if one fails, the system can continue running.

    3. Application Layer

    • Your user applications run here.
    • They request services via standard APIs or POSIX calls, which get translated into IPC messages to the microkernel or system services.
    • Applications are fully isolated, which enhances reliability.

    4. Communication Model

    • QNX uses message-passing IPC instead of traditional system calls.
    • Every process can send and receive messages synchronously or asynchronously.
    • This ensures determinism, essential for real-time systems.

    5. Memory Architecture

    • Microkernel handles basic memory protection.
    • Applications and services are isolated in their own address space, preventing accidental overwrites.
    • Memory faults in one service usually do not affect the kernel or other services.

    6. Highlights of QNX Architecture

    • Modular & Scalable: Add/remove services without touching the kernel.
    • Fault-Tolerant: Crashes in user-space services don’t crash the kernel.
    • Deterministic: Real-time scheduling ensures predictable behavior.
    • POSIX-Compliant: Supports standard APIs for portability.

    Architecture Diagram (Text Representation)

    +----------------------------------+
    |         User Applications        |
    +----------------------------------+
    |        POSIX APIs / Libraries    |
    +----------------------------------+
    |       User-Space Services        |
    |  (File System, Network, Drivers)|
    +----------------------------------+
    |           Microkernel            |
    |  (Scheduler, IPC, Interrupts)   |
    +----------------------------------+
    |           Hardware Layer         |
    +----------------------------------+
    

    Interview-Friendly Answer:

    “QNX has a microkernel-based architecture, where the kernel is minimal and handles only essential functions like task scheduling, interprocess communication (IPC), interrupt handling, and memory management. All other services, such as file systems, network stacks, and device drivers, run as user-space processes, communicating with the kernel and each other via IPC. Applications run on top of these services using POSIX APIs. This modular design ensures high reliability, fault tolerance, and deterministic real-time performance, making QNX ideal for embedded and safety-critical systems.”

    Explanation of the Diagram

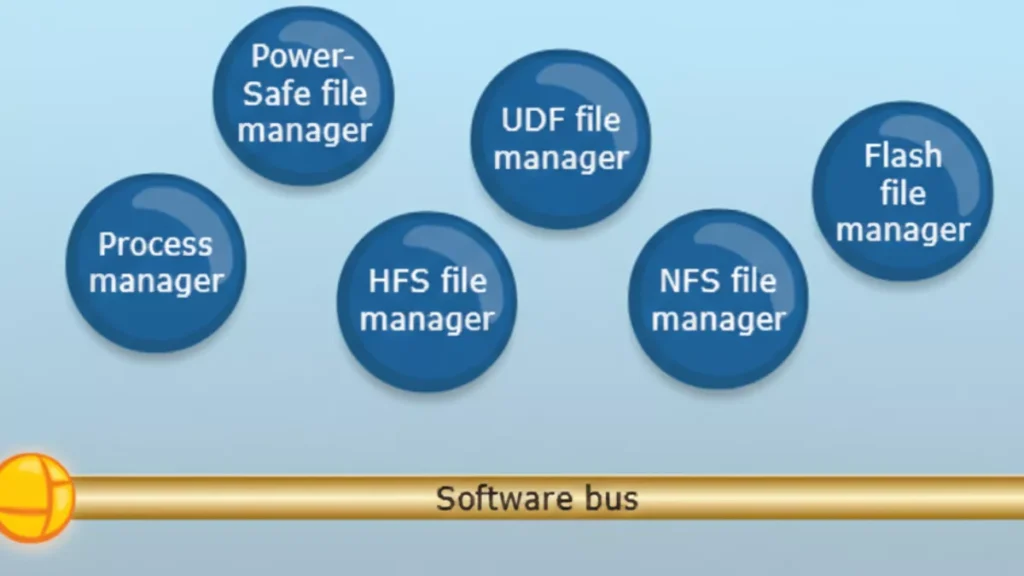
    1. Software Bus (Middle Layer)
      • Acts as a communication backbone for all user-space managers and applications.
      • All managers (file, network, GUI, character, etc.) and applications communicate with each other through this message-passing mechanism.
      • Essentially, this is how QNX implements microkernel principles: minimal kernel + IPC.
    1. Upper Layer: File and Process Managers
      These are system-level services running in user space:
      • Process Manager: Handles process creation, deletion, and scheduling requests.
      • File Managers: Manage different types of file systems:
        • Power-Safe file manager
        • UDF file manager
        • HFS file manager
        • NFS file manager
        • Flash file manager
      • These managers communicate via the software bus, instead of being inside the kernel.
    1. Lower Layer: Applications and Resource Managers
      • GUI Manager: Handles graphical interface.
      • Character Manager: Handles character devices (e.g., keyboard, serial port).
      • Network Manager: Handles network services.
      • Mqueue Manager: Manages message queues (IPC feature).
      • CIFS File Manager: For network file sharing (SMB/CIFS).
      • Applications: End-user or embedded applications running on top of these managers.

    Key Takeaways

    • This diagram shows QNX’s modular microkernel architecture in action:
      • Microkernel: Handles only essential kernel tasks (not shown explicitly in this diagram; it’s below the software bus, managing IPC, scheduling, and interrupts).
      • Software bus: Allows all user-space managers and applications to communicate.
      • Managers: Implement higher-level OS services in user space.
      • Applications: Sit at the top and use these services via message passing.
    • If one manager crashes, it doesn’t crash the kernel or other managers, highlighting QNX’s fault-tolerant design.

    Interview Tip:
    You can say:

    “This diagram shows QNX Neutrino’s user-space architecture. System managers like file managers, network manager, GUI manager, and process manager run as independent processes in user space. Applications communicate with these managers via the software bus, which implements the microkernel’s message-passing IPC. This design makes QNX highly modular, fault-tolerant, and suitable for real-time embedded systems.”

    QNX uses a microkernel architecture, meaning the operating system kernel is kept very small and only contains the most critical functions.
    All other OS services run as separate user-space processes, not inside the kernel.

    What Runs Inside the QNX Microkernel?

    The QNX Neutrino microkernel includes only four core responsibilities:

    1. Thread scheduling
      • Priority-based, fully preemptive
      • Ensures deterministic real-time behavior
    2. Inter-Process Communication (IPC)
      • Message passing (MsgSend, MsgReceive, MsgReply)
      • This is the heart of QNX
    3. Interrupt handling
      • Fast and predictable interrupt response
    4. Low-level thread and process management

    Nothing else runs in kernel space

    What Runs Outside the Kernel (User Space)?

    All higher-level OS services are implemented as user-space servers:

    • File systems (e.g., /fs-qnx6.so)
    • Device drivers (UART, I2C, SPI, Audio, Network)
    • Networking stack (TCP/IP)
    • Process manager (procnto)
    • Memory manager
    • Resource managers

    These components communicate using message passing.

    QNX Architecture Overview (Logical Flow)

    +-----------------------+
    |   Applications          |
    +-----------------------+
              |
              |  Message Passing (IPC)
              |
    +-----------------------+
    | OS Services / Servers |
    | (Drivers, FS, Net)         |
    +-----------------------+
              |
              | IPC
              |
    +-----------------------+
    |   Microkernel         |
    | (Scheduler, IPC, IRQ)|
    +-----------------------+
              |
    +-----------------------+
    |      Hardware         |
    +-----------------------+
    

    Message Passing – The Core Concept

    Unlike Linux (which uses system calls heavily), QNX uses:

    • Synchronous message passing
    • Client sends request → server processes → replies

    Example:

    • App wants to write to a UART
    • App sends message to UART driver
    • UART driver responds after operation
    • No shared memory required
    • Strong isolation
    • Predictable timing

    Why Microkernel? (Advantages)

    1. High Reliability

    • If a driver crashes, only that process restarts
    • Kernel remains unaffected

    2. Fault Tolerance

    • Ideal for safety-critical systems (ASIL-D)

    3. Deterministic Real-Time Behavior

    • Guaranteed response times
    • Used in automotive and medical systems

    4. Security

    • Smaller kernel → smaller attack surface

    QNX vs Linux (Interview Comparison)

    FeatureQNXLinux
    Kernel typeMicrokernelMonolithic
    DriversUser spaceKernel space
    IPCMessage passingSyscalls + shared memory
    Real-timeNativeNeeds RT patches
    Fault isolationStrongWeak
    Safety certificationYes (ASIL-D)Limited

    Real-World Example (Automotive)

    In a car infotainment system:

    • Audio driver crashes
    • Only audio service restarts
    • Navigation and UI keep running

    This is why QNX is used in automotive ECUs

    One-Line Interview Answer

    QNX uses a microkernel architecture where only scheduling, IPC, interrupts, and thread management run in the kernel, while all other services like drivers and file systems run in user space as separate processes, ensuring high reliability, fault isolation, and deterministic real-time behavior.

    In QNX (Neutrino), the kernel space contains only the most critical real-time components. Everything else runs in user space.

    The following run in kernel space:

    1. Thread Scheduling

    • Priority-based, fully preemptive scheduler
    • Ensures deterministic real-time behavior
    • Handles context switching

    2. Inter-Process Communication (IPC)

    • Core message passing mechanism
    • MsgSend(), MsgReceive(), MsgReply()
    • Fast, synchronous IPC

    IPC is the heart of QNX

    3. Interrupt Handling

    • Low-latency interrupt dispatching
    • Interrupt Service Routines (ISRs)
    • Interrupt events delivery to threads

    4. Low-Level Thread & Process Management

    • Thread creation and destruction
    • Basic process control
    • Kernel-level synchronization primitives

    What Does NOT Run in Kernel Space?

    These run in user space, not kernel space:

    • Device drivers (UART, I2C, SPI, Audio, Network)
    • File systems
    • Memory manager
    • Network stack (TCP/IP)
    • Process manager (procnto)
    • Resource managers

    One-Line Interview Answer

    In QNX, kernel space contains only the microkernel responsible for scheduling, message-passing IPC, interrupt handling, and low-level thread management; all other OS services and drivers run in user space.

    Memory Tip for Interviews

    Think S-I-I-T:

    • Scheduling
    • IPC
    • Interrupts
    • Threads

    In QNX Neutrino, almost everything except the microkernel runs in user space as separate processes (servers).

    Major Components Running in User Space

    1. Process Manager (procnto)

    • Handles:
      • Process creation (fork, spawn)
      • Signal delivery
      • POSIX compliance
    • Acts as the root server of the system

    2. Memory Manager

    • Virtual memory management
    • Address space creation
    • Memory protection
    • Page faults handling (with kernel support)

    3. Device Drivers

    • UART, I2C, SPI, CAN
    • Audio, Display, Camera
    • GPIO, ADC, PWM
    • Network drivers
    • Run as normal user processes
    • Can be restarted if they crash

    4. File Systems

    • QNX6 filesystem
    • Flash file systems
    • Network file systems
    • Mounted under /

    5. Network Stack

    • TCP/IP stack
    • Ethernet, Wi-Fi drivers
    • Socket services

    6. Resource Managers

    • Implement POSIX-style resources
    • Expose services as files (e.g. /dev/ser1)
    • Handle open/read/write/ioctl

    7. System Services & Daemons

    • Audio services
    • Power management
    • Clock services
    • Logging services

    8. User Applications

    • HMI / UI apps
    • Control logic
    • Diagnostic tools
    • Middleware

    QNX User Space Layout (Conceptual)

    +----------------------+
    |   User Applications  |
    +----------------------+
    | System Services      |
    | File Systems         |
    | Network Stack        |
    | Device Drivers       |
    | Resource Managers    |
    | procnto              |
    +----------------------+
            |
            | IPC (message passing)
            |
    +----------------------+
    |   Microkernel        |
    +----------------------+
    

    Why This Design Matters

    Fault Isolation

    • Driver crash ≠ system crash

    Easy Recovery

    • Restart a single service

    Safety Certification

    • Ideal for ASIL-D systems

    Secure Architecture

    • Minimal kernel attack surface

    One-Line Interview Answer

    In QNX, user space contains the process manager, memory manager, device drivers, file systems, network stack, resource managers, system services, and all applications—each running as separate processes that communicate via message passing.

    QNX uses message passing as its core communication mechanism to achieve deterministic real-time behavior, fault isolation, reliability, and scalability in a microkernel architecture.

    1. Fits the Microkernel Design

    QNX keeps the kernel very small.
    Since drivers, file systems, and services run in user space, they must communicate safely.

    ➡ Message passing replaces shared kernel data structures

    • No direct function calls across protection boundaries
    • Clean client–server model

    2. Deterministic Real-Time Behavior (Key Reason)

    Message passing in QNX is:

    • Synchronous
    • Priority-aware

    What this means:

    • Client blocks until server replies
    • Server temporarily inherits the client’s priority (priority inheritance)

    ✔ Prevents priority inversion
    ✔ Guarantees bounded latency
    ✔ Ideal for hard real-time systems

    3. Strong Fault Isolation & Reliability

    • Each driver/service runs as a separate process
    • If a driver crashes:
      • Kernel stays alive
      • Other services keep running
      • Only the failed service is restarted

    ➡ Message passing enforces strict process isolation

    4. Security by Design

    • No shared memory by default
    • No arbitrary kernel access
    • Services only expose controlled interfaces

    ➡ Smaller attack surface than monolithic kernels

    5. Unified Communication Model

    QNX uses one mechanism everywhere:

    OperationImplemented via
    File I/O (read/write)Messages
    Device accessMessages
    Network stackMessages
    Signals & eventsMessages

    ➡ Simpler OS design
    ➡ Easier to reason about timing

    6. Zero-Copy Efficiency

    Despite being message-based:

    • QNX supports zero-copy transfers
    • Uses shared memory only when explicitly needed

    ➡ High performance with real-time guarantees

    7. Easier Debugging & Maintenance

    • Services can be:
      • Stopped
      • Replaced
      • Restarted
    • No kernel rebuild required

    ➡ Faster development and safer updates

    Real Example (Automotive)

    • Audio application → sends message to audio driver
    • Audio driver crashes
    • Audio service restarts
    • Navigation & safety systems continue running

    ➡ System does not reboot

    One-Line Interview Answer

    QNX uses message passing to enable safe and deterministic communication between user-space services in its microkernel architecture, providing real-time predictability, fault isolation, priority inheritance, and high system reliability.

    Memory Trick for Interviews

    Think D-R-F-S-U:

    • Determinism
    • Reliability
    • Fault isolation
    • Security
    • Unified IPC

    Resource managers in QNX are user-space server processes that implement POSIX-style resources (files, devices, pseudo-devices) and expose them through the filesystem namespace using message passing.

    In simple words:

    A resource manager lets a user-space service behave like a file or device (e.g. /dev/ser1).

    Why Resource Managers Exist

    QNX follows the principle:

    “Everything is a file”

    Instead of placing drivers in kernel space (like Linux), QNX uses resource managers in user space to handle:

    • open()
    • read()
    • write()
    • ioctl()
    • close()

    All these calls are translated into messages.

    Where Do Resource Managers Run?

    • User space
    • As normal processes
    • Communicate with clients via QNX IPC (message passing)
    • Crash-safe
    • Restartable
    • Isolated

    Common Examples of Resource Managers

    ResourceExample
    Serial driver/dev/ser1
    GPIO/dev/gpioX
    Audio/dev/snd/*
    Custom device/dev/mydevice
    Pseudo file/proc, /dev/random

    How a Resource Manager Works (Flow)

    1. Application calls:fd = open("/dev/ser1", O_RDWR);
    2. Kernel converts this into a message
    3. Message is sent to the resource manager
    4. Resource manager processes the request
    5. Sends a reply back to the application

    Key Components of a Resource Manager

    1. Dispatch Layer

    • Receives messages
    • Routes them to appropriate handlers

    2. Connect Functions

    • Handle:
      • open()
      • close()

    3. I/O Functions

    • Handle:
      • read()
      • write()
      • ioctl()

    Types of Resource Managers

    Device Resource Managers

    • Hardware drivers (UART, I2C, CAN)

    Filesystem Resource Managers

    • QNX6, Flash FS

    Pseudo Resource Managers

    • Virtual or logical devices

    Benefits of Resource Managers

    Fault Isolation

    • Driver crash ≠ system crash

    POSIX Compliance

    • Standard file APIs

    Real-Time Friendly

    • Priority inheritance during IPC

    Easy Debugging

    • Run, stop, restart like any process

    QNX vs Linux (Quick Comparison)

    FeatureQNXLinux
    Driver locationUser spaceKernel space
    InterfaceFile-basedSyscalls
    Crash impactLocalOften system-wide
    IPCMessage passingFunction calls

    One-Line Interview Answer

    Resource managers in QNX are user-space processes that expose devices and services as POSIX-compliant files, handling open/read/write/ioctl requests via message passing, enabling fault isolation and real-time reliability.

    The microkernel’s role in QNX is to provide the core real-time foundation by handling thread scheduling, message-passing IPC, interrupt handling, and basic process/thread management, while all other OS services run in user space.

    QNX achieves fault tolerance by running drivers and OS services in user space, using message passing for isolation, and allowing failed components to be restarted without affecting the microkernel or the rest of the system.

    How QNX Achieves Fault Tolerance (Key Points)

    1. Microkernel Architecture
      • Kernel contains only scheduling, IPC, and interrupts
      • Minimal kernel → fewer failure points
    2. User-Space Drivers & Services
      • Device drivers, file systems, network stack run as separate processes
      • A crash affects only that component, not the whole OS
    3. Message Passing (Strong Isolation)
      • No shared kernel data by default
      • Faults are contained within a single process
    4. Service Restart & Recovery
      • Failed services/drivers can be restarted dynamically
      • System continues running
    5. Priority Inheritance in IPC
      • Prevents priority inversion during communication
      • Maintains real-time stability even under faults
    6. Health Monitoring (Optional)
      • Watchdogs and supervisors can detect failures and relaunch services

    Adaptive Partitioning in QNX is a CPU resource management mechanism that guarantees each group of threads a minimum percentage of CPU time, while dynamically redistributing unused CPU to other partitions.

    Key Points (Simple)

    • CPU time is divided into partitions
    • Each partition has a guaranteed minimum CPU budget
    • Unused CPU is adaptively shared with others
    • Ensures real-time tasks are never starved

    Why QNX Uses Adaptive Partitioning

    • Prevents CPU starvation
    • Improves system predictability
    • Supports mixed-criticality systems (safety + infotainment)

    Example

    PartitionCPU Guarantee
    Safety tasks40%
    Audio30%
    UI20%
    Background10%
    • If UI uses only 10%, the extra 10% is temporarily used by others
    • When UI needs CPU again, it gets its guaranteed share back

    Where It’s Used

    • Automotive ECUs
    • Medical devices
    • Industrial control systems

    One-Line Interview Answer

    Adaptive partitioning ensures guaranteed CPU bandwidth for critical tasks while efficiently sharing unused CPU among other processes.

    A thread in QNX is the smallest schedulable unit of execution that runs within a process and is scheduled by the microkernel based on priority.

    Key points:

    • Executes code
    • Has its own:
      • Program counter
      • Stack
      • Priority
    • Shares process resources (memory, file descriptors)
    • Scheduled directly by the QNX microkernel

    A process in QNX is a protected container that provides an address space and resources for one or more threads.

    Key points:

    • Owns:
      • Virtual address space
      • File descriptors
      • Signals
      • Permissions
    • Contains one or more threads
    • Provides isolation from other processes

    Relationship (Easy to Remember)

    • Process = container
    • Thread = worker
    Process
     ├── Thread 1 (main thread)
     ├── Thread 2
     └── Thread 3
    

    QNX-Specific Interview Highlight

    • Threads are the real-time scheduling entities, not processes
    • Priority, IPC, and interrupts are all thread-centric

    One-Line Comparison (Interview Gold)

    In QNX, a process provides isolation and resources, while threads are the actual execution units scheduled by the microkernel.

    Thread States in QNX

    In QNX Neutrino, a thread can exist in the following main states:

    1. READY

    • Thread is ready to run
    • Waiting for CPU
    • Placed in a priority-based ready queue

    2. RUNNING

    • Thread is currently executing on the CPU

    3. BLOCKED

    • Thread is waiting for an event or resource

    Common reasons:

    • Waiting for a message (MsgReceive)
    • Waiting for a reply (MsgSend)
    • Waiting for I/O
    • Waiting for a mutex or semaphore
    • Sleeping (nanosleep)

    4. STOPPED

    • Thread execution is suspended

    Causes:

    • Debugger attached
    • Job control signals (e.g. SIGSTOP)
    • Explicit suspension

    5. WAITING (ZOMBIE – process level)

    • Thread has exited
    • Waiting for parent process to collect status

    Note: Zombie is mainly a process concept, but threads can be in a terminated state internally.

    Simple State Diagram (Interview Friendly)

    READY → RUNNING → BLOCKED
      ↑        ↓         |
      └────────┴─────────┘
            STOPPED
    

    Important QNX Interview Points

    • Threads (not processes) are scheduled
    • Scheduling is priority-based and preemptive
    • IPC operations heavily influence BLOCKED states
    • Message passing directly affects thread transitions

    One-Line Interview Answer

    In QNX, threads transition between READY, RUNNING, BLOCKED, and STOPPED states, with scheduling handled at the thread level using priority-based preemption.

    Memory Trick

    Think R-R-B-S:

    • Ready
    • Running
    • Blocked
    • Stopped

    Thread Scheduling Algorithm in QNX

    QNX uses a priority-based, fully preemptive, deterministic thread scheduling algorithm, designed for hard real-time systems.

    Core Characteristics

    1. Priority-Based Scheduling

    • Each thread has a fixed priority
    • Priority range: 0 (lowest) to 255 (highest)
    • Highest-priority READY thread always runs

    2. Fully Preemptive

    • If a higher-priority thread becomes READY:
      • It immediately preempts the currently running thread
    • Ensures fast response for real-time tasks

    3. Round-Robin Within Same Priority

    • Threads with the same priority share CPU time
    • Each gets a time slice
    • Prevents starvation among equal-priority threads

    4. Thread-Centric Scheduling

    • QNX schedules threads, not processes
    • Each thread is an independent scheduling entity

    5. Deterministic Behavior

    • Scheduling decisions are predictable
    • No dynamic priority changes by default
    • Ideal for safety-critical systems

    Scheduling Flow (Simple)

    1. Scheduler checks READY queues (highest → lowest priority)
    2. Picks the highest-priority READY thread
    3. Thread runs until:
      • It blocks
      • Its time slice expires (same-priority case)
      • A higher-priority thread becomes READY

    Priority Inheritance (Very Important)

    • Used during message passing and mutex locking
    • If a high-priority thread is blocked by a lower-priority one:
      • Lower-priority thread temporarily inherits the higher priority
    • Prevents priority inversion

    Comparison with Linux (Interview Highlight)

    FeatureQNXLinux
    SchedulingFixed priorityCFS (dynamic)
    PreemptionAlwaysConfig-dependent
    DeterminismGuaranteedBest-effort
    Priority inheritanceBuilt-inPartial

    One-Line Interview Answer

    QNX uses a priority-based, fully preemptive scheduling algorithm where the highest-priority ready thread always runs, with round-robin scheduling among threads of equal priority and priority inheritance to prevent inversion.

    Conclusion

    QNX is not just another operating system—it is built for environments where reliability, predictability, and safety truly matter. Understanding QNX means understanding how real-time systems behave under pressure, how failures are isolated, and how software can continue running even when individual components crash.

    These interview questions and answers are meant to help you think like a QNX engineer, not just repeat definitions. By focusing on microkernel design, message passing, scheduling, fault tolerance, and system design choices, this content prepares you to explain why QNX works the way it does, not just what it is.

    If you can clearly explain these concepts in your own words during an interview, it shows strong fundamentals, real project exposure, and confidence in system-level thinking—qualities that interviewers look for in embedded and automotive roles.

    Master the concepts, relate them to real use cases, and you won’t just clear a QNX interview—you’ll stand out as someone who truly understands the system.

    FAQ : QNX OS Interview Questions

    1. What is QNX OS?

    QNX is a real-time operating system (RTOS) designed for systems that require high reliability, deterministic performance, and fault tolerance. It is widely used in automotive, medical, industrial, and safety-critical embedded systems.

    2. Why is QNX called a microkernel operating system?

    QNX uses a microkernel architecture, meaning only the most essential services (scheduling, IPC, interrupt handling) run in kernel space. All other services run in user space, improving system stability and fault isolation.

    3. How is QNX different from Linux?

    Linux uses a monolithic kernel, while QNX uses a microkernel. In QNX, drivers and services run in user space and can be restarted if they fail, whereas in Linux, a faulty driver can crash the entire system.

    4. What runs in kernel space in QNX?

    Only critical components run in kernel space:

    • Thread scheduling
    • Inter-process communication (IPC)
    • Interrupt handling
    • Low-level synchronization

    This keeps the kernel small and reliable.

    5. What runs in user space in QNX?

    Most system services run in user space, including:

    • Device drivers
    • File systems
    • Network stacks
    • Resource managers
    • System services

    This design improves fault tolerance.

    6. Why does QNX use message passing?

    QNX uses message passing for IPC to ensure:

    • Deterministic communication
    • Strong process isolation
    • Safer interaction between services
    • Easier debugging and recovery

    It is a core reason for QNX’s reliability.

    7. What is a resource manager in QNX?

    A resource manager is a user-space server that manages system resources like files, devices, or custom interfaces. Applications interact with resource managers using standard POSIX calls such as open(), read(), and write().

    8. What is the role of the microkernel in QNX?

    The microkernel acts as a traffic controller, handling communication, scheduling, and interrupts while letting user-space services do the rest. This separation makes the system robust and scalable.

    9. How does QNX achieve fault tolerance?

    QNX achieves fault tolerance through:

    • Process isolation
    • User-space drivers
    • Automatic service restart
    • Priority-based scheduling

    A failure in one component does not crash the entire system.

    10. What is adaptive partitioning in QNX?

    Adaptive partitioning ensures CPU time is reserved for critical processes. Even if one process misbehaves, real-time and safety-critical tasks continue to run without disruption.

    11. What is a process in QNX?

    A process is an independent program with its own memory space. It may contain one or more threads and communicates with other processes using message passing.

    12. What is a thread in QNX?

    A thread is the smallest unit of execution in QNX. Threads share the same address space within a process but are scheduled independently.

    13. What are the thread states in QNX?

    Common thread states include:

    • Running
    • Ready
    • Blocked (waiting for IPC or resources)
    • Stopped

    These states help manage real-time execution efficiently.

    14. What scheduling algorithm does QNX use?

    QNX uses priority-based preemptive scheduling. Higher-priority threads always run first, ensuring deterministic real-time behavior.

    Read More about Process : What is is Process
    Read More about System Call in Linux : What is System call
    Read More about IPC : What is IPC
  • Master Arduino Interview Questions (Beginner to Experienced) : 2026

    Top Arduino interview questions for beginners to experienced engineers. Covers concepts, debugging, projects, and real-world applications.

    Arduino is one of the most widely used embedded platforms for learning, prototyping, and even production-grade solutions. Because of its simplicity and flexibility, Arduino-based questions are commonly asked in embedded software interviews, electronics interviews, and IoT roles.

    This article provides a complete collection of Arduino interview questions, carefully structured from beginner to expert level, including hardware, programming, peripherals, memory, communication protocols, debugging, and real-world design challenges.

    Whether you are a student, fresher, or experienced embedded engineer, this guide will help you prepare confidently.

    Why These Arduino Questions Matter in Interviews

    Interviewers are not just testing Arduino syntax. They want to understand:

    • How you think
    • How you debug
    • How well you understand hardware–software interaction
    • Whether you can build reliable real-world systems

    Knowing answers to these questions shows strong embedded fundamentals, which easily transfer to STM32, ESP32, PIC, AVR, and ARM Cortex MCUs.

    Arduino Interview Questions :

    BEGINNER LEVEL : Arduino Basics

    1. What is Arduino?
    2. What are the main components of an Arduino board?
    3. What is the difference between Arduino Uno, Nano, and Mega?
    4. What microcontroller is used in Arduino Uno?
    5. What is the operating voltage of Arduino Uno?
    6. What is the clock frequency of Arduino Uno?
    7. What is the difference between microcontroller and microprocessor?
    8. What are digital pins in Arduino?
    9. What are analog pins in Arduino?
    10. What is the resolution of Arduino ADC?
    11. What is the purpose of the setup() function?
    12. What is the purpose of the loop() function?
    13. How many times does setup() run?
    14. How many times does loop() run?
    15. What is a sketch in Arduino?
    16. What language is used to program Arduino?
    17. Is Arduino C or C++?
    18. What is the role of the Arduino IDE?
    19. What is bootloader in Arduino?
    20. What happens when you upload a sketch?
    21. What is the difference between USB and barrel jack power?
    22. What is VIN pin?
    23. What is GND?
    24. What happens if you power Arduino with more than 5V?
    25. What is the maximum current per GPIO pin?
    26. What is the purpose of onboard LED?
    27. Why is pin 13 commonly used?
    28. What is pinMode()?
    29. What is digitalWrite()?
    30. What is digitalRead()?
    31. What is analogRead()?
    32. What is analogWrite()?
    33. Why is analogWrite() not true analog?
    34. What is PWM?
    35. Which Arduino pins support PWM?
    36. What is the duty cycle?
    37. What is the default PWM frequency?
    38. What is a delay function?
    39. What is delay()?
    40. Why should delay() be avoided?
    41. What is millis()?
    42. What is micros()?
    43. What is baud rate?
    44. What is Serial Monitor?
    45. What is Serial.begin()?
    46. What is Serial.print()?
    47. Difference between Serial.print() and Serial.println()
    48. What is the default serial baud rate?
    49. What happens if baud rates mismatch?
    50. What is pull-up resistor?
    51. What is internal pull-up in Arduino?
    52. How do you enable internal pull-up?
    53. What is debounce?
    54. Why is switch debouncing needed?
    55. What is breadboard?
    56. What is jumper wire?
    57. What is short circuit?
    58. What happens if GND and VCC are shorted?
    59. Why is resistor used with LED?
    60. What happens if LED is connected without resistor?

    INTERMEDIATE LEVEL : Arduino Programming & Peripherals

    1. What is the memory size of Arduino Uno?
    2. What is Flash memory?
    3. What is SRAM?
    4. What is EEPROM?
    5. Difference between Flash, SRAM, and EEPROM
    6. Where is the program stored?
    7. Where are variables stored?
    8. What happens when SRAM overflows?
    9. What is stack in Arduino?
    10. What is heap?
    11. What causes stack overflow?
    12. What is global variable?
    13. What is local variable?
    14. What is static variable?
    15. What is volatile keyword?
    16. When should volatile be used?
    17. What happens if volatile is not used?
    18. What is ISR?
    19. What is interrupt?
    20. What is polling?
    21. Difference between polling and interrupt
    22. What are external interrupts in Arduino?
    23. Which pins support external interrupts?
    24. What is attachInterrupt()?
    25. What is interrupt latency?
    26. Can delay() be used inside ISR?
    27. Can Serial be used inside ISR?
    28. What is timer in Arduino?
    29. How many timers are there in Arduino Uno?
    30. What is Timer0 used for?
    31. What is Timer1?
    32. What is Timer2?
    33. What is prescaler?
    34. What is timer overflow?
    35. What is timer compare match?
    36. How PWM is generated internally?
    37. What is hardware PWM?
    38. What is software PWM?
    39. Difference between hardware and software PWM
    40. What is watchdog timer?
    41. Why watchdog is used?
    42. How to enable watchdog?
    43. What happens when watchdog resets?
    44. What is I2C?
    45. What are SDA and SCL?
    46. What is I2C address?
    47. What is master and slave?
    48. What is clock stretching?
    49. What is pull-up resistor in I2C?
    50. What happens if pull-ups are missing?
    51. What is SPI?
    52. What are MOSI, MISO, SCK, SS?
    53. Difference between SPI and I2C
    54. What is SPI clock polarity?
    55. What is SPI clock phase?
    56. What is UART?
    57. Difference between UART and USART
    58. What is full-duplex?
    59. What is half-duplex?
    60. What is RX and TX?
    61. How many UARTs are there in Arduino Uno?
    62. What is SoftwareSerial?
    63. Limitations of SoftwareSerial
    64. What is ADC reference?
    65. What is AREF pin?
    66. What is internal reference voltage?
    67. What is sensor noise?
    68. How to filter noisy ADC values?
    69. What is moving average filter?
    70. What is low-pass filter?
    71. What is oversampling?
    72. What is calibration?
    73. What is sensor linearity?
    74. What is blocking code?
    75. What is non-blocking code?
    76. What is state machine?
    77. Why state machine is useful?
    78. What is finite state machine?
    79. What is cooperative multitasking?
    80. What is Arduino Scheduler?
    81. What is FreeRTOS?
    82. Can FreeRTOS run on Arduino?
    83. Difference between Arduino and RTOS
    84. What is task?
    85. What is context switch?
    86. What is priority inversion?
    87. What is semaphore?
    88. What is mutex?
    89. What is queue?
    90. What is deadlock?

    ADVANCED LEVEL : Hardware, Optimization & Architecture

    1. What happens when Arduino powers ON?
    2. What is reset vector?
    3. What is fuse bit?
    4. What is brown-out detection?
    5. What is clock source in Arduino?
    6. Internal vs external oscillator
    7. What happens if clock fails?
    8. What is bootloader section?
    9. How to remove bootloader?
    10. What is bare-metal programming?
    11. Arduino vs bare-metal programming
    12. What is register-level programming?
    13. What is DDR register?
    14. What is PORT register?
    15. What is PIN register?
    16. Difference between PORTx, PINx, DDRx
    17. How to toggle pin using register?
    18. How much faster is register access?
    19. What is inline function?
    20. What is macro?
    21. Macro vs inline function
    22. What is compiler optimization?
    23. What is -O0, -O1, -O2, -Os?
    24. What is code size optimization?
    25. What is speed optimization?
    26. What is memory alignment?
    27. What is bit manipulation?
    28. Why use bit masking?
    29. What is atomic operation?
    30. How to make code atomic?
    31. What is critical section?
    32. How to protect shared data?
    33. What is race condition?
    34. What is reentrancy?
    35. What is stack corruption?
    36. What is heap fragmentation?
    37. Why dynamic memory is dangerous in Arduino?
    38. Why malloc() is discouraged?
    39. What is memory leak?
    40. How to detect memory leak?
    41. What is PROGMEM?
    42. Why use PROGMEM?
    43. What is F() macro?
    44. What happens if SRAM exhausts?
    45. How to debug SRAM issues?
    46. What is linker?
    47. What is ELF file?
    48. What is HEX file?
    49. What is map file?
    50. How to analyze map file?

    EXPERT LEVEL : Debugging, Real-World & Failure Analysis

    1. Why Arduino code works sometimes and fails sometimes?
    2. How to debug Arduino without debugger?
    3. What is logic analyzer?
    4. What is oscilloscope?
    5. How to debug I2C issues?
    6. How to debug SPI issues?
    7. How to debug UART issues?
    8. What causes random resets?
    9. How to identify watchdog reset?
    10. What causes brown-out reset?
    11. What causes bootloader corruption?
    12. How to recover bricked Arduino?
    13. What is EMI?
    14. How EMI affects Arduino?
    15. How to reduce EMI?
    16. What is grounding issue?
    17. What is ground loop?
    18. Why common ground is important?
    19. What happens if grounds are not common?
    20. How to protect GPIO pins?
    21. What is ESD?
    22. How to protect from ESD?
    23. What is latch-up?
    24. How to avoid latch-up?
    25. What is power sequencing?
    26. Why power sequencing matters?
    27. How to design reliable Arduino hardware?
    28. What is decoupling capacitor?
    29. Why place capacitors near VCC?
    30. What is bulk capacitor?
    31. What happens if decoupling is missing?
    32. What is thermal issue?
    33. How overheating affects MCU?
    34. What is derating?
    35. What is MTBF?
    36. What is fault-tolerant design?
    37. How to design fail-safe system?
    38. What is redundancy?
    39. What is watchdog window mode?
    40. How to log errors in Arduino?
    41. What is persistent fault logging?
    42. How to store crash data?
    43. How to implement software reset?
    44. Difference between reset and restart
    45. What is firmware update?
    46. How OTA works in Arduino?
    47. What is bootloader security?
    48. How to protect firmware?
    49. What are real-time constraints?
    50. Arduino vs STM32 in production?

    1. Smart LED Controller (Beginner)

    Description:
    Control LED brightness and ON/OFF using a push button and PWM. Add multiple modes like blink, fade, and breathing effect.

    Key Concepts Learned:

    • GPIO
    • PWM
    • millis() (non-blocking delay)
    • State machine basics

    Why Interviewers Like It:
    Tests basic Arduino knowledge + clean coding practices.

    2. Temperature & Humidity Monitoring System

    Description:
    Use DHT11/DHT22 sensor to read temperature and humidity and display values on Serial Monitor or LCD/OLED.

    Key Concepts Learned:

    • Sensor interfacing
    • Timing constraints
    • Data validation
    • Library usage

    Interview Angle:
    “How do you handle sensor delay and invalid readings?”

    3. Digital Voltmeter using Arduino

    Description:
    Measure external voltage using Arduino ADC and voltage divider circuit.

    Key Concepts Learned:

    • ADC
    • Voltage divider
    • ADC resolution & reference
    • Calibration

    Interview Angle:
    “How do you improve ADC accuracy?”

    4. Password-Based Door Lock System

    Description:
    Create a keypad-based security system that controls a relay/servo for door locking.

    Key Concepts Learned:

    • Keypad scanning
    • EEPROM (store password)
    • State machine
    • Security basics

    Interview Angle:
    “How do you protect stored passwords?”

    5. Smart Traffic Light Controller

    Description:
    Implement a real-world traffic light system using timers and states (RED, YELLOW, GREEN).

    Key Concepts Learned:

    • Finite State Machine (FSM)
    • Timers
    • Non-blocking design

    Interview Angle:
    “Why FSM is better than delay-based logic?”

    6. Real-Time Clock (RTC) Based Alarm System

    Description:
    Use RTC (DS3231) to trigger alarms or events at specific times.

    Key Concepts Learned:

    • I2C communication
    • Timekeeping
    • Low-power concepts

    Interview Angle:
    “How does RTC keep time when power is off?”

    7. Arduino Data Logger (SD Card)

    Description:
    Log sensor data to an SD card with timestamp.

    Key Concepts Learned:

    • SPI
    • File systems (FAT)
    • Memory management
    • Error handling

    Interview Angle:
    “What happens if SD card is removed during write?”

    8. Smart Home Automation System

    Description:
    Control lights, fan, and appliances via Bluetooth/Wi-Fi using mobile app.

    Key Concepts Learned:

    • UART / Wi-Fi
    • Command parsing
    • Modular code design

    Interview Angle:
    “How do you design scalable command handling?”

    9. Watchdog-Protected Embedded System (Advanced)

    Description:
    Implement watchdog timer to auto-reset Arduino if software hangs.

    Key Concepts Learned:

    • Watchdog timer
    • Fault detection
    • System reliability

    Interview Angle:
    “How do you debug unexpected resets?”

    10. Mini RTOS-Based Task Scheduler (Expert)

    Description:
    Create a lightweight cooperative scheduler or use FreeRTOS on Arduino to manage multiple tasks.

    Key Concepts Learned:

    • Multitasking
    • Task scheduling
    • Semaphores & queues
    • Real-time constraints

    Interview Angle:
    “Why Arduino is not truly real-time?”

    BONUS: Industry-Level Project Ideas

    • Arduino-based Battery Management System (BMS)
    • I2C Bus Analyzer using Arduino
    • Bootloader-level LED diagnostics
    • Power-failure safe EEPROM logger
    • Sensor fault detection system

    How to Present These Projects in Interviews

    For each project, always explain:

    1. Problem statement
    2. Hardware used
    3. Software architecture
    4. Challenges faced
    5. Optimizations done
    6. Debugging approach
    7. Future improvements

    Conclusion

    Arduino is more than just a beginner platform—it is a gateway into embedded systems engineering. Interviewers use Arduino-based questions to evaluate how well you understand core embedded concepts, not just APIs.

    If you master:

    • Arduino fundamentals
    • Memory and timing
    • Interrupts and communication
    • Debugging and optimization

    You are not just preparing for an Arduino interview you are preparing for any embedded system role.

    Frequently Asked Questions (FAQ) : Arduino Interview Preparation

    1. Is Arduino enough to crack embedded system interviews?

    Arduino is sufficient for entry-level and intermediate embedded interviews if you understand hardware concepts, memory, interrupts, timers, and debugging. Interviewers focus more on fundamentals than the board itself.

    2. Which Arduino board should I prepare for interviews?

    The Arduino Uno is the most commonly used board in interviews. Once fundamentals are clear, you can easily transition to Nano, Mega, ESP32, or STM32.

    3. Do interviewers ask Arduino coding questions?

    Yes. Interviewers often ask:

    • LED blink without delay()
    • Button debouncing logic
    • Interrupt-based examples
    • Timer or PWM based problems
      They may also ask you to explain code flow instead of writing full programs.

    4. How important is debugging knowledge in Arduino interviews?

    Debugging knowledge is extremely important. Many interview questions focus on:

    • Random resets
    • Serial not working
    • I2C communication failure
    • Watchdog resets
    • Power and grounding issues

    Knowing how to debug matters more than writing code.

    5. Is Arduino used in real-world products?

    Arduino is mostly used for prototyping and learning, but the concepts learned are directly applicable to industrial MCUs like STM32, NXP, TI, and ESP.

    6. Should I learn register-level programming for Arduino interviews?

    Yes, especially for experienced roles. Interviewers like candidates who understand:

    • DDR, PORT, PIN registers
    • Performance optimization
    • Hardware control without libraries

    7. How much electronics knowledge is required for Arduino interviews?

    Basic electronics knowledge is required, including:

    • Resistors, LEDs
    • Pull-up and pull-down resistors
    • Voltage divider
    • Decoupling capacitors
    • Power supply basics

    8. What common mistakes should I avoid in Arduino interviews?

    • Overusing delay()
    • Not understanding memory limitations
    • Ignoring power and grounding
    • Using dynamic memory blindly
    • Not explaining debugging steps clearly

    9. Can Arduino help me move to STM32 or ARM Cortex MCUs?

    Yes. Arduino builds a strong foundation in:

    • Embedded C/C++
    • Timers and interrupts
    • Communication protocols
    • Debugging mindset

    Transitioning to STM32 becomes much easier afterward.

    10. How should I prepare Arduino projects for interviews?

    Always explain:

    1. Problem statement
    2. Hardware selection
    3. Software architecture
    4. Challenges faced
    5. Debugging approach
    6. Optimization techniques
    7. Possible improvements

    This shows real engineering thinking.

    Read More about Process : What is is Process

    Read More about System Call in Linux : What is System call

    Read More about IPC : What is IPC

  • QNX OS Interview Questions 2026 : Complete Guide from Beginner to Advanced

    Complete QNX OS interview guide with beginner to advanced questions on RTOS, IPC, scheduling, drivers, debugging, and automotive systems.

    QNX is widely used in safety-critical and real-time embedded systems such as automotive infotainment, ADAS, medical devices, and industrial automation. Preparing for a QNX interview requires much more than memorizing basic RTOS concepts it demands a deep understanding of microkernel architecture, message passing, real-time scheduling, device drivers, memory management, and system-level debugging.

    This article provides a complete and structured set of QNX OS interview questions, carefully arranged from beginner to advanced level. Whether you are a fresher stepping into embedded systems or an experienced engineer working on automotive or safety-critical platforms, these questions will help you assess your knowledge, identify gaps, and prepare confidently for real-world QNX interviews.

    Each section mirrors how QNX is actually used in production systems, making this guide practical, relevant, and industry-focused.

    Why These QNX Interview Questions Are Useful

    These questions are not random or theoretical. They are based on real interview patterns and day-to-day QNX development scenarios.

    Here’s why this question set is genuinely useful:

    • Covers the complete QNX ecosystem
      From microkernel basics to advanced topics like adaptive partitioning, audio services, drivers, and safety isolation, nothing important is skipped.
    • Matches real interview progression
      Interviews usually start with architecture and fundamentals, then move to IPC, scheduling, memory, drivers, and finally system design. This question flow follows the same pattern.
    • Builds strong conceptual clarity
      Many engineers “use” QNX but struggle to explain why things work the way they do. These questions force you to think at system level, not just API level.
    • Helps freshers and experienced engineers alike
      Beginners can start from the basics, while experienced candidates can focus on advanced debugging, performance tuning, audio, and safety-critical design.
    • Automotive and safety focused
      QNX is heavily used in automotive. Topics like ISO 26262, ASIL, hypervisor, fault tolerance, and real-time guarantees are frequently asked and fully covered here.
    • Excellent self-assessment tool
      If you can confidently explain most of these questions, you are interview-ready. If not, they clearly show where you need to revise.

    In short, this question set prepares you not just to pass interviews, but to think like a QNX system engineer.

    QNX OS Interview Questions

    BASIC LEVEL : QNX Fundamentals

    QNX Basics

    1. What is QNX?
    2. Is QNX a real-time operating system?
    3. What does “microkernel” mean in QNX?
    4. How is QNX different from Linux?
    5. Where is QNX commonly used?
    6. What are the main features of QNX?
    7. What does POSIX compliance mean in QNX?
    8. Is QNX open source or proprietary?
    9. What is Neutrino in QNX?
    10. What is deterministic behavior in RTOS?
    11. What is the latest version of QNX?

    QNX Architecture

    1. Explain QNX architecture
    2. Explain QNX microkernel architecture.
    3. What runs in kernel space in QNX?
    4. What runs in user space in QNX?
    5. Why does QNX use message passing?
    6. What are resource managers in QNX?
    7. What is the role of the microkernel?
    8. How does QNX achieve fault tolerance?
    9. What is adaptive partitioning?
    10. What is a thread in QNX?
    11. What is a process in QNX?

    For a detailed explanation of the answer, you can visit : QNX OS Interview Questions and Answer

    BASIC : Boot & Startup

    1. What is the QNX boot sequence?
    2. What is IPL (Initial Program Loader)?
    3. What is IFS (Image File System)?
    4. What is startup code in QNX?
    5. What is the role of procnto?
    6. What is io-pkt?
    7. What is devb-*?
    8. What is devc-*?
    9. What is a startup script?
    10. Where are startup scripts located?

    INTERMEDIATE : Process, Thread & Scheduling

    Processes & Threads

    1. Difference between process and thread in QNX?
    2. What is the default thread scheduling policy?
    3. What is priority inheritance?
    4. What is priority inversion?
    5. How does QNX handle priority inversion?
    6. What is round-robin scheduling?
    7. What is FIFO scheduling?
    8. What is sporadic scheduling?
    9. What is adaptive scheduling?
    10. How many priority levels does QNX support?

    Scheduling

    1. How does QNX guarantee real-time behavior?
    2. What happens if a high-priority thread blocks?
    3. How does QNX handle preemption?
    4. What is timeslice in QNX?
    5. What is thread affinity?
    6. How to bind threads to CPU cores?
    7. How does SMP work in QNX?
    8. How does QNX handle multicore systems?
    9. What is load balancing in QNX?
    10. What is interrupt latency?

    INTERMEDIATE : IPC & Synchronization

    IPC (Message Passing)

    1. Explain QNX message passing.
    2. What is MsgSend()?
    3. What is MsgReceive()?
    4. What is MsgReply()?
    5. What is synchronous vs asynchronous IPC?
    6. Why message passing is faster in QNX?
    7. What happens if a server crashes?
    8. How does QNX recover from server failure?
    9. What is pulse in QNX?
    10. What is a channel?

    Synchronization

    1. What is a mutex?
    2. What is a semaphore?
    3. Difference between mutex and semaphore?
    4. What is condition variable?
    5. What is read-write lock?
    6. How does QNX avoid deadlocks?
    7. What is priority ceiling?
    8. What is priority inheritance mutex?
    9. What are atomic operations?
    10. How to synchronize ISRs with threads?

    INTERMEDIATE : Memory Management

    1. How is memory managed in QNX?
    2. What is virtual memory?
    3. Does QNX support MMU?
    4. What is physical vs virtual address?
    5. What is shared memory?
    6. How to create shared memory in QNX?
    7. What is mmap()?
    8. What is memory partitioning?
    9. What is adaptive partitioning scheduler (APS)?
    10. How does QNX prevent memory starvation?

    INTERMEDIATE : Signals, Timers & Interrupts

    Signals

    1. What are signals in QNX?
    2. Difference between signals and pulses?
    3. How does QNX handle signals?
    4. What is sigaction()?
    5. What is signal masking?

    Timers

    1. What is a timer in QNX?
    2. Difference between POSIX timer and QNX timer?
    3. What is timer_create()?
    4. What is a watchdog timer?
    5. How are timers implemented internally?

    Interrupts

    1. What is ISR in QNX?
    2. How to attach an interrupt?
    3. What is InterruptAttach()?
    4. Difference between ISR and IST?
    5. What is interrupt latency?
    6. How does QNX handle nested interrupts?
    7. What is interrupt masking?
    8. What is pulse from ISR?
    9. Why ISR must be short?
    10. How does QNX handle interrupt priorities?

    ADVANCED : Device Drivers & Resource Managers

    Drivers

    1. What is a QNX device driver?
    2. Difference between Linux and QNX drivers?
    3. What is a resource manager?
    4. What is resmgr_attach()?
    5. What is iofunc_*?
    6. How does open/read/write work in QNX?
    7. What is pathname space?
    8. How does QNX handle /dev?
    9. What is io-pkt architecture?
    10. What is devb block driver?

    Character & Block Drivers

    1. How to write a character driver in QNX?
    2. How to write a block driver in QNX?
    3. How to expose hardware to user space?
    4. How does QNX handle DMA?
    5. How to handle interrupts in drivers?
    6. How to debug QNX drivers?
    7. What is driver hot-plug?
    8. What is devctl()?
    9. What is mount in QNX?
    10. How does filesystem driver work?

    ADVANCED – Networking, Filesystem & Storage

    Networking

    1. What is io-pkt?
    2. How TCP/IP stack works in QNX?
    3. Difference between QNX and Linux networking?
    4. What is socket API in QNX?
    5. How to debug network issues in QNX?
    6. What is PPS (Persistent Publish Subscribe)?
    7. What is Qnet?
    8. How IPC works across nodes?
    9. What is adaptive networking?
    10. How does QNX handle Ethernet drivers?

    Filesystem

    1. What filesystems are supported in QNX?
    2. What is QNX6 filesystem?
    3. What is flash filesystem?
    4. What is wear leveling?
    5. What is power-safe filesystem?
    6. How does QNX handle journaling?
    7. What is fs-qnx6.so?
    8. How to mount filesystem at boot?
    9. What is mount vs fstab?
    10. How to debug filesystem issues?

    EXPERT : Audio, Automotive & Safety

    Audio (Very Important for Automotive)

    1. How ALSA works in QNX?
    2. Difference between Linux ALSA and QNX audio?
    3. What is PCM in QNX?
    4. What is mixer in QNX?
    5. What is audio routing?
    6. What is TDM?
    7. What is I2S in QNX?
    8. How audio service starts in QNX?
    9. How to debug audio latency issues?
    10. How to write a custom audio codec driver?

    Automotive & Safety

    1. What is ASIL?
    2. How QNX supports functional safety?
    3. What is ISO 26262?
    4. What is safety partition?
    5. What is hypervisor in QNX?
    6. Difference between QNX Hypervisor and Linux?
    7. What is secure boot in QNX?
    8. What is trust zone usage in QNX?
    9. How to isolate safety-critical tasks?
    10. How QNX ensures freedom from interference?

    EXPERT : Debugging, Performance & Optimization

    Debugging

    1. How to debug QNX applications?
    2. What is gdb in QNX?
    3. What is pdebug?
    4. How to debug startup issues?
    5. How to debug boot failures?
    6. How to debug drivers?
    7. How to trace IPC?
    8. What is System Profiler?
    9. What is Momentics IDE?
    10. How to analyze thread states?

    Performance

    1. How to reduce IPC latency?
    2. How to optimize scheduling?
    3. How to measure interrupt latency?
    4. How to reduce boot time?
    5. How to optimize memory usage?
    6. How to profile CPU usage?
    7. How to handle CPU starvation?
    8. How to debug deadlocks?
    9. How to detect priority inversion?
    10. How to tune APS parameters?

    ARCHITECT / SYSTEM DESIGN LEVEL

    1. Design a fault-tolerant QNX system.
    2. Design an audio service architecture in QNX.
    3. Design multi-core scheduling for QNX.
    4. Design safe OTA update mechanism in QNX.
    5. Design driver recovery without reboot.
    6. Design IPC between safety and non-safety domains.
    7. Design fast boot system in QNX.
    8. Design logging framework in QNX.
    9. Design watchdog strategy.
    10. Design startup dependency ordering.

    BONUS : REAL INTERVIEW SCENARIO QUESTIONS

    1. Why did you choose QNX over Linux?
    2. How do you debug a hung QNX system?
    3. How do you recover from driver crash?
    4. How do you handle memory leaks in QNX?
    5. How do you ensure real-time guarantees?
    6. What challenges did you face in QNX?
    7. How do you debug race conditions?
    8. How do you handle CPU overload?
    9. How do you design high-availability service?
    10. Explain one QNX project you worked on.

    Conclusion

    QNX is not just another operating system — it is designed for systems where failure is not an option. That’s why interviewers expect more than surface-level knowledge. They look for engineers who understand real-time behavior, fault isolation, IPC, scheduling, drivers, and system reliability.

    This comprehensive list of QNX OS interview questions is designed to help you build that understanding step by step. If you go through these questions honestly and study the areas where you feel weak, you won’t just memorize answers — you’ll gain confidence in how QNX actually works in real products.

    Use this guide as:

    • A revision checklist before interviews
    • A learning roadmap for QNX
    • A benchmark for your embedded systems knowledge

    Mastering these concepts will not only help you clear QNX interviews, but also make you a stronger, more reliable embedded software engineer in real-world projects.

    Frequently Asked Questions (FAQ) : QNX OS Interview Preparation

    1. What is QNX and why is it used in embedded systems?

    QNX is a real-time operating system (RTOS) based on a microkernel architecture. It is widely used in embedded systems because it offers deterministic performance, high reliability, fault isolation, and strong support for safety-critical applications such as automotive infotainment, ADAS, medical devices, and industrial automation.

    2. Is QNX difficult to learn for beginners?

    QNX can feel challenging at first, especially if you are new to RTOS concepts. However, if you already understand C/C++, processes, threads, and basic OS concepts, learning QNX becomes much easier. Starting with microkernel fundamentals and message passing helps build a strong foundation.

    3. How is QNX different from Linux?

    Linux uses a monolithic kernel where most services run in kernel space, while QNX follows a microkernel approach. In QNX, drivers, filesystems, and network stacks run in user space, which improves fault tolerance and system stability—an important requirement for safety-critical systems.

    4. Why is message passing important in QNX?

    Message passing is the core IPC mechanism in QNX. It enables safe, deterministic communication between processes and threads. Because services run in user space, message passing ensures isolation while still delivering high performance and real-time guarantees.

    5. What topics are most important for a QNX interview?

    Interviewers usually focus on:

    • Microkernel architecture
    • IPC (MsgSend, MsgReceive, pulses)
    • Thread scheduling and priorities
    • Memory management
    • Interrupt handling
    • Resource managers and device drivers
    • Debugging and performance tuning
    • Automotive and safety concepts (ISO 26262, ASIL)

    6. Are QNX interview questions more theoretical or practical?

    Most QNX interviews are practical and scenario-based. Interviewers often ask how you debug issues, design fault-tolerant services, handle priority inversion, or recover from driver failures rather than just theoretical definitions.

    7. Is QNX mainly used in automotive projects?

    Automotive is the largest user of QNX today, especially for infotainment and digital cockpits. However, QNX is also widely used in medical devices, railway systems, industrial controllers, networking equipment, and aerospace applications.

    8. Do I need driver development experience to clear a QNX interview?

    Driver knowledge is not mandatory for entry-level roles, but it is a big advantage for experienced positions. Understanding resource managers, interrupt handling, and user-space drivers significantly improves your interview performance.

    9. How should I prepare for advanced QNX interview rounds?

    For advanced rounds, focus on:

    • Real-time scheduling policies
    • Adaptive partitioning (APS)
    • IPC performance tuning
    • Debugging tools (GDB, Momentics, System Profiler)
    • Multicore and SMP behavior
    • System design and fault recovery strategies

    10. Are QNX interviews harder than Linux embedded interviews?

    QNX interviews are usually more system-design oriented and focus heavily on real-time behavior and reliability. While Linux interviews test kernel and driver knowledge, QNX interviews test how well you understand deterministic systems and fault isolation.

    11. Can these QNX interview questions help in real projects?

    Yes. These questions are not just for interviews. They help you understand how QNX systems behave in real products, how services communicate, how failures are handled, and how performance is optimized—skills that are directly applicable to real-world projects.

    12. What level of C/C++ knowledge is required for QNX?

    A solid understanding of C is essential, and C++ is commonly used for application and service development. Knowledge of pointers, memory management, multithreading, and synchronization primitives is critical for working effectively with QNX.

    13. How long does it take to prepare for a QNX interview?

    Preparation time depends on your background. Freshers may need 6–8 weeks, while experienced embedded engineers can revise and prepare in 2–3 weeks by focusing on QNX-specific concepts and practical scenarios.

    14. Is QNX still relevant in 2026 and beyond?

    Yes. QNX continues to be a key platform for safety-critical and automotive systems. With the growth of software-defined vehicles and real-time computing, QNX remains highly relevant.

    15. How should I use this QNX interview question guide effectively?

    Go through the questions section by section. Try to explain each answer in your own words. Wherever you struggle, revise that topic and relate it to real scenarios. This approach will build confidence and improve both interview performance and practical understanding.

    Read More about Process : What is is Process
    Read More about System Call in Linux : What is System call
    Read More about IPC : What is IPC
  • Master MCU Peripheral Interview Questions 2026 : Beginner to Advanced

    Prepare for MCU interviews with our complete 2026 guide on MCU Peripheral Interview Questions. Covering GPIO, ADC, DAC, Timers, UART, SPI, I2C, PWM, CAN, RTC, Watchdog, DMA, and more for beginners and experts.

    If you are preparing for an embedded systems or MCU interview, understanding peripherals is critical. MCU peripherals form the bridge between a microcontroller and the external world, allowing it to sense, control, and communicate.

    This article covers MCU Peripheral Interview Questions comprehensively, from beginner to experienced levels, making it a must-read for anyone looking to ace their interview.

    What Are MCU Peripherals?

    MCU peripherals are built-in hardware modules that extend the functionality of a microcontroller. These peripherals include GPIOs, ADCs, DACs, timers, UART, SPI, I2C, PWM, CAN, USB, RTC, watchdog timers, and more. They help in data acquisition, communication, timing, and control tasks. Understanding these peripherals at both conceptual and practical levels is vital for interview success.

    1. GPIO (General Purpose Input/Output)

    GPIO pins are the simplest yet most used MCU peripherals. They allow the MCU to read switches, buttons, and sensors or control LEDs, relays, and motors.

    Beginner Questions:

    • What is GPIO?
    • Difference between input, output, and alternate function modes.
    • Explain pull-up and pull-down resistors.
    • How do you configure a pin as input or output?

    Intermediate Questions:

    • How do you debounce a button using software?
    • What are open-drain vs push-pull outputs?
    • Explain how to toggle a pin using bitwise operations.
    • How do you handle multiple GPIO interrupts?

    Experienced Questions:

    • Explain port registers: MODER, OTYPER, PUPDR, IDR, ODR in STM32.
    • How would you implement a matrix keypad using GPIO?
    • How to reduce power consumption when using GPIO pins?

    Practical Coding Questions:

    • Toggle an LED connected to a GPIO pin every 500ms using a timer.
    • Read a switch and increment a counter on each press.

    2. ADC (Analog-to-Digital Converter)

    ADC allows MCUs to read analog signals from sensors like temperature, light, or pressure sensors.

    Beginner Questions:

    • What is ADC? Why is it needed?
    • Explain resolution and reference voltage.
    • How does sampling rate affect ADC reading?

    Intermediate Questions:

    • Difference between single conversion and continuous conversion mode.
    • Explain oversampling and averaging techniques.
    • How to read multiple channels using ADC?

    Experienced Questions:

    • How to implement DMA-based ADC for continuous sampling?
    • Difference between SAR, Sigma-Delta, and Flash ADCs.
    • Explain calibration of ADC in MCUs.

    Practical Coding Questions:

    • Read temperature sensor values using ADC and convert to Celsius.
    • Implement a moving average filter for noisy ADC data.

    3. DAC (Digital-to-Analog Converter)

    DAC converts digital values into analog signals, commonly used in audio, motor control, or waveform generation.

    Beginner Questions:

    • What is DAC? Why is it used?
    • Difference between DAC and PWM.

    Intermediate Questions:

    • Explain resolution and update rate.
    • How to generate a sine wave using DAC?

    Experienced Questions:

    • How to synchronize DAC output with a timer or DMA?
    • Explain voltage reference impact on DAC accuracy.

    Practical Coding Questions:

    • Generate a 1kHz sine wave using DAC and timer-triggered DMA.

    4. Timers and Counters

    Timers and counters are essential for scheduling tasks, generating PWM, measuring time intervals, and delays.

    Beginner Questions:

    • What is a timer? Difference between timer and counter.
    • Explain one-shot, periodic, and PWM modes.

    Intermediate Questions:

    • Difference between input capture, output compare, and PWM mode.
    • Explain prescaler and auto-reload registers.
    • How to implement delays using timers instead of delay() function.

    Experienced Questions:

    • How to synchronize multiple timers.
    • Explain dead-time insertion for complementary PWM.
    • Difference between basic, general-purpose, and advanced timers in STM32.

    Practical Coding Questions:

    • Implement a timer interrupt to blink an LED.
    • Generate a PWM signal with 50% duty cycle using timer.

    5. UART (Universal Asynchronous Receiver/Transmitter)

    UART is a standard peripheral for asynchronous serial communication.

    Beginner Questions:

    • What is UART? Difference from USART.
    • Explain baud rate.
    • Difference between synchronous and asynchronous communication.

    Intermediate Questions:

    • Difference between polling and interrupt-driven UART.
    • How to implement RX/TX buffers.
    • Explain parity bits, stop bits, and framing errors.

    Experienced Questions:

    • Implement DMA-based UART for high-speed communication.
    • How to handle multiple UARTs simultaneously.
    • How to detect and recover from UART overrun errors.

    Practical Coding Questions:

    • Send “Hello World” over UART.
    • Implement an echo program using interrupt-driven UART.

    6. SPI (Serial Peripheral Interface)

    SPI is a fast, full-duplex communication protocol used for high-speed sensors and displays.

    Beginner Questions:

    • What is SPI? How many lines are used?
    • Difference between master and slave.

    Intermediate Questions:

    • Explain MOSI, MISO, SCK, CS pins.
    • Difference between full-duplex and half-duplex SPI.
    • Explain SPI modes (Clock polarity and phase).

    Experienced Questions:

    • How to implement multi-slave SPI communication.
    • Use of DMA in SPI for high-speed transfer.
    • SPI data integrity: CRC or checksum implementation.

    Practical Coding Questions:

    • Read data from an SPI-based ADC.
    • Implement SPI with interrupt for continuous data reading.

    7. I2C (Inter-Integrated Circuit)

    I2C is a two-wire protocol for communication with sensors, EEPROMs, and displays.

    Beginner Questions:

    • What is I2C? How many wires are needed?
    • Difference between master and slave.

    Intermediate Questions:

    • Explain start, stop, ACK, and NACK signals.
    • Difference between 7-bit and 10-bit addressing.
    • Explain standard-mode, fast-mode, and fast-mode plus.

    Experienced Questions:

    • How to handle bus contention and clock stretching.
    • Implement repeated start condition.
    • Troubleshooting techniques for I2C bus errors.

    Practical Coding Questions:

    • Read/write from an I2C temperature sensor.
    • Implement DMA-based I2C for continuous data transfer.

    8. CAN (Controller Area Network)

    CAN is widely used in automotive and industrial systems for robust communication.

    Beginner Questions:

    • What is CAN? Where is it used?
    • Explain CAN IDs and messages.

    Intermediate Questions:

    • Difference between CAN 2.0A and 2.0B.
    • Explain bit stuffing and error detection.

    Experienced Questions:

    • How to implement CAN bus with interrupt and FIFO.
    • Difference between standard and extended frame.
    • Handling bus-off and error passive states.

    Practical Coding Questions:

    • Transmit and receive CAN messages using STM32.

    9. PWM (Pulse Width Modulation)

    PWM is used for motor control, LED brightness, and analog signal emulation.

    Beginner Questions:

    • What is PWM?
    • Explain duty cycle.
    • Applications of PWM.

    Intermediate Questions:

    • How to generate PWM using timers.
    • Difference between complementary and normal PWM.

    Experienced Questions:

    • Synchronous vs asynchronous PWM generation.
    • Dead time insertion and phase-shifted PWM.

    Practical Coding Questions:

    • Generate variable PWM to control motor speed or LED brightness.

    10. RTC (Real-Time Clock)

    RTC keeps track of real-world time and is useful in low-power or time-critical applications.

    Beginner Questions:

    • What is RTC?
    • Difference between system clock and RTC.

    Intermediate Questions:

    • Explain alarm, calendar, and backup registers.
    • How to use RTC to wake up MCU from low-power mode.

    Experienced Questions:

    • How to calibrate RTC against oscillator drift.
    • Using external crystal vs internal oscillator for RTC.

    11. Watchdog Timer

    Watchdog timers are critical for system reliability, ensuring MCU recovers from software hangs.

    Beginner Questions:

    • What is a watchdog timer?
    • Why is it used?

    Intermediate Questions:

    • Difference between independent and windowed watchdog.
    • How to reset MCU using watchdog.

    Experienced Questions:

    • How to design software to prevent watchdog reset during long operations.
    • Implementing watchdog in RTOS-based systems.

    12. DMA (Direct Memory Access)

    DMA allows peripherals to transfer data without CPU intervention, increasing efficiency.

    Beginner Questions:

    • What is DMA? Why is it used?

    Intermediate Questions:

    • Difference between memory-to-memory, memory-to-peripheral, and peripheral-to-memory.
    • How does DMA reduce CPU load?

    Experienced Questions:

    • Using DMA with UART, ADC, SPI for high-speed data transfer.
    • Handling DMA interrupts and error flags.

    13. Advanced Peripherals: USB, Ethernet, CAN-FD, Audio, LCD

    USB: Device vs host, USB HID/CDC implementation, USB 2.0 vs 3.0.

    Ethernet: PHY vs MAC, half-duplex vs full-duplex, implementing TCP/IP on MCU.

    Audio/I2S: Generating audio signals using DAC or I2S interface.

    LCD/LED Drivers: Driving displays using SPI/I2C.

    Capacitive Touch: Implementing touch interfaces on MCU.

    Conclusion

    Preparing for MCU Peripheral Interview Questions requires a mix of conceptual knowledge, hands-on programming, and peripheral-specific expertise. From GPIO to DMA, ADC, DAC, timers, UART, SPI, I2C, CAN, PWM, RTC, watchdog, USB, and Ethernet, you need to understand register-level details, interrupts, DMA, and low-power features to stand out in interviews. Practice coding, debug peripherals, and refer to datasheets to become interview-ready. With this guide, you are now equipped to tackle beginner to advanced MCU interview questions confidently.

    FAQs : MCU Peripheral Interview Questions

    1. What are MCU peripherals and why are they important?
    MCU peripherals are built-in hardware modules like GPIO, ADC, DAC, Timers, UART, SPI, I2C, PWM, CAN, RTC, Watchdog, and DMA. They extend a microcontroller’s capabilities, allowing it to interact with sensors, actuators, and other devices, which is critical for embedded system functionality.

    2. Which MCU peripherals are most commonly asked in interviews?
    Interviewers usually focus on GPIO, ADC, DAC, Timers, UART, SPI, I2C, PWM, CAN, RTC, Watchdog timers, and DMA. Understanding register-level operation, interrupts, and practical coding examples of these peripherals is highly recommended.

    3. How should a beginner prepare for MCU peripheral interview questions?
    Start by understanding the concept and working of each peripheral. Learn GPIO pin configuration, ADC reading, PWM generation, and UART communication. Practice coding simple examples, like blinking LEDs, reading buttons, or sending data over UART.

    4. What is the difference between ADC and DAC in MCUs?
    ADC (Analog-to-Digital Converter) converts analog signals into digital values so the MCU can process sensor inputs. DAC (Digital-to-Analog Converter) converts digital signals to analog outputs, useful for audio or waveform generation.

    5. How do timers and counters work in MCU interviews?
    Timers and counters help manage delays, generate PWM, and schedule tasks. They operate in modes like one-shot, periodic, input capture, or output compare. Understanding prescaler, auto-reload, and interrupt usage is key for interviews.

    6. What is the difference between UART, SPI, and I2C?
    UART is asynchronous, using TX/RX lines for serial communication. SPI is full-duplex, high-speed, with MOSI, MISO, SCK, and CS pins. I2C is a two-wire protocol (SDA/SCL) for multi-slave communication. Each has its advantages depending on speed, complexity, and distance.

    7. Why are PWM signals important in MCUs?
    PWM (Pulse Width Modulation) signals control motors, LEDs, and analog-like outputs using digital pins. Duty cycle adjustment allows speed control or brightness control in real-time, which is frequently asked in practical interview questions.

    8. How do watchdog timers enhance system reliability?
    Watchdog timers monitor software execution. If the MCU hangs or freezes, the watchdog resets it automatically, ensuring reliability in critical applications like automotive or industrial systems.

    9. What is DMA and why is it useful in MCU applications?
    DMA (Direct Memory Access) allows peripherals to transfer data to/from memory without CPU intervention. This improves efficiency, reduces CPU load, and is commonly tested in high-level MCU interview questions.

    10. Are real-time clocks (RTC) often asked in interviews?
    Yes, RTC questions are common. MCUs use RTC to track real-world time, set alarms, and wake up from low-power modes. Interviewers may ask about external vs internal oscillators and calibration techniques.

    11. How can I practically demonstrate MCU peripheral knowledge in interviews?
    Bring examples like LED blinking, ADC-based sensor reading, PWM motor control, UART echo programs, or SPI/I2C sensor interfacing. Writing interrupt-driven or DMA-based code showcases advanced skills.

    12. How can I stay updated with MCU peripheral interview trends for 2026?
    Follow MCU datasheets, embedded system blogs, online courses, and forums. Practice coding on STM32, ESP32, or Atmega platforms. Staying hands-on with GPIO, ADC, UART, SPI, I2C, PWM, CAN, and DMA will keep you ready for 2026 interviews.

    Read More about Process : What is is Process

    Read More about System Call in Linux : What is System call

    Read More about IPC : What is IPC

  • Master PCI Drivers in Linux (2026)

    Learn PCI Drivers in Linux , including PCIe architecture, BARs, device probing, interrupts, and kernel driver development.

    If you’re curious about how Linux talks to hardware on the PCI bus, you’re in the right place. Today we’re going to unpack PCI drivers in Linux, explain how they work, and give you hands‑on insights into writing, debugging, and maintaining them. Think of this as a conversation no jargon‑heavy press release stuff just clear, direct, smart explanations.

    We’ll cover everything from the basics of PCI architecture to writing your own PCI driver, handling interrupts, using kernel APIs, and debugging in real time. Whether you’re an embedded engineer, a kernel hacker, or just passionate about low‑level Linux development you’ll find value here.

    What Is a PCI Device and Why Do We Need Drivers?

    Ask yourself this: when a network card, graphics card, or storage controller plugs into your machine, how does Linux know what to do with it? That’s where PCI devices and PCI drivers in Linux come into play.

    PCI stands for Peripheral Component Interconnect. It’s a standard bus that lets the CPU talk to hardware devices through a uniform, discoverable interface. Each PCI device has:

    • A unique Vendor ID
    • A Device ID
    • One or more Base Address Registers (BARs)

    These BARs map device memory or registers into the CPU’s address space. The Linux kernel uses all of this information to initialize hardware and make it usable by software.

    But to actually drive the device — to make it send packets, render pixels, or read data — Linux needs a PCI driver.

    Why PCI Drivers in Linux Matter

    You might be thinking: “Isn’t Linux just going to figure this out?” Not quite.

    Hardware does not speak an agreed universal language — it has its own control registers, memory layout, protocols, and quirks. A PCI driver in Linux is the piece of software that:

    • Detects the PCI device
    • Allocates resources for it
    • Maps its I/O or memory regions
    • Hooks interrupt handlers
    • Provides user‑level interfaces

    Without a proper driver, the hardware sits idle. With a good driver, your system boots smoothly and performs reliably.

    Linux PCI Subsystem: An Overview

    Before we write code, let’s understand the ecosystem.

    The Linux PCI subsystem handles:

    • Device enumeration — when the system boots, it scans the PCI bus for devices
    • Resource allocation — assigning IRQs, memory ranges, and I/O ports
    • Driver binding — matching PCI devices to drivers based on Vendor/Device IDs
    • Runtime power management
    • Hot plugging (on PCIe systems)

    At the core is the struct pci_driver, which defines callbacks the kernel uses to interact with your driver.

    Key Structures You’ll See in PCI Drivers

    Here’s a snapshot of essential kernel structs you’ll encounter:

    struct pci_driver {
        const char *name;
        const struct pci_device_id *id_table;
        int (*probe)(struct pci_dev *dev, const struct pci_device_id *id);
        void (*remove)(struct pci_dev *dev);
        …
    };
    
    • probe() — called when the kernel finds a matching PCI device.
    • remove() — called when the device is removed or the module is unloaded.
    • id_table — lists the Vendor and Device IDs this driver supports.

    struct pci_dev represents the device itself — the registers, BARs, IRQs, and more.

    PCI Driver Loading and Binding

    When a PCI device is detected:

    1. The Linux kernel scans all PCI buses
    2. It reads each device’s configuration space
    3. It tries to match the device against registered pci_driver tables
    4. If a match succeeds, it calls the driver’s probe()

    This lets your code initialize the device early in boot or when the module loads.

    Writing Your First PCI Driver in Linux

    Let’s get practical.

    Here’s a minimal skeleton of a PCI driver:

    #include <linux/module.h>
    #include <linux/pci.h>
    
    static const struct pci_device_id mypci_ids[] = {
        { PCI_DEVICE(0x1234, 0x5678) },
        { 0, }
    };
    MODULE_DEVICE_TABLE(pci, mypci_ids);
    
    static int mypci_probe(struct pci_dev *dev, const struct pci_device_id *id)
    {
        pr_info("PCI device found: Vendor=0x%x Device=0x%x\n",
                id->vendor, id->device);
        /* Allocate resources, map BARs, setup IRQs */
        return 0;
    }
    
    static void mypci_remove(struct pci_dev *dev)
    {
        pr_info("PCI device removed\n");
    }
    
    static struct pci_driver mypci_driver = {
        .name = "mypci",
        .id_table = mypci_ids,
        .probe = mypci_probe,
        .remove = mypci_remove,
    };
    
    module_pci_driver(mypci_driver);
    MODULE_LICENSE("GPL");
    

    This small driver:

    • Registers itself with the PCI subsystem
    • Matches a specific vendor/device
    • Prints info when a device is found

    You can expand this to allocate DMA memory, map IO regions, handle interrupts, and expose sysfs or char interfaces.

    PCI Configuration Space: What You Need to Know

    Every PCI device has a configuration space (256 bytes on classic PCI, larger on PCIe).

    It holds:

    • Vendor and Device IDs
    • Command/Status registers
    • BARs
    • Interrupt line and pin
    • Capabilities (like MSI or power management)

    Linux provides helpers like pci_read_config_word() and pci_write_config_dword() to access this safely.

    Understanding config space is essential — it’s the first step in letting your driver talk to hardware.

    Memory and I/O Mapping With PCI Drivers

    PCI devices have regions called BARs — Base Address Registers — that tell the OS where the device’s registers or memory are.

    You use:

    pci_request_regions(dev, "myname");
    pci_enable_device(dev);
    bar_addr = pci_iomap(dev, bar_num, 0);
    

    This:

    • Reserves the I/O or memory ranges
    • Enables the device
    • Maps those regions into the Linux kernel’s address space

    Once mapped, you use readl()/writel() or ioread8()/iowrite8() to interact with the hardware registers.

    Interrupts: IRQs, MSI, and Event Handling

    Most PCI devices generate interrupts. Linux supports:

    • Legacy IRQs
    • MSI (Message Signaled Interrupts)
    • MSI‑X (multiple MSI vectors)

    In your driver, you register an interrupt handler:

    ret = request_irq(dev->irq, mypci_isr, IRQF_SHARED, "mypci_irq", dev);
    

    Your ISR should be fast, defer heavy work to tasklets or workqueues, and return quickly.

    Modern drivers use MSI because it avoids shared IRQ lines and is more efficient.

    DMA and PCI Drivers in Linux

    For high‑speed data transfer, you’ll want to use DMA (Direct Memory Access). PCI devices often support bus master DMA.

    Linux provides APIs:

    • dma_alloc_coherent()
    • dma_map_single()
    • dma_unmap_page()

    This ensures memory you share with the hardware is safe from CPU caches and accessible to the PCI device.

    Getting DMA right is critical for performance, especially in networking, storage, and graphics drivers.

    Power Management and PCI

    Modern systems can suspend, resume, and power‑manage PCI devices.

    Linux offers hooks like:

    • pci_enable_wake()
    • pm_runtime_enable()
    • pci_set_power_state()

    Your driver must respond to suspend/resume events gracefully so that hardware enters low power and comes back up without failure.

    Error Handling and PCI

    PCI supports Advanced Error Reporting (AER). Bad device behavior, master aborts, or target timeouts can happen.

    Linux PCI drivers should:

    • Check return values
    • Use pci_try_enable_device()
    • Handle I/O errors
    • Reset devices if needed

    Good error handling makes your driver robust and reliable on real hardware.

    Hot‑Plug and PCIe

    PCI Express supports hot‑plugging on some platforms.

    Linux can detect and bind drivers when devices appear after boot.

    You’ll need to test how your driver behaves when devices show up unexpectedly, or disappear — like in server blade environments.

    Debugging PCI Drivers in Linux

    If your driver doesn’t work, what tools do you use?

    Here are essential ones:

    1. dmesg

    Kernel logs show probe messages, IRQ errors, BAR mappings, and more.

    2. lspci

    Shows PCI devices detected by Linux:

    lspci -vvv
    

    This reveals device class, IRQs, BARs, capabilities, and vendor/device IDs.

    3. debugfs

    Many PCI subsystems expose debug info here.

    4. printk / pr_info

    Place log statements in your driver to track execution.

    5. tracepoints and perf

    You can attach to kernel trace events to see what’s happening.

    Effective debugging is not just about tools — it’s about understanding what success looks like for your driver.

    User Space Interaction: ioctl, sysfs, and Character Devices

    Your PCI driver might need to talk to user space.

    Common methods:

    • Character driver — exposes a /dev node
    • sysfs entries — expose attributes under /sys
    • ioctl — custom commands between user and kernel

    Design your interface with simplicity and safety in mind.

    Real‑World Example: Network PCI Driver (Simplified)

    Real PCI drivers are large. But at a high level, a network PCI driver:

    • Registers PCI support
    • Enables device and memory regions
    • Allocates RX/TX queues with DMA buffers
    • Registers net_device and NAPI poll structures
    • Handles interrupts and packet transmission
    • Supports ethtool for statistics and features

    This illustrates how PCI drivers integrate with other Linux subsystems.

    Performance Tips for PCI Drivers

    To make your driver fast:

    • Use MSI/MSI‑X instead of legacy IRQs
    • Avoid unnecessary interrupts with batching
    • Use NAPI or polling for network drivers
    • Cache frequently used data
    • Avoid blocking calls in ISR

    Efficiency matters — especially on high‑throughput devices.

    Common Pitfalls and How to Avoid Them

    Here are things that commonly break PCI drivers:

    • Forgetting pci_enable_device()
    • Not requesting regions with pci_request_regions()
    • Ignoring error returns
    • Incorrect DMA mapping
    • Conflicting IRQs

    Simple checks and code structure go a long way.

    Testing Your PCI Driver Safely

    When testing:

    • Use virtual machines or hardware with risk tolerance
    • Always have a way to recover when kernel panics
    • Use incremental changes
    • Test suspend/resume

    Testing is just as important as writing good code.

    Step-by-Step Implementation of a PCI Driver in Linux

    Step 0: Prerequisites

    Before starting, make sure you have:

    1. A Linux system (Ubuntu, Fedora, or embedded Linux)
    2. Kernel headers installedsudo apt-get install build-essential linux-headers-$(uname -r)
    3. A PCI device for testing or a virtual PCI device on QEMU.
    4. Root privileges for flashing/loading the driver.
    5. Text editor: vim, nano, or IDE like VS Code.

    Step 1: Understand Your PCI Device

    Every PCI device has:

    • Vendor ID and Device ID
    • BARs (Base Address Registers) — memory or I/O
    • IRQ — interrupt line
    • Capabilities — like MSI/MSI-X

    You can check these with:

    lspci -nnv
    

    Example output:

    00:19.0 Ethernet controller [0200]: Intel Corporation I211 Gigabit Network Connection [8086:1533] (rev 03)
    
    • Vendor ID: 8086
    • Device ID: 1533

    Step 2: Create Driver Skeleton

    Create a directory for your driver:

    mkdir ~/pci_driver
    cd ~/pci_driver
    

    Create a file called mypci.c.

    Minimal skeleton:

    #include <linux/module.h>
    #include <linux/pci.h>
    #include <linux/init.h>
    #include <linux/kernel.h>
    
    #define DRIVER_NAME "mypci_driver"
    
    /* PCI device ID table */
    static const struct pci_device_id mypci_ids[] = {
        { PCI_DEVICE(0x8086, 0x1533) }, // Replace with your device
        { 0, }
    };
    MODULE_DEVICE_TABLE(pci, mypci_ids);
    
    /* Probe function */
    static int mypci_probe(struct pci_dev *dev, const struct pci_device_id *id)
    {
        pr_info(DRIVER_NAME ": PCI device found Vendor=0x%x Device=0x%x\n",
                id->vendor, id->device);
        return 0;
    }
    
    /* Remove function */
    static void mypci_remove(struct pci_dev *dev)
    {
        pr_info(DRIVER_NAME ": PCI device removed\n");
    }
    
    /* PCI driver structure */
    static struct pci_driver mypci_driver = {
        .name = DRIVER_NAME,
        .id_table = mypci_ids,
        .probe = mypci_probe,
        .remove = mypci_remove,
    };
    
    module_pci_driver(mypci_driver);
    
    MODULE_LICENSE("GPL");
    MODULE_AUTHOR("KALP");
    MODULE_DESCRIPTION("Sample PCI driver");
    

    Step 3: Create Makefile

    In the same folder, create a Makefile:

    obj-m += mypci.o
    
    all:
    	make -C /lib/modules/$(shell uname -r)/build M=$(PWD) modules
    
    clean:
    	make -C /lib/modules/$(shell uname -r)/build M=$(PWD) clean
    

    Step 4: Compile the Driver

    Run:

    make
    

    You should see a mypci.ko file — this is your kernel module.

    Step 5: Load the Driver

    1. Insert the module:
    sudo insmod mypci.ko
    
    1. Check kernel logs:
    dmesg | tail
    

    You should see:

    mypci_driver: PCI device found Vendor=0x8086 Device=0x1533
    
    1. List loaded modules:
    lsmod | grep mypci
    

    Step 6: Map BARs (Memory/I/O regions)

    Modify probe() to request and map memory:

    int bar = 0; // First BAR
    if (pci_request_regions(dev, DRIVER_NAME)) {
        pr_err(DRIVER_NAME ": Unable to request PCI regions\n");
        return -ENODEV;
    }
    
    pci_enable_device(dev);
    
    void __iomem *bar0 = pci_iomap(dev, bar, pci_resource_len(dev, bar));
    if (!bar0) {
        pr_err(DRIVER_NAME ": Unable to map BAR\n");
        pci_release_regions(dev);
        return -ENODEV;
    }
    
    pr_info(DRIVER_NAME ": BAR0 mapped at %p\n", bar0);
    

    Release BARs in remove():

    pci_iounmap(dev, bar0);
    pci_release_regions(dev);
    pci_disable_device(dev);
    

    Step 7: Setup Interrupt Handling

    1. Add an interrupt service routine (ISR):
    static irqreturn_t mypci_isr(int irq, void *dev_id)
    {
        pr_info(DRIVER_NAME ": Interrupt received\n");
        return IRQ_HANDLED;
    }
    
    1. Request IRQ in probe():
    if (request_irq(dev->irq, mypci_isr, IRQF_SHARED, DRIVER_NAME, dev)) {
        pr_err(DRIVER_NAME ": Unable to request IRQ\n");
        pci_iounmap(dev, bar0);
        pci_release_regions(dev);
        return -EBUSY;
    }
    
    1. Free IRQ in remove():
    free_irq(dev->irq, dev);
    

    Step 8: Support DMA (Optional for High-Speed Devices)

    If your PCI device uses DMA:

    dma_addr_t dma_handle;
    void *dma_buf;
    
    dma_buf = dma_alloc_coherent(&dev->dev, BUF_SIZE, &dma_handle, GFP_KERNEL);
    if (!dma_buf) {
        pr_err("Failed to allocate DMA buffer\n");
        return -ENOMEM;
    }
    
    /* Use dma_buf for device DMA */
    
    /* Free DMA in remove() */
    dma_free_coherent(&dev->dev, BUF_SIZE, dma_buf, dma_handle);
    

    Step 9: Enable Hot Plug / Power Management (Optional)

    Add runtime PM hooks:

    static int mypci_suspend(struct pci_dev *dev, pm_message_t state)
    {
        pr_info(DRIVER_NAME ": Device suspend\n");
        return 0;
    }
    
    static int mypci_resume(struct pci_dev *dev)
    {
        pr_info(DRIVER_NAME ": Device resume\n");
        return 0;
    }
    
    static struct pci_driver mypci_driver = {
        .name = DRIVER_NAME,
        .id_table = mypci_ids,
        .probe = mypci_probe,
        .remove = mypci_remove,
        .suspend = mypci_suspend,
        .resume = mypci_resume,
    };
    

    Step 10: Test Your Driver

    • Load the module: sudo insmod mypci.ko
    • Check dmesg
    • Verify PCI BARs mapped: lspci -vvv
    • Generate an interrupt (if hardware supports)
    • Unload module: sudo rmmod mypci
    • Ensure cleanup works

    Step 11: Flash Driver for Permanent Use

    Once tested:

    1. Copy the .ko file to /lib/modules/$(uname -r)/extra/:
    sudo cp mypci.ko /lib/modules/$(uname -r)/extra/
    
    1. Update module dependencies:
    sudo depmod -a
    
    1. Add to /etc/modules to auto-load at boot:
    echo "mypci" | sudo tee -a /etc/modules
    
    1. Reboot and verify:
    lsmod | grep mypci
    dmesg | tail
    

    Step 12: Debugging and Validation

    • Check logs: dmesg | tail -50
    • List devices: lspci -vvv
    • Check memory mapping: cat /sys/bus/pci/devices/0000:00:19.0/resource
    • Use strace / perf for performance insights

    Step 13: Optional: Expose Device to User Space

    Use sysfs:

    device_create_file(&dev->dev, &dev_attr_status);
    

    Or character device:

    alloc_chrdev_region(&dev_num, 0, 1, "mypci_char");
    cdev_init(&my_cdev, &fops);
    cdev_add(&my_cdev, dev_num, 1);
    

    This allows applications to read/write PCI device.

    PCI Drivers in Linux Interview Questions & Answers

    Round 1: Fundamentals / Basic Concepts

    1. What is PCI?

    Answer:
    PCI stands for Peripheral Component Interconnect. It’s a hardware bus standard that allows CPUs to communicate with peripherals like network cards, graphics cards, or storage devices. PCI devices are discoverable and configurable using Vendor ID, Device ID, BARs, and IRQs.

    2. What is a PCI driver in Linux?

    Answer:
    A PCI driver in Linux is a kernel module that allows the Linux kernel to interact with a PCI device. It:

    • Detects devices
    • Allocates resources
    • Maps I/O and memory regions
    • Handles interrupts
    • Exposes interfaces to user space

    3. What are BARs in PCI devices?

    Answer:
    BAR stands for Base Address Register. It tells the OS where the device’s memory or I/O space is. PCI devices can have multiple BARs:

    • Memory BAR: Maps device memory to CPU address space
    • I/O BAR: Maps I/O registers

    Linux uses pci_iomap() to map BARs in a driver.


    4. How does Linux detect PCI devices?

    Answer:
    Linux uses PCI enumeration:

    1. Scans PCI buses on boot
    2. Reads each device’s configuration space
    3. Matches Vendor/Device ID with registered pci_driver
    4. Calls the driver’s probe() function

    Tools like lspci show detected devices.


    5. What is struct pci_driver?

    Answer:
    It’s the main structure representing a PCI driver in Linux:

    struct pci_driver {
        const char *name;
        const struct pci_device_id *id_table;
        int (*probe)(struct pci_dev *, const struct pci_device_id *);
        void (*remove)(struct pci_dev *);
    };
    
    • probe() is called when a device is found
    • remove() is called on device removal

    6. What is the PCI configuration space?

    Answer:
    It’s a special memory region (256 bytes in PCI, larger in PCIe) that contains:

    • Vendor ID & Device ID
    • BARs
    • Interrupt lines/pins
    • Capabilities (MSI, power management)

    Linux drivers access it using pci_read_config_word() or pci_write_config_dword().


    7. What are IRQs and MSI in PCI?

    Answer:

    • IRQ (Interrupt Request): A signal from device to CPU indicating an event
    • MSI (Message Signaled Interrupt): Modern alternative to legacy IRQs, sent as messages via PCIe instead of shared IRQ lines
    • MSI-X: Supports multiple vectors for high-performance devices

    8. How do you map PCI device memory in Linux?

    Answer:

    1. Request device regions: pci_request_regions()
    2. Enable device: pci_enable_device()
    3. Map BAR: pci_iomap(dev, bar_num, size)
    4. Access mapped memory: readl()/writel()

    9. What are the steps in writing a PCI driver?

    Answer:

    1. Identify device (Vendor/Device ID)
    2. Create driver skeleton (pci_driver)
    3. Implement probe() and remove()
    4. Map device memory and I/O regions
    5. Request interrupts
    6. Optional: DMA setup, power management, sysfs or char device interface
    7. Compile, load, test, and flash

    10. How can a user-space program interact with a PCI driver?

    Answer:

    • Character device: /dev/mydevice
    • Sysfs entries: /sys/bus/pci/devices/0000:00:19.0/
    • ioctl: For custom commands

    11. How do you debug PCI drivers?

    Answer:

    • dmesg logs
    • lspci -vvv
    • cat /sys/bus/pci/devices/.../resource
    • Kernel printk (pr_info(), pr_err())
    • Tracepoints (trace-cmd, perf)

    12. Difference between PCI and PCIe

    Answer:

    PCIPCIe
    Parallel busSerial point-to-point
    Shared busDedicated lanes
    Lower bandwidthHigher bandwidth
    IRQ-basedSupports MSI/MSI-X

    13. What are common pitfalls in PCI drivers?

    Answer:

    • Forgetting pci_enable_device()
    • Not requesting regions (pci_request_regions())
    • Incorrect IRQ handling
    • Memory mapping errors
    • Ignoring DMA synchronization
    • No proper cleanup in remove()

    Round 2: Advanced / Practical Questions

    14. How do you handle DMA in PCI drivers?

    Answer:
    Use Linux DMA APIs:

    void *buf;
    dma_addr_t dma_handle;
    
    buf = dma_alloc_coherent(&dev->dev, size, &dma_handle, GFP_KERNEL);
    /* Use buf for device DMA */
    dma_free_coherent(&dev->dev, size, buf, dma_handle);
    

    DMA ensures CPU and PCI device access the same memory without cache issues.


    15. What is the difference between ioremap() and pci_iomap()?

    Answer:

    • ioremap(): Maps any physical address into kernel space
    • pci_iomap(): Convenience function to map PCI BARs; automatically uses device’s BAR info

    16. How do you support hot-plug in PCIe?

    Answer:

    • Implement probe() and remove() correctly
    • Kernel detects insertion/removal
    • Optionally implement runtime PM hooks (suspend(), resume())

    17. What are common memory access functions in PCI drivers?

    Answer:

    • readb(), writeb() → 8-bit
    • readw(), writew() → 16-bit
    • readl(), writel() → 32-bit
    • ioread8(), iowrite8() → for I/O mapped regions

    18. How do you register an interrupt handler?

    Answer:

    request_irq(dev->irq, mypci_isr, IRQF_SHARED, "mypci", dev);
    
    • ISR should be fast and defer heavy work using tasklets or workqueues
    • Free IRQ in remove()

    19. What is MSI and why is it preferred over legacy IRQs?

    Answer:

    • MSI is Message Signaled Interrupts, sent as packets over PCIe
    • Avoids shared IRQs
    • Supports multiple vectors (MSI-X)
    • Reduces CPU overhead → better performance for high-speed devices

    20. How do you implement power management?

    Answer:

    • Use runtime PM APIs:
    pci_enable_wake()
    pm_runtime_enable()
    pci_set_power_state(dev, PCI_D3hot)
    
    • Implement suspend() and resume() callbacks

    21. How do you handle BARs of varying sizes?

    Answer:

    • Use pci_resource_len(dev, bar_num) to get BAR size
    • Map BAR using pci_iomap(dev, bar_num, size)
    • Always release in remove()

    22. How do you clean up on driver removal?

    Answer:
    In remove():

    free_irq(dev->irq, dev);
    pci_iounmap(dev, bar0);
    pci_release_regions(dev);
    pci_disable_device(dev);
    

    Ensures no memory leaks or dangling pointers.


    23. Explain pci_enable_device()

    Answer:

    • Enables PCI device I/O and memory regions
    • Activates device and allows access to BARs
    • Must call before accessing device registers

    24. How to expose PCI device attributes in sysfs?

    Answer:

    static DEVICE_ATTR(status, S_IRUGO, show_status, NULL);
    device_create_file(&pdev->dev, &dev_attr_status);
    
    • Allows user-space read/write via /sys/bus/pci/devices/...

    25. How do you debug mapping issues?

    Answer:

    • Check lspci -vvv for BAR info
    • Use dmesg logs after pci_iomap()
    • Verify physical addresses in /sys/bus/pci/devices/.../resource

    26. How to test PCI driver functionality?

    Answer:

    • Load module: sudo insmod mypci.ko
    • Check logs: dmesg
    • Verify BAR mapping: cat /sys/bus/pci/devices/.../resource
    • Generate device interrupts and see ISR logs
    • Test user-space interface (char device or sysfs)
    • Unload module: sudo rmmod mypci

    27. Difference between PCI legacy interrupts and MSI/MSI-X

    FeatureLegacy IRQMSIMSI-X
    SharingShared IRQ lineDedicatedMultiple vectors
    OverheadHigherLowerLower + multiple events
    PerformanceLow-mediumHighHigh

    28. How does Linux match PCI devices with drivers?

    Answer:

    • Using struct pci_device_id table in driver
    • Kernel compares device Vendor ID & Device ID with table entries
    • Calls driver’s probe() on match

    29. Common mistakes in PCI driver interviews

    • Forgetting pci_release_regions()
    • Not checking return values
    • Mapping wrong BAR
    • Not freeing IRQ
    • Not handling suspend/resume

    30. How do you optimize a PCI driver for performance?

    Answer:

    • Use MSI/MSI-X interrupts
    • Batch device requests instead of frequent interrupts
    • Use DMA for bulk transfers
    • Avoid blocking calls in ISR
    • Use workqueues/tasklets for deferred work

    Pro Tip:

    If asked “Explain end-to-end PCI driver development”, you can summarize:

    1. Identify device IDs
    2. Create driver skeleton (pci_driver)
    3. Implement probe() / remove()
    4. Map BARs and memory
    5. Setup interrupts (legacy or MSI/MSI-X)
    6. DMA setup if needed
    7. Optional: power management and hot-plug support
    8. Test with dmesg, lspci, sysfs, char device
    9. Flash module for boot auto-load

    FAQ: PCI Drivers in Linux

    1. What is a PCI driver in Linux?

    A PCI driver in Linux is a kernel module that allows the operating system to communicate with PCI devices, such as network cards, graphics cards, or storage controllers. It handles device detection, memory mapping, interrupt handling, and provides user-space interfaces.

    2. How does Linux detect PCI devices?

    Linux performs PCI enumeration during boot or module load. It scans all PCI buses, reads each device’s configuration space, and matches the device’s Vendor ID and Device ID with the registered pci_driver. If a match is found, the kernel calls the driver’s probe() function.

    3. What is a PCI configuration space?

    Every PCI device has a configuration space, which stores information like:

    • Vendor ID & Device ID
    • Base Address Registers (BARs)
    • Interrupt lines and pins
    • Device capabilities (e.g., MSI, power management)

    Linux drivers access it using pci_read_config_word() or pci_write_config_dword().

    4. What are BARs in PCI devices?

    Base Address Registers (BARs) specify the memory or I/O regions of a PCI device. They tell the OS where the device’s registers or memory are mapped. Linux uses pci_iomap() to map BARs into kernel virtual memory for easy access.

    5. How are interrupts handled in PCI drivers?

    PCI devices generate interrupts to notify the CPU of events. Linux supports:

    • Legacy IRQs – shared interrupt lines
    • MSI (Message Signaled Interrupts) – dedicated messages
    • MSI-X – multiple vectors for high-performance devices

    Drivers register an ISR with request_irq() and free it in remove().

    6. How can a user-space application interact with a PCI driver?

    User-space interaction is possible via:

    • Character devices (/dev/mydevice)
    • Sysfs entries (/sys/bus/pci/devices/...)
    • ioctl commands for custom control

    This allows applications to read/write device data safely.

    7. What is the role of DMA in PCI drivers?

    Direct Memory Access (DMA) allows PCI devices to read/write system memory without CPU intervention. Linux provides APIs like:

    • dma_alloc_coherent()
    • dma_map_single()
    • dma_free_coherent()

    DMA improves performance for high-speed devices like network cards or storage controllers.

    8. How do you debug PCI drivers in Linux?

    Common debugging methods:

    • dmesg – check kernel logs
    • lspci -vvv – view device details
    • /sys/bus/pci/devices/.../resource – verify BARs
    • Kernel logs with pr_info() or pr_err()
    • Trace tools like trace-cmd or perf for performance insights

    9. What is the difference between PCI and PCIe?

    FeaturePCIPCIe
    Bus typeParallel shared busSerial point-to-point lanes
    BandwidthLowerHigher
    IRQLegacy shared IRQsSupports MSI/MSI-X
    Hot-plugLimitedFully supported

    PCIe is modern and faster but the driver concepts remain similar.

    10. What are common mistakes to avoid in PCI drivers?

    • Forgetting to call pci_enable_device()
    • Not requesting or releasing device regions (pci_request_regions(), pci_release_regions())
    • Incorrect IRQ or memory mapping
    • Not freeing IRQs or DMA buffers in remove()
    • Ignoring suspend/resume callbacks or error handling

    Read More about Process : What is is Process

    Read More about System Call in Linux : What is System call

    Read More about IPC : What is IPC

  • Master USB Drivers in Linux (2026)

    USB Drivers in Linux explained for beginners earn USB architecture, driver registration, device detection, and real-world examples.

    If you’ve ever plugged a USB device into your Linux system and wondered how it magically works, you’ve experienced the power of USB drivers in Linux. From keyboards and mice to storage devices and cameras, Linux relies on USB drivers to communicate with a wide variety of peripherals.

    This article will take you on a deep dive into USB drivers in Linux, covering USB driver classes, providing a comprehensive hands-on with USB drivers, and explaining everything in a way that feels like I’m chatting with you over coffee.

    What Are USB Drivers in Linux?

    At the most basic level, a USB driver in Linux is a piece of software that allows your Linux operating system to recognize, control, and communicate with USB devices. Without these drivers, your computer wouldn’t know how to interact with devices like USB flash drives, printers, or even USB-based sensors.

    Linux has a highly modular architecture for drivers, which means the system can load and unload USB drivers dynamically, giving flexibility and stability. These drivers exist primarily in the Linux kernel, which acts as a bridge between the hardware and software.

    Why USB Drivers Are Important

    Imagine plugging in a USB keyboard and nothing works. That’s what happens without the proper USB drivers in Linux. They provide essential functionality such as:

    • Device recognition: Identifying the type and capabilities of the USB device.
    • Communication management: Ensuring data can move to and from the device correctly.
    • Power management: Controlling how much power the device uses, which is crucial for laptops and embedded systems.
    • Error handling: Recovering from connection failures or data corruption.

    USB drivers in Linux make sure everything from your mouse clicks to file transfers happen smoothly.

    Understanding USB Driver Classes

    Linux categorizes USB devices into USB driver classes, each with its own set of responsibilities. Knowing these classes is critical for anyone wanting to work on USB drivers or debug hardware.

    1. HID (Human Interface Device)

    These are devices like keyboards, mice, and game controllers. The HID class driver ensures input devices communicate effectively with Linux input subsystems.

    2. Mass Storage

    Devices like USB flash drives, external HDDs, and SSDs fall under this category. The USB Mass Storage class handles file system interaction and allows devices to behave like standard storage drives.

    3. Audio

    USB audio devices like microphones, headsets, and speakers use the USB Audio class. Linux uses ALSA (Advanced Linux Sound Architecture) to interface with these devices.

    4. Video (UVC)

    Webcams and other video devices fall under the USB Video Class. Linux Video4Linux (V4L2) framework helps in streaming video from these devices.

    5. Communication Devices

    This class includes USB modems, network adapters, and serial converters. The drivers here manage data packets and connectivity.

    6. Custom and Vendor-Specific Classes

    Some devices don’t fit standard classes. They require vendor-specific drivers, which Linux supports through custom kernel modules.

    How USB Drivers Work in Linux

    The interaction between a USB device and Linux involves several steps:

    1. Detection
      When a device is plugged in, the kernel detects it using the USB host controller.
    2. Enumeration
      The kernel queries the device to determine its type, capabilities, and which driver to load.
    3. Driver Binding
      Based on the USB device class or specific vendor ID, the kernel binds the device to the appropriate USB driver in Linux.
    4. Communication
      Once bound, the device can send and receive data using defined endpoints.
    5. Power Management
      Linux can suspend or resume the device to save power without losing functionality.

    This modular, dynamic approach is one reason Linux is robust and reliable in handling USB devices.

    Kernel Modules and USB Drivers

    Most USB drivers in Linux exist as kernel modules, which are pieces of code that can be loaded or unloaded at runtime. You can check which USB drivers are loaded on your system using:

    lsmod | grep usb
    

    Or see connected devices with:

    lsusb
    

    Writing a Simple USB Driver (Overview)

    Here’s a high-level view of writing a USB driver:

    1. Include necessary headers:#include <linux/module.h> #include <linux/usb.h>
    2. Define USB device ID table:
      Identify which devices your driver will manage.
    3. Create probe and disconnect functions:
      • Probe: Called when the device is connected.
      • Disconnect: Called when the device is removed.
    4. Register the driver with the USB subsystem:static struct usb_driver my_usb_driver = { .name = "my_usb_driver", .id_table = my_usb_table, .probe = my_probe, .disconnect = my_disconnect, };
    5. Initialize and exit module:module_usb_driver(my_usb_driver);

    This structure ensures Linux can dynamically manage your driver just like any other USB driver.

    Comprehensive Hands-On With USB Drivers

    Getting hands-on experience is the best way to understand USB drivers in Linux. Here’s a practical roadmap for beginners:

    Step 1: Explore USB Devices

    Use lsusb to list all devices and understand their class, vendor ID, and product ID.

    lsusb -v
    

    Step 2: Monitor Kernel Logs

    Check dmesg after plugging a USB device to see how Linux handles it:

    dmesg | tail -n 20
    

    Step 3: Interact With Drivers

    You can bind and unbind devices manually to understand driver behavior:

    echo -n "1-1" > /sys/bus/usb/drivers/usb/unbind
    echo -n "1-1" > /sys/bus/usb/drivers/usb/bind
    

    Step 4: Develop a Simple USB Driver

    Start with a simple driver for a USB LED or a custom device. Use kernel logging to observe probe and disconnect events.

    Step 5: Test USB Driver Classes

    Experiment with different USB classes like HID and Mass Storage. Use virtual USB devices if hardware is limited.

    Step 6: Debugging USB Drivers

    Use usbmon for packet-level USB monitoring and dmesg for driver messages.

    sudo modprobe usbmon
    cat /sys/kernel/debug/usb/usbmon/0u
    

    USB Driver Development Tips

    1. Start with known devices: Use devices with existing drivers to compare behavior.
    2. Use kernel logs extensively: dmesg is your best friend for debugging.
    3. Understand USB descriptors: Device descriptors, configuration descriptors, and endpoint descriptors are key to writing drivers.
    4. Follow Linux coding standards: For readability and maintainability.
    5. Use Virtual Machines for testing: Prevents system crashes during driver development.

    Common USB Driver Classes Explained

    Here’s a deeper look at the most popular USB driver classes:

    ClassExamplesDescription
    HIDKeyboard, MouseManages user input devices
    Mass StorageFlash drives, HDDHandles file system communication
    AudioMicrophone, USB SpeakerAudio streaming and recording
    VideoWebcamVideo capture and streaming
    CDC (Communication Device Class)USB ModemNetworking and serial communication
    Vendor-SpecificCustom devicesRequires custom kernel module

    Step 1: Set Up Your USB Driver Development Environment

    Before writing the driver:

    1. Install Linux kernel headers (for compiling kernel modules):
    sudo apt update
    sudo apt install build-essential linux-headers-$(uname -r)
    
    1. Check existing USB devices to pick one for testing:
    lsusb
    

    Output example:

    Bus 001 Device 004: ID 1234:5678 My_USB_Device
    
    • Here 1234 is Vendor ID and 5678 is Product ID.
    • We’ll use these IDs in the driver to bind our device.

    Step 2: Understand the USB Driver Skeleton

    Every USB driver has the following basic structure:

    1. Include headers
    2. Define USB device ID table
    3. Define probe() and disconnect() functions
    4. Register driver with the USB subsystem
    5. Module initialization and cleanup

    Step 3: Write Your Simple USB Driver

    Create a folder:

    mkdir ~/usb_driver_test
    cd ~/usb_driver_test
    

    Create file: my_usb_driver.c

    #include <linux/kernel.h>
    #include <linux/module.h>
    #include <linux/usb.h>
    
    MODULE_LICENSE("GPL");
    MODULE_AUTHOR("Kalp");
    MODULE_DESCRIPTION("Simple USB Driver Example");
    MODULE_VERSION("0.1");
    
    // Replace these with your USB device's vendor and product ID
    #define USB_VENDOR_ID  0x1234
    #define USB_PRODUCT_ID 0x5678
    
    // Table of devices this driver will support
    static const struct usb_device_id usb_table[] = {
        { USB_DEVICE(USB_VENDOR_ID, USB_PRODUCT_ID) },
        {} // Terminating entry
    };
    MODULE_DEVICE_TABLE(usb, usb_table);
    
    // Probe function: called when device is connected
    static int my_usb_probe(struct usb_interface *interface, const struct usb_device_id *id)
    {
        printk(KERN_INFO "USB device (%04X:%04X) plugged\n", id->idVendor, id->idProduct);
        return 0;
    }
    
    // Disconnect function: called when device is removed
    static void my_usb_disconnect(struct usb_interface *interface)
    {
        printk(KERN_INFO "USB device removed\n");
    }
    
    // USB driver structure
    static struct usb_driver my_usb_driver = {
        .name = "my_usb_driver",
        .id_table = usb_table,
        .probe = my_usb_probe,
        .disconnect = my_usb_disconnect,
    };
    
    // Register the driver
    module_usb_driver(my_usb_driver);
    

    This is a working skeleton. It prints messages when your USB device is connected or removed.

    Step 4: Write a Makefile

    Create Makefile:

    obj-m += my_usb_driver.o
    
    all:
    	make -C /lib/modules/$(shell uname -r)/build M=$(PWD) modules
    
    clean:
    	make -C /lib/modules/$(shell uname -r)/build M=$(PWD) clean
    

    Step 5: Compile the Driver

    make
    
    • This generates my_usb_driver.ko (kernel object).
    • Check for *.ko file:
    ls
    

    Step 6: Load the USB Driver

    1. Insert module:
    sudo insmod my_usb_driver.ko
    
    1. Check kernel log:
    dmesg | tail -n 20
    
    • You should see something like:
    USB device (1234:5678) plugged
    
    1. List USB devices and drivers:
    lsusb -t
    
    • Shows driver bound to the device.

    Step 7: Test Device Removal

    1. Remove USB device.
    2. Check dmesg:
    USB device removed
    
    1. Plug device back in to see probe messages again.

    Step 8: Flash and Load Automatically on Boot (Optional)

    If you want this driver to auto-load:

    1. Copy driver to /lib/modules:
    sudo cp my_usb_driver.ko /lib/modules/$(uname -r)/kernel/drivers/usb/
    
    1. Update module dependencies:
    sudo depmod -a
    
    1. Add to modules to load at boot:
    echo "my_usb_driver" | sudo tee -a /etc/modules
    
    1. Reboot and check dmesg to confirm driver loaded automatically.

    Step 9: Extend Driver for Hands-On Interaction

    Once the skeleton works, you can:

    • Read/write to USB endpoints using usb_bulk_msg().
    • Handle multiple interfaces for complex devices.
    • Integrate with sysfs for user-space access.
    • Log data to kernel using dev_info().

    Example for sending data to a bulk endpoint:

    unsigned char data[4] = {0x01, 0x02, 0x03, 0x04};
    int retval;
    retval = usb_bulk_msg(dev, usb_sndbulkpipe(dev, 1), data, sizeof(data), &actual_length, 1000);
    

    Step 10: Debugging Tips

    • dmesg → Check kernel logs
    • lsusb -v → Inspect device descriptors
    • usbmon → Monitor USB traffic
    • modinfo my_usb_driver.ko → Check module info
    • rmmod my_usb_driver → Remove driver safely

    USB Drivers in Linux : Interview Questions & Answers (Round 1 & 2)

    Round 1: Basics & Conceptual Questions

    1. What is a USB driver in Linux?

    Answer:
    A USB driver in Linux is a kernel module or software component that allows the operating system to communicate with a USB device. It detects the device, loads the appropriate driver, manages data transfer, and handles power and error management.

    2. Explain USB driver classes in Linux.

    Answer:
    USB devices are categorized into classes based on functionality:

    • HID (Human Interface Device): Keyboards, mice, game controllers.
    • Mass Storage: USB drives, external HDD/SSD.
    • Audio: USB microphones, speakers.
    • Video (UVC): Webcams.
    • Communication Devices (CDC): Modems, network adapters.
    • Vendor-Specific: Custom devices needing custom drivers.

    3. What is the difference between a USB device driver and a USB class driver?

    Answer:

    • USB Device Driver: Written for a specific device, recognizes its vendor/product ID.
    • USB Class Driver: Supports a whole category of devices (e.g., HID, Mass Storage) without needing device-specific code.

    4. What are probe() and disconnect() functions in a USB driver?

    Answer:

    • probe(): Called when a device matching the driver is plugged in. Initializes the device and binds it to the driver.
    • disconnect(): Called when the device is removed. Cleans up resources and unbinds the driver.

    5. How do you check connected USB devices in Linux?

    Answer:

    • lsusb – Lists all USB devices.
    • lsusb -t – Shows hierarchical device tree and drivers.
    • dmesg – Logs kernel messages when devices are plugged/unplugged.

    6. What is USB enumeration?

    Answer:
    Enumeration is the process where the USB host queries a newly connected device for:

    • Vendor ID and Product ID
    • Device class and subclass
    • Endpoints and descriptors

    This determines which driver to load.

    7. Explain endpoints in USB.

    Answer:
    Endpoints are logical channels for communication between the host and the USB device:

    • Control endpoint: Used for device configuration and control.
    • Bulk endpoint: High-volume data transfer (e.g., USB drives).
    • Interrupt endpoint: Low-latency, periodic communication (e.g., keyboard).
    • Isochronous endpoint: Streaming data with guaranteed bandwidth (e.g., audio/video).

    8. Difference between user-space and kernel-space USB drivers

    Answer:

    AspectKernel-Space DriverUser-Space Driver (libusb)
    PrivilegesRootCan run as normal user
    PerformanceHighModerate
    AccessDirect hardwareThrough kernel APIs
    Use-caseComplex, performance-criticalSimple testing, USB apps

    9. How does Linux manage USB device power?

    Answer:
    Linux supports USB suspend/resume callbacks in the driver. Drivers can:

    • Suspend devices when idle
    • Resume on device activity
    • Reduce power consumption on laptops and embedded systems

    10. What is lsmod and how is it used?

    Answer:
    lsmod lists all loaded kernel modules. It can be used to check if a USB driver module is loaded.

    lsmod | grep usb
    

    Round 2: Advanced & Practical Questions

    11. How do you write a basic USB driver skeleton?

    Answer:
    Steps to write a Linux USB driver:

    1. Include headers: <linux/module.h>, <linux/usb.h>
    2. Define USB device ID table
    3. Implement probe() and disconnect() functions
    4. Define struct usb_driver with driver info
    5. Register the driver using module_usb_driver()

    12. What is a USB device descriptor?

    Answer:
    It is a data structure sent by the USB device to the host during enumeration containing:

    • Device class
    • Vendor ID / Product ID
    • Number of configurations and endpoints
    • Maximum packet size

    13. How do you bind a USB device to a driver manually?

    Answer:

    echo -n "1-1" > /sys/bus/usb/drivers/usb/unbind
    echo -n "1-1" > /sys/bus/usb/drivers/usb/bind
    
    • Useful for debugging or testing new drivers.

    14. How do you debug a USB driver?

    Answer:

    • dmesg → Kernel logs
    • usbmon → Packet-level USB traffic
    • lsusb -v → Device descriptors
    • modinfo <driver> → Module information

    15. What is the difference between bulk, interrupt, and isochronous transfer?

    Answer:

    TypePurposeExample
    BulkLarge data, no guaranteed timingUSB flash drive
    InterruptSmall data, low latencyKeyboard/mouse
    IsochronousContinuous streaming, timingWebcam/audio

    16. How do you load and remove a USB driver module?

    Answer:

    sudo insmod my_usb_driver.ko   # Load module
    sudo rmmod my_usb_driver       # Remove module
    dmesg | tail -n 20             # Check logs
    

    17. How does USB hot-plugging work in Linux?

    Answer:
    Linux detects USB connection via the USB host controller, enumerates the device, and automatically binds it to the appropriate driver. udev can trigger user-space events.

    18. How can you test a custom USB driver?

    Answer:

    1. Compile driver with Makefile
    2. Load module using insmod
    3. Check dmesg logs for probe messages
    4. Plug/unplug device to confirm disconnect()
    5. Use usbmon for packet-level testing

    19. What is usb_bulk_msg()?

    Answer:
    A kernel function to send/receive data through bulk endpoints. Example:

    unsigned char data[4] = {0x01, 0x02, 0x03, 0x04};
    int retval;
    retval = usb_bulk_msg(dev, usb_sndbulkpipe(dev, 1), data, sizeof(data), &actual_length, 1000);
    

    20. How do you make a USB driver load automatically at boot?

    Answer:

    1. Copy module to /lib/modules/$(uname -r)/kernel/drivers/usb/
    2. Run sudo depmod -a
    3. Add driver name to /etc/modules
    4. Reboot

    21. Difference between Class driver and Vendor driver in Linux USB

    Answer:

    • Class driver: Works for all devices following a USB standard (HID, Mass Storage, Audio).
    • Vendor driver: Works only with devices from a specific manufacturer, identified by Vendor ID/Product ID.

    22. What is MODULE_DEVICE_TABLE() used for?

    Answer:
    It creates a table linking the driver to supported USB devices so that the kernel can match the driver automatically during enumeration.

    23. How to handle multiple USB interfaces in a driver?

    Answer:

    • Query interfaces using interface->cur_altsetting
    • Initialize each interface separately
    • Use endpoints per interface for communication

    24. Explain the difference between usb_register() and module_usb_driver().

    Answer:

    • usb_register() → Registers driver explicitly and requires cleanup in module_exit()
    • module_usb_driver() → Macro that automatically handles registration and cleanup

    25. Can USB drivers be written entirely in user space?

    Answer:
    Yes, using libusb. But kernel-space drivers are faster and can access hardware directly, which is needed for complex or performance-critical devices.

    26. How to get detailed info about a USB device in Linux?

    Answer:

    lsusb -v
    
    • Provides all descriptors: configuration, endpoints, vendor/product ID, class info.

    27. What are the common errors while writing USB drivers?

    Answer:

    • Wrong Vendor/Product ID
    • Improper endpoint handling
    • Not handling probe/disconnect correctly
    • Kernel panics due to NULL pointers
    • Not managing device power properly

    28. How does Linux handle USB device removal (hot unplug)?

    Answer:

    • Kernel triggers disconnect() callback
    • Releases allocated resources
    • Updates driver bindings
    • Notifies user-space via udev

    29. How to make a USB Mass Storage device accessible via a custom driver?

    Answer:

    1. Bind driver to device using Vendor/Product ID
    2. Use usb_bulk_msg() for read/write
    3. Integrate with Linux file system via block interface (optional for advanced use)

    30. How do you monitor USB data traffic for debugging?

    Answer:

    • Load usbmon module: sudo modprobe usbmon
    • Monitor raw traffic: cat /sys/kernel/debug/usb/usbmon/0u
    • Use Wireshark with usbmon for visual analysis

    FAQs About USB Drivers in Linux

    1. What is the difference between USB device driver and USB class driver?

    • A USB device driver is specific to a device, while a USB class driver works for a group of devices following the same standard.

    2. Can I write a USB driver in user space?

    • Yes, using libraries like libusb, but kernel-space drivers provide better performance and hardware control.

    3. How do I know which USB driver is used by my device?

    • Use lsusb -t to see the hierarchy and driver bindings.

    4. Are USB drivers in Linux backward compatible?

    • Generally, yes. Linux maintains backward compatibility for most USB devices.

    5. What is a probe function in USB drivers?

    • It initializes the device when it is connected and binds it to the driver.

    6. How can I debug USB drivers?

    • Use dmesg, usbmon, and lsusb -v for in-depth analysis.

    7. Do I need root access to load USB drivers?

    • Yes, loading kernel modules requires root privileges.

    8. Can Linux automatically update USB drivers?

    • Most drivers are part of the kernel, so updating the kernel updates the drivers. Additional drivers may be installed via packages.

    9. How to handle USB power management in drivers?

    • Linux provides suspend/resume callbacks in USB drivers for managing power efficiently.

    10. What is the role of descriptors in USB drivers?

    • Descriptors provide information about device capabilities, endpoints, and communication types.

    Conclusion

    Understanding USB drivers in Linux is not only essential for hardware communication but also for creating custom devices and debugging peripherals. From USB driver classes like HID and Mass Storage to comprehensive hands-on with USB drivers, this knowledge empowers you to work confidently with Linux at the kernel and user levels.

    Linux’s modular architecture, robust kernel support, and tools like lsusb and usbmon make USB driver development approachable for beginners while still being powerful for experts. With practice, you can develop, test, and maintain your own USB drivers, opening doors to a deeper understanding of Linux systems.

    Read More about Process : What is is Process

    Read More about System Call in Linux : What is System call

    Read More about IPC : What is IPC

  • Master Input Drivers in Linux (2026)

    Learn Input Drivers in Linux with a beginner-friendly guide covering input subsystem, event handling, keymaps, and real-world examples.

    If you’re new to Linux kernel internals, but curious to understand input drivers in Linux, you’re in the right place. In this friendly, in‑depth article, we’ll walk through what input drivers are, why they matter, how they work, and how you can interact with them hands‑on. Think of this like sitting with a cup of coffee and breaking down a topic you know matters for systems engineering, embedded Linux work, or just deepening your OS skills.

    1. What Are Input Drivers in Linux?

    Input drivers in Linux are pieces of code inside the Linux kernel that let user input devices — like keyboards, mice, touchscreens, and game controllers — talk to your system. They translate physical actions (key presses, finger swipes, button clicks) into events the operating system and applications can understand.

    In simple terms:

    The input driver is the translator between hardware and Linux’s input system.

    This includes devices that humans interact with directly or indirectly. The Linux input subsystem is clean and unified. It treats all input uniformly, which makes things like consistent event handling possible across different devices.

    Because of this abstraction, many user programs, libraries, and desktop environments don’t have to worry about whether a device is USB, Bluetooth, or built‑in — the input driver handles that.

    2. Why Input Drivers Matter in Linux

    If input drivers didn’t exist, your Linux system would be blind and deaf to keyboard taps, mouse movements, touch gestures, and all other human interactions. They are critical at many levels:

    • User interaction — Without them, Linux cannot accept input.
    • Device support — Support for new hardware often means new or updated drivers.
    • Embedded systems — If you’re building Linux images for embedded devices, you often have to add or tweak input drivers manually.
    • Gaming and multimedia — High‑performance input handling is necessary for responsive applications.

    The Linux Input Subsystem gives a uniform way to read events, which is powerful: a single application can read input events from many different devices without knowing how those devices work internally.

    3. Key Components of the Linux Input Subsystem

    To understand input drivers deeply, let’s break down the Linux input stack:

    Input Core

    The central part of the input subsystem that handles:

    • Event queues
    • Common device structures
    • Interaction with user‑space via /dev/input/eventX

    Input Handlers

    These convert events into meaningful actions. For example:

    • Keyboard handler turns scancodes into key codes.
    • Mouse handler turns movement into cursor position changes.

    Input Devices

    These are the actual pieces of hardware:

    • Keyboards
    • Mice
    • Touchscreens
    • Joysticks
    • Sensors with human interaction

    Input devices register with the system through a driver.

    Linux uses a unified device class for input called evdev (event device), which exports devices as /dev/input/eventX nodes. Applications read from these nodes to get events.

    4. How Input Devices Communicate with Linux

    Input drivers operate at kernel level and transform raw hardware signals into the event system. The basic flow is:

    1. Hardware event – A physical key press, movement, or signal.
    2. Driver interrupt or polling – The driver either gets notified by the hardware (interrupt) or checks periodically (poll).
    3. Driver generates input event – The driver wraps the raw info into a Linux input event.
    4. Input core processes event – It queues and processes those events.
    5. User‑space application reads event – Through evdev, the user space receives and reacts to the input.

    Here’s a simplified visualization:

    Hardware Device → Kernel Driver → Linux Input Subsystem → /dev/input → User App
    

    If any part of that chain is broken, input won’t work properly.

    5. The Role of Input Event Devices

    Linux exposes input devices through the evdev interface:

    /dev/input/event0
    /dev/input/event1
    ...
    

    Each device gets its own eventX node. These nodes allow input events to flow from kernel space to user space.

    Developers use tools like:

    • evtest
    • libevdev
    • udevadm

    These tools let you view, debug, or grab events from input devices.

    For example, evtest prints all events from devices in real time. It helps you understand what the kernel sees when you interact with hardware.

    6. Anatomy of a Linux Input Driver

    A Linux input driver generally includes:

    Driver Structure

    Each input driver has an entry that lists supported devices — usually identified by vendor ID, product ID, or bus type.

    Probe Function

    This runs when the hardware is detected. It initializes device hardware, allocates structures, and registers the device with the input core.

    Event Handling Function

    Called when hardware reports an event. It packages raw data into input events.

    Interrupt or Poll Handler

    Depending on the device, it either:

    • Responds to hardware interrupts, or
    • Polls the hardware regularly.

    Teardown Function

    Cleans up when the device is removed or the driver is unloaded.

    All of this code lives in the kernel — either built in or as a loadable module.

    7. Configuring Input Drivers: Device Tree and Udev

    Modern Linux uses Device Tree and udev rules to configure input drivers.

    Device Tree

    On ARM and embedded boards, many input devices are described in the device tree (.dts). This description tells Linux:

    • Which driver to use
    • IRQs and GPIO lines
    • Communication protocols (I2C, SPI)

    Example snippet:

    touchscreen@1a {
        compatible = "goodix,gt911";
        reg = <0x1a>;
        interrupts = <GTP_INT_GPIO IRQ_TYPE_EDGE_FALLING>;
        ...
    };
    

    This makes the kernel driver bind to the hardware automatically.

    udev

    udev is the device manager for Linux. It dynamically creates device nodes under /dev when hardware arrives. For input devices, udev populates:

    /dev/input/by-id/
    

    and

    /dev/input/by-path/
    

    udev rules can rename or assign persistent names to devices.

    8. Writing a Simple Input Driver in Linux

    Let’s walk through a basic input driver. I’ll keep it simple so you get the core idea.

    This example is for a generic button on a custom embedded board.

    Step 1: Required Headers

    #include <linux/module.h>
    #include <linux/input.h>
    #include <linux/platform_device.h>
    #include <linux/gpio.h>
    #include <linux/interrupt.h>
    

    Step 2: Driver Data Structure

    struct button_drv_data {
        struct input_dev *input;
        int irq_number;
        int gpio_number;
    };
    

    Step 3: Interrupt Handler

    static irqreturn_t button_isr(int irq, void *dev_id) {
        struct button_drv_data *data = dev_id;
        int value = gpio_get_value(data->gpio_number);
    
        input_report_key(data->input, BTN_0, value);
        input_sync(data->input);
    
        return IRQ_HANDLED;
    }
    

    Step 4: Probe Routine

    static int button_probe(struct platform_device *pdev) {
        struct button_drv_data *data;
        int error;
    
        data = devm_kzalloc(&pdev->dev, sizeof(*data), GFP_KERNEL);
        data->input = devm_input_allocate_device(&pdev->dev);
    
        data->gpio_number = /* read from device tree */;
        data->irq_number = gpio_to_irq(data->gpio_number);
    
        input_set_drvdata(data->input, data);
        data->input->name = "Generic Button";
    
        input_set_capability(data->input, EV_KEY, BTN_0);
    
        error = input_register_device(data->input);
    
        request_irq(data->irq_number, button_isr, IRQF_TRIGGER_RISING | IRQF_TRIGGER_FALLING, "btn", data);
        return 0;
    }
    

    Step 5: Remove Routine

    static int button_remove(struct platform_device *pdev) {
        free_irq(data->irq_number, data);
        return 0;
    }
    

    This driver:

    • Allocates input device
    • Registers button event
    • Sets up an interrupt
    • Generates BTN_0 events when the button changes state

    9. Debugging Input Drivers

    Debugging input drivers can be tricky, but tools make it easier:

    1. dmesg

    Check kernel messages:

    dmesg | grep input
    

    It shows driver loading and errors.

    2. evtest

    View live event stream:

    sudo evtest /dev/input/eventX
    

    You’ll see key codes, movement, etc.

    3. udevadm

    Check udev info:

    udevadm info --attribute-walk /dev/input/eventX
    

    This helps you verify device properties.

    4. libinput‑debug

    If you are using libinput (common in desktops):

    libinput debug-events
    

    This shows higher‑level, parsed data.

    10. Use Cases: Keyboard, Mouse, Touchscreens, Gamepads

    Keyboard Drivers

    A keyboard driver handles key press codes and translates them into key events. The Linux input subsystem works with many types:

    • USB keyboards
    • Bluetooth keyboards
    • Matrix keyboards in embedded devices

    Thanks to the input core, all keyboards appear consistently in /dev/input.

    Mouse and Pointer Devices

    Mouse drivers take:

    • X/Y movement
    • Buttons

    and convert them into standard pointer events.

    Touchscreens

    Touchscreens need more sophisticated drivers:

    • Multi‑touch support
    • Gestures
    • Pressure
    • Coordinates

    Touch drivers often use protocols like MT and integrate with libinput.

    Gamepad and Joystick Support

    Game controllers generate multiple axes and buttons. Linux input drivers handle:

    • Analog sticks
    • Digital buttons
    • POV hats

    Game developers can read input events directly or through libraries like SDL.

    11. Best Practices for Input Driver Development

    Here are some practical tips:

    Use Existing Helpers

    The kernel has many helper functions for:

    • Event reporting
    • Device registration
    • Polling and interrupt handling

    Reuse them where possible.

    Follow Linux Coding Style

    Formatting and naming help others read your driver.

    Keep Performance in Mind

    Input drivers need to be responsive. Avoid slow code paths in interrupt context.

    Use Device Tree

    For embedded devices, always describe hardware in the device tree — no hardcoding.

    Test With Tools

    Make sure evtest and libinput show correct events.

    12. Hands‑On: Real Work With Input Drivers

    Let’s walk through a real‑world scenario: You are adding touchscreen support to a custom hardware board running Linux.

    Step A: Identify Hardware

    Check which controller is used (example: Goodix GT911).

    Step B: Write Device Tree Entry

    In your board device tree:

    gt911@5d {
        compatible = "goodix,gt911";
        reg = <0x5d>;
        interrupt-parent = <&gpio1>;
        interrupts = <GTP_INT_GPIO IRQ_TYPE_EDGE_FALLING>;
        reset-gpios = <&gpio1 23 GPIO_ACTIVE_LOW>;
        touchscreen-size-x = <800>;
        touchscreen-size-y = <480>;
    };
    

    Step C: Check Kernel Driver

    Make sure your kernel config includes:

    CONFIG_TOUCHSCREEN_GOODIX
    

    or build it as a module.

    Step D: Boot and Verify

    Once Linux boots:

    ls /dev/input/
    evtest
    

    You should see a touchscreen device.

    Step E: Test Interaction

    Run:

    evtest /dev/input/eventX
    

    Touch the screen — you’ll see events with coordinates.

    Linux Input Drivers Interview Questions and Answers

    Basic Level (Round 1)

    Q1: What are input drivers in Linux?

    A: Input drivers are kernel modules that allow Linux to communicate with input devices like keyboards, mice, touchscreens, or game controllers. They convert raw hardware signals into events that the OS or applications can understand.

    Q2: What is the Linux Input Subsystem?

    A: The Linux Input Subsystem is a part of the kernel that handles input devices in a uniform way. It provides a standard interface (evdev) so that all applications can read input events without worrying about the underlying hardware.

    Q3: What is evdev?

    A: evdev (event device) is a kernel interface that exposes input devices as /dev/input/eventX. It allows user-space applications to read input events such as key presses, mouse movement, or touchscreen touches.

    Q4: How does Linux differentiate between input devices?

    A: Each device is registered with the input subsystem and assigned a unique /dev/input/eventX node. udev provides persistent naming (by-id or by-path) for devices. Drivers also specify device capabilities, like EV_KEY for keyboards or EV_ABS for touchscreens.

    Q5: Name some types of input devices supported by Linux.

    A:

    • Keyboards (USB, Bluetooth, matrix)
    • Mouse and touchpads
    • Touchscreens (single and multi-touch)
    • Gamepads and joysticks
    • Sensors like buttons, proximity, or motion detectors

    Q6: What are input events?

    A: Input events are structures representing a change in device state, like a key pressed, mouse moved, or a touchscreen touched. They are defined by struct input_event in the kernel and passed to the user-space through /dev/input/eventX.

    Q7: What is the role of udev with input devices?

    A: udev dynamically creates device nodes in /dev when a device is plugged in. For input devices, it manages naming (by-id, by-path) and permissions, ensuring applications can access the correct input device consistently.


    Q8: What is a device tree in Linux?

    A: A device tree describes hardware to the Linux kernel, particularly on embedded ARM devices. Input devices are declared here with properties like IRQs, GPIO pins, and communication protocols (I2C, SPI).


    Q9: What is the difference between an interrupt-driven input driver and a polling input driver?

    A:

    • Interrupt-driven: The hardware notifies the driver when an event occurs. Efficient for low-power devices.
    • Polling: The driver regularly checks the hardware for events. Simple but may use more CPU and add latency.

    Q10: How can you check which input devices are present in Linux?

    A:

    ls /dev/input/
    

    Or use tools like cat /proc/bus/input/devices or evtest.


    Intermediate Level (Round 2)

    Q11: Explain the steps when an input device generates an event.

    A:

    1. Hardware generates a signal (key press, touch).
    2. The input driver receives the signal via interrupt or polling.
    3. Driver translates it into a Linux input event (struct input_event).
    4. Input core queues the event and sends it to /dev/input/eventX.
    5. User-space applications read the event through evdev or libraries like libinput.

    Q12: What is input_register_device()?

    A: It’s a kernel function used by input drivers to register a device with the Linux input subsystem. After calling it, the device is visible in /dev/input.


    Q13: What are input capabilities in Linux?

    A: Input capabilities define what a device can do. They include event types (EV_KEY, EV_ABS, EV_REL), key codes, or axes. This helps applications understand the type of events a device can generate.


    Q14: How do you debug input drivers in Linux?

    A:

    • dmesg — Check kernel logs.
    • evtest /dev/input/eventX — View events in real time.
    • libinput debug-events — For higher-level parsed events.
    • udevadm info — Check device attributes.

    Q15: What is input_report_key()?

    A: It’s a function in input drivers used to report key/button events to the input subsystem. For example, pressing a keyboard key triggers input_report_key(dev, KEY_A, 1).


    Q16: What is input_sync()?

    A: After reporting one or multiple events, input_sync() flushes the events to the input core. Without it, events might not reach user-space immediately.


    Q17: Explain multi-touch support in Linux.

    A: Multi-touch devices generate multiple absolute events (EV_ABS) for each finger. The Linux input subsystem uses slots to track touches, allowing applications to detect gestures like pinch, swipe, or zoom.


    Q18: How does a touchscreen driver differ from a keyboard driver?

    A:

    • Touchscreen: Reports absolute coordinates (EV_ABS) and may support multi-touch.
    • Keyboard: Reports discrete key presses (EV_KEY).
      Both register events through the input subsystem, but touchscreens need more data handling for gestures.

    Q19: Can you hot-plug input devices in Linux?

    A: Yes, udev detects when devices are plugged/unplugged and creates or removes the corresponding /dev/input/eventX nodes. Drivers handle initialization dynamically using probe/remove functions.


    Q20: How are custom input devices added in embedded Linux?

    A:

    1. Define the hardware in Device Tree.
    2. Write or enable the kernel driver.
    3. Register the device with the input subsystem.
    4. Use evtest or libinput to verify events.

    Q21: What is the difference between EV_KEY and EV_REL?

    A:

    • EV_KEY: Discrete events like button presses (keyboard, mouse buttons).
    • EV_REL: Relative events, like mouse movement or scroll wheel changes.

    Q22: How do you handle debouncing in input drivers?

    A: Debouncing ensures that a single button press isn’t registered multiple times. It can be handled:

    • In hardware (capacitor-based)
    • In software (delay logic inside ISR)
    • Using kernel APIs like input_set_capability and timing checks.

    Q23: Explain the role of input_allocate_device()

    A: Allocates and initializes a new struct input_dev in the kernel, which will later be registered with the input core.


    Q24: How do you support multiple buttons or keys in one input driver?

    A: Set capabilities for each key/button using input_set_capability(). Then report key events individually using input_report_key() followed by input_sync().


    Q25: How do you test a Linux input driver on embedded hardware?

    A:

    • Build kernel module or enable driver in kernel.
    • Boot the device.
    • Use /dev/input/eventX with evtest or custom test apps.
    • Simulate hardware events (press buttons, touch screen).
    • Monitor kernel logs for driver activity (dmesg).

    Q26: Explain input polling vs interrupt handling in drivers.

    A:

    • Polling: Driver reads hardware at regular intervals. Simple but may waste CPU cycles.
    • Interrupt: Hardware triggers an interrupt when a change occurs. More efficient and faster response.

    Q27: How does libinput relate to input drivers?

    A: Libinput is a user-space library that reads /dev/input/eventX and provides a uniform interface for applications (GNOME, KDE). Drivers still exist in kernel space, but libinput abstracts event processing for desktops.


    Q28: Can input drivers be implemented as kernel modules?

    A: Yes, input drivers can be built-in or as loadable kernel modules (.ko). Modules can be loaded/unloaded at runtime using insmod or modprobe.


    Q29: How do you debug a driver that doesn’t show any events?

    A:

    • Check kernel logs (dmesg) for probe errors.
    • Verify device tree configuration.
    • Ensure GPIOs/IRQs are correctly assigned.
    • Test with a known working driver to rule out hardware issues.

    Q30: How does the input subsystem interact with power management?

    A: Drivers can suspend/resume devices using power management callbacks. This ensures input devices don’t consume power when idle but can wake the system (like pressing a key to wake a laptop).


    Advanced Level Questions (Scenario-Based)

    Q31: Scenario: Touchscreen shows wrong coordinates, what would you check?

    A:

    • Verify driver calibration and resolution.
    • Check Device Tree properties (touchscreen-size-x/y).
    • Inspect raw events using evtest.
    • Check for firmware updates for the touchscreen.

    Q32: Scenario: A new keyboard doesn’t work on embedded Linux. Steps?

    A:

    1. Check if driver is loaded (lsmod).
    2. Check kernel logs (dmesg).
    3. Verify Device Tree or platform data.
    4. Use evtest to see if events arrive.
    5. Update driver or kernel config if needed.

    Q33: Explain hot-plug handling in a USB mouse driver.

    A: The driver has probe and remove functions. When the USB device is connected, the probe function initializes it and registers with input subsystem. On removal, the remove function frees resources and unregisters the device.


    Q34: How do you implement multi-touch gestures in Linux?

    A: Multi-touch drivers report multiple EV_ABS slots. Gestures like pinch, swipe, and rotate are interpreted in user-space (libinput, X11, Wayland) by reading multiple touch slots.


    Q35: How to integrate a new I2C button controller as input device?

    A:

    • Define I2C bus and address in Device Tree.
    • Write or adapt driver to read button states.
    • Register buttons with input subsystem.
    • Map events to EV_KEY codes and call input_report_key().

    Q36: How do you manage key repeat (auto-repeat) in Linux?

    A: The input core can handle key repeat. Drivers report key press and release events. Auto-repeat is handled in the input core or user-space via X11 or libinput.


    Q37: Difference between /dev/input/eventX and /dev/input/mouseX?

    A:

    • /dev/input/eventX — Full, detailed event stream, including key, absolute, and relative events.
    • /dev/input/mouseX — Simplified, legacy interface for mouse movements and buttons only.

    Q38: Can a driver report multiple device types?

    A: Yes, for example a touchscreen can also have physical buttons. You can report EV_KEY and EV_ABS events from the same driver.

    Q39: What kernel logs are most useful for input driver debugging?

    A:

    • dmesg for driver probe/init messages.
    • printk statements inside ISR or probe functions.
    • /proc/bus/input/devices to verify device registration.

    Q40: Best practices for writing input drivers?

    A:

    • Use existing input core helpers.
    • Avoid long operations in interrupts.
    • Follow kernel coding style.
    • Use Device Tree, not hardcoded GPIOs.
    • Test events with evtest and libinput.
    • Handle suspend/resume for power management.

    FAQ: Input Drivers in Linux

    1. What are input drivers in Linux?

    Answer:
    Input drivers are kernel-level modules that allow Linux to communicate with input devices like keyboards, mice, touchscreens, game controllers, and buttons. They translate raw hardware signals into events that applications and the OS can understand.

    2. How do input drivers work in Linux?

    Answer:
    When a hardware device generates an input (e.g., key press or mouse movement), the input driver receives it via an interrupt or polling mechanism. The driver converts it into a standard event (struct input_event) and sends it to the input core. Applications read these events through /dev/input/eventX using evdev or libraries like libinput.

    3. What is the Linux input subsystem?

    Answer:
    The Linux input subsystem is a kernel framework that unifies all input devices. It manages event queues, device registration, and communication with user-space. This uniform layer allows applications to handle keyboards, mice, touchscreens, and more without worrying about hardware details.

    4. What is evdev and why is it important?

    Answer:
    evdev (event device) is a Linux kernel interface that exposes input devices as /dev/input/eventX. It’s the standard way for applications to read input events. evdev ensures consistency, so developers don’t need to write separate code for each type of device.

    5. How do I find all input devices on Linux?

    Answer:
    You can use:

    ls /dev/input/
    cat /proc/bus/input/devices
    evtest
    

    These commands list devices, details, and allow you to monitor real-time input events.

    6. What is the role of udev in input drivers?

    Answer:
    udev dynamically creates device nodes when devices are connected and removes them when devices are disconnected. It ensures consistent naming (by-id or by-path) and sets proper permissions for user-space access.


    7. How are input drivers configured in embedded Linux?

    Answer:
    In embedded Linux, input drivers are often configured through the Device Tree, which specifies IRQs, GPIOs, I2C/SPI addresses, and device capabilities. Drivers then register with the input subsystem using this information.


    8. How can I debug input drivers?

    Answer:

    • Use dmesg to check kernel messages.
    • Use evtest /dev/input/eventX to view events in real-time.
    • Use libinput debug-events for parsed events.
    • Use udevadm info --attribute-walk /dev/input/eventX to inspect device attributes.

    9. What is the difference between EV_KEY and EV_REL?

    Answer:

    • EV_KEY — Discrete key/button events like keyboard keys or mouse buttons.
    • EV_REL — Relative movement events like mouse movement or scroll wheel changes.

    10. Can I hot-plug input devices in Linux?

    Answer:
    Yes, Linux supports hot-plugging. udev detects newly connected devices, and the kernel driver’s probe function initializes them. Removal triggers the driver’s remove function, freeing resources.


    11. How do touchscreen drivers work?

    Answer:
    Touchscreen drivers report absolute coordinates (EV_ABS) and may support multi-touch. Each touch is tracked in a slot, allowing gestures like pinch, swipe, and multi-finger taps. The input subsystem passes these events to applications via evdev.


    12. What is input_report_key() and input_sync()?

    Answer:

    • input_report_key() — Reports a key or button state to the input subsystem.
    • input_sync() — Flushes events so they reach user-space immediately. These functions are essential in driver code for reporting input accurately.

    13. How do I implement multi-button or multi-touch support?

    Answer:

    • Set device capabilities using input_set_capability().
    • For multiple buttons, report each with input_report_key().
    • For multi-touch, report each finger in a separate slot (EV_ABS) and call input_sync().

    14. How do I handle key debouncing?

    Answer:
    Debouncing ensures a single press isn’t registered multiple times. It can be handled:

    • Hardware: Using capacitors or filters.
    • Software: Adding timing checks in ISR or polling code.
    • Kernel APIs: Using input core helpers to manage repeat events.

    15. Can input drivers be loadable kernel modules?

    Answer:
    Yes, most input drivers can be built as loadable kernel modules (.ko). They can be inserted with insmod or modprobe and removed without rebooting. Built-in drivers are compiled directly into the kernel.


    16. What tools help test input drivers?

    Answer:

    • evtest — View events from /dev/input/eventX.
    • libinput debug-events — Higher-level event stream for desktop environments.
    • dmesg — Check kernel logs for driver messages.
    • Custom test scripts in Python or C using libevdev.

    17. How do I add support for a new input device in embedded Linux?

    Answer:

    1. Define the hardware in the Device Tree.
    2. Write or enable the input driver in the kernel.
    3. Register the device using input_register_device().
    4. Test using evtest or libinput.
    5. Debug with dmesg if events do not appear.

    18. How does Linux input subsystem handle power management?

    Answer:
    Input drivers can suspend devices when idle and resume them when needed. For example, a keyboard can wake a sleeping system. Drivers implement suspend/resume callbacks to manage power efficiently.

    19. Difference between /dev/input/eventX and /dev/input/mouseX?

    Answer:

    • /dev/input/eventX — Full event stream (key presses, absolute/relative events, multi-touch).
    • /dev/input/mouseX — Simplified legacy mouse interface, mainly for relative movements and buttons.

    20. How can I check Device Tree binding for an input device?

    Answer:
    Use the following commands:

    dmesg | grep input
    cat /proc/device-tree/
    

    Or inspect /sys/class/input/ for registered devices and their properties.

    Final Take

    I wrote this guide to make Input Drivers in Linux clear, practical, and useful. You don’t need a PhD to understand Linux input, just curiosity and the right roadmap. Now you’ve got both.

    If you want, I can also provide a downloadable PDF, code samples repository, or a video walk‑through for each step. Just ask!

    Read More about Process : What is is Process

    Read More about System Call in Linux : What is System call

    Read More about IPC : What is IPC

  • Master Drivers in Linux | Ultimate Guide to I2C, SPI, and GPIO (2026)

    Learn Drivers in Linux with a beginner-friendly guide covering device driver types, kernel interaction, hardware access, and real-world examples.

    If you’ve ever wondered how Linux communicates with the hardware inside your computer or embedded system, the answer lies in drivers in Linux. Drivers are the bridge between the operating system and the hardware, allowing your software to interact with sensors, displays, motors, and other peripherals seamlessly.

    Today, we’ll break down the world of Linux drivers, focusing on three widely used interfaces: I2C, SPI, and GPIO. By the end of this guide, you’ll understand not just what these drivers do, but how they work, why they are important, and how you can interact with them.

    What Are Drivers in Linux?

    In simple terms, a driver is a piece of software that tells the operating system how to communicate with a piece of hardware. Without drivers, the OS would not know how to operate your keyboard, monitor, Wi-Fi card, or even a simple LED.

    Think of a driver as a translator: it translates generic commands from your OS into device-specific instructions. Linux, being open-source, has a robust driver model that supports a wide range of hardware from different manufacturers. Drivers in Linux can be:

    1. Built-in: Compiled directly into the Linux kernel.
    2. Loadable Kernel Modules (LKMs): Dynamically loaded into the kernel when needed. This is very common for devices like USB peripherals, I2C sensors, or SPI modules.

    Why Drivers in Linux Are Important

    Without drivers, your hardware is essentially useless. Let’s take a real-world analogy: imagine having a smartphone without an app that tells it how to read your fingerprint. That’s your hardware without a driver. In Linux:

    • Drivers allow communication between hardware and software.
    • They manage resources like memory, interrupts, and I/O ports.
    • They abstract complex hardware details, making programming simpler.
    • They enable modularity — you can add or remove drivers without affecting the entire OS.

    Understanding drivers is crucial for embedded systems developers, Linux kernel enthusiasts, and anyone looking to work with hardware on Linux.

    Types of Drivers in Linux

    Linux drivers can be classified into several categories based on the type of hardware they manage:

    1. Character Device Drivers: Handle devices that transmit data as a stream of bytes, like serial ports or keyboards.
    2. Block Device Drivers: Manage devices that store data in blocks, like hard drives and SSDs.
    3. Network Device Drivers: Control network hardware like Ethernet or Wi-Fi cards.
    4. Platform Device Drivers: For devices integrated on boards like I2C sensors, SPI modules, and GPIO-controlled peripherals.

    For this guide, we’ll focus on drivers in Linux for I2C, SPI, and GPIO, which are crucial in embedded Linux projects.

    Understanding I2C in Linux

    I2C (Inter-Integrated Circuit) is a communication protocol widely used in embedded systems. It allows multiple devices to communicate using just two wires: SDA (data) and SCL (clock). I2C is perfect for low-speed communication between sensors, EEPROMs, and microcontrollers.

    How I2C Works

    1. The master device initiates communication.
    2. Each device on the bus has a unique address.
    3. Data is transmitted in packets, with acknowledgment signals sent back and forth.
    4. Multiple slaves can share the same bus, but only one master controls the clock.

    I2C Drivers in Linux

    Linux provides a kernel subsystem for I2C, which handles all the communication details. The main components are:

    • I2C adapter driver: Manages the physical bus (hardware-specific).
    • I2C client driver: Manages devices connected to the bus, like sensors or EEPROMs.

    Example: Interacting with an I2C Device

    On Linux, you can interact with I2C devices using:

    sudo apt-get install i2c-tools
    i2cdetect -y 1
    

    This command scans the I2C bus and lists all connected devices. Writing a driver for an I2C sensor involves registering a client driver that communicates with the sensor using the I2C subsystem APIs.

    Understanding SPI in Linux

    SPI (Serial Peripheral Interface) is another popular communication protocol. Unlike I2C, SPI uses four wires: MISO, MOSI, SCLK, and CS. SPI is faster than I2C and is often used for displays, memory cards, and high-speed sensors.

    How SPI Works

    1. The master device controls the clock.
    2. Data is transmitted simultaneously: master out to slave in (MOSI) and slave out to master in (MISO).
    3. Multiple slaves are supported using separate chip select (CS) lines.

    SPI Drivers in Linux

    Linux has an SPI subsystem that supports:

    • SPI master drivers: Control the SPI bus.
    • SPI device drivers: Control the slave devices.

    Example: SPI Device Driver

    A typical SPI driver in Linux will:

    1. Register the SPI device with the kernel.
    2. Implement read/write operations using SPI APIs.
    3. Handle interrupts or DMA for efficient data transfer.

    SPI is preferred when speed is critical, like in ADCs, DACs, or display modules.

    Understanding GPIO in Linux

    GPIO (General Purpose Input/Output) pins are the most basic way to interact with hardware. You can control LEDs, read buttons, or interface with relays using GPIO.

    How GPIO Works

    • Each GPIO pin can be configured as input or output.
    • Input pins can read signals (like button presses).
    • Output pins can drive signals (like turning on an LED).

    GPIO Drivers in Linux

    Linux exposes GPIO through the GPIO subsystem, which provides:

    • sysfs interface: Older method to access GPIO via /sys/class/gpio/.
    • Character device interface: Modern method using /dev/gpiochipX.

    Example: Controlling a GPIO Pin

    echo 23 > /sys/class/gpio/export
    echo out > /sys/class/gpio/gpio23/direction
    echo 1 > /sys/class/gpio/gpio23/value
    

    This sequence sets GPIO 23 as an output and turns it on. Writing a proper GPIO driver involves handling pin mapping, interrupts, and edge detection.

    Writing Linux Drivers: A Step-by-Step Overview

    Writing drivers in Linux might sound complex, but it’s manageable if you understand the structure. Here’s a simplified flow:

    1. Include Kernel Headers#include <linux/module.h> #include <linux/kernel.h> #include <linux/init.h>
    2. Initialize the Driverstatic int __init my_driver_init(void) { printk(KERN_INFO "Driver loaded successfully\n"); return 0; }
    3. Cleanup on Exitstatic void __exit my_driver_exit(void) { printk(KERN_INFO "Driver unloaded\n"); }
    4. Register Drivermodule_init(my_driver_init); module_exit(my_driver_exit); MODULE_LICENSE("GPL"); MODULE_AUTHOR("Your Name"); MODULE_DESCRIPTION("Example Linux Driver");

    For I2C, SPI, and GPIO, you’d use specific kernel APIs to interact with the respective subsystem.

    Debugging Linux Drivers

    Once your driver is written, debugging is key. Linux provides multiple tools:

    • dmesg: View kernel messages.
    • lsmod: List loaded modules.
    • insmod/rmmod: Load and remove modules.
    • strace: Trace system calls.
    • gdb or kgdb: Debug kernel code for complex issues.

    Best Practices for Linux Drivers

    1. Always check return values of API calls.
    2. Use interrupts instead of busy-waiting for efficiency.
    3. Follow kernel coding standards for readability.
    4. Modularize your driver to handle multiple devices.
    5. Ensure thread-safety when accessing shared resources.

    Real-World Applications of I2C, SPI, and GPIO Drivers

    1. I2C: Temperature sensors, EEPROMs, accelerometers, real-time clocks.
    2. SPI: OLED displays, SD cards, ADC/DAC modules.
    3. GPIO: LEDs, buttons, relays, buzzers.

    Embedded Linux systems like Raspberry Pi, BeagleBone, and custom ARM boards rely heavily on these drivers for their operation.

    Step-by-Step Guide: Implementing an I2C Driver in Linux

    We’ll create a basic I2C Linux driver that can read/write data from a device and be tested in userspace. I’ll cover:

    1. Kernel setup
    2. Writing the driver
    3. Compiling as a loadable kernel module (LKM)
    4. Flashing/loading the module
    5. Testing with a simple userspace program

    Step 1: Prepare Your Environment

    Before writing an I2C driver, ensure:

    1. Linux kernel headers are installed.sudo apt-get install linux-headers-$(uname -r)
    2. Your I2C bus is enabled (especially on embedded boards like Raspberry Pi or BeagleBone).
      • On Raspberry Pi, enable via raspi-config.
      • On BeagleBone, use Device Tree overlays.
    3. Install i2c-tools to test the bus:sudo apt-get install i2c-tools i2cdetect -y 1

    This will show connected devices on the I2C bus.

    Step 2: Create the Driver Directory

    mkdir ~/i2c_driver
    cd ~/i2c_driver
    

    We will have:

    • i2c_driver.c → Driver source code
    • Makefile → Build instructions

    Step 3: Write the I2C Driver Code

    Here’s a simple example driver for an I2C device:

    // i2c_driver.c
    #include <linux/module.h>
    #include <linux/kernel.h>
    #include <linux/init.h>
    #include <linux/i2c.h>
    #include <linux/slab.h>
    
    #define DEVICE_NAME "my_i2c_device"
    #define I2C_BUS_NUM 1       // I2C bus number (change for your hardware)
    #define I2C_ADDR    0x48    // I2C slave device address
    
    static struct i2c_client *my_i2c_client;
    
    // Probe function called when device is detected
    static int my_i2c_probe(struct i2c_client *client, const struct i2c_device_id *id)
    {
        printk(KERN_INFO "I2C device detected at address 0x%02x\n", client->addr);
        my_i2c_client = client;
        return 0;
    }
    
    // Remove function called when driver is removed
    static int my_i2c_remove(struct i2c_client *client)
    {
        printk(KERN_INFO "I2C device removed\n");
        return 0;
    }
    
    // I2C device ID table
    static const struct i2c_device_id my_i2c_id[] = {
        { DEVICE_NAME, 0 },
        { }
    };
    MODULE_DEVICE_TABLE(i2c, my_i2c_id);
    
    // I2C driver structure
    static struct i2c_driver my_i2c_driver = {
        .driver = {
            .name = DEVICE_NAME,
        },
        .probe = my_i2c_probe,
        .remove = my_i2c_remove,
        .id_table = my_i2c_id,
    };
    
    // Module init function
    static int __init my_i2c_init(void)
    {
        int ret;
        ret = i2c_add_driver(&my_i2c_driver);
        if (ret)
            printk(KERN_ERR "Failed to register I2C driver: %d\n", ret);
        else
            printk(KERN_INFO "I2C driver registered\n");
        return ret;
    }
    
    // Module exit function
    static void __exit my_i2c_exit(void)
    {
        i2c_del_driver(&my_i2c_driver);
        printk(KERN_INFO "I2C driver unregistered\n");
    }
    
    module_init(my_i2c_init);
    module_exit(my_i2c_exit);
    
    MODULE_LICENSE("GPL");
    MODULE_AUTHOR("Your Name");
    MODULE_DESCRIPTION("Simple I2C Linux Driver Example");
    

    What this driver does:

    • Registers an I2C driver with the kernel.
    • Detects a device at a given I2C address.
    • Logs messages when the device is probed or removed.

    Step 4: Write the Makefile

    # Makefile for building the I2C driver
    obj-m += i2c_driver.o
    
    all:
    	make -C /lib/modules/$(shell uname -r)/build M=$(PWD) modules
    
    clean:
    	make -C /lib/modules/$(shell uname -r)/build M=$(PWD) clean
    

    Step 5: Compile the Driver

    make
    

    You should see i2c_driver.ko generated. This is the kernel module file.

    Step 6: Load (Flash) the Driver

    Load the module into the kernel:

    sudo insmod i2c_driver.ko
    

    Check kernel logs to see if it detected the I2C device:

    dmesg | tail
    

    Expected output:

    I2C driver registered
    I2C device detected at address 0x48
    

    Step 7: Test the Driver

    You can use i2c-tools to confirm device communication:

    i2cdetect -y 1
    

    To read/write data from the device:

    # Read 1 byte from register 0x00
    i2cget -y 1 0x48 0x00
    
    # Write value 0x55 to register 0x01
    i2cset -y 1 0x48 0x01 0x55
    

    For more advanced testing, you can create a userspace program using /dev/i2c-X and the ioctl interface.

    Step 8: Remove the Driver

    sudo rmmod i2c_driver
    dmesg | tail
    

    Expected output:

    I2C device removed
    I2C driver unregistered
    

    Step 9: Advanced Enhancements

    Once the basic driver works, you can add:

    1. Read/Write operations in the driver using i2c_smbus_read_byte_data() and i2c_smbus_write_byte_data().
    2. Interrupt handling for sensors.
    3. Device Tree integration for automatic binding on boot.
    4. Character device interface to allow userspace programs to communicate via /dev/my_i2c_device.

    Optional: Add Flash-Clear Functionality

    If your device has flash memory, you can implement a flash clear function:

    static void clear_device_flash(void)
    {
        int ret;
        ret = i2c_smbus_write_byte_data(my_i2c_client, 0x00, 0x00); // Example
        if (ret < 0)
            printk(KERN_ERR "Failed to clear flash\n");
        else
            printk(KERN_INFO "Flash cleared successfully\n");
    }
    

    Call this in the probe function after device initialization if needed.

    Drivers in Linux: Interview Questions & Answers (I2C, SPI, GPIO)

    If you’re preparing for an embedded Linux or kernel developer role, questions on drivers in Linux are very common. Below is a comprehensive list of interview questions along with human-friendly answers, covering both basics and advanced topics.

    1. What are Drivers in Linux?

    Answer:
    Drivers in Linux are programs that allow the operating system to communicate with hardware devices. They act like a translator, converting generic OS commands into hardware-specific instructions. Without drivers, devices like keyboards, displays, or sensors cannot work properly with Linux.


    2. What are the main types of Linux drivers?

    Answer:
    There are four main types:

    1. Character Device Drivers – Handle data as a stream (e.g., keyboard, serial ports).
    2. Block Device Drivers – Handle data in blocks (e.g., hard drives, SSDs).
    3. Network Device Drivers – Control network interfaces (Ethernet, Wi-Fi).
    4. Platform Drivers – Control on-board peripherals like I2C, SPI, GPIO devices.

    3. What is an I2C driver in Linux?

    Answer:
    I2C (Inter-Integrated Circuit) is a two-wire communication protocol used to connect multiple peripherals with a master device.
    In Linux, I2C drivers are divided into:

    • I2C Adapter Driver: Handles the physical bus.
    • I2C Client Driver: Handles the connected device, like a temperature sensor.

    You can interact with I2C devices using i2cdetect and Linux APIs.


    4. What is an SPI driver in Linux?

    Answer:
    SPI (Serial Peripheral Interface) is a faster, 4-wire protocol used for high-speed peripherals like ADCs or displays. Linux SPI drivers are divided into:

    • SPI Master Drivers: Control the bus.
    • SPI Device Drivers: Control the slave device.

    SPI drivers use the Linux SPI subsystem APIs for reading, writing, and configuring devices.


    5. What is a GPIO driver in Linux?

    Answer:
    GPIO (General Purpose Input/Output) allows control of simple hardware pins. GPIO drivers in Linux use the GPIO subsystem to read or write pin values.
    For example, you can toggle an LED by writing 1 or 0 to a GPIO pin. Modern Linux exposes GPIO via /dev/gpiochipX (character device interface).


    6. Difference between I2C and SPI?

    Answer:

    FeatureI2CSPI
    Wires2 (SDA, SCL)4 (MISO, MOSI, SCLK, CS)
    SpeedSlowerFaster
    DevicesMultiple devices, shared busMultiple devices, separate CS lines
    Use CaseSensors, EEPROMDisplays, ADC/DAC, SD cards

    7. What is a Loadable Kernel Module (LKM)?

    Answer:
    An LKM is a driver that can be loaded or unloaded into the Linux kernel at runtime without rebooting.

    • Commands: insmod, rmmod, modprobe
    • Advantages: Modular, reduces kernel size, easy to update drivers.

    8. How do you debug Linux drivers?

    Answer:
    Common tools include:

    • dmesg – Check kernel logs
    • lsmod – List loaded modules
    • strace – Trace system calls
    • gdb or kgdb – Debug kernel code
    • Logging using printk(KERN_INFO) inside the driver

    9. How do interrupts work in Linux drivers?

    Answer:
    Interrupts notify the driver when a device needs attention instead of constantly polling.

    • Saves CPU cycles
    • Handled by IRQ handlers in the driver
    • Common in GPIO (button press), SPI (data ready), I2C (sensor alert)

    10. Can one driver handle multiple devices?

    Answer:
    Yes. For example:

    • An I2C bus can have multiple sensors with unique addresses.
    • SPI bus can have multiple devices using separate chip select (CS) pins.

    FAQs on Drivers in Linux

    1. What is the difference between I2C and SPI?
    I2C uses 2 wires and is slower but simpler. SPI uses 4 wires, is faster, and supports higher data rates.

    2. Can I write Linux drivers in Python?
    No, Linux drivers must be written in C or C++ and compiled into the kernel. Python can interact with drivers via user-space APIs.

    3. What is a loadable kernel module?
    A module is a piece of code that can be loaded or removed from the kernel at runtime without rebooting.

    4. How do I test a GPIO pin?
    Use the sysfs interface or /dev/gpiochipX and toggle the pin value to see if connected hardware responds.

    5. Are I2C addresses fixed?
    No, most devices have configurable addresses, often set by hardware pins.

    6. How do interrupts work in drivers?
    Interrupts notify the driver when an event occurs, avoiding continuous polling and saving CPU resources.

    7. Can a driver handle multiple devices?
    Yes, modern drivers often support multiple clients or devices on the same bus.

    8. Is kernel programming dangerous?
    Mistakes can crash the system or corrupt memory. Always test in a virtual machine or development board.

    9. How do I know if a driver is loaded?
    Use lsmod to list modules and dmesg to check for kernel logs.

    10. Can Linux drivers work across different boards?
    Yes, but hardware-specific details like GPIO numbers or I2C bus IDs may need adjustment.

    11. How to handle concurrency in drivers?
    Use mutexes, spinlocks, or atomic operations provided by the kernel.

    12. Do I need to reboot after loading a driver?
    Not for loadable kernel modules. You can insert and remove modules without rebooting.

    Conclusion

    Mastering drivers in Linux opens the door to controlling and understanding hardware at a deep level. Whether you are dealing with I2C sensors, SPI displays, or GPIO pins, understanding how drivers work will empower you to build reliable and efficient systems. Start with simple character or GPIO drivers, then explore I2C and SPI devices, and gradually expand your knowledge to complex hardware subsystems.

    Remember, writing drivers is a mix of learning kernel internals, understanding hardware, and practical coding. With patience and practice, you’ll be able to build your own embedded Linux projects with confidence.

    Read More about Process : What is is Process

    Read More about System Call in Linux : What is System call

    Read More about IPC : What is IPC

  • Master Interrupt Handling in Linux (2026)

    Master Interrupt Handling in Linux (2026) with a clear, beginner-friendly guide covering IRQ flow, ISR, softirqs, tasklets, and real-world examples.

    If you’re new to embedded systems, Linux device drivers, or real‑time programming, the term Interrupt handling probably sounds important and it is. But what is it really? And why do engineers talk about Linux interrupt handlers, deferred routines, ISRs, and event management like these are magic spells?

    Let’s break this down in a simple, friendly way. By the time you’re done reading this, you’ll understand not just the theory, but also how interrupts work in real systems like Linux, why we need deferred routines, and how to implement a driver ISR practically.

    1. What Are Interrupts?

    Think of interrupts like a polite tap on the shoulder while you’re focused on a task.

    You’re writing code. Suddenly your phone buzzes. Your attention shifts for a moment, you check the phone, then go back to coding. That’s an interruption — and your brain handles it without a full context switch to another task.

    In computer systems, interrupts work the same way. They let hardware or software alert the processor that something needs immediate attention, without waiting for the CPU to check repeatedly.

    So at its core:

    Interrupt handling is how processors manage incoming signals that require immediate attention and how software responds to them.

    2. Why Interrupt Handling Matters

    Imagine you’re reading data from a sensor. The sensor might not send data continuously. Instead, it might interrupt the CPU when new data is ready. If the CPU just kept polling the sensor, it would waste time and power.

    Interrupts let the CPU sleep, run other tasks, and only deal with the sensor when necessary — that’s efficiency in systems programming.

    In real‑time and embedded environments, interrupt handling is critical. It ensures responsiveness, low latency, and better system performance.

    3. Understanding Interrupts

    At its simplest, an interrupt is a signal to the processor indicating that an event needs immediate attention.

    Interrupts can be generated by:

    • External hardware (e.g., a keyboard input)
    • Internal events (e.g., timer expiration)
    • Software (e.g., system calls meant to trigger special action)

    When an interrupt occurs, the CPU temporarily stops executing its current code and jumps to a designated piece of code called an interrupt service routine or ISR.

    Let’s break that down in plain words:

    1. Something happens.
    2. The hardware tells the CPU, “Hey, stop what you’re doing.”
    3. The CPU saves its work in progress.
    4. The CPU executes a handler function.
    5. After handling, it goes back to what it was doing.

    That’s interrupt handling in action.

    4. How a CPU Responds to an Interrupt

    This sequence is where the magic happens:

    1. Interrupt signal arrives at the processor.
    2. The CPU saves its current state (so it can resume later).
    3. The CPU jumps to a special address in memory — where the interrupt handler lives.
    4. The handler runs — quickly and efficiently.
    5. The CPU restores the original state and continues normal work.

    Hardware interrupts are fast. They demand immediate attention. So we must keep interrupt handlers short and efficient.

    5. Interrupt Types

    There are typically two broad categories:

    1) Hardware Interrupts

    These are signals from devices like:

    • Timers
    • Network controllers
    • Storage devices
    • Sensors

    They tell the CPU something happened outside the processor.

    2) Software Interrupts

    Triggered by software instructions. On Linux systems, software interrupts can be caused by system calls or exceptions.

    6. Linux Interrupt Handlers

    Now let’s talk Linux interrupt handlers.

    In Linux, interrupt handling is more abstract. We don’t write assembly code to handle every signal anymore. The Linux kernel gives us frameworks to register and implement handlers.

    At a glance, Linux interrupt handlers:

    • Are functions in the kernel
    • Execute in interrupt context (no sleeping, no blocking)
    • Must return quickly

    A typical interrupt handler in Linux looks like this:

    irqreturn_t my_irq_handler(int irq, void *dev_id) {
        // handle hardware event
        return IRQ_HANDLED;
    }
    

    We register this handler using:

    request_irq(irq_number, my_irq_handler, flags, "name", dev_id);
    

    Once registered, Linux knows to call my_irq_handler whenever that interrupt number is triggered.

    This is central to Interrupt handling in Linux.

    7. What Is a Driver ISR?

    ISR stands for Interrupt Service Routine. In driver development, ISR is the function that responds to a hardware interrupt.

    For example, when a network card receives data, it triggers an interrupt. The network driver’s ISR reads the data, acknowledges the interrupt in the hardware registers, and tells the kernel that new data is ready for processing.

    A driver ISR must:

    • Be as short as possible
    • Acknowledge and clear the interrupt source
    • Schedule further work outside the interrupt context if needed

    That last point brings us to deferred routines.

    Interrupt handling at the driver level is all about coordinating between the hardware interrupt and the higher‑level processing you want to do.

    8. Implementing Driver ISR Step‑by‑Step

    Here’s a simple step‑by‑step on how to implement a driver ISR in Linux:

    Step 1: Identify the Device IRQ

    Every device interrupt is mapped to an IRQ number. You usually get this from the device tree or PCI config.

    Step 2: Write Your ISR

    irqreturn_t my_device_isr(int irq, void *dev_id) {
        struct my_device *dev = dev_id;
        // read interrupt status from device
        // clear interrupt
        // schedule further work if needed
        return IRQ_HANDLED;
    }
    

    Step 3: Register the ISR

    ret = request_irq(dev->irq, my_device_isr, 0, "my_device", dev);
    if (ret) {
        printk("Failed to register IRQ\n");
    }
    

    Step 4: Handle Cleanup

    When your module unloads:

    free_irq(dev->irq, dev);
    

    That’s the basic pattern: register, handle, release.

    Now let’s talk about when interrupt handlers are not enough.

    9. Need for Deferred Routines

    Why do we need deferred routines?

    ISRs in Linux must run quickly. They execute in a special context where:

    • You can’t sleep
    • You can’t block
    • You can’t do heavy processing

    But what if your device interrupt signals that there’s a lot of data to process? You can’t do all that inside the ISR.

    Enter deferred routines.

    Deferred routines allow you to push the heavy lifting out of the interrupt context and into a safer environment. This improves responsiveness and system stability.

    Think of interrupt handling like answering a phone call. The ISR answers the call, writes down a memo, then hands the memo to someone else (deferred routine) to do the actual paperwork.

    10. What Are Deferred Routines in Linux?

    In Linux kernel, deferred routines are mechanisms that let you delay work until after the interrupt handler has finished.

    There are a few models:

    • Bottom halves
    • Softirqs
    • Tasklets
    • Workqueues

    All of these let you defer work outside the time‑critical context.

    Why do we need these?

    Because doing heavy computation in the ISR can delay other interrupts and degrade system performance.

    So we move the heavy tasks to:

    • A safe context
    • That can sleep or block
    • That can take its time without delaying other devices

    That’s interrupt event management in real‑world kernels.

    11. Linux Deferred Routines: Bottom Halves, Tasklets, Workqueues

    Bottom Halves

    This is a generic term for all deferred work mechanisms in Linux. Originally, bottom halves were a simple mechanism to postpone processing.

    Over time, they evolved into more structured things.

    Tasklets

    Tasklets are built on softirqs. They let you schedule small pieces of work that run later in softirq context.

    They are good for:

    • Short deferred work
    • When order doesn’t matter
    • When you don’t need to sleep

    Schedule a tasklet with:

    tasklet_schedule(&my_tasklet);
    

    Workqueues

    Workqueues are a more flexible deferred work mechanism.

    They allow:

    • Sleeping
    • Blocking
    • Running in process context

    Workqueues are usually the choice when you want to handle heavier processing.

    Here’s how you use them:

    INIT_WORK(&my_work, my_work_fn);
    schedule_work(&my_work);
    

    So the flow looks like:

    1. ISR triggers
    2. ISR schedules work in a workqueue
    3. Workqueue function runs later in normal process context

    This is clean interrupt event management.

    12. Interrupt Event Management

    Now let’s talk about interrupt event management. That’s the broader view of how a system handles interrupts from start to finish.

    Interrupt event management covers:

    • Detecting the interrupt event
    • Dispatching it to the right handler
    • Minimizing latency
    • Deferring heavy work
    • Cleaning up properly

    Good interrupt event management ensures your system:

    • Responds quickly
    • Doesn’t miss important events
    • Doesn’t hog CPU time
    • Doesn’t block other tasks unnecessarily

    In Linux, most of this is handled by the kernel’s interrupt subsystem. As a driver developer, your job is to plug into that system properly and cleanly.

    13. Tips for Better Interrupt Handling

    Here are practical tips that experienced developers use:

    1. Keep ISRs Short

    Don’t process data in the ISR. Acknowledge the interrupt, record minimal info, then defer work.

    2. Use Workqueues for Heavy Work

    If you need to process lots of data or interact with kernel APIs that sleep, use workqueues.

    3. Prioritize Latency‑Sensitive Code

    If your application is real‑time or latency critical, test how interrupt handlers affect performance.

    4. Avoid Blocking Calls in Interrupt Context

    Blocking in an interrupt can crash the kernel.

    5. Test With Real Hardware

    Simulators are good, but nothing beats testing on real devices.

    14. Common Mistakes and How to Avoid Them

    New developers often make these mistakes:

    Doing Heavy Work in ISR

    Remember: ISR is not a place for business logic.

    Forgetting to Acknowledge the Interrupt

    If you don’t clear the interrupt source in hardware, the interrupt can repeat endlessly.

    Blocking in ISR

    You are in interrupt context. Blocking can deadlock the system.

    Not Handling Shared IRQs

    Some platforms share IRQ lines. Always check if the interrupt belongs to your device.

    Interview Questions & Answers on Interrupt Handling

    Round 1: Fundamental / Basic Level

    These questions test your understanding of the core concepts.

    1. What is an interrupt?

    Answer:
    An interrupt is a signal to the CPU that something needs its immediate attention. Instead of constantly checking (polling) for events, the CPU can pause its current task and handle the event triggered by the interrupt.

    2. Why do we need interrupts?

    Answer:
    Interrupts improve system efficiency. Without interrupts, the CPU would waste time polling devices. Interrupts allow the CPU to do other tasks and respond only when an event occurs.

    3. What are the types of interrupts?

    Answer:

    • Hardware interrupts: Triggered by devices like keyboards, timers, network cards, sensors.
    • Software interrupts: Triggered by software instructions or system calls.

    4. What is an ISR?

    Answer:
    ISR stands for Interrupt Service Routine. It’s a special function that executes when an interrupt occurs. Its job is to handle the interrupt quickly and return control to the CPU.

    5. What is interrupt latency?

    Answer:
    Interrupt latency is the time delay between when an interrupt occurs and when the ISR actually starts executing. Lower latency means faster response.

    6. Can an ISR sleep or block in Linux?

    Answer:
    No. ISR runs in interrupt context, where sleeping or blocking is not allowed. That’s why we use deferred routines for heavy work.

    7. What are deferred routines?

    Answer:
    Deferred routines are mechanisms to postpone heavy or non-urgent work outside the ISR. In Linux, these include tasklets and workqueues.

    8. What is the difference between tasklets and workqueues?

    Answer:

    • Tasklets: Lightweight, run in softirq context, cannot sleep.
    • Workqueues: Run in process context, can sleep, used for heavier tasks.

    9. What is the difference between polling and interrupts?

    Answer:

    • Polling: CPU continuously checks if a device needs attention → wastes CPU cycles.
    • Interrupts: Device notifies CPU only when action is required → efficient.

    10. What is the difference between hardware and software interrupts?

    Answer:

    • Hardware: Generated by external devices.
    • Software: Generated by software instructions, like int in x86 or system calls.

    11. Can multiple interrupts occur at the same time?

    Answer:
    Yes. The CPU uses interrupt priority to decide which one to handle first. Lower priority interrupts wait until higher priority interrupts are serviced.

    12. What is an interrupt vector?

    Answer:
    It’s a memory address pointing to the ISR corresponding to a specific interrupt.

    13. What is edge-triggered vs level-triggered interrupt?

    Answer:

    • Edge-triggered: Interrupt triggers on signal change (rising/falling edge).
    • Level-triggered: Interrupt triggers when signal stays high or low.

    14. What is nested interrupts?

    Answer:
    Nested interrupts allow higher priority interrupts to interrupt a currently running ISR. It improves responsiveness for critical events.

    15. What is masking and unmasking interrupts?

    Answer:
    Masking disables interrupts temporarily to avoid conflicts; unmasking allows interrupts to be received again.

    16. Why should ISR be kept short?

    Answer:
    Long ISRs block other interrupts and degrade system performance. Heavy work should be deferred.

    17. What is interrupt context vs process context?

    Answer:

    • Interrupt context: ISR runs here, cannot sleep, temporary execution.
    • Process context: Normal kernel or user process execution, can sleep, block, or perform long tasks.

    18. What is a spurious interrupt?

    Answer:
    An interrupt that occurs without a valid cause, usually due to hardware noise or misconfiguration.

    19. What is IRQ in Linux?

    Answer:
    IRQ stands for Interrupt Request Line. It’s a hardware line that signals the CPU when a device needs attention.

    20. How does Linux manage interrupts?

    Answer:
    Linux uses a layered approach:

    1. Hardware triggers an interrupt → CPU jumps to ISR.
    2. ISR handles minimal work.
    3. Deferred routines (bottom halves, tasklets, workqueues) handle heavy work.

    Round 2: Advanced / Practical Level

    These are scenario-based, Linux, and driver-level questions.

    21. How do you register an interrupt handler in Linux?

    Answer:
    Use request_irq():

    int request_irq(unsigned int irq, irq_handler_t handler,
                    unsigned long flags, const char *name, void *dev);
    

    Example:

    request_irq(dev->irq, my_device_isr, 0, "my_device", dev);
    

    22. How do you release an interrupt handler?

    Answer:
    Use free_irq():

    free_irq(dev->irq, dev);
    

    23. How to check which device triggered a shared IRQ?

    Answer:
    In the ISR, read the device’s status register. If no event is pending, return IRQ_NONE.

    24. Explain bottom halves in Linux.

    Answer:
    Bottom halves defer work from ISR. They are mechanisms like softirqs, tasklets, or workqueues. They allow longer processing outside the critical interrupt context.

    25. What are softirqs?

    Answer:
    Softirqs are lightweight kernel mechanisms that allow deferred work at a higher priority than tasklets. They run in interrupt context and cannot sleep.

    26. When would you use workqueues instead of tasklets?

    Answer:
    Use workqueues when:

    • You need to sleep/block.
    • Tasklets are not enough for heavy processing.

    27. How do you handle high-frequency interrupts efficiently?

    Answer:

    • Keep ISR minimal.
    • Use deferred routines.
    • Consider interrupt coalescing if supported.
    • Avoid unnecessary hardware polling.

    28. What is interrupt storm and how to prevent it?

    Answer:

    • Interrupt storm: Too many interrupts overwhelm the CPU.
    • Prevention: Mask interrupts temporarily, coalesce events, optimize ISR.

    29. How do you debug interrupt handlers in Linux?

    Answer:

    • Use printk() for logging.
    • Use cat /proc/interrupts to check counts.
    • Use ftrace or perf to trace ISR execution.
    • Ensure minimal logging in ISR to avoid latency.

    30. Explain nested interrupts in Linux.

    Answer:
    Linux allows higher priority interrupts to preempt lower ones. Nested interrupts are managed by interrupt controller hardware (APIC) and kernel.

    31. What are spurious interrupts and how do you handle them?

    Answer:
    Spurious interrupts occur due to noise or hardware bugs. Handle them by verifying device status in ISR and returning IRQ_NONE if not valid.

    32. How does Linux handle shared interrupts?

    Answer:
    Multiple devices can share an IRQ. Each ISR checks its device status. If the interrupt does not belong to the device, return IRQ_NONE.

    33. Difference between hard and soft interrupt in Linux.

    Answer:

    • Hard interrupt: Hardware-triggered, handled immediately by ISR.
    • Soft interrupt (softirq): Deferred work, runs in kernel context.

    34. How do you minimize ISR execution time?

    Answer:

    • Handle only critical tasks in ISR.
    • Defer processing to workqueues/tasklets.
    • Avoid heavy loops and blocking calls.
    • Preallocate buffers if needed.

    35. Explain interrupt event management in Linux.

    Answer:
    It’s the end-to-end handling of interrupts: detection, dispatch, acknowledgment, deferral, and cleanup. Proper management ensures minimal latency, efficiency, and stability.

    36. Can user-space handle interrupts?

    Answer:
    Directly, no. User-space cannot access IRQ lines. But UIO (Userspace I/O) allows limited handling in user space via mapped devices.

    37. How do you acknowledge an interrupt in Linux?

    Answer:
    Acknowledgment is usually done by writing to a device-specific register inside the ISR to clear the interrupt source.

    38. What are edge-triggered and level-triggered interrupts?

    Answer:

    • Edge-triggered: Occurs on signal change.
    • Level-triggered: Occurs while signal remains high/low.

    39. How does deferred routine improve system performance?

    Answer:
    By moving heavy work out of ISR, the CPU is free to handle other interrupts or processes, reducing latency and improving responsiveness.

    40. Explain interrupt priority.

    Answer:
    High-priority interrupts can preempt lower-priority ones. Priority is managed by hardware interrupt controller (like APIC on x86).

    41. How do you handle interrupts for multiple devices sharing the same IRQ?

    Answer:

    • Check status registers of each device in ISR.
    • Execute handler only if the device actually generated the interrupt.
    • Return IRQ_NONE for devices not causing the interrupt.

    42. What is the difference between IRQF_SHARED and IRQF_DISABLED?

    Answer:

    • IRQF_SHARED: Marks that IRQ can be shared among devices.
    • IRQF_DISABLED: (deprecated) disables local interrupts during ISR to avoid reentry.

    43. Can interrupts be masked globally?

    Answer:
    Yes. CPUs can disable all interrupts temporarily, but this should be minimal to avoid latency problems.

    44. How do you measure interrupt latency in Linux?

    Answer:
    Use tools like cyclictest, ftrace, or perf to measure the time between interrupt occurrence and ISR execution.

    45. What is interrupt storm and how do you debug it?

    Answer:
    An interrupt storm happens when a device continuously generates interrupts. Debug with /proc/interrupts, reduce ISR execution time, or coalesce interrupts in hardware.

    FAQ : Interrupt Handling

    1. What is interrupt handling?

    Answer:
    Interrupt handling is how a CPU responds to signals from hardware or software that need immediate attention. It ensures the system reacts quickly without constantly checking devices.

    2. Why are interrupts important in embedded systems?

    Answer:
    Interrupts make systems efficient by letting the CPU focus on other tasks until a device signals it needs attention. This reduces wasted CPU cycles and improves system responsiveness.

    3. What is an ISR?

    Answer:
    ISR stands for Interrupt Service Routine. It’s the function that runs when an interrupt occurs. The ISR handles only critical work and usually schedules heavier tasks elsewhere.

    4. Can ISRs sleep or block in Linux?

    Answer:
    No. ISRs run in interrupt context where sleeping or blocking is not allowed. Heavy processing should be deferred using tasklets or workqueues.

    5. What are deferred routines?

    Answer:
    Deferred routines are mechanisms to move heavy or non-urgent work out of the ISR. In Linux, deferred routines include softirqs, tasklets, and workqueues.

    6. What is the difference between hardware and software interrupts?

    Answer:

    • Hardware interrupts come from devices like keyboards, timers, or network cards.
    • Software interrupts are triggered by software instructions or system calls.

    7. What is interrupt latency?

    Answer:
    Interrupt latency is the delay between when an interrupt occurs and when its ISR starts executing. Minimizing latency is important for real-time systems.

    8. What is the difference between edge-triggered and level-triggered interrupts?

    Answer:

    • Edge-triggered: Occurs on a signal change (rising/falling edge).
    • Level-triggered: Occurs while the signal is high or low.

    9. How does Linux manage shared interrupts?

    Answer:
    Multiple devices can share an IRQ line. Each ISR checks its device’s status. If the interrupt belongs to another device, the ISR returns IRQ_NONE.

    10. What are tasklets and workqueues?

    Answer:

    • Tasklets: Lightweight deferred routines that run in softirq context, cannot sleep.
    • Workqueues: Run in process context, can sleep, used for heavier processing outside the ISR.

    11. How do you register an interrupt handler in Linux?

    Answer:
    You use the request_irq() function:

    request_irq(dev->irq, my_isr, 0, "device_name", dev);
    

    After this, Linux will call my_isr whenever that IRQ occurs.

    12. How do you release an interrupt handler?

    Answer:
    Use free_irq() when your module unloads:

    free_irq(dev->irq, dev);
    

    This prevents dangling references and ensures system stability.

    13. What is interrupt event management?

    Answer:
    Interrupt event management is the end-to-end process of detecting, handling, deferring, and cleaning up interrupts. Proper management ensures low latency, system stability, and efficiency.

    14. What is a spurious interrupt?

    Answer:
    A spurious interrupt happens without a valid cause, often due to hardware noise or misconfiguration. The ISR should verify the source and return IRQ_NONE if no real event exists.

    15. How do you avoid long ISRs?

    Answer:

    • Handle only critical work in ISR.
    • Use deferred routines like tasklets or workqueues for heavy processing.
    • Preallocate resources to avoid dynamic memory allocation in ISR.

    16. Can userspace handle interrupts?

    Answer:
    Not directly. However, UIO (Userspace I/O) allows user-space programs to receive device interrupts via kernel mapping.

    Read More about Process : What is is Process

    Read More about System Call in Linux : What is System call

    Read More about IPC : What is IPC