Learn how to set up your dev environment for drone programming step by step. Python, VSCode, MAVSDK, DroneKit, PX4, ArduPilot, simulators and more.
If you’ve ever watched a drone glide autonomously through the air, navigate obstacles, or execute a precise waypoint mission and thought “I want to build that software” this guide is exactly where you need to start.
Setting up your dev environment for drone programming is the foundation everything else rests on. Get it wrong and you’ll spend hours debugging weird errors that have nothing to do with your actual drone code. Get it right and the whole experience becomes surprisingly smooth even as a beginner.
This guide walks you through everything from scratch: what drone software actually is, how it works, which OS to pick, installing Python, setting up VSCode, configuring Git, understanding virtual environments, installing MAVSDK and DroneKit, getting PX4 or ArduPilot running in simulation, and finally writing and running your first drone script. No steps skipped. No hand-waving.
By the end, you’ll have a working drone development environment on your machine and a clear mental model of how all the pieces fit together.
What Is Drone Programming and How Does Drone Software Work?
Drone programming is the act of writing software that controls the behavior of unmanned aerial vehicles (UAVs). This ranges from low-level firmware running on flight controllers to high-level mission scripts running on companion computers or ground stations.
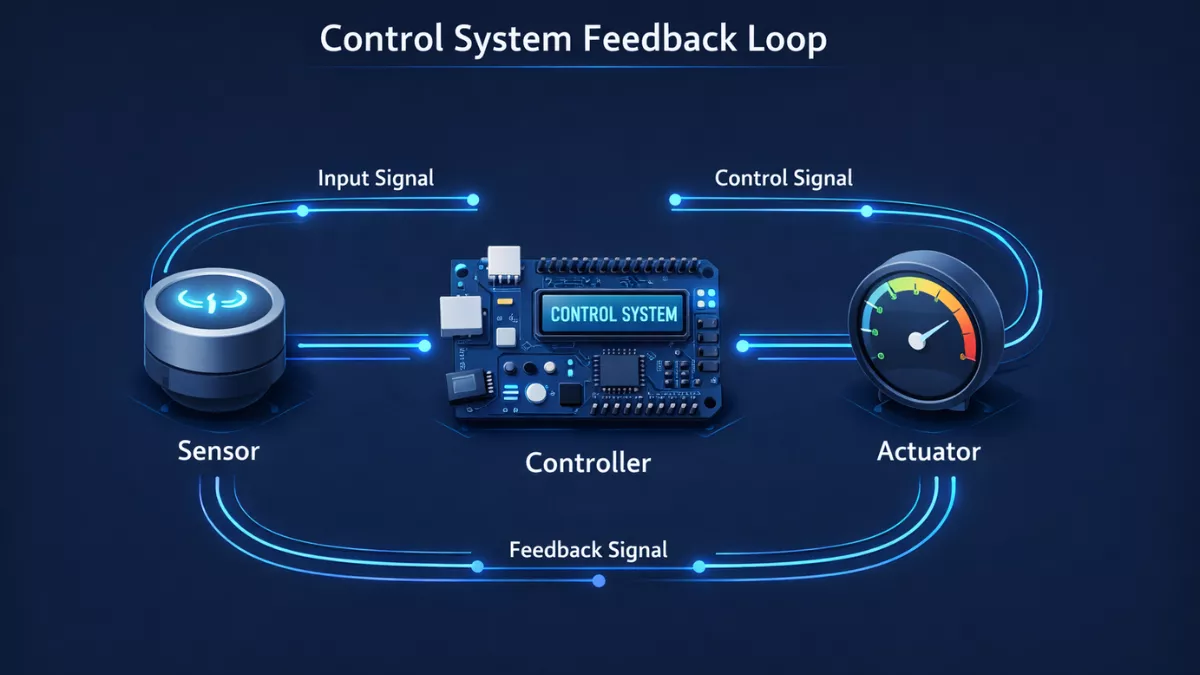
At a basic level, a drone has sensors (GPS, IMU, barometer, compass), actuators (motors and ESCs), and a flight controller a microcontroller that runs flight firmware and translates inputs into motor commands. What we’re building as drone software developers sits mostly above that flight controller layer.
The typical drone software stack looks like this:
- Flight firmware : PX4 or ArduPilot running on the flight controller hardware (Pixhawk, Cube, etc.)
- Communication protocol : MAVLink, the protocol both firmwares use to exchange data between the drone and external software
- Ground control software : Mission Planner, QGroundControl, or custom apps that communicate over MAVLink
- Autonomous mission scripts : Python scripts using DroneKit, MAVSDK, or custom MAVLink handlers to control flight behavior programmatically
When you write a Python script that says “take off to 10 meters, fly to waypoint A, then land,” your script sends MAVLink messages to the flight controller. The flight controller handles the physical job of actually flying the drone based on those commands. Your code is the brain; the firmware is the muscle.
Understanding this separation is crucial. You’re not programming the motors directly. You’re programming the intent and the flight firmware turns that intent into real physical motion.
Understanding Drone Architecture: The Big Picture
Before diving into tools, it helps to understand what you’re actually building toward. Here’s a simplified view of drone system architecture:
Companion computer : a small Linux computer (like Raspberry Pi or Nvidia Jetson) mounted on the drone that runs your Python scripts. It communicates with the flight controller over a serial (UART) or USB connection using MAVLink.
Flight controller : runs PX4 or ArduPilot firmware. Manages stabilization, GPS navigation, motor control. Receives MAVLink commands from the companion computer or ground control station.
Ground Control Station (GCS) : your laptop running Mission Planner or QGroundControl. Sends commands, reads telemetry, plans waypoint missions.
Telemetry radio : wireless MAVLink link between drone and GCS. Typically 433 MHz or 915 MHz for outdoor range.
In development mode, you usually skip the physical drone entirely and run everything in simulation using SITL (Software in the Loop) — PX4 SITL or ArduPilot SITL. Your Python script thinks it’s talking to a real drone. The simulator thinks it’s a real flight controller. The physics engine handles what would happen in the real world. This lets you test code safely without crashing anything.
Why Your Development Environment Matters More Than You Think
A lot of beginners jump straight into writing drone code before properly setting up their environment. They install Python system-wide, don’t use virtual environments, mix library versions, skip Git, and write scripts in Notepad. Then they spend three days debugging a DroneKit version conflict that had nothing to do with their actual code.
A clean, properly structured development environment:
- Prevents version conflicts between Python packages
- Makes it easy to switch between PX4 and ArduPilot projects without breaking anything
- Gives you proper debugging tools so you can actually find bugs
- Makes collaboration with teammates straightforward through Git
- Mirrors professional drone development practices used in real companies
Investing 2-3 hours to set this up correctly will save you dozens of hours of frustration later.
Choosing the Right Operating System for Drone Development
This is one of the first decisions you’ll make, and it matters quite a bit. Let’s be honest about each option.
Ubuntu Linux (Best Overall Choice)
Ubuntu, specifically Ubuntu 22.04 LTS, is the gold standard for drone development. Nearly all drone development toolchains — PX4, ArduPilot, Gazebo simulator — are primarily developed and tested on Ubuntu. You’ll find the most documentation, the most support, and the fewest setup headaches on Ubuntu.
If you’re serious about drone software development professionally, Ubuntu is what you should be using. Most real-world drone companies run Ubuntu on their development machines and companion computers. Getting comfortable with Linux now is an investment that pays off hugely.
Windows (Works, But Adds Friction)
Windows is usable, especially since the introduction of WSL2 (Windows Subsystem for Linux). You can run Ubuntu inside Windows, which gets you close to a native Linux experience for the command-line toolchain. Many beginners start here because it’s familiar.
The friction points: USB and serial port handling in WSL2 requires extra steps with usbipd. Some PX4 SITL components don’t behave exactly as expected. Build times are slower. Driver issues for USB-to-serial adapters are more common.
If you’re on Windows, WSL2 with Ubuntu 22.04 is the recommended path rather than trying to run everything natively. Or dual-boot — keep Windows for everyday use and boot into Ubuntu when doing drone dev work.
macOS (Decent for High-Level Development)
macOS is reasonably good for Python-based drone scripting with MAVSDK or DroneKit. Most Python tooling works well. Homebrew makes installing dependencies straightforward.
Where macOS falls short is the full simulation stack. Running Gazebo with PX4 SITL on macOS is significantly more painful than on Ubuntu. It’s possible, but expect more troubleshooting. For pure Python scripting against a simulator running in a VM or remote machine, macOS is fine. For building the full local simulation environment, Ubuntu is much easier.
Quick Comparison
| Feature | Ubuntu 22.04 | Windows + WSL2 | macOS |
|---|---|---|---|
| PX4 SITL | Excellent | Good (with setup) | Difficult |
| ArduPilot SITL | Excellent | Good | Good |
| Gazebo Simulator | Excellent | Moderate | Poor |
| Python/MAVSDK | Excellent | Excellent | Excellent |
| USB/Serial | Simple | Extra steps needed | Good |
| Overall for beginners | Best | Acceptable | Acceptable |
The recommendation is clear: use Ubuntu 22.04 LTS if you can. If you’re locked to Windows, use WSL2. If you’re on macOS, you can still follow most of this guide — just be aware of the simulator limitations.
Hardware Requirements for Drone Development
You don’t need a powerful machine to get started, but simulation adds overhead. Here’s what works:
- Minimum: Intel Core i5 (6th gen or newer), 8 GB RAM, 50 GB free SSD space
- Recommended: Intel Core i7 or AMD Ryzen 7, 16 GB RAM, 100 GB SSD, dedicated GPU
- For Gazebo simulation: The GPU matters significantly. A dedicated NVIDIA or AMD GPU makes Gazebo much smoother.
If your machine is on the lower end, don’t worry. You can run ArduPilot SITL without Gazebo (just the plain SITL with no 3D visualization) and that works fine on modest hardware.
Installing Python: The Right Way
Python is the dominant language for drone scripting. Both DroneKit and MAVSDK have Python SDKs, and the ecosystem of supporting libraries (NumPy, asyncio, logging tools) makes Python the natural choice for most drone automation work.
Which Python Version to Use
Use Python 3.10 or Python 3.11. As of 2025-2026, these are the sweet spots — stable, widely supported by all major drone libraries, and not so new that you’ll hit compatibility edges.
Avoid Python 3.12+ for now unless you’ve specifically confirmed your target libraries support it. MAVSDK and DroneKit both have specific version requirements and sometimes lag behind the absolute latest Python releases.
Never use Python 2. It’s dead. DroneKit originally required Python 2 but has long since moved on.
Installing Python on Ubuntu
sudo apt update
sudo apt install python3.11 python3.11-venv python3.11-dev python3-pip -y
Check it installed correctly:
python3.11 --version
# Should output: Python 3.11.x
Ubuntu ships with a system Python. You don’t want to mess with that. Always use virtual environments (covered shortly) for your projects so your system Python stays clean.
Installing Python on Windows
Download the installer from python.org. During installation, check the box that says “Add Python to PATH.” This is critical — without it, you’ll get “python is not recognized” errors in the terminal.
After installation, open Command Prompt and verify:
python --version
pip --version
If using WSL2, install Python inside your WSL2 Ubuntu environment using the same apt commands as above. Don’t mix Windows Python and WSL2 Python — keep everything in WSL2 for drone development.
Installing Python on macOS
Use Homebrew (the standard macOS package manager):
brew install python@3.11Then add it to your PATH in your .zshrc or .bashrc:
export PATH="/opt/homebrew/opt/python@3.11/bin:$PATH"Setting Up PATH Variables
PATH is the list of directories your shell searches when you type a command. If Python or pip isn’t in your PATH, commands won’t work even if Python is installed.
On Linux/macOS, edit your shell config file (usually ~/.bashrc or ~/.zshrc) and add:
export PATH="$HOME/.local/bin:$PATH"This ensures pip-installed tools are accessible globally. After editing, reload with:
source ~/.bashrcInstalling and Configuring VSCode for Drone Development
Visual Studio Code is the editor of choice for drone development. It’s free, lightweight, has excellent Python support, a powerful debugger, integrated terminal, and a massive extension ecosystem. Professional drone developers use it. Beginners find it approachable. It’s the right tool.
Installation
Download from code.visualstudio.com. On Ubuntu, install via the .deb package or snap:
sudo snap install code --classicOn Windows and macOS, use the installer from the website.
Essential Extensions for Python and Drone Development
After installing VSCode, install these extensions. Open the Extensions sidebar (Ctrl+Shift+X) and search for each:
- Python (Microsoft) — Essential. Provides IntelliSense, linting, debugging, and virtual environment support. Install this first.
- Pylance — Advanced Python language server. Gives much better type checking and autocomplete than the base Python extension.
- Python Debugger — Adds the debug adapter for step-through debugging Python scripts.
- GitLens — Supercharges Git integration. Shows who changed what line, when, and why. Invaluable for team projects.
- Git Graph — Visual branch history. Makes understanding your Git state much clearer.
- Remote – WSL — If on Windows with WSL2, this lets you open and edit files inside your WSL2 environment directly in VSCode.
- Serial Monitor — Useful when connecting to real hardware over USB serial.
- YAML (Red Hat) — Drone configuration files are often YAML. This extension gives syntax highlighting and validation.
- Prettier — Code formatter. Keeps your code style consistent.
- indent-rainbow — Colors indentation levels. Python is indentation-sensitive, so this helps catch errors visually.
Configuring VSCode Python Interpreter
After creating a virtual environment (covered in the next section), you need to tell VSCode which Python interpreter to use. Press Ctrl+Shift+P, type “Python: Select Interpreter,” and choose the one inside your project’s .venv folder. VSCode will then use that environment for linting, autocomplete, and debugging.
Setting Up the VSCode Debugger
The debugger is one of VSCode’s most powerful features and something beginners frequently skip. Don’t skip it.
Create a .vscode/launch.json file in your project root:
{
  "version": "0.2.0",
  "configurations": [
    {
      "name": "Python: Drone Script",
      "type": "debugpy",
      "request": "launch",
      "program": "${file}",
      "console": "integratedTerminal",
      "env": {
        "PYTHONPATH": "${workspaceFolder}"
      }
    }
  ]
}
Now press F5 to start debugging any Python file. You can set breakpoints by clicking the gutter (the space left of line numbers), and execution will pause there so you can inspect variables. This is enormously helpful when debugging drone telemetry parsing or connection logic.
VSCode Terminal Tips
Open the integrated terminal with Ctrl+` (backtick). You can have multiple terminals open simultaneously — run your SITL simulator in one, your Python script in another, and watch logs in a third. Split terminals with the split icon in the terminal panel. This multi-terminal workflow is something professional drone developers use constantly.
Installing Git and Understanding GitHub Workflow
Git is the version control system every developer needs. It tracks changes to your code, lets you roll back mistakes, collaborate with others, and maintain a clean history of what you did and why.
Installing Git
On Ubuntu:
sudo apt install git -yOn Windows, download Git for Windows from git-scm.com. It includes Git Bash, a terminal that understands Git commands.
On macOS, Xcode Command Line Tools include Git, or install via Homebrew:
brew install gitConfigure your identity after installing:
git config --global user.name "Your Name"
git config --global user.email "you@example.com"
Git Basics Every Drone Developer Should Know
You don’t need to memorize all of Git. Learn these core commands and you’ll handle 90% of day-to-day work:
# Initialize a new repository
git init

# Check what's changed
git status

# Stage changes
git add .

# Commit with a message
git commit -m "Add waypoint mission script"

# See commit history
git log --oneline

# Create a branch for a new feature
git checkout -b feature/obstacle-avoidance

# Switch back to main
git checkout main

# Push to GitHub
git push origin main
GitHub Beginner Workflow
Create a GitHub account at github.com. Then for each new project:
- Create a new repository on GitHub (click the + icon, “New repository”)
- Clone it locally:
git clone https://github.com/yourusername/drone-project.git - Write code, run it, fix bugs
- Stage and commit:
git add . && git commit -m "Describe what you did" - Push to GitHub:
git push origin main
Get in the habit of committing often with descriptive messages. “Fix connection timeout issue in MAVSDK telemetry handler” is a useful commit message. “Fix stuff” is not. Future-you will thank present-you.
Creating Your First Drone Project: Folder Structure
Professional drone projects have a consistent folder structure. Here’s what works well:
drone-project/
├── .venv/              # Virtual environment (not committed to Git)
├── .vscode/            # VSCode settings
│   └── launch.json
├── .gitignore          # Files to exclude from Git
├── README.md           # Project description
├── requirements.txt    # Python dependencies
├── config/             # Configuration files (YAML, JSON)
│   └── mission.yaml
├── src/                # Source code
│   ├── connection.py   # Connection handling
│   ├── telemetry.py    # Telemetry reading
│   └── mission.py      # Mission execution
├── tests/              # Test scripts
│   └── test_connection.py
└── logs/               # Log output (not committed to Git)
Create your .gitignore file to exclude things you don’t want in Git:
.venv/
__pycache__/
*.pyc
logs/
*.log
.env
Python Virtual Environments: Why They Matter and How to Set Them Up
A virtual environment is an isolated Python environment for a specific project. It has its own installed packages separate from your system Python and separate from other projects. This is not optional in professional development — it’s standard practice.
Without virtual environments, you install DroneKit globally on your system. Then you try to install MAVSDK for a different project and it conflicts with a dependency DroneKit needs. Now neither works. With virtual environments, each project has its own sandbox.
Creating a Virtual Environment
# Navigate to your project folder
cd drone-project

# Create the virtual environment
python3.11 -m venv .venv
This creates a .venv folder inside your project. It contains its own Python interpreter and pip.
Activating the Virtual Environment
On Linux/macOS:
source .venv/bin/activateOn Windows (Command Prompt):
.venv\Scripts\activateOn Windows (PowerShell):
.venv\Scripts\Activate.ps1After activation, your terminal prompt shows (.venv) at the start. Any pip install commands now install into this environment, not system-wide.
Deactivating
deactivateManaging Dependencies with pip and requirements.txt
Install packages with pip while your venv is active:
pip install mavsdkSave your dependencies to requirements.txt so others (or future you) can recreate the environment:
pip freeze > requirements.txtTo recreate the environment from requirements.txt on a new machine:
python3.11 -m venv .venv
source .venv/bin/activate
pip install -r requirements.txt
Always commit requirements.txt to Git. Never commit the .venv folder itself — it’s too large and platform-specific.
MAVLink Explained Simply
MAVLink (Micro Air Vehicle Link) is the communication protocol used by PX4 and ArduPilot to send and receive data. Think of it as the language your drone speaks.
MAVLink messages are small, efficient binary packets. Each message has a type (like HEARTBEAT, GLOBAL_POSITION_INT, COMMAND_LONG) and a payload containing the actual data. When PX4 sends a GLOBAL_POSITION_INT message, it contains the current latitude, longitude, altitude, and velocity. When you send a COMMAND_LONG message with the right parameters, you’re telling the flight controller to take off, land, or fly to a waypoint.
You don’t usually write raw MAVLink directly. Libraries like DroneKit and MAVSDK handle that for you, giving you clean Python APIs. But understanding MAVLink helps enormously when debugging — because when something doesn’t work, you often need to look at the raw message exchange to understand why.
The two versions to know:
- MAVLink 1 — older, smaller packets, widely supported
- MAVLink 2 — newer, adds message signing, better packet IDs. PX4 and ArduPilot both support MAVLink 2. MAVSDK uses MAVLink 2.
Installing MAVSDK: The Modern Way to Control Drones with Python
MAVSDK is the modern, actively maintained SDK for drone control over MAVLink. It has official support for Python, C++, Swift, and other languages. For new projects, MAVSDK is the recommended starting point over DroneKit.
Why MAVSDK Over DroneKit?
DroneKit is older (developed by 3DR) and hasn’t had active maintenance in several years. It works for ArduPilot, but has issues with newer MAVLink versions and PX4. MAVSDK is actively developed, supports both PX4 and ArduPilot, uses async Python (asyncio), and handles connection management much more robustly.
That said, DroneKit is still widely used in ArduPilot projects and there’s a huge amount of existing code and tutorials for it. We’ll cover installing both.
Installing MAVSDK Python
Make sure your virtual environment is activated, then:
pip install mavsdkThat’s it. MAVSDK Python ships with the MAVSDK server binary included, so you don’t need a separate server installation.
Your First MAVSDK Script
import asyncio
from mavsdk import System

async def run():
    drone = System()
    await drone.connect(system_address="udp://:14540")

    print("Waiting for drone to connect...")
    async for state in drone.core.connection_state():
        if state.is_connected:
            print("Drone connected!")
            break

    print("Waiting for global position estimate...")
    async for health in drone.telemetry.health():
        if health.is_global_position_ok and health.is_home_position_ok:
            print("Global position ok")
            break

    print("Arming drone...")
    await drone.action.arm()

    print("Taking off...")
    await drone.action.takeoff()

    await asyncio.sleep(10)

    print("Landing...")
    await drone.action.land()

if __name__ == "__main__":
    asyncio.run(run())
This script connects to a simulated drone (more on simulator setup shortly), arms it, takes off, waits 10 seconds, and lands. Clean, readable, async.
Installing DroneKit: The ArduPilot Workhorse
DroneKit is the go-to library if you’re working with ArduPilot. Many real-world ArduPilot projects use it, and there’s a large body of documentation and community support.
Installing DroneKit Python
pip install dronekitFor connection to serial hardware (real drone), also install:
pip install dronekit-sitldronekit-sitl is a Python wrapper around ArduPilot SITL that spins up the simulator directly from Python, which is convenient for quick testing.
Your First DroneKit Script
from dronekit import connect, VehicleMode
import time

# Connect to simulator
vehicle = connect('127.0.0.1:14550', wait_ready=True)

print(f"Vehicle mode: {vehicle.mode.name}")
print(f"Armed: {vehicle.armed}")
print(f"GPS: {vehicle.gps_0}")
print(f"Battery: {vehicle.battery}")
print(f"Location: {vehicle.location.global_frame}")

# Arm and take off
vehicle.mode = VehicleMode("GUIDED")
vehicle.armed = True

while not vehicle.armed:
    print("Waiting to arm...")
    time.sleep(1)

print("Arming complete. Taking off...")
vehicle.simple_takeoff(10)  # Take off to 10 meters

while True:
    altitude = vehicle.location.global_relative_frame.alt
    print(f"Altitude: {altitude:.1f}m")
    if altitude >= 9.5:
        print("Target altitude reached")
        break
    time.sleep(1)

vehicle.close()
Notice the difference from MAVSDK: DroneKit is synchronous (no async/await). It’s simpler to follow for beginners but can cause blocking issues in complex applications.
Setting Up PX4 for Development
PX4 is one of the two major open-source flight stacks. It’s widely used in commercial drones, research platforms, and custom builds. The PX4 development setup on Ubuntu involves building the firmware from source and running the SITL simulator.
PX4 Development Setup on Ubuntu 22.04
First, clone the PX4 repository:
git clone https://github.com/PX4/PX4-Autopilot.git --recursive
cd PX4-Autopilot
Run the automatic dependency installer:
bash ./Tools/setup/ubuntu.shThis installs all required packages including GCC toolchains, CMake, and Python dependencies. It takes a few minutes. You may need to reboot after this.
PX4 SITL Setup
SITL (Software in the Loop) runs the PX4 firmware as a process on your computer, simulating all sensors and flight dynamics:
# From the PX4-Autopilot directory
make px4_sitl gazebo-classic
This builds PX4 SITL with Gazebo simulation. The first build takes 10-20 minutes. Subsequent builds are much faster due to caching.
When it starts successfully, you’ll see the Gazebo window with a drone model, and terminal output showing PX4 startup messages. SITL listens on UDP port 14540 by default, which is what your MAVSDK Python scripts connect to.
For a lighter SITL without Gazebo (no visual simulation, just flight dynamics):
make px4_sitl none_irisThis starts faster and uses less CPU, making it good for pure script testing when you don’t need the 3D visualization.
Setting Up ArduPilot for Development
ArduPilot is the other major open-source flight stack. It powers ArduCopter (multirotor), ArduPlane (fixed-wing), and ArduRover (ground vehicles). The ArduPilot community is large and the documentation is excellent.
ArduPilot Setup on Ubuntu 22.04
git clone https://github.com/ArduPilot/ardupilot.git
cd ardupilot
git submodule update --init --recursive
Install dependencies:
Tools/environment_install/install-prereqs-ubuntu.sh -y
. ~/.profile
ArduPilot SITL Guide
Running ArduCopter SITL:
cd ArduCopter
sim_vehicle.py -v ArduCopter --console --map
The –console flag opens a MAVProxy terminal. The –map flag opens a moving map showing the simulated drone position. ArduPilot SITL opens a MAVLink server on UDP 14550 by default.
You can also run SITL with Gazebo for better visual simulation, but for most DroneKit scripting, the plain SITL with console and map is more than sufficient.
Gazebo Simulator Setup
Gazebo is a 3D robotics simulator that integrates with both PX4 and ArduPilot to provide realistic visual simulation including physics, camera sensors, LIDAR, and environmental effects.
There are two versions in common use:
- Gazebo Classic (formerly Gazebo 11) — still widely used with PX4, the version you’ll encounter most in PX4 SITL tutorials
- Gazebo Harmonic (modern Gazebo) — the new generation, better maintained, more features
For PX4 development, Gazebo Classic is installed automatically by the ubuntu.sh setup script. For ArduPilot, follow the ArduPilot Gazebo plugin installation guide in their documentation.
Gazebo is GPU-hungry. If simulation is slow, lower the simulation quality or use SITL without Gazebo for script testing.
Connecting Simulators to Python Scripts
Once your SITL is running, connecting from Python is straightforward.
MAVSDK connecting to PX4 SITL
await drone.connect(system_address="udp://:14540")DroneKit connecting to ArduPilot SITL
vehicle = connect('127.0.0.1:14550', wait_ready=True)Using MAVProxy as a router
MAVProxy is a command-line ground control station that can also act as a MAVLink router — splitting one MAVLink stream to multiple clients. This is useful when you want both a GCS (like QGroundControl) and your Python script connected simultaneously:
mavproxy.py --master=udp:127.0.0.1:14550
            --out=127.0.0.1:14551
            --out=127.0.0.1:14552
Now connect QGroundControl to port 14551 and your Python script to port 14552. Both can send commands and receive telemetry simultaneously.
Reading Telemetry Data
Telemetry is the stream of data coming from the drone — position, velocity, attitude, battery, GPS health, etc. Reading telemetry is usually the first thing a drone script does.
Reading Telemetry with MAVSDK
async def read_telemetry(drone):
    async for position in drone.telemetry.position():
        print(f"Latitude: {position.latitude_deg:.6f}")
        print(f"Longitude: {position.longitude_deg:.6f}")
        print(f"Altitude: {position.absolute_altitude_m:.2f}m")
        break  # Just read one sample

    async for battery in drone.telemetry.battery():
        print(f"Battery: {battery.remaining_percent:.1%}")
        break

    async for gps_info in drone.telemetry.gps_info():
        print(f"GPS fix type: {gps_info.fix_type}")
        print(f"Satellites: {gps_info.num_satellites}")
        break
Reading Telemetry with DroneKit
print(f"GPS: {vehicle.gps_0}")
print(f"Battery: {vehicle.battery.voltage}V")
print(f"Altitude: {vehicle.location.global_relative_frame.alt}m")
print(f"Heading: {vehicle.heading}")
print(f"Airspeed: {vehicle.airspeed} m/s")
print(f"Mode: {vehicle.mode.name}")
Sending Drone Commands
Beyond reading telemetry, you want to actually control the drone. Here’s how to send common commands.
Flying to a Waypoint with MAVSDK
from mavsdk.mission import MissionItem, MissionPlan

mission_items = []
mission_items.append(MissionItem(
    latitude_deg=47.398039859999997,
    longitude_deg=8.5455725400000002,
    relative_altitude_m=10,
    speed_m_s=10,
    is_fly_through=True,
    gimbal_pitch_deg=float('nan'),
    gimbal_yaw_deg=float('nan'),
    camera_action=MissionItem.CameraAction.NONE,
    loiter_time_s=float('nan'),
    camera_photo_interval_s=float('nan'),
    acceptance_radius_m=float('nan'),
    yaw_deg=float('nan'),
    camera_photo_distance_m=float('nan')
))

mission_plan = MissionPlan(mission_items)
await drone.mission.set_return_to_launch_after_mission(True)
await drone.mission.upload_mission(mission_plan)
await drone.action.arm()
await drone.mission.start_mission()
Flying to a Waypoint with DroneKit
from dronekit import LocationGlobalRelative
from pymavlink import mavutil

def goto_position(vehicle, lat, lon, alt):
    target = LocationGlobalRelative(lat, lon, alt)
    vehicle.simple_goto(target)

goto_position(vehicle, 47.3980398, 8.5455725, 10)
Common Connection Problems and How to Fix Them
| Problem | Cause | Fix |
|---|---|---|
| Connection timeout | SITL not running, wrong port | Start SITL first, verify port number |
| “Permission denied” on serial port | User not in dialout group | sudo usermod -a -G dialout $USER then logout/login |
| DroneKit hangs on connect() | Firewall blocking UDP, wrong address | Check firewall rules, verify address |
| MAVSDK server not found | mavsdk package not installed in venv | Activate venv, pip install mavsdk |
| Gazebo crashes on startup | GPU driver issue, insufficient VRAM | Update GPU drivers, use non-Gazebo SITL |
| PX4 build fails | Missing dependencies | Re-run ubuntu.sh, check cmake version |
| ArduPilot SITL sim_vehicle not found | PATH not updated after install | source ~/.profile |
| MAVProxy not found | Not installed | pip install MAVProxy |
Linux USB and Serial Permission Fixes
On Linux, serial ports are owned by the dialout group. If you’re connecting to real hardware over USB and get “Permission denied /dev/ttyUSB0,” run:
sudo usermod -a -G dialout $USERLog out and log back in (or reboot) for the group change to take effect. Check which port your device is on:
ls /dev/tty* | grep -E "USB|ACM"Plug and unplug your device while watching dmesg output to see which device node gets created:
sudo dmesg | tail -20Windows Driver Issues
Common USB-to-serial adapters (CP2102, CH340, FTDI) require drivers on Windows. Download from the manufacturer’s site:
- CP2102: Silicon Labs CP210x USB to UART Bridge
- CH340: WCH CH340 driver
- FTDI: FTDI D2XX drivers
After installing drivers, the device appears as COMx in Device Manager. Use this port string in DroneKit: 'COM3' or 'COM3,57600' (with baud rate).
Debugging Drone Applications
Debugging drone code has unique challenges compared to web development. The drone might be in the air when something goes wrong. Errors might be subtle — wrong coordinate units, wrong command sequence, timing issues. Here are practical debugging approaches.
Structured Logging
Use Python’s logging module instead of print statements. It gives you timestamps, log levels, and the ability to write to files:
import logging

logging.basicConfig(
    level=logging.DEBUG,
    format='%(asctime)s - %(levelname)s - %(message)s',
    handlers=[
        logging.FileHandler('logs/mission.log'),
        logging.StreamHandler()
    ]
)

logger = logging.getLogger(__name__)

logger.info("Starting mission")
logger.debug(f"GPS fix: {vehicle.gps_0}")
logger.warning("Battery below 30%")
logger.error(f"Connection failed: {e}")
MAVLink Inspector
QGroundControl has a built-in MAVLink Inspector (Analyze menu > MAVLink Inspector) that shows you all MAVLink messages in real time. When your script isn’t behaving as expected, open QGroundControl alongside your script to see what messages are actually being exchanged.
VSCode Breakpoints for Drone Scripts
Set breakpoints at critical points in your mission code — before arming, before takeoff, before each waypoint command. When execution pauses, inspect variables to verify the latitude/longitude values are correct, the vehicle mode is what you expect, and battery levels are acceptable before proceeding.
Drone Cybersecurity Basics and Safety Best Practices
Drone software development carries real safety and security responsibilities that web or mobile development doesn’t. A bug in your code can cause a drone to crash, fly away, or injure someone.
Safety Best Practices
- Always test new code in SITL simulation before flying on real hardware
- When testing on real hardware, start with low altitudes (5-10 meters) in an open area
- Have a manual override ready — know how to switch to manual mode and take over from your script
- Implement a watchdog in your code: if telemetry drops or unexpected conditions occur, command RTL (Return to Launch)
- Check battery levels before and during flight; land safely with adequate reserve
- Never arm motors without a reason; add mode and pre-arm checks to your scripts
Drone Cybersecurity Basics
MAVLink 2 supports message signing — a way to authenticate that commands come from trusted sources. Enable this in production systems to prevent injection attacks.
Telemetry radios transmit in the clear by default. In sensitive applications, consider encrypted radio links or VPN tunnels for ground-to-drone communication.
Secure your companion computer: change default passwords, disable unnecessary services, use SSH keys instead of passwords, keep the OS updated.
Common Beginner Mistakes and How to Avoid Them
| Mistake | Why It Causes Problems | Fix |
|---|---|---|
| Installing packages globally instead of in venv | Version conflicts across projects | Always activate venv first |
| Skipping the SITL simulation step | First flight test on real hardware with untested code | Always test in simulation first |
| Not checking vehicle mode before sending commands | GUIDED commands ignored in AUTO or MANUAL mode | Always verify and set correct mode |
| Forgetting to wait for GPS lock | Takeoff without GPS causes unstable flight | Poll health status before arming |
| Wrong coordinate format | Flying to wrong location or crash | Verify lat/lon are decimal degrees, not DMS |
| Not handling exceptions | Script crashes silently, drone continues on last command | Wrap critical sections in try/except |
| Mixing MAVLink 1 and MAVLink 2 | Message parsing errors, dropped commands | Verify SDK and firmware MAVLink version match |
Performance Optimization Tips
Once your basic setup is working, here are ways to improve performance:
- Use async properly: MAVSDK is built on asyncio. Don’t block the event loop with time.sleep() — use await asyncio.sleep() instead.
- Limit telemetry polling frequency: High-frequency polling wastes bandwidth. Request telemetry at the rate you actually need. 1-5 Hz is fine for most mission monitoring; 50 Hz is for control loops.
- Batch waypoints: Upload full mission plans rather than sending one waypoint at a time. The drone handles transitions more smoothly.
- Profile before optimizing: Use Python’s cProfile or line_profiler to find actual bottlenecks before guessing.
How Professionals Structure Drone Software Projects
In professional drone development teams, projects are typically structured around these principles:
- Separation of concerns: Connection management, telemetry reading, mission execution, and safety monitoring are separate modules, not one giant script.
- Configuration as data: Mission parameters (waypoints, altitude, speed) live in YAML or JSON files, not hardcoded in Python. This lets operators change missions without touching code.
- State machine architecture: Flight missions are modeled as state machines (PREFLIGHT, TAKEOFF, EN_ROUTE, ON_STATION, LANDING, LANDED). Each state has entry conditions, exit conditions, and error handlers.
- Comprehensive logging: Every telemetry reading, command sent, and state transition is logged with timestamps to a persistent log file.
- Simulation CI: Automated tests run against SITL in CI/CD pipelines (GitHub Actions, GitLab CI) before any code merges to main.
Recommended Learning Roadmap
If you’re just starting, here’s a practical progression:
- Week 1-2: Set up Ubuntu, install Python, VSCode, Git. Get comfortable with the terminal. Learn Git basics.
- Week 3-4: Learn Python fundamentals. Functions, loops, dictionaries, async/await. Work through Python tutorials.
- Week 5-6: Set up ArduPilot SITL. Connect with DroneKit. Write scripts to read telemetry and fly simple missions.
- Week 7-8: Set up PX4 SITL with Gazebo. Migrate to MAVSDK. Learn async patterns.
- Week 9-12: More complex missions — waypoint sequences, geofencing, payload control. Study open-source drone projects.
- Month 4+: Real hardware testing. Companion computer setup. Custom MAVLink plugins. Contributing to open source.
Best Resources for Drone Programming
These are genuinely useful, not filler:
- PX4 User Guide (docs.px4.io) — authoritative source for PX4 setup, SITL, and configuration
- ArduPilot Developer Documentation (ardupilot.org/dev) — covers ArduPilot architecture, SITL, and DroneKit extensively
- MAVSDK Python Documentation (mavsdk.mavlink.io) — API reference and examples for MAVSDK
- MAVLink Protocol Documentation (mavlink.io/en) — message definitions, connection setup, protocol details
- QGroundControl User Guide — for understanding GCS workflow alongside your scripts
- pymavlink GitHub and docs — for when you need to work closer to the raw MAVLink layer
Open Source Drone Projects Worth Studying
- PX4-Autopilot (GitHub) — the flight firmware itself. Reading the source teaches you enormous amounts about flight control architecture.
- ArduPilot (GitHub) — similarly educational for ArduCopter/ArduPlane internals
- MAVSDK-Python examples (GitHub) — well-written example scripts for common use cases
- QGroundControl source — see how a real GCS is built on top of MAVLink
Career Opportunities in Drone Software Development
Drone software is a growing field with real career momentum. The areas where developers are most in demand:
- Autonomous mission systems: Companies like Skydio, Zipline, and Wing need engineers who can write reliable autonomous flight software.
- GCS software development: Building ground control systems, mission planners, and telemetry dashboards.
- Companion computer software: Edge computing on drones — computer vision, real-time object detection, SLAM navigation.
- Firmware development: Contributing to PX4 or ArduPilot, or developing custom firmware for specialized hardware.
- Drone-as-a-service platforms: Cloud-based fleet management, remote ID compliance systems, UTM integration.
The intersection of robotics, embedded systems, and cloud — which drone software sits squarely in — is one of the highest-demand skill combinations in software engineering right now.
The Future of Autonomous Drone Programming
The field is evolving fast. A few trends worth tracking:
AI-driven autonomy: Moving from GPS waypoint following to truly intelligent navigation — obstacle avoidance using neural networks, semantic scene understanding, adaptive path planning. PyTorch and TensorFlow models are already running on Jetson-class companion computers.
5G and edge computing: Low-latency 5G connections enabling real-time remote control and offloading compute-heavy tasks to edge servers instead of onboard hardware.
Swarm coordination: Multi-drone systems that coordinate to cover large areas, relay communications, or collectively manipulate objects. MAVLink supports multi-vehicle setups and the software patterns for swarms are maturing.
Unified hardware-software platforms: Companies like Auterion (enterprise PX4 platform) are pushing toward more standardized application development frameworks, making it easier to deploy Python apps across different drone hardware.
Final Setup Checklist
Before writing your first real drone script, make sure you can check every box:
- Ubuntu 22.04 (or WSL2 with Ubuntu 22.04) installed and updated
- Python 3.11 installed and accessible from terminal
- VSCode installed with Python, Pylance, and GitLens extensions
- Git installed and configured with your name and email
- GitHub account created
- Project folder created with proper structure
- Virtual environment created (.venv) and activated
- MAVSDK installed inside venv
- DroneKit installed inside venv (for ArduPilot projects)
- requirements.txt generated and committed to Git
- PX4 SITL or ArduPilot SITL installed and boots successfully
- Python script connects to SITL and reads telemetry successfully
- VSCode debugger configured and working
- Logging module set up in your project
Conclusion
Setting up your dev environment for drone programming is genuinely one of the most important things you’ll do as a drone developer. It might feel like overhead — time you’d rather spend writing flight code — but every hour invested here pays back multifold.
A clean Ubuntu setup with properly isolated Python environments, a well-configured VSCode, Git from day one, and a working SITL simulator gives you the foundation to iterate fast, debug effectively, and build software you can actually trust.
Start with the checklist. Get everything working. Run the basic MAVSDK or DroneKit example against your SITL. Watch the simulated drone take off on your screen. That moment — when your Python code makes something fly, even in simulation — is pretty satisfying. And it only gets better from there.
The tools are open source, the documentation is good, the community is helpful, and the field is genuinely exciting. There’s no better time to get started.
Frequently Asked Questions
What programming language is best for drone programming?
Python is the dominant choice for drone scripting and automation, especially with MAVSDK and DroneKit. C++ is used for flight firmware development (PX4 and ArduPilot are written in C++). For most developers getting started with autonomous missions, telemetry reading, and control logic, Python is the right starting point due to its readable syntax, excellent async support, and rich ecosystem of libraries.
Do I need a real drone to learn drone programming?
No. Both PX4 and ArduPilot have mature SITL (Software in the Loop) simulators that let you run your Python scripts against a fully simulated drone. The simulator handles flight physics, sensor simulation, and responds to MAVLink commands exactly as real hardware would. Most professional drone developers do the majority of testing in simulation before ever flying real hardware.
What is MAVSDK and how is it different from DroneKit?
MAVSDK is a modern SDK developed by the PX4 team that supports both PX4 and ArduPilot over MAVLink. It uses Python async/await patterns, is actively maintained, and is the recommended choice for new projects. DroneKit is an older SDK primarily targeting ArduPilot that uses synchronous Python. DroneKit is still widely used in legacy projects but hasn’t received major updates in recent years. For new development, MAVSDK is generally preferred.
What is MAVLink and why does it matter?
MAVLink is the communication protocol used by PX4 and ArduPilot flight controllers to exchange data with external software. Every command you send (takeoff, goto waypoint, land) and every piece of telemetry you receive (GPS position, battery, attitude) travels as a MAVLink message. Libraries like MAVSDK and DroneKit handle MAVLink for you, but understanding the protocol helps enormously when debugging connection issues or building custom integrations.
Should I use Ubuntu, Windows, or macOS for drone development?
Ubuntu 22.04 LTS is the clear best choice. PX4 and ArduPilot toolchains are primarily developed and tested on Ubuntu, and you’ll encounter significantly fewer setup issues. If you’re on Windows, use WSL2 with Ubuntu rather than native Windows tools. macOS works for high-level Python scripting but has significant limitations for running the full simulation stack locally.
How do I connect Python to a PX4 SITL simulator?
Start PX4 SITL, then in your Python script with MAVSDK use: await drone.connect(system_address="udp://:14540"). PX4 SITL listens on UDP port 14540 by default. For QGroundControl simultaneously, PX4 also outputs on port 14550. For ArduPilot SITL with DroneKit, use: vehicle = connect('127.0.0.1:14550', wait_ready=True).
What is Python virtual environment and why do I need it for drone projects?
A Python virtual environment is an isolated Python installation for a specific project. It keeps your project’s dependencies separate from other projects and from your system Python. This prevents version conflicts — for example, one project needing MAVSDK 1.4 while another needs 2.0. Create one with python3 -m venv .venv, activate it with source .venv/bin/activate, then install packages with pip normally. Always use one per project.
What is PX4 SITL and how do I set it up on Ubuntu?
PX4 SITL (Software in the Loop) is a simulation mode that runs the actual PX4 flight firmware as a process on your computer, with simulated sensors. Set it up on Ubuntu by cloning the PX4-Autopilot repository from GitHub, running bash ./Tools/setup/ubuntu.sh to install dependencies, then building with make px4_sitl gazebo-classic. The first build takes 10-20 minutes. Once running, your Python scripts connect over UDP.
How do I install DroneKit for Python?
Activate your Python virtual environment, then run pip install dronekit. For SITL simulation support, also run pip install dronekit-sitl. DroneKit requires Python 3.6+ and works on Linux, macOS, and Windows. For real hardware serial connections, you’ll also want pip install pyserial.
What VSCode extensions do I need for drone development?
The essential extensions are: Python (Microsoft), Pylance, Python Debugger, GitLens, and Remote – WSL (if using WSL2 on Windows). Additionally useful: YAML (Red Hat) for configuration files, Serial Monitor for USB hardware connections, and Git Graph for visual branch history. Install all of these from the VSCode Extensions marketplace (Ctrl+Shift+X).
How do I fix “permission denied” errors on /dev/ttyUSB0 in Linux?
This happens because your user isn’t in the dialout group that owns serial port devices. Run: sudo usermod -a -G dialout $USER and then log out and log back in (or reboot). The change takes effect on next login. You can verify you’re in the group with groups $USER. This is a one-time fix per user account.
Can I use Raspberry Pi as a companion computer for drone development?
Yes, Raspberry Pi is one of the most popular companion computers for drone projects. A Raspberry Pi 4 (4GB or 8GB) running Raspberry Pi OS (based on Debian/Ubuntu) is a good choice. Connect it to the flight controller via UART or USB, install MAVSDK or DroneKit on it, and run your Python scripts directly on the Pi. The Pi communicates with PX4 or ArduPilot via MAVLink over the serial connection.
What is ArduPilot SITL and how is it different from PX4 SITL?
ArduPilot SITL is ArduPilot’s simulation mode, running ArduCopter/ArduPlane/ArduRover as a process on your computer. It communicates via MAVLink on UDP 14550 by default. Compared to PX4 SITL, ArduPilot SITL is generally easier to set up on all platforms including macOS and Windows. DroneKit connects naturally to ArduPilot SITL. The two simulators are not interchangeable — you need to pick the one matching your target firmware.
How do I organize my drone project files professionally?
Use a clean folder structure: keep source code in a src/ directory, configuration files in config/, test scripts in tests/, and logs in logs/. Keep your virtual environment in .venv/ at the project root (excluded from Git). Always include a requirements.txt, a README.md, and a .gitignore. Separate concerns: connection handling, telemetry reading, and mission execution should be in separate Python modules, not one large script.
What is the difference between PX4 and ArduPilot?
Both are open-source flight firmware stacks that use MAVLink and run on common flight controller hardware (Pixhawk, Cube, etc.). PX4 is developed by Dronecode/Linux Foundation, has a stronger presence in commercial and research applications, and is the basis for many enterprise drone platforms. ArduPilot has a larger community, longer history, and supports a broader range of vehicle types (copters, planes, rovers, boats, submarines). Both are excellent choices — the selection often depends on your target application and what community resources are most available for your use case.
For detailed understanding of Platform Devices and Drivers on Linux, refer to the Linux documentation on Platform Devices and Drivers .
Mr. Raj Kumar is a highly experienced Technical Content Engineer with 7 years of dedicated expertise in the intricate field of embedded systems. At Embedded Prep, Raj is at the forefront of creating and curating high-quality technical content designed to educate and empower aspiring and seasoned professionals in the embedded domain.
Throughout his career, Raj has honed a unique skill set that bridges the gap between deep technical understanding and effective communication. His work encompasses a wide range of educational materials, including in-depth tutorials, practical guides, course modules, and insightful articles focused on embedded hardware and software solutions. He possesses a strong grasp of embedded architectures, microcontrollers, real-time operating systems (RTOS), firmware development, and various communication protocols relevant to the embedded industry.
Raj is adept at collaborating closely with subject matter experts, engineers, and instructional designers to ensure the accuracy, completeness, and pedagogical effectiveness of the content. His meticulous attention to detail and commitment to clarity are instrumental in transforming complex embedded concepts into easily digestible and engaging learning experiences. At Embedded Prep, he plays a crucial role in building a robust knowledge base that helps learners master the complexities of embedded technologies.