Learn how to build a quadcopter drone from scratch with this complete step-by-step guide. Covers parts list, wiring, Betaflight setup, ESC calibration, cost breakdown, and beginner mistakes to avoid. Start building today.
So you’ve been watching FPV videos on YouTube at 2 AM, your jaw dropping every time a drone slices through a forest at 120 km/h, and now you’re thinking: can I actually build one of these myself?
Yes. You absolutely can.
Building a quadcopter drone from scratch is one of the most satisfying technical projects a hobbyist can take on. It sits at the crossroads of electronics, physics, software, and pure mechanical creativity. And the best part? You don’t need an engineering degree to pull it off.
This guide on building a quadcopter drone is written for beginners who are serious about learning. Not the kind of “beginner content” that glosses over everything important, but the real, honest breakdown that covers every component, every wire, every mistake, and every decision you’ll face along the way.
By the end of this article, you’ll know exactly what parts to buy, how to wire everything together, how to configure your flight controller, and how to actually get your build off the ground safely.
What Is a Quadcopter Drone?
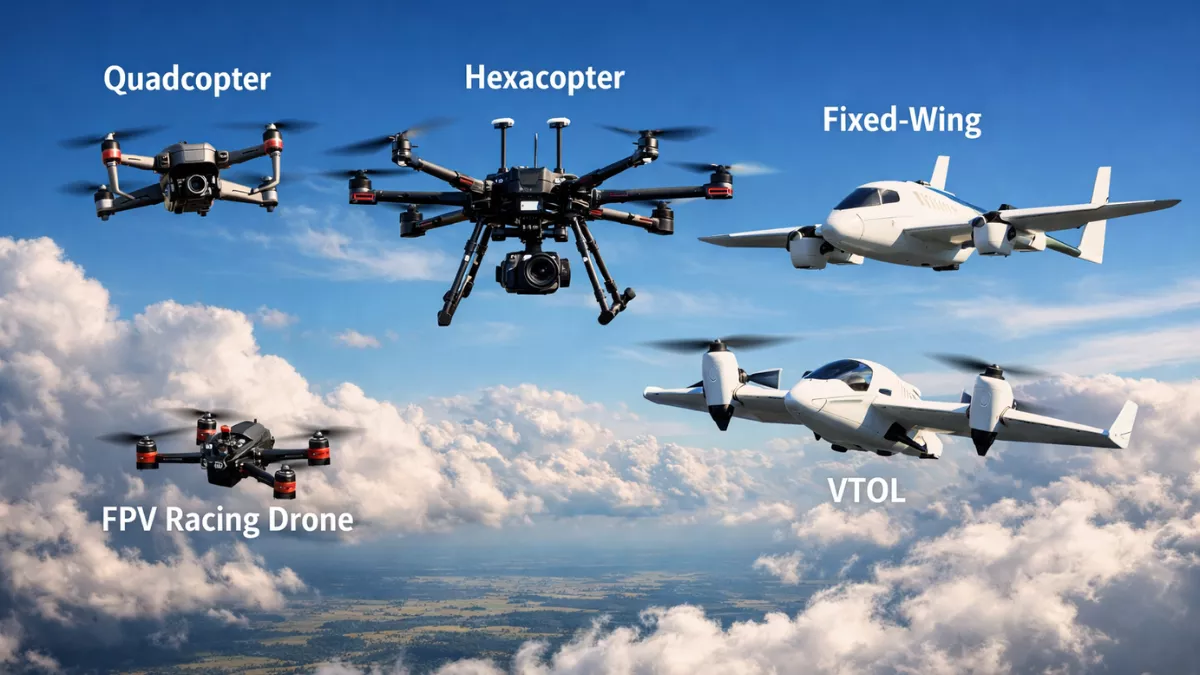
A quadcopter is a type of multirotor aircraft that uses four motors and four propellers to fly. The “quad” part just means four. Each motor spins a propeller, and by varying the speed of individual motors, the drone can move in any direction, hover in place, or rotate on its axis.
Here’s the simple version of how it works:
- Two motors spin clockwise (CW), two spin counter-clockwise (CCW)
- This cancels out torque and keeps the drone stable
- To move forward, the rear motors speed up and front motors slow down slightly
- To rotate (yaw), motors on one diagonal speed up while the other diagonal slows down
The flight controller (a small onboard computer) handles all of this automatically, dozens of times per second. You don’t manually control each motor. You give inputs through a radio transmitter, and the flight controller translates those inputs into motor commands in real time.
That’s the magic of modern drone building. The physics are complex, but the electronics and software handle most of the heavy lifting.
Why Build Your Own Quadcopter Instead of Buying One?
Fair question. You can walk into a store and buy a DJI Mini or a Parrot drone off the shelf. Why go through the trouble of building?
Here are the honest reasons:
1. You learn how drones actually work. When something breaks (and it will break), you’ll know exactly what failed and how to fix it. RTF (ready-to-fly) drone owners are often helpless when their quad crashes.
2. You can build exactly what you want. Want a 5-inch freestyle quad? A 7-inch long-range cruiser? A tiny 3-inch indoor ripper? Building your own means you choose every component based on your specific use case.
3. It’s cheaper at the performance tier you’re targeting. A DIY 5-inch freestyle build that rips at 100+ km/h will cost you around $200-350 USD. A prebuilt with equivalent performance would run $400-600+, if you can even find one.
4. Upgrades become trivial. Want better motors? Swap them. Cracked a frame? $20 for a new one. Prebuilt drones often have proprietary parts that are expensive and hard to find.
5. The community is incredible. DIY drone building has one of the most active, helpful communities in any tech hobby. Places like Reddit’s r/Multicopter and RCGroups have millions of collective hours of experience you can tap for free.
The downside? There’s a learning curve. But that’s the point of this guide.
Parts Required to Build a Quadcopter Drone
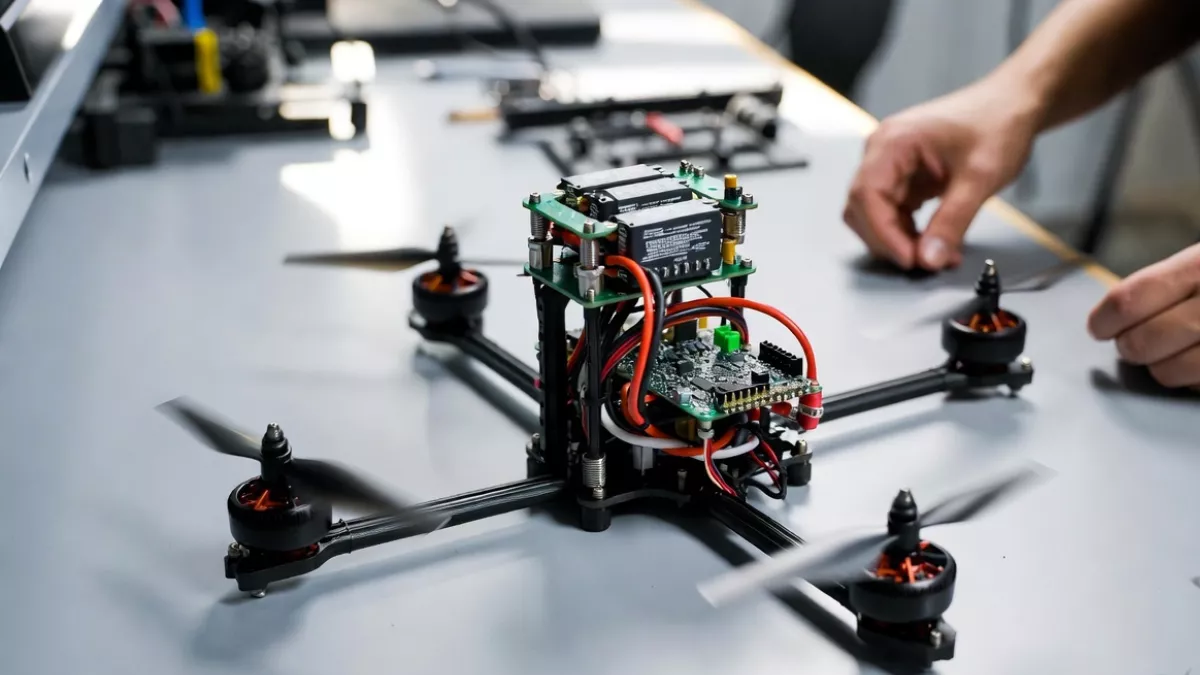
This is where most beginners get overwhelmed, so let’s walk through each component clearly. We’ll use a 5-inch freestyle/racing quad as our build target since it’s the most popular starting point and has the best community support.
1. Frame
The frame is the skeleton. Everything bolts onto it.
For a 5-inch build, you want a 5-inch frame, which refers to the diagonal motor-to-motor distance that accommodates 5-inch propellers.
What to look for:
- Material: Carbon fiber (standard for any serious build)
- Weight: 70-100g is a good range for 5-inch frames
- Design: “True-X” or “Stretched-X” layout (motor positions affect flight characteristics)
- Stack mounting: Ensure it fits 30x30mm or 20x20mm flight controller stacks
Popular beginner-friendly frames:
- Diatone Roma F5
- Flywoo Explorer LR4
- iFlight Nazgul5 frame
2. Motors (4x)
Motors convert electrical energy into rotational force (torque) that spins the propellers. This is one of the most important specs you’ll choose.
Brushless motors are standard for any quadcopter build. They’re efficient, powerful, and long-lasting compared to old brushed motors.
Motor specs you need to understand:
- Stator size (e.g., 2306, 2207, 2306): First two digits = stator diameter in mm, last two = stator height in mm. Bigger stator = more torque and power.
- KV rating: Revolutions per minute per volt (with no load). Higher KV = faster spin but less torque. For 5-inch props on 4S battery: 1700-2300KV. For 6S: 1400-1700KV.
- Motor direction: Two CW (clockwise) and two CCW (counter-clockwise)
Good motors for beginners:
- T-Motor F40 Pro IV (2306, 1950KV)
- XING2 2207 by iFlight
- Emax Eco II 2207
Pro tip: Don’t cheap out on motors. They’re the heart of your build. A motor failure mid-flight usually means a crash, so quality matters.
3. ESCs – Electronic Speed Controllers (4x or 1x 4-in-1)
The ESC sits between the flight controller and each motor. It receives a digital signal from the FC and converts it into a three-phase AC signal the brushless motor understands.
You have two options:
Individual ESCs (one per motor): More flexible, easier to replace one if it fails. Slightly more wiring.
4-in-1 ESC: All four ESCs on a single board. Cleaner build, less wiring, more popular in modern builds.
Key specs:
- Current rating: For a 5-inch freestyle build, 35A-45A per ESC is fine. Go 50A+ if you’re planning aggressive flying.
- Input voltage: Check it matches your battery (4S = up to 16.8V, 6S = up to 25.2V)
- Protocol support: DSHOT (300, 600, or 1200) is the standard digital protocol now. Avoid older analog protocols.
- Firmware: BLHeli_32 or AM32 are the current standards. Both allow ESC telemetry.
4. Flight Controller (FC)
This is the brain. The flight controller receives your radio inputs, reads sensor data from its onboard gyroscope and accelerometer, and sends precise speed commands to the ESCs to keep the drone stable.
Almost every modern freestyle and racing quad runs Betaflight firmware. Your flight controller needs to be Betaflight-compatible.
What to look for:
- F7 or H7 processor (faster processing, better for modern builds)
- On-board barometer and magnetometer (optional but useful)
- OSD (On-Screen Display) built-in for FPV overlay
- UART ports: You need at least 3 free UARTs for receiver, video transmitter, and GPS (if used)
- 30x30mm or 20x20mm mounting holes to match your frame
Popular beginner-friendly flight controllers:
- Matek F405-CTR
- Speedybee F405 V3
- Holybro Kakute H7
5. Radio Receiver (RX)
The receiver is what listens to your transmitter (radio controller). It plugs into the flight controller and feeds it your stick inputs.
The protocol ecosystem matters. Your receiver must match your transmitter:
- ExpressLRS (ELRS): Currently the best option. Open source, ultra-low latency (~2ms), long range, affordable. Available in 2.4GHz and 900MHz.
- FrSky (ACCESS/D16): Reliable, widely used. Good range.
- TBS Crossfire/Tracer: Excellent long-range option, pricier.
If you’re buying a transmitter fresh, go ExpressLRS. It’s the community standard in 2024-2025.
6. FPV Camera (Optional but Recommended)
If you want first-person view flying (seeing what the drone sees through goggles), you need an FPV camera.
For analog FPV:
- Runcam Robin 3
- Foxeer Razer Nano
For digital FPV (HD quality):
- DJI O3 Air Unit (expensive but excellent)
- HDZero Whoop Lite (lower latency than DJI)
Beginners often start with analog FPV since the complete ecosystem is cheaper.
7. Video Transmitter (VTX)
The VTX takes the camera signal and broadcasts it wirelessly to your FPV goggles. It connects to the FC for OSD data overlay and power.
Key specs:
- Output power: 200mW-1W depending on local regulations (always check your country’s RF laws)
- Smart Audio or Tramp protocol support: Lets you control VTX settings through Betaflight OSD without touching the board
8. Battery
LiPo (Lithium Polymer) batteries are the standard for drone power. They deliver high current bursts that LiPo chemistry handles well.
Key specs:
- Cell count (S): 4S (14.8V nominal) is standard for 5-inch builds. 6S gives more punch but requires lower KV motors.
- Capacity (mAh): 1300-1800mAh for 5-inch freestyle. More capacity = more weight = shorter punchy flights.
- C-rating: Indicates max continuous discharge. 75C+ is preferred for freestyle. Don’t cheap out here; low C-rating batteries sag under load and perform poorly.
- Connector: XT60 is standard for 5-inch builds.
9. Propellers
Propellers (props) are consumable items. You’ll break them. Buy a lot.
For 5-inch builds:
- Pitch: 4.something is typical (e.g., 5148, 5147, 5045)
- Blade count: 3-blade (triblade) is most common. 2-blade is more efficient for long-range.
- Material: PC (polycarbonate) for durability, Nylon for lighter weight
Popular picks: HQ Props 5×4.8×3, Gemfan 51477, DAL Cyclone
10. Miscellaneous Components
- Capacitor: A 35V 1000uF electrolytic capacitor across the battery leads reduces voltage spikes and motor noise. Cheap and important.
- XT60 connector + pigtail: For connecting the battery to the power distribution system.
- Antenna: For receiver and VTX (if external antennas required)
- FC/ESC stack hardware: M3 screws, nylon standoffs, TPU mounts
Tools You’ll Need
You don’t need a professional workshop. But you do need the right basics:
- Soldering iron: A temperature-controlled iron is essential. Hakko FX-888D or TS100 are beloved community staples. Don’t use a cheap $10 iron; bad solder joints are responsible for more drone failures than any other single cause.
- Solder: 63/37 or 60/40 rosin core solder. 0.8mm diameter is easiest to work with.
- Flux: No-clean flux paste makes soldering motor wires and ESC pads dramatically easier.
- Hex drivers: M2 and M3 sizes. A ball-end hex driver set is worth the investment.
- Digital multimeter: For checking continuity, voltage, and diagnosing shorts before you power on.
- Smoke stopper: A DIY in-line current limiter that prevents your ESC/FC from catching fire if there’s a short. Literally a light bulb in series. Make one before your first power-on.
- Prop removal tool / prop gripper: Makes removing tight propellers much easier.
- Helping hands / PCB holder: For soldering without burning your fingers.
- Heat shrink tubing: Various sizes, for protecting solder joints.
- Wire: 16AWG for battery leads, 22-24AWG for signal wires.
- Zip ties and double-sided tape: For securing components in the frame.
Optional but helpful:
- Oscilloscope (for advanced debugging)
- Bench power supply (for testing without a LiPo)
- Hot air gun (for heat shrink)
Step-by-Step Build Guide
Okay. Here’s where it all comes together. Take your time with each step. Rushing is how you end up with a $300 paperweight.
Step 1: Prepare Your Workspace
Clean, flat surface. Good lighting. Organize your components so you can see everything. Take photos of component layouts before you bolt things down, because you’ll thank yourself later.
Print out or open on a second screen:
- Your frame’s wiring diagram
- Your FC’s pinout diagram
- Your ESC’s documentation
Step 2: Assemble the Frame
Start with the bottom plate. Most frames require you to thread motor mounts or arm plates through the bottom.
- Install the motor mounts/arms without fully tightening yet
- Route the ESC/motor wire paths through the frame cutouts (do this before motors are mounted)
- Check that standoffs for the FC stack are in place
- Fully tighten arm screws with thread-locker (Loctite Blue, not Red) on critical bolts
One thing beginners forget: check that the frame arms are all identical in length and angle. An asymmetric frame will fly weird and waste your tuning time.
Step 3: Mount and Wire the Motors
Each motor has three phase wires (usually labeled A, B, C or just left bare). The order you connect them to the ESC determines motor spin direction.
Procedure:
- Mount motors to the arms. Motor screws should not be so long they contact the motor windings inside. Rule of thumb: screw length = motor mounting hole depth (usually 3-4mm).
- Apply thread-locker to motor screws.
- Route phase wires toward the ESC or 4-in-1 ESC board.
- Tin (pre-coat with solder) the motor pads on the ESC and the motor wire ends.
- Solder motor wires to ESC motor pads (A to A, B to B, C to C for now, direction will be reversed in software later).
Pro tip: Twist the three motor wires together loosely before routing. It reduces EMI (electromagnetic interference) slightly and looks clean.
Step 4: Install the ESC (or 4-in-1 Stack)
For a 4-in-1 ESC:
- Thread the FC standoffs through the frame’s stack holes.
- Seat the ESC board on the bottom standoffs.
- Pass the motor wires through frame cutouts and solder them to the ESC.
- Solder the battery lead/pigtail to the ESC’s VBAT and GND pads. Make these joints clean and solid, this joint carries ALL the current.
- Solder the capacitor across VBAT and GND pads at the battery connection point, as close to the ESC as possible. Observe polarity (negative stripe on cap = GND).
For individual ESCs, mount each one on the arm near the motor, run signal and power wires back to the FC/PDB, and repeat motor wire soldering for each.
Step 5: Mount the Flight Controller
- Seat the FC on top of the ESC (in a stack configuration) using nylon standoffs, not metal ones directly under the FC. Metal can cause shorts.
- Connect the ESC-to-FC signal cable. On a 4-in-1 ESC, this is usually a 8-pin or 10-pin ribbon cable. Motor 1 signal → FC Motor 1 pad, etc.
- If using separate ESCs, run individual signal wires from each ESC to the corresponding FC motor output pad.
- Connect the ESC telemetry wire to a free FC UART RX pad (for ESC telemetry in Betaflight).
Check your FC orientation. If it’s not centered or not aligned with the nose of the frame, you’ll configure the mount orientation in Betaflight later. Mark which direction is forward on the FC before sealing everything up.
Step 6: Install the Receiver
- Mount the receiver somewhere protected inside the frame (usually under the FC or on the rear arm).
- Solder the RX to the FC:
- RX 5V → FC 5V
- RX GND → FC GND
- RX TX → FC UART RX (for SBUS, CRSF, or ELRS protocols, the RX transmits data to the FC’s receive pin)
- Route antenna wires out of the frame. For 2.4GHz ELRS, keep antennas at 90 degrees to each other for best signal coverage.
The UART assignment matters. Write down which UART port you connected the receiver to. You’ll need this in Betaflight.
Step 7: Install Camera and VTX
- Mount the FPV camera in the camera bracket at the front of the frame. Typical tilt angle is 20-30 degrees for freestyle, 40-60 degrees for racing.
- Connect:
- Camera video out → VTX video in
- Camera power (usually 5V or direct battery voltage depending on cam specs) → FC CAM output or a regulated pad
- Mount VTX in the frame. If it runs hot, don’t enclose it completely.
- Connect:
- VTX video in → Camera video out
- VTX power → ESC VBAT (many VTXes can take direct battery voltage with an internal regulator)
- VTX Smart Audio or Tramp wire → FC TX pad on a free UART
- VTX GND → FC GND
Antenna placement is critical. Keep the VTX antenna as far from carbon fiber as possible. Carbon absorbs RF signals. Route it out the side or back of the frame and use an antenna mount.
Wiring and Connections Explained
A lot of beginners wire everything up and then stare blankly wondering why nothing works. Here’s a mental model that helps:
Think of your drone’s electrical system in layers:
Layer 1 – Power: Battery → ESC → Motors (high current path) Layer 2 – Regulated power: ESC BEC or separate BEC → FC, Camera, VTX (5V regulated) Layer 3 – Signal: FC → ESC (motor commands), RX → FC (pilot inputs), FC → VTX (OSD data)
Every component needs power from the right layer and a common ground reference. If you have a “floating ground” (a component that shares no ground with the FC), it won’t communicate properly.
Ground loop rule: Every component’s GND wire should ultimately connect back to the battery negative. You can daisy-chain grounds, but if you break the chain, you break communication.
The smoke stopper test: Before connecting a real battery, use your smoke stopper (DIY current-limiting device). If the bulb glows bright and stays on, you have a short. Disconnect immediately and find it before you destroy your ESC.
Flight Controller Setup: Betaflight Configuration
Betaflight is free, open-source firmware that runs on your flight controller. You configure it through Betaflight Configurator, a desktop app available for Windows, Mac, and Linux.
Initial Connection
- Connect FC to your PC via USB (micro-USB or USB-C depending on FC)
- Open Betaflight Configurator
- Click “Connect” in the top right corner
- If the FC isn’t detected, install the appropriate driver (ImpulseRC Driver Fixer is a lifesaver here)
Step-by-Step Betaflight Setup
Firmware tab: Flash the latest stable Betaflight release for your FC target. Don’t flash the latest release candidate unless you know what you’re doing.
Ports tab:
- Set the UART where your receiver is connected to “Serial RX”
- Set the UART where your VTX SmartAudio/Tramp is connected to “VTX (TBS SmartAudio)” or “IRC Tramp”
- Enable ESC telemetry if your ESC supports it
Configuration tab:
- Set your receiver protocol (CRSF for ELRS/Crossfire, SBUS for FrSky, etc.)
- Enable features you need: Air Mode, Anti-Gravity, Dynamic Notch filter
- Set board alignment if your FC is rotated (enter degrees in Roll/Pitch/Yaw)
- Set motor protocol to DSHOT600
Receiver tab:
- Verify stick inputs are moving the bars correctly
- Set stick ranges (usually 1000-2000us)
- Assign channel map (AETR1234 is common for most radios)
Modes tab:
- Assign Arm to a switch on your transmitter
- Assign Angle/Horizon/Acro to switches
- Assign Beeper to a switch (saves crashed drones)
OSD tab: Configure what’s shown on your FPV display: battery voltage, RSSI, flight timer, mAh consumed, etc.
Motors tab: This is critical. With props OFF, connect your battery (use smoke stopper first), go to Motors tab, enable the motor test slider, and spin each motor individually. Verify:
- Each motor spins when its slider is moved
- Motor direction is correct (checking against Betaflight’s motor direction diagram)
If a motor spins the wrong direction, go to the ESC telemetry/BLHeli_Suite and reverse that motor’s direction in software. No rewiring needed.
PIDs tab: Leave PIDs at defaults for your first flight. Betaflight’s defaults are flyable. Don’t touch PIDs until you’ve done several flights and identified specific behavior issues.
Calibration and Testing
ESC Calibration
With DSHOT protocol, ESC calibration is handled automatically via Betaflight. No manual calibration needed. This is one of the biggest advantages of DSHOT over older analog protocols.
If you’re using older analog protocols (not recommended), you’ll need to perform manual ESC calibration by following the ESC’s manual.
Accelerometer Calibration
In Betaflight’s Setup tab, click “Calibrate Accelerometer” with the drone on a flat, level surface. This teaches the FC what “level” means. Important for Angle and Horizon modes, but not strictly needed for Acro (manual) mode.
Radio Calibration
In the Receiver tab, check all your sticks and switches register correctly. Set the channel ranges so min is ~1000 and max is ~2000.
Set your arm switch. In Betaflight Modes tab:
- Arm switch at full position should arm the drone
- Ensure the “minimum throttle” requirement is set (you usually need throttle at zero to arm)
Pre-Flight Checklist (Every Single Time)
Never skip this. Experienced pilots run this checklist every flight:
- Props tight and secure (check each one with a twist)
- Battery fully charged and plugged in securely
- All motor screws tight
- Range check on radio (walk 30 paces, ensure full control)
- OSD showing correct battery voltage
- Arm in a safe direction (nose pointing away from people)
Common Mistakes Beginners Make
These are the top failures I see, in real builds:
1. Wrong prop direction. Props have a top and bottom side. Flat face up, curved face toward the ground (the curve creates lift as air moves over it). Many beginners install them upside down and wonder why the drone won’t lift.
2. Not using thread-locker on motor screws. Vibration loosens screws. A motor that falls off mid-flight is a disaster. Use Loctite Blue (removable) on all motor screws.
3. Cold solder joints. These look shiny but have a grainy, dull texture under good light. They make intermittent contact. Heat both the pad and the wire simultaneously, then flow solder into the joint. Don’t touch solder to the iron directly.
4. Wrong UART assignment. Plugging the receiver into UART2 but telling Betaflight it’s on UART1. Always double-check port assignments.
5. Skipping the smoke stopper. One short can kill your FC, ESC, and battery in seconds. The smoke stopper is not optional.
6. Flying in Acro mode before you’re ready. Acro mode has no self-leveling. If you let go of the sticks, the drone maintains whatever angle it’s at. Learn in Angle mode first, or use a simulator (Velocidrone, Liftoff) before touching a real quad.
7. Not trimming PID gains. Flying a quad with stock PIDs is fine for testing, but a quad that oscillates violently or feels sluggish needs PID adjustment. Learn the basics of PID tuning or use Betaflight’s RPM filter and Blackbox for data-driven tuning.
8. Ignoring motor temperature. After test flights, touch the motors (carefully). If they’re hot enough to hurt, they’re being pushed too hard. Check for incorrect prop choice, motor direction, or ESC settings.
9. Battery over-discharge. Don’t fly until your battery is at 3.0V per cell or lower. LiPo batteries damaged by over-discharge can swell, catch fire, or simply lose 50% of their capacity permanently. Land at 3.5V per cell.
10. Not labeling wires. Inside a drone frame it gets chaotic. Use small pieces of colored heat shrink or marker labels so you know what each wire does six months later when you’re troubleshooting.
Safety Tips for Drone Builders
Safety isn’t just about not crashing. It’s about not hurting yourself, others, or property.
Electrical safety:
- Never charge LiPo batteries unattended
- Charge in a LiPo-safe bag or metal container
- If a battery swells (puffy), stop using it immediately. Dispose at a battery recycling facility.
- Never short a LiPo. Even briefly shorting a charged 4S can release enough energy to cause severe burns.
Flying safety:
- Always fly in legally permitted areas. In most countries (including India), you need a DGCA Remote Pilot Certificate to fly drones above 250g.
- Never fly over people or near airports without proper clearance
- Keep visual line of sight unless you’re certified for BVLOS
- Always have a spotter when flying FPV (someone watching the physical drone)
- Never arm a drone with props on while working on it or near people
Build safety:
- Don’t solder in an enclosed space without ventilation. Solder flux fumes are unpleasant and potentially harmful.
- Wear safety glasses when spinning props for testing. A broken prop at 20,000 RPM is a projectile.
- Keep props off the drone until all electronics are configured and tested
In India specifically: The DGCA has specific rules under the Drone Rules 2021. Nano drones (under 250g) have minimal restrictions. Micro drones (250g-2kg) need registration and a pilot certificate for outdoor flying. Build accordingly.
Cost Breakdown
Here’s a realistic parts cost for a 5-inch freestyle quad in 2025 (USD):
| Component | Budget Option | Mid-Range |
|---|---|---|
| Frame | $15-20 | $25-45 |
| Motors (x4) | $40-50 | $60-100 |
| 4-in-1 ESC | $25-35 | $40-65 |
| Flight Controller | $25-35 | $45-75 |
| Receiver (ELRS) | $15-20 | $25-35 |
| FPV Camera (analog) | $15-20 | $25-40 |
| VTX (analog) | $15-20 | $25-40 |
| Props (10-pack) | $5-10 | $10-15 |
| Battery (x2) | $30-40 | $55-80 |
| Misc (hardware, wire, capacitor) | $10-15 | $15-20 |
| Total (build only) | $195-265 | $325-515 |
Additional costs if starting from zero:
- Radio transmitter: $30 (Radiomaster Pocket with ELRS) to $200+ (Radiomaster TX16S)
- FPV goggles (analog): $50-150
- Battery charger: $30-60
- Soldering iron + supplies: $40-80
Budget full setup (build + radio + goggles + charger): ~$350-500 Mid-range full setup: ~$600-900
DIY vs Prebuilt Drone Comparison
| Factor | DIY Build | Prebuilt RTF |
|---|---|---|
| Upfront cost | Lower at performance level | Higher |
| Time to first flight | 10-30 hours | Minutes |
| Repairability | Excellent | Poor (proprietary parts) |
| Customizability | Unlimited | Very limited |
| Knowledge gained | High | Minimal |
| Performance tuning | Full control | Limited or locked |
| Beginner friendliness | Lower | Higher |
| Community support | Huge | Depends on brand |
The verdict: If you want to truly understand drones, fly better, and maintain your aircraft independently, DIY is the path. If you just want aerial footage and aren’t interested in the technical side, DJI makes excellent prebuilt products.
Most serious FPV pilots build their own for performance and freestyle. Photography pilots often go prebuilt for reliability.
Upgrades and Customization
Once you have your first build flying, the rabbit hole opens up. Some popular upgrade paths:
HD Digital FPV: Switching from analog to DJI O3 Air Unit or HDZero dramatically improves your FPV video quality. Expect to spend $100-250 for this upgrade.
GPS and Return-to-Home: Adding a GPS module ($20-30) and configuring GPS Rescue in Betaflight gives you a safety net if you lose signal. Essential for longer-range flying.
Blackbox logging: Many FCs have onboard Blackbox (data logging). Enabling this and using Betaflight Blackbox Explorer lets you see exactly what your FC was doing during a flight, invaluable for PID tuning.
RPM filtering: If your ESC supports DSHOT with telemetry, you can use RPM-based dynamic notch filtering in Betaflight. This dramatically reduces propwash and oscillations by filtering out motor harmonics. It’s one of the biggest flight quality improvements available.
Custom motor mounts and TPU parts: 3D-printed TPU (thermoplastic polyurethane) camera mounts, antenna holders, and battery straps let you protect components and personalize your build. The FPV community shares thousands of free designs on Thingiverse and Printables.
Longer antennas and external VTX antennas: If your range is limited, upgrading to a better VTX antenna (pagoda, lollipop, or patch array on your goggles) can significantly improve FPV signal.
Troubleshooting Guide
Drone won’t arm:
- Is throttle at zero?
- Is the arm switch assigned correctly in Betaflight Modes tab?
- Check Betaflight’s Arming Flags in the main Setup tab. Hover over the flag for an explanation.
- Common culprits: RXLOSS (receiver not detected), THROTTLE (throttle not at zero), ANGLE (roll/pitch angle too steep)
Motors not spinning when testing:
- Check DSHOT protocol is selected in Configuration tab
- Verify motor signal wires are connected to correct FC pads
- Check ESC is powered (battery connected, not just USB)
One motor spinning wrong direction:
- Reverse in BLHeli Suite or via Betaflight motor direction settings (DSHOT command)
Drone flips on takeoff:
- Wrong motor direction for one or more motors
- Props installed on wrong motors (CW prop on CCW motor)
- Check motor diagram in Betaflight against your physical layout
FPV image is black or fuzzy:
- Check camera power voltage (some cameras need 5V, others run on 12V or battery voltage)
- Verify camera video wire is connected to VTX video input, not another pin
- Check VTX channel and band matches your goggles
RSSI is low or connection drops:
- Antenna orientation (keep at 90 degrees for omni coverage)
- Antenna too close to carbon fiber or battery
- Check receiver bind and protocol in Betaflight
Motors getting very hot:
- Wrong prop pitch/size for your motor KV
- Flying with damaged/unbalanced props
- Low C-rating battery causing voltage sag and motors working harder
Excessive vibration in flight:
- Unbalanced or damaged props (replace immediately)
- Loose motor screws
- Motor bearing worn out (listen for a gritty sound when spinning by hand)
FAQs: Building a Quadcopter Drone
How long does it take to build a quadcopter drone from scratch?
For a first-time builder, expect 15-30 hours spread over several days. This includes component sourcing time, reading documentation, soldering, configuring Betaflight, and testing. With experience, builders can complete a new build in 3-5 hours. Don’t rush your first build. Every hour you spend double-checking connections saves you from expensive mistakes.
What is the best motor KV for a 5-inch quadcopter?
For a 4S LiPo battery with 5-inch props, 1900-2300KV is the sweet spot. For 6S, drop to 1400-1700KV. Higher KV on 6S would overspin the motor and burn it out. The KV, battery voltage, and prop size are a triangle: change one and you need to reconsider the others.
Do I need to register my DIY drone in India?
Yes, if your completed drone weighs more than 250 grams. Under India’s Drone Rules 2021, drones in the Micro category (250g-2kg) require registration with the DGCA’s Digital Sky Platform and a Remote Pilot Certificate (RPC) for outdoor flying in most zones. Nano drones (under 250g) have fewer restrictions but still cannot be flown in certain zones like airports, military areas, and national parks.
What is the difference between Acro mode and Angle mode?
Angle mode uses the accelerometer to keep the drone level. If you release the sticks, it self-levels. Great for beginners. Acro mode (full manual) does not self-level. The drone holds whatever angle you put it in. It feels like the difference between driving a car with traction control (Angle) versus a rear-wheel-drive car with traction control off (Acro). Acro feels more natural with practice and gives much more control, but requires proper stick technique.
What is ESC calibration and do I need to do it?
ESC calibration is a process of teaching the ESC what throttle range corresponds to minimum and maximum power. With analog protocols (PPM, PWM), this is required manually. With DSHOT digital protocol (which is what you should be using), calibration is handled automatically by Betaflight sending digital values. If you’re using a modern build with DSHOT, you do not need to manually calibrate your ESCs.
How far can a DIY quadcopter fly on one battery?
For a typical 5-inch freestyle build, expect 4-6 minutes of aggressive flying on a 1500mAh 4S battery, or 7-10 minutes of cruising. Range in terms of distance is limited by your FPV signal and radio link. With ExpressLRS 2.4GHz and decent antennas, you can maintain link at 2-4km, though flying that far FPV on analog with a 200mW VTX would be challenging. Long-range builds with 7-inch+ frames and 900MHz ELRS can cover 10-20km+ on a single charge.
How do I choose between a 4S and 6S build?
4S (14.8V nominal, 16.8V full) is the standard recommendation for beginners. More components are available, tuning is more forgiving, and batteries are cheaper. 6S (22.2V nominal, 25.2V full) gives more motor efficiency, cooler-running motors, and generally crisper throttle response. But it requires lower KV motors and costs more in batteries. Start with 4S, move to 6S if you want to optimize performance later.
What simulator should I use before flying my first quadcopter?
Velocidrone is the gold standard for learning quad control. It has realistic physics and is used by professional FPV racers for training. Liftoff is more accessible and visually polished. DRL Simulator (Drone Racing League) is free on Steam and a decent introduction. Spend 10-20 hours in a simulator before your first real flight. Your muscle memory from the sim will translate directly, and you’ll crash virtual quads instead of real ones while learning the basics.
Can I build a quadcopter that takes photos or video for real estate or photography?
Yes, but the architecture is different from a freestyle build. Photography quads prioritize stability, smooth gimbal-stabilized camera movement, and long flight time over raw performance. For this purpose, starting with a prebuilt like a DJI Mini 4 Pro is probably smarter unless you specifically want the DIY experience. If you do DIY for photography, you’d pair a 7-inch+ long-range frame with a gimbal, GPS, and an HD camera. This is a significantly more complex build than a freestyle quad.
Final Thoughts
Building your first quadcopter drone is a journey that touches every corner of electronics, software, and physics. You’ll solder your first joint, watch a motor spin for the first time when you push the slider in Betaflight, and feel a completely different kind of excitement when that machine you built with your own hands lifts off a field for the first time.
It’s going to be frustrating at points. A solder joint that looks fine will cause intermittent problems. Betaflight will show an error flag you’ve never seen. A prop will shatter on the first landing.
That’s normal. Every experienced builder has a graveyard of broken components behind them.
The community around DIY drone building is genuinely one of the most welcoming and knowledgeable technical communities online. Don’t hesitate to post questions on r/Multicopter, the Betaflight GitHub issues page, or dedicated FPV Discord servers. The odds are high that someone has encountered your exact problem before.
Keep your first build simple. Get it in the air. Get some flights under your belt. Then start asking yourself “what would I change?” That question is what drives every upgrade, every next build, and every hour of tinkering in this hobby.
The sky is literally the limit, but it starts on your workbench with a soldering iron.
Once you’ve got your quadcopter flying confidently, the natural next step for a lot of builders is learning to program it. Not just configure Betaflight, but actually write code that controls autonomous missions, waypoints, and failsafe logic. If that interests you, check out this detailed guide on how to learn drone programming from scratch in 2026 — it covers the full stack from MAVLink basics to Python DroneKit missions.
External References
- Betaflight Documentation – Official firmware documentation
- Oscar Liang’s Drone Building Blog – Deeply technical tutorials from one of the community’s most respected voices
- DGCA Drone Rules 2021 (India) – Official regulatory framework
- RCGroups FPV Forum – Community discussions and build logs
- Betaflight GitHub – Open-source firmware codebase and release notes
Mr. Raj Kumar is a highly experienced Technical Content Engineer with 7 years of dedicated expertise in the intricate field of embedded systems. At Embedded Prep, Raj is at the forefront of creating and curating high-quality technical content designed to educate and empower aspiring and seasoned professionals in the embedded domain.
Throughout his career, Raj has honed a unique skill set that bridges the gap between deep technical understanding and effective communication. His work encompasses a wide range of educational materials, including in-depth tutorials, practical guides, course modules, and insightful articles focused on embedded hardware and software solutions. He possesses a strong grasp of embedded architectures, microcontrollers, real-time operating systems (RTOS), firmware development, and various communication protocols relevant to the embedded industry.
Raj is adept at collaborating closely with subject matter experts, engineers, and instructional designers to ensure the accuracy, completeness, and pedagogical effectiveness of the content. His meticulous attention to detail and commitment to clarity are instrumental in transforming complex embedded concepts into easily digestible and engaging learning experiences. At Embedded Prep, he plays a crucial role in building a robust knowledge base that helps learners master the complexities of embedded technologies.